This handbook provides configuration steps in PortaSwitch that are required to set up the CloudPBX Self-Care Portal, available via the Add-on Mart.
Example
Say you are planning to offer customers the CloudPBX Self-Care Portal that is hosted at cloudpbx.company.com. You enable your PBX customer "ABC company” to add new phone lines, activate additional features such as call recording, and manage the PBX settings.
"ABC company" chooses a service package that:
- Is priced at $30 per month
- Includes:
- Up to 10 cloud PBX phone lines
- 1 auto-attendant
- Unlimited call recording add-on products
The portal should limit assigning the auto-attendant product to an auto-attendant and extension product to an extension. Furthermore, customers should only be able to view and activate products that are included in their service package.
"ABC company" intends to grant distinct permissions for portal access based on the employee’s role:
- Bob, an IT administrator – can access all PBX data
- Steve, a PBX administrator – is responsible for configuring the phone lines and other PBX features, and shouldn’t access payments and invoices
- Adam, an operations manager – responsible for processing invoices and payments, shouldn’t access the PBX configuration
Preparation
To configure user access to the portal, you will need to upload the portal structure to PortaSwitch (step 2.1). Before starting the configuration, contact the PortaOne support team to obtain the file with the portal structure in JSON format.
Configuration overview
The configuration includes the standard cloud PBX service setup with additional portal-related steps such as configuring user access to the portal, creating the set of main and add-on products (referred to as “customer agreement”) that a specific customer can use, and dividing products into groups (e.g., “Extensions” and “Auto-attendants”) to simplify the choice for the customer.
Let’s see the overall list of steps:
- Service package configuration
1.2 Create a subscription plan
1.3 Create products
- Access configuration
2.1 Upload the portal structure to PortaSwitch to control permissions for portal users
- Customer configuration
3.3 Assign roles
Service package configuration
1.1 Create customer tariffs
Configure the customer tariffs for the pay-as-you-go charging as described in the Cloud PBX services handbook.
1.2 Subscription plans
To charge your customer for their service package, configure a subscription plan with a monthly fee of $30 as described in the Charging for Value-added Services handbook.
1.3 Create products
In our example, the service package includes up to 10 cloud PBX phone lines, 1 auto-attendant, and 1 call recording add-on. For that, you need to create “Extension” and “Auto-attendant” main products, and an add-on product “Call recording”.
Main products
Follow the steps in the Cloud PBX services handbook to create the “Extension” product and the Configuring the auto attendant functionality handbook to create the “Auto-attendant” product.
Add-on product
Follow the Create add-on product step in the Call recording configuration handbook to create the “Call recording” add-on product.
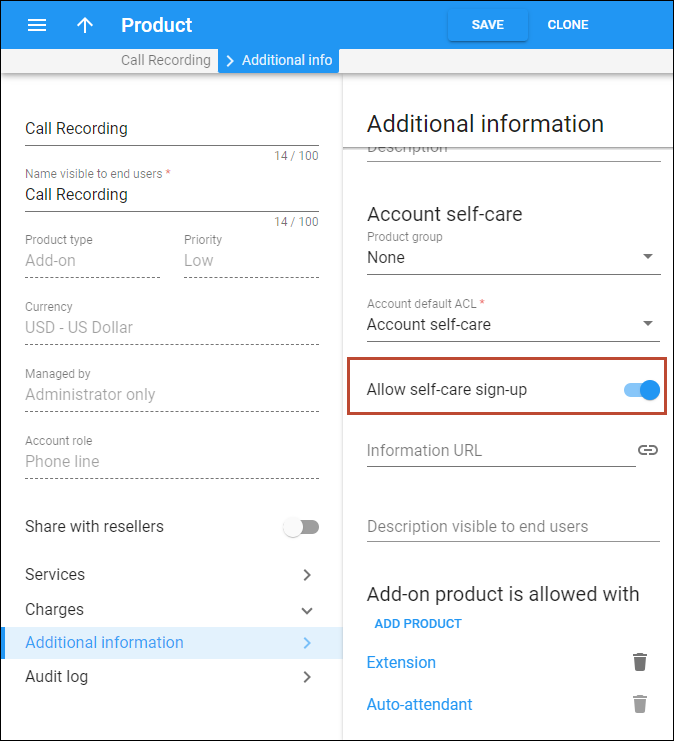
You must enable the Allow self-care sign-up option on each add-on product to allow customers to self sign-up.
- Open the add-on product, e.g., “Call recording”.
- On the add-on product setting, go to Additional info > Account self-care.
- Turn on the Allow self-care sign-up toggle.
- Click Save.
1.4 Create product groups
You can organize products in groups, so it will be easier for the customer to select the product they are looking for. For instance, you can offer several products with different configurations for extensions, and include them in a single group “Extensions”. This way, when the customer adds a new extension, they will see only the products that are designated for extensions, and will not be able to choose a product for an auto-attendant by mistake.
In our example, the customer should be able to activate “Extension”, “Auto-attendant”, and “Call recording” products on the portal. For this, you need to create two product groups “Extensions” and “Auto-attendants”. Since the “Call recording” add-on product should be available for accounts with either product, we won’t add it to any group, but allow its usage via Agreements (see step 3.5).
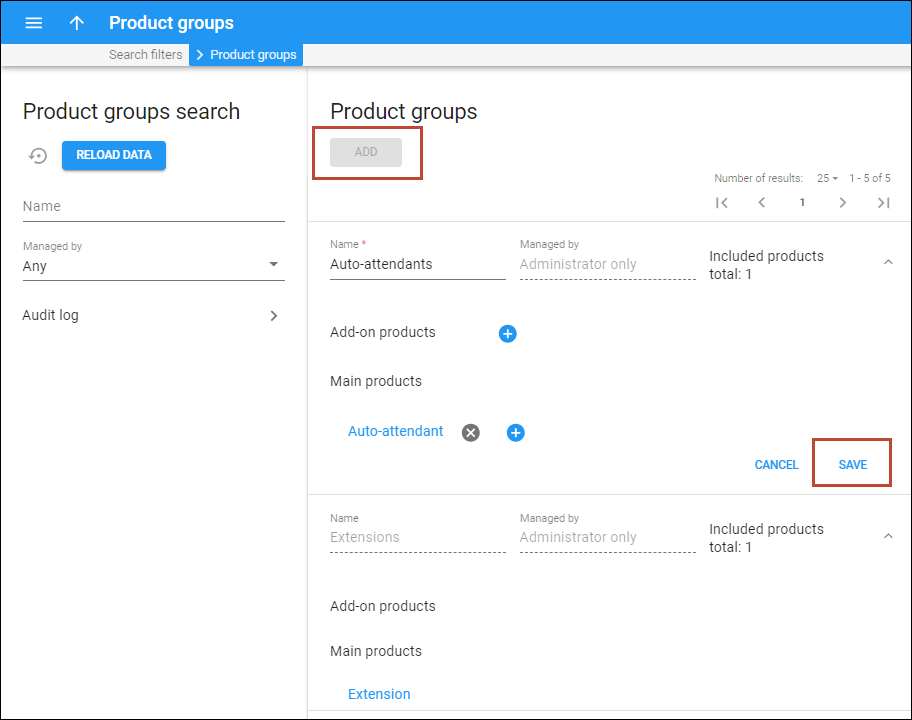
- Go to Service catalog > Product groups.
- Set the corresponding product group name in the Name field, e.g., “Extensions” and “Auto-attendant.”
- Click Add and create two product groups:
- “Extensions” – add the “Extension” main product in the Main product dialog.
- “Auto-attendants” – add the “Auto-attendant” main product in the Main product dialog.
- Click Save.
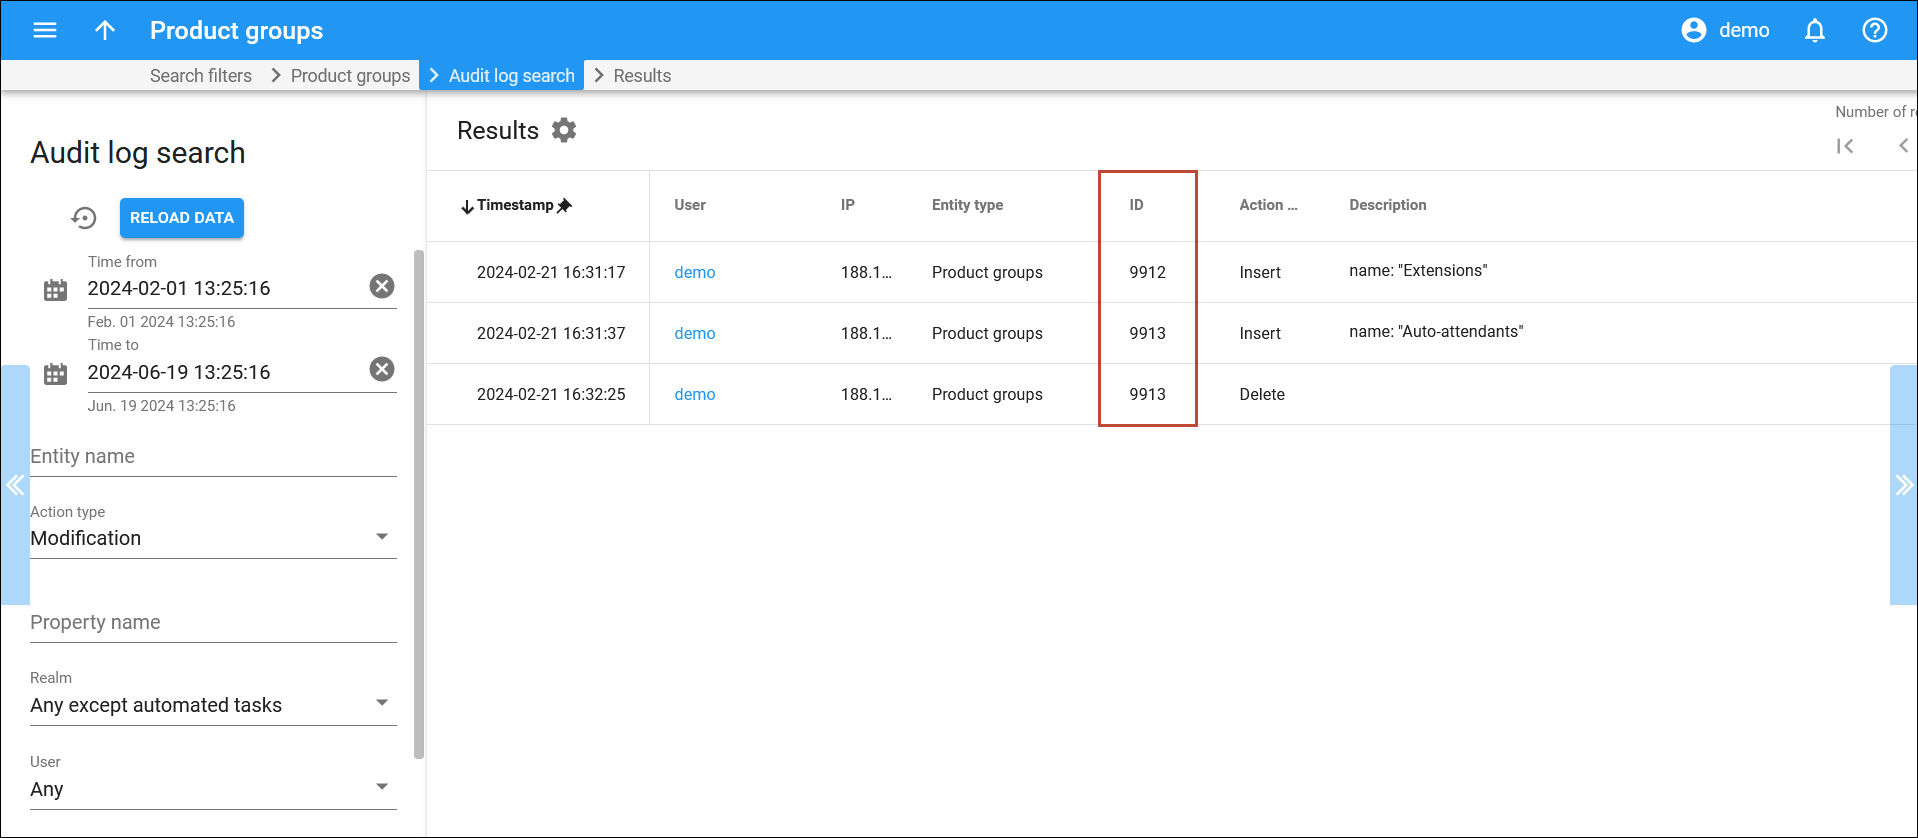
The IDs of the created product groups will be used when filling in the form on the portal’s ConfigUI. You can find the IDs of the product groups on the Audit log page.
Access configuration
2.1 Portal structure
If your PortaSwitch system version is MR98 and higher, you can define what functionality (pages, tabs) the customer or customer individual can see on the portal. For this, you need to upload the portal structure in the JSON format (received at the preparation step) to PortaSwitch and configure user permissions.
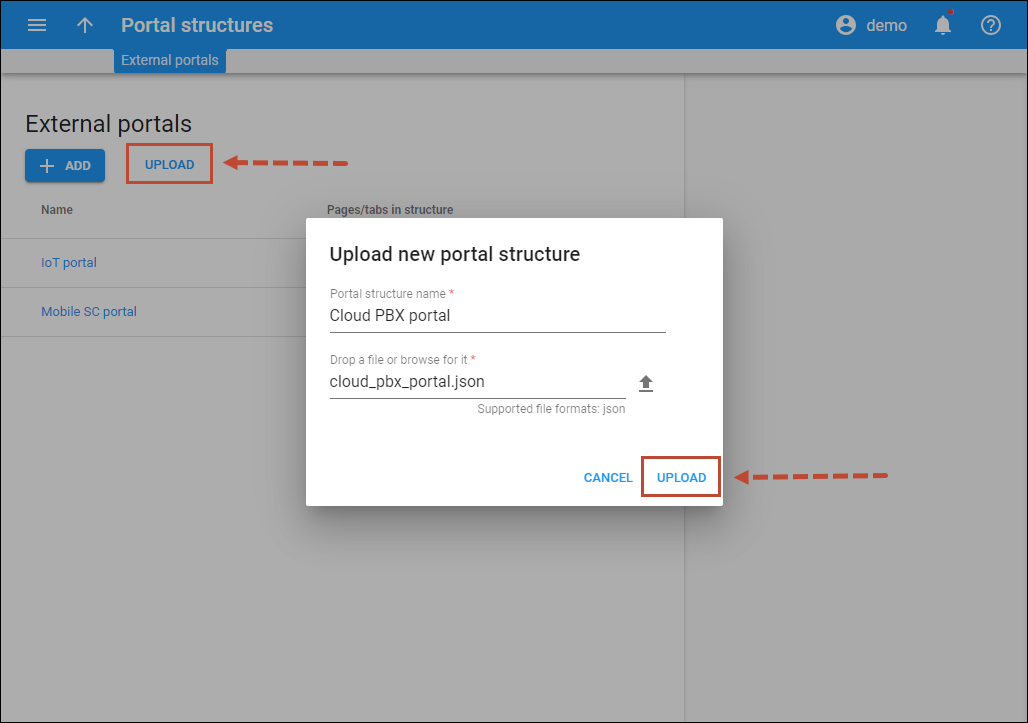
- Go to My company > Access control > Portal structures.
- Upload the structure for the CloudPBX Self-Care Portal on the External portals panel.
- Click Upload.
- Drop a file in the Drop a file or browse for it field or click Browse
 to browse on your computer.
2.2 Create roles for users
In our example, "ABC Company" plans to give distinct permissions to its employees for managing PBX data based on their roles, such as IT administrator, PBX administrator, or operations manager.
To create these roles and configure the permissions for them, perform the following steps:
- Create roles:
- Open My company > Access control > Roles.
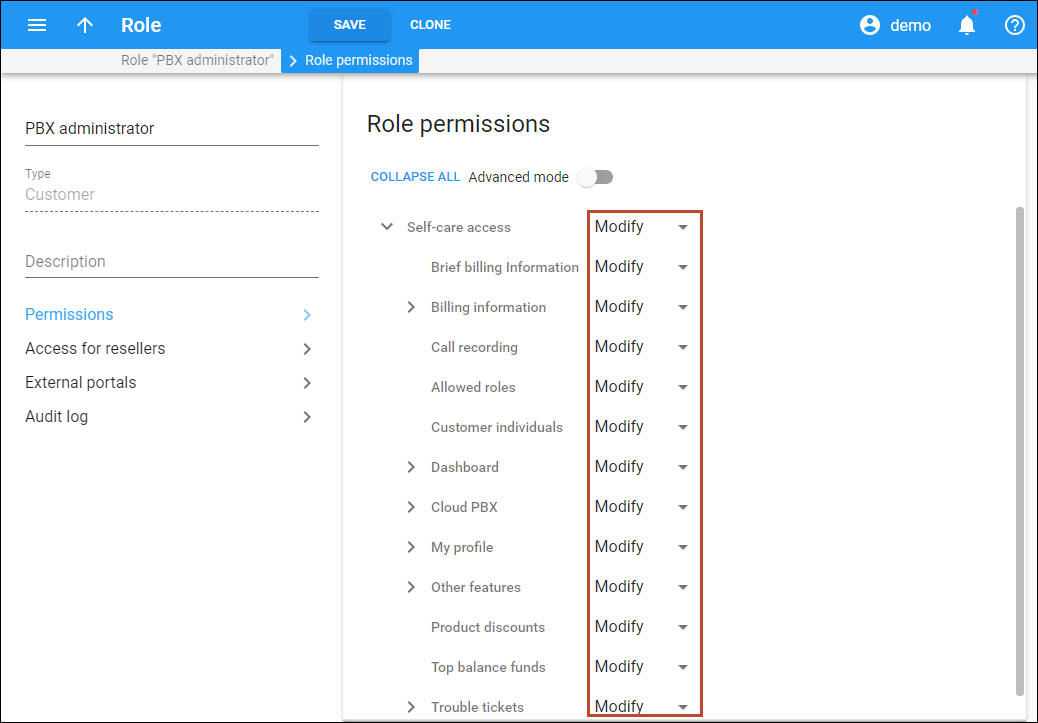
- Create roles “IT administrator”, “PBX administrator”, and “Operations manager” with the Customer self-care role type.
- Configure data access permissions for the created roles:
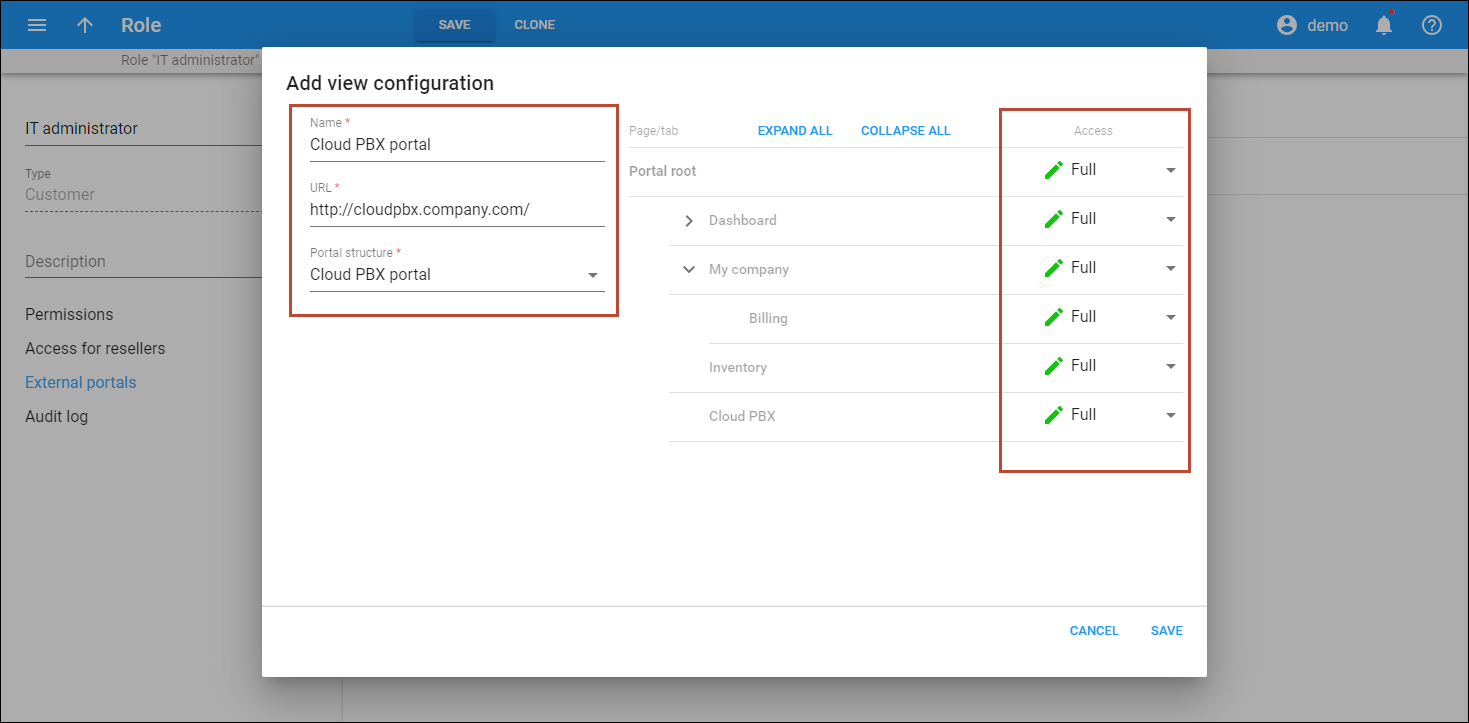
- Configure what functionality the user with the “IT administrator” role can see and manage for the portal.
- Open “IT administrator” role > External portals > click Add.
- Specify the URL where the CloudPBX portal is hosted and select the structure for the CloudPBX Self-Care Portal (uploaded at step 2.1), e.g., cloudpbx.company.com.
- Select “Full” access for all functionality > Save.
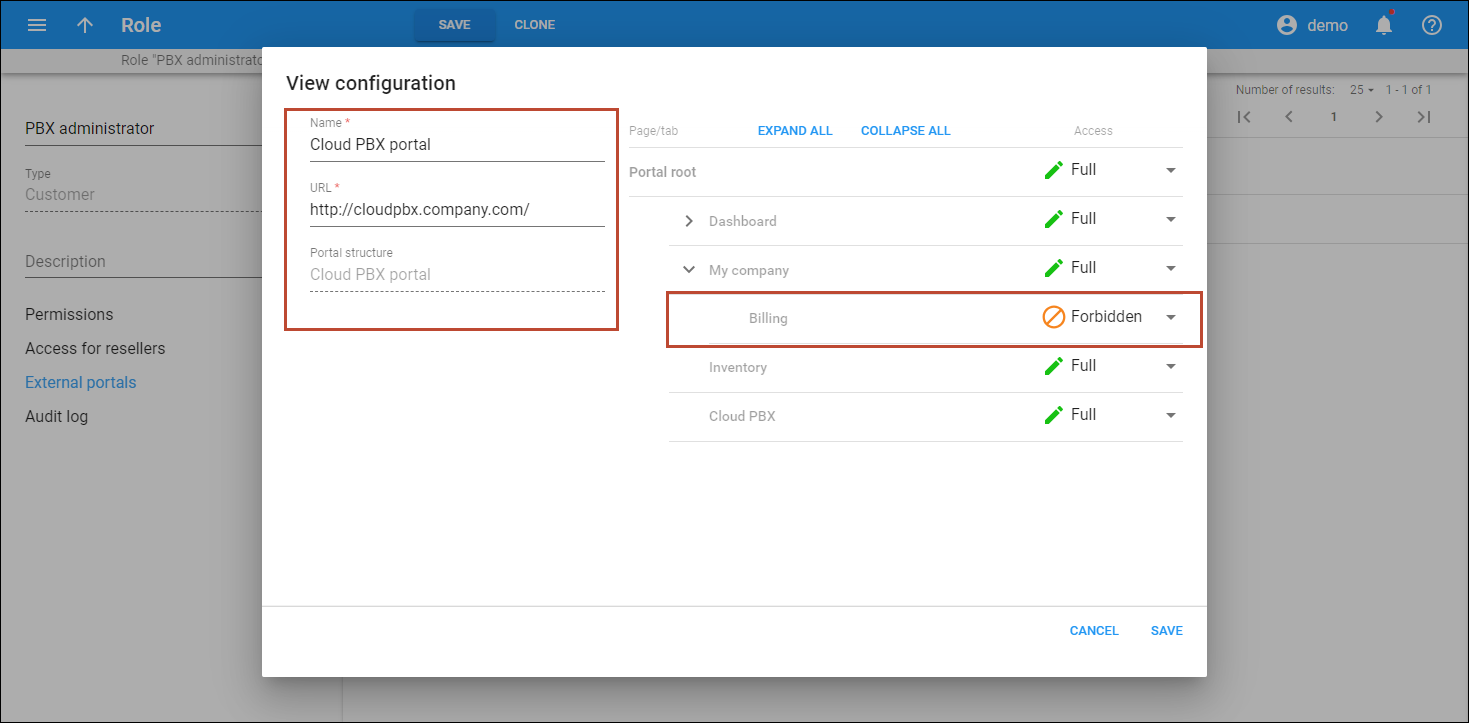
- Configure what functionality the user with the “PBX administrator” role can see and manage through the portal.
- Open the “PBX administrator” role > External portals > click Add.
- Specify the URL where the CloudPBX portal is hosted and select the structure for the CloudPBX Self-Care Portal (uploaded at step 2.1), e.g., cloudpbx.company.com.
- Select “Forbidden” access for Billing functionality > Save.
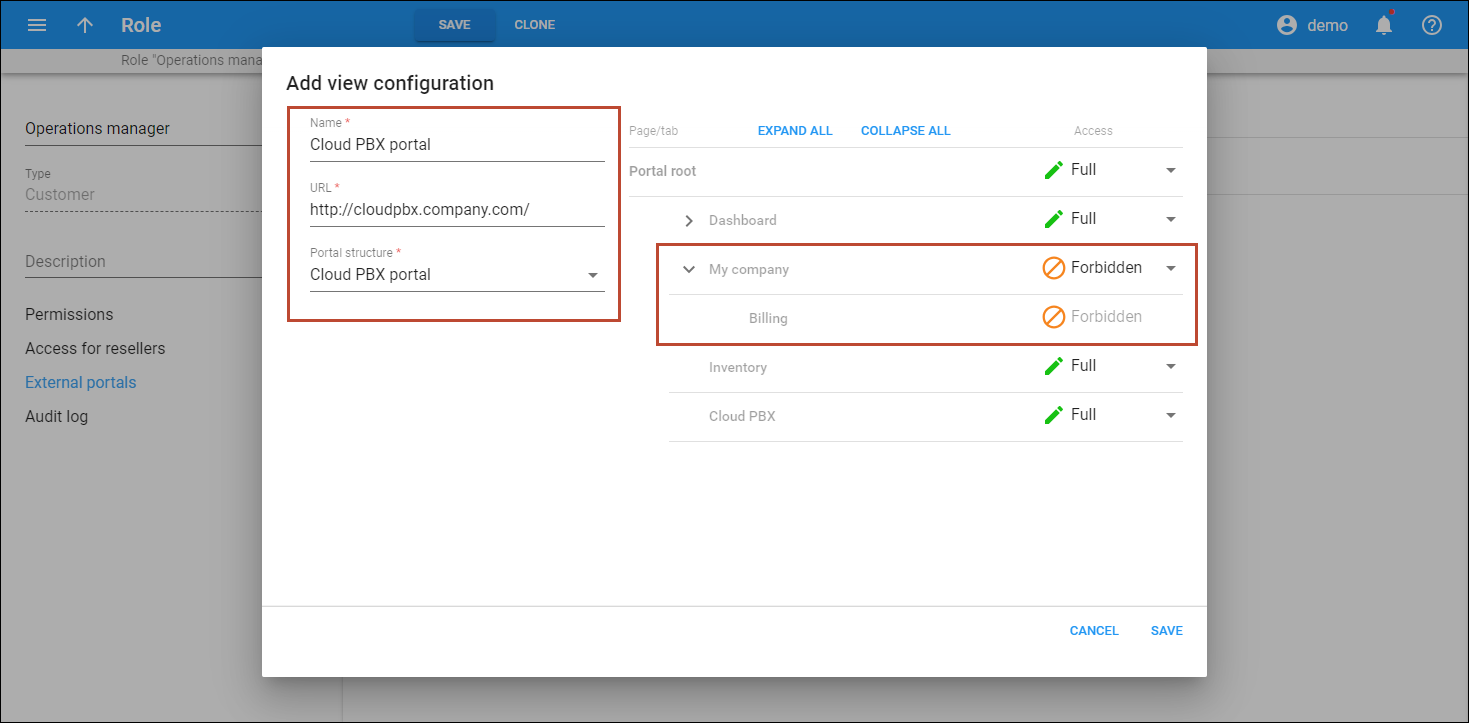
- Configure what functionality the user with the “Operations manager” role can see and manage for the portal.
- Open “Operations manager” role > External portals > click Add.
- Specify the URL where the CloudPBX portal is hosted and select the structure for the CloudPBX Self-Care Portal (uploaded at step 2.1), e.g., cloudpbx.company.com.
- Select “Forbidden” access for all functionality except My company (includes Billing) > Save.
- Click Save.
Customer configuration
3.1 Create a customer class
In this step, the customer class should be configured as described in the Cloud PBX services handbook.
Follow the steps in the Manage customer class notifications handbook to configure customer notifications.
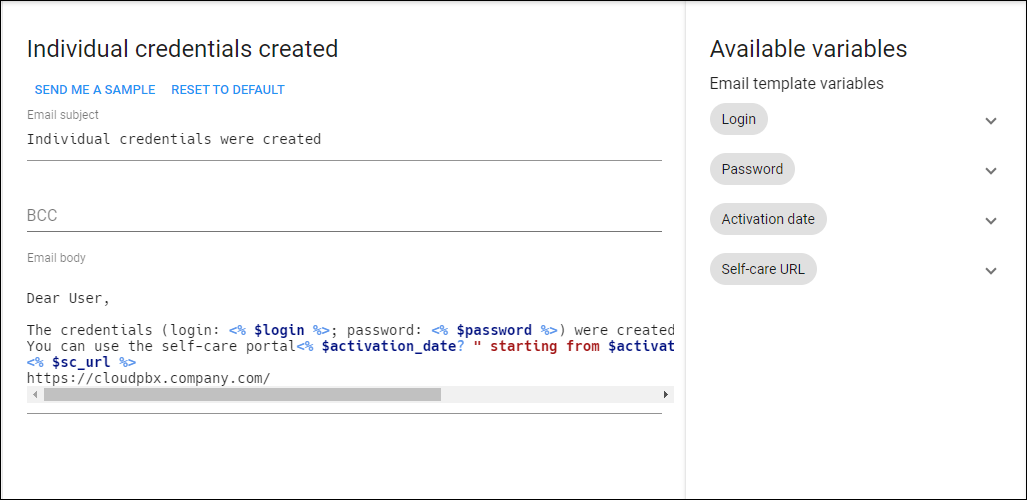
To send your employees a link to the CloudPBX Self-Care Portal with their credentials, configure the notification template:
- Go to My company > Templates and select the template used in the customer class assigned to the PBX customers, e.g., Cloud PBX customer class.
- Open the template > Password recovery > Individual credentials created. Make sure the Login and Password variables are set, and manually specify the URL of the CloudPBX Self-Care Portal after the <% $sc_url %> Self-care URL variable, e.g., https://cloudpbx.company.com.
3.2 Create a customer
In this step, the customer should be configured as described in the Cloud PBX services handbook.
3.3 Assign roles
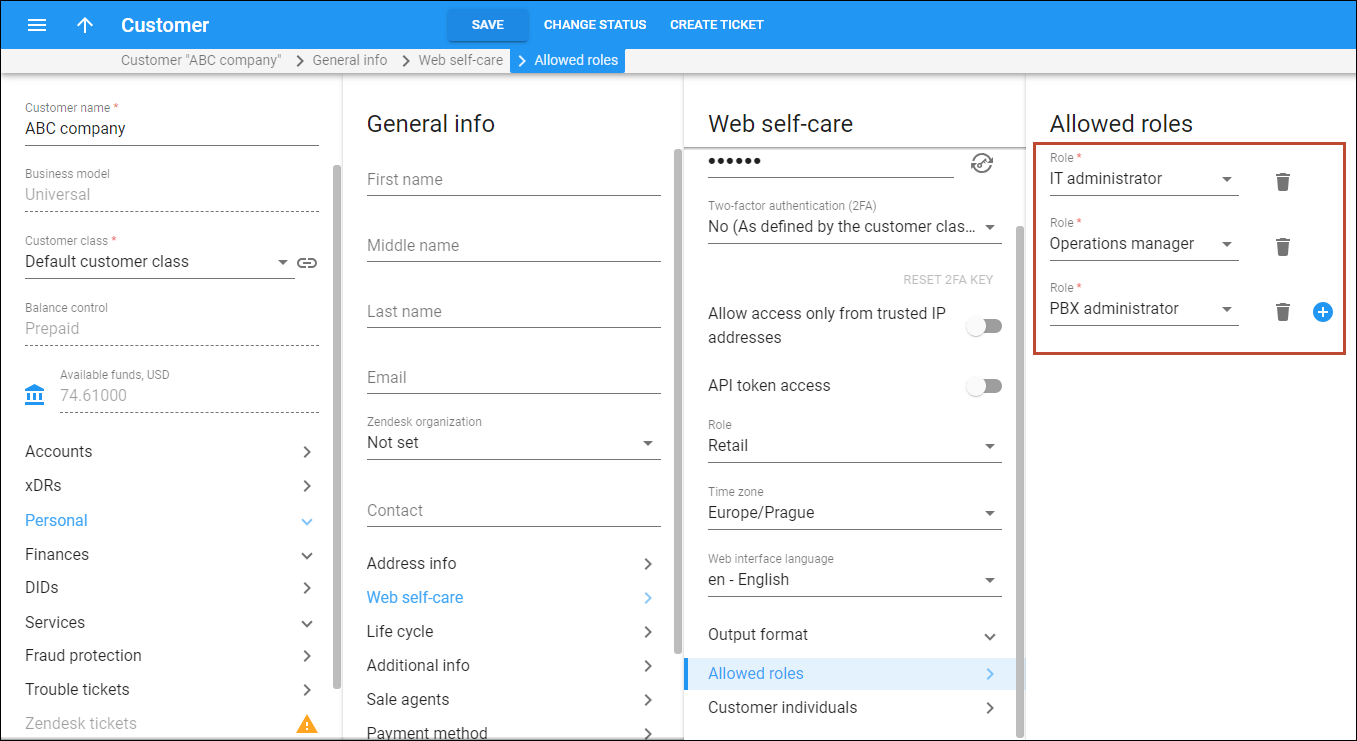
Open the “ABC company” customer record and assign the created roles, e.g., “IT administrator”, “PBX administrator”, and “Operations manager”.
- Go to Customer > Personal > General info > Web self-care > Allowed roles.
- Click Add
 > select the created roles in the Role field.
 - Click Save.
3.4 Create customer individuals
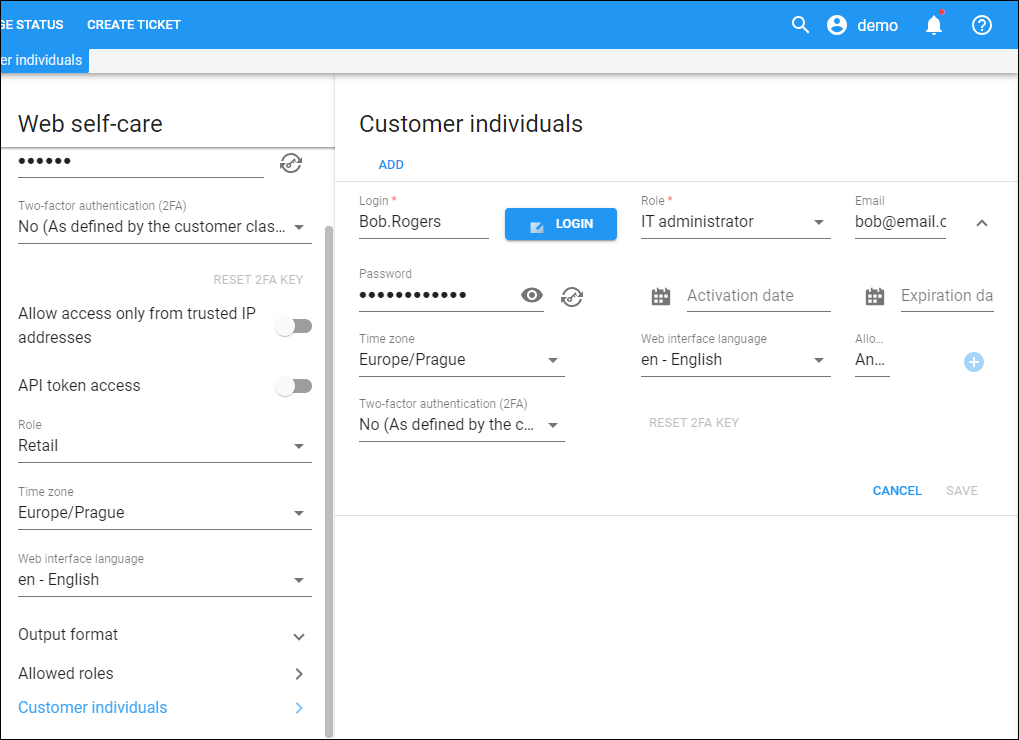
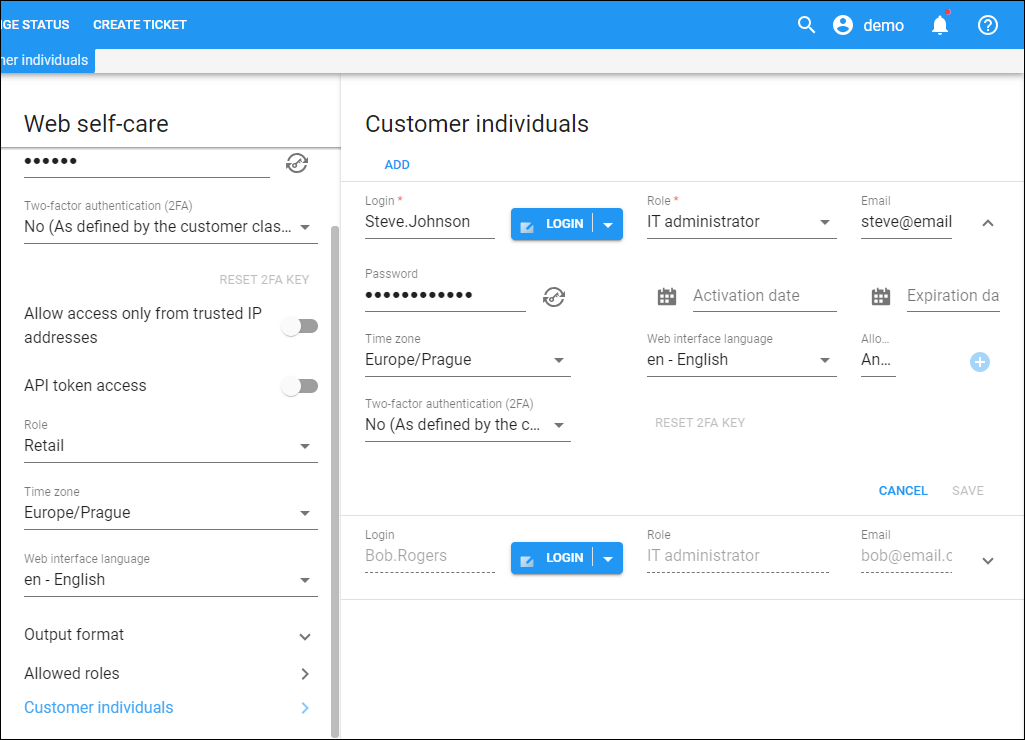
- Open Customer > Personal > General info > Web self-care.
- On the Customer individuals page, click Add.
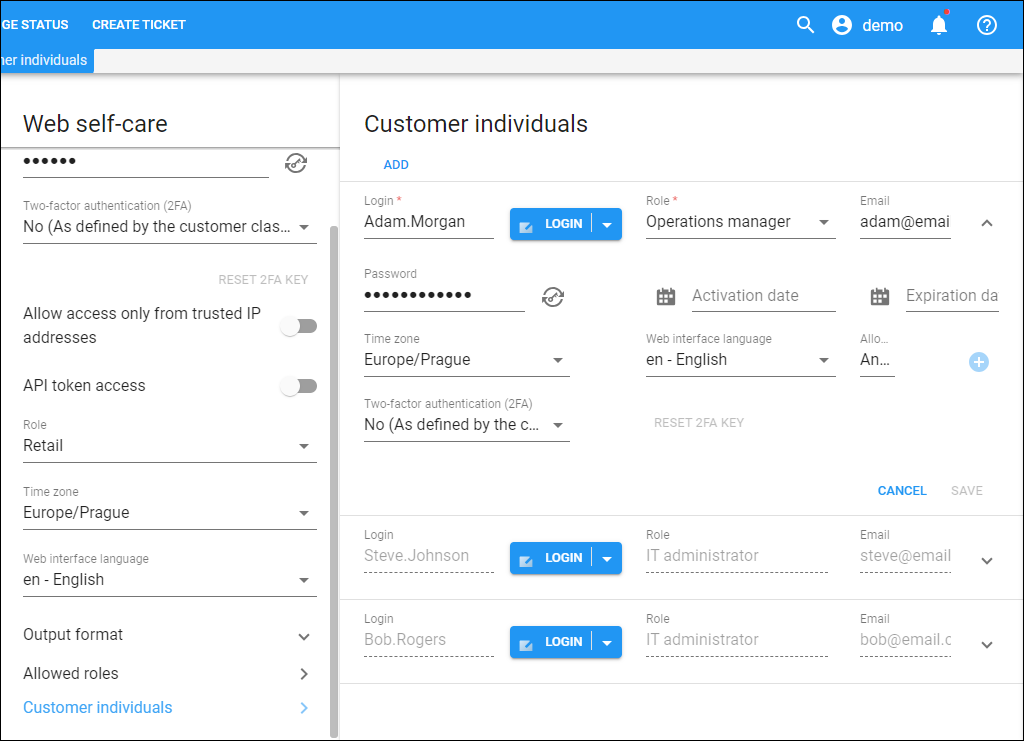
- Select the “IT administrator” role for Bob, specify the credentials, Bob’s email, and other parameters.
- Select the “PBX administrator” role for Steve, specify the credentials, Steve’s email, and other parameters.
- Select the “Operations manager” role for Adam, specify the credentials, Adam’s email, and other parameters.
- Click Save.
3.5 Configure agreements
Customer agreement defines the set of main and add-on products that a specific customer can use on the portal. You need to configure customer agreements to enable customers to add new extensions themselves.
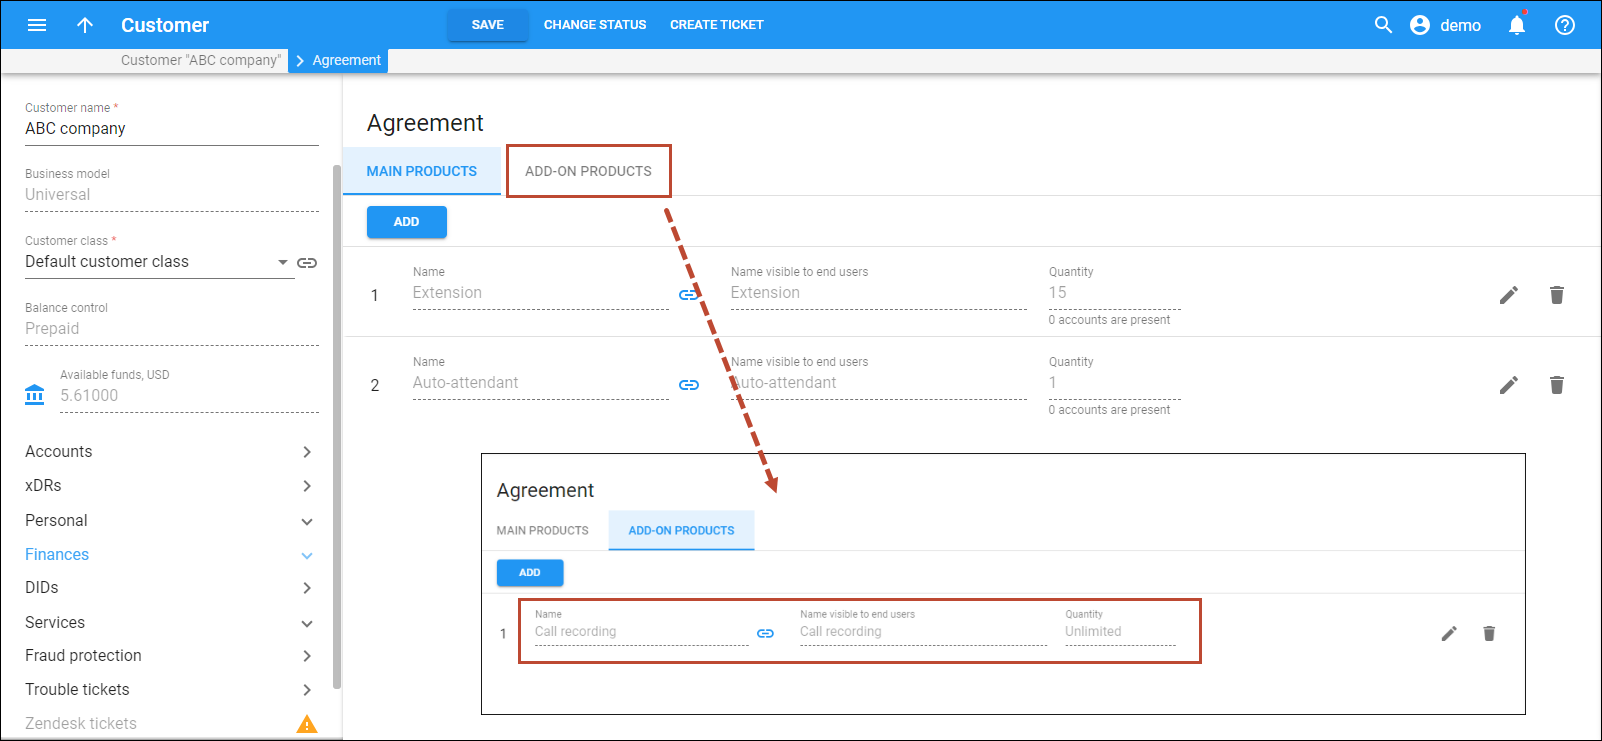
According to our example above, the customer agreement should include the main “Extension” and “Auto-attendant” products and the add-on product “Call recording”. The number of extensions created with the main products is limited via the Quantity option to 10 and 1 extension respectively, and the add-on can be assigned to an unlimited number of extensions or auto-attendants.
To create an agreement:
- Open Customer > Finances > Agreement.
- Add products:
- Click Main products > Add, select the main “Extension” and “Auto-attendant” and in the Quantity field, specify “15” and “1” as the number of accounts the product can be assigned to.
Products added to the agreement have to use the “Universal” account role.
- Click Add-on products > Add, select “Call recording” in the Quantity field, and select "Unlimited" to allow all the accounts to assign this add-on product.
- Click Main products > Add, select the main “Extension” and “Auto-attendant” and in the Quantity field, specify “15” and “1” as the number of accounts the product can be assigned to.
- Click Save.
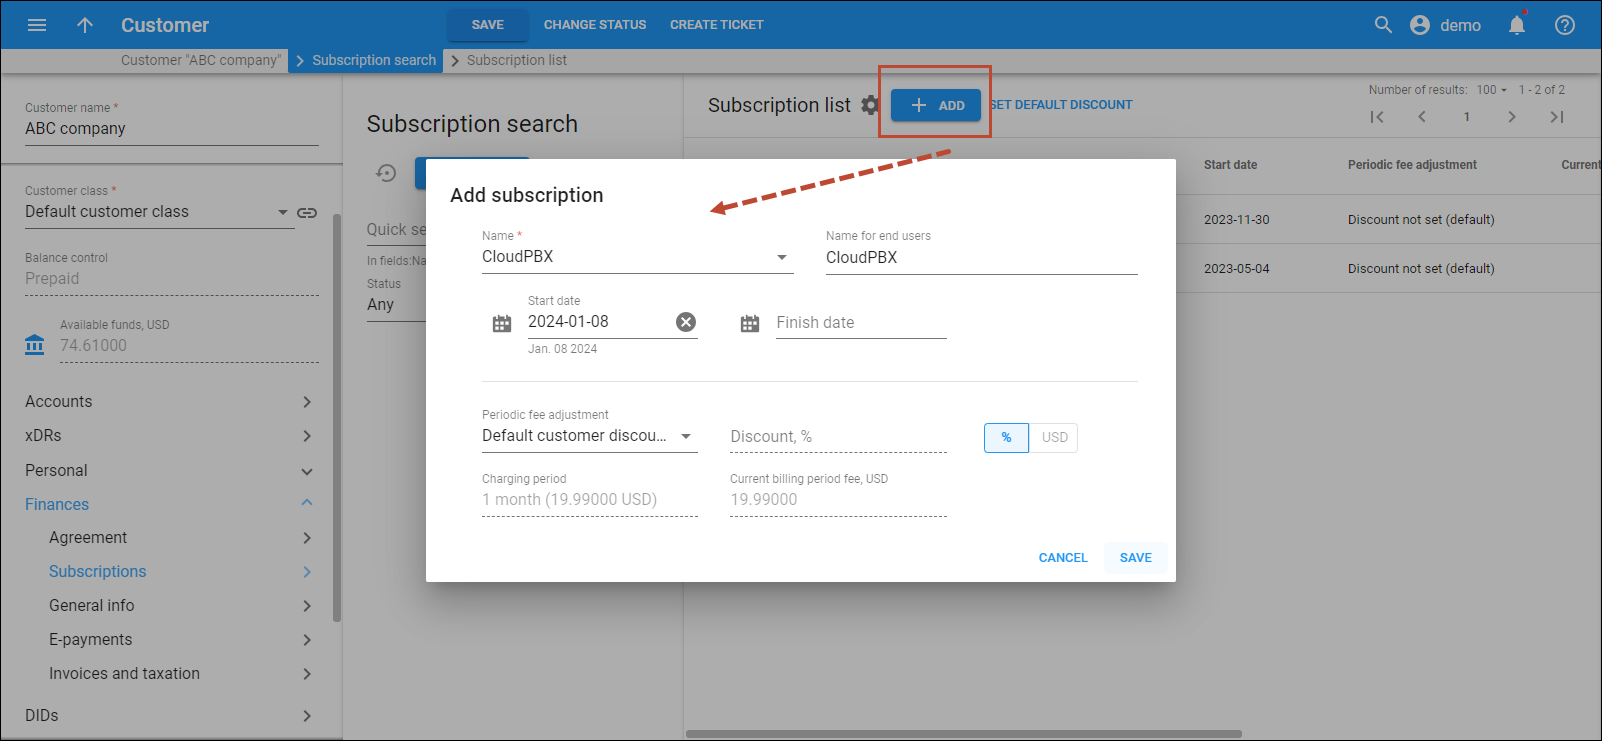
3.6 Assign subscription to the customer
Note that when you create a customer, the created subscription should be assigned directly to this customer according to our example.


