Automated call wrap-up scheduling
Call center owners can now allocate the newly introduced “call wrap-up” timer to their agents to effectively manage their “after call work”. During this time, agents can fully focus on post-call tasks such as updating client information, documenting call details, or scheduling follow-up actions.
Once a call ends, a “wrap-up” timer is activated for the agent, which means that during the set time, the agent becomes unavailable for new incoming calls via hunt/ring group. The agent can dedicate time to complete the post-call tasks before handling the next call.
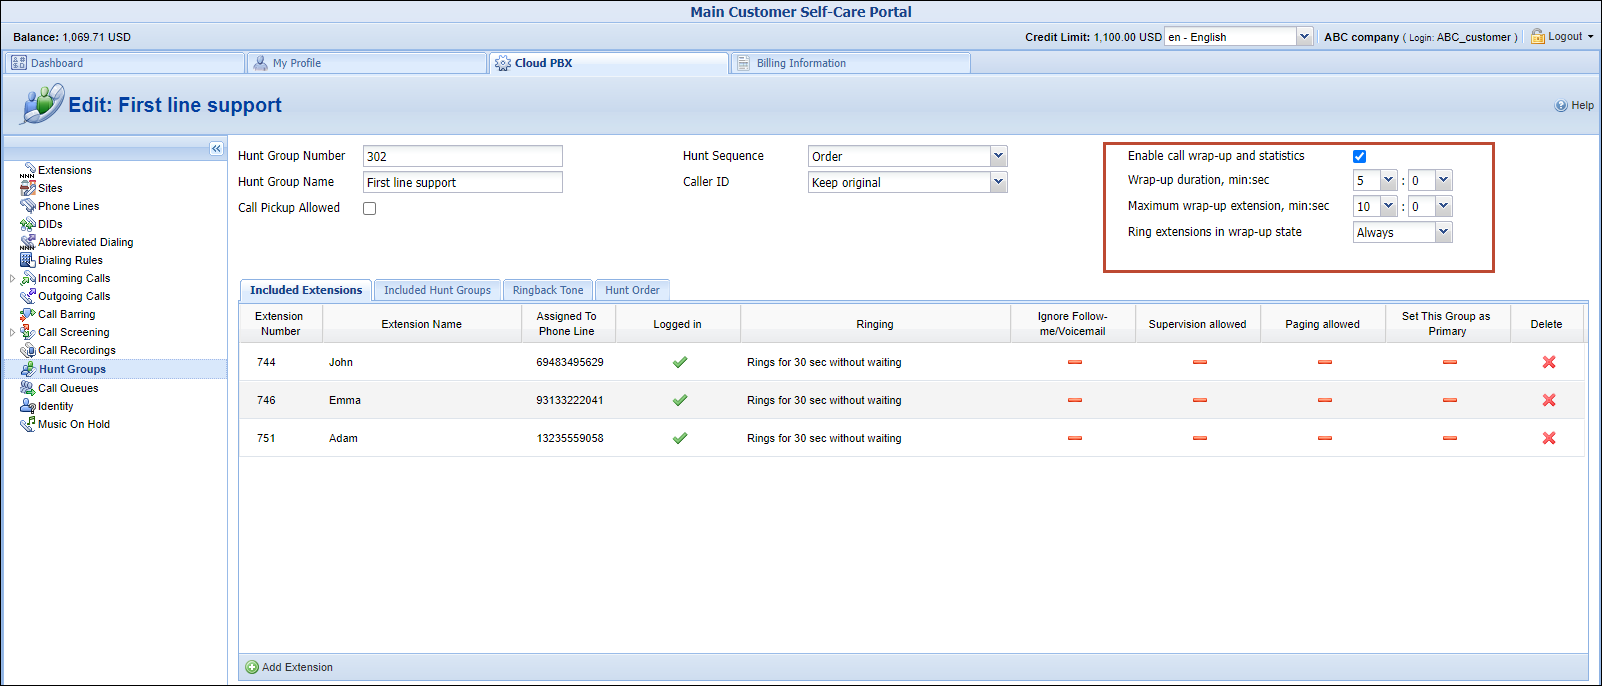
On the customer self-care interface, the PBX admin can enable the call wrap-up time for a specific hunt group. Admins can also specify the duration of the wrap-up timer (Wrap-up duration option) and limit the maximum duration that the agents can set on their self-care interface (Maximum wrap-up extension option). The agents can also manually stop the timer on their self-care interfaces if they finish the after-call work before the timer ends.
Call centers with only a few agents on staff may benefit from allowing agents with an active call wrap-up timer to receive calls via hunt/ring group (Ring extensions in wrap-up state option).
The feature is designed for call centers and the “call wrap-up” timer is typically available on the user interface for call center agents, which is developed by third-party companies. Administration of the “ wrap-up” timer is on the roadmap for our Cloud PBX self-care portal, but if your PBX customers need to access it immediately, the feature is available on the default customer self-care portal.
- Agents have enough time to wrap up calls before receiving the next call.
- PBX customers provide better customer service.
Let’s say Adam is the manager of the call center (PBX admin) in the ABC company. John is a new agent in the support team supervised by Adam.
Adam configures the “First line support” hunt group and enables the 5-minute call wrap-up timer after the call is finished. To do this he opens his self-care interface, goes to the Hunt Groups tab, selects the “First line support” hunt group, marks the Enable call wrap-up and statistics checkbox, and sets 5 minutes for the wrap-up timer in the Wrap-up duration option. He also allows the agent to extend the timer up to 10 min from their self-care interface (the Maximum wrap-up extension option).
John finishes the call with a client sent to the “First line support” hunt group. He needs to write a follow-up email to the client. While working on this task, John will be unavailable to take support calls for 5 minutes. Even though he doesn’t participate in handling calls sent to this hunt group he can still receive direct calls. He starts writing the follow-up email. John’s manager, Adam, calls John to ask whether the email has been already sent to the client. John discusses a few email details with Adam and sends it. Once the call wrap-up timer is finished (after 5 minutes), John can receive another support call.
Find the configuration details and specifics here.
Prohibit the routing of calls with invalid CLI
Calling Line Identification (CLI) provides information about the caller and helps the called party decide whether to answer the call. In the telecom market, there is a growing effort to ensure the validity of CLI transmitted through the network. For instance, a valid CLI should be an E.164 phone number of predetermined length consisting of a valid country code, area or mobile network code, and line number. To compel service providers to deliver valid CLI numbers, vendors may refuse to process calls with the CLI that doesn’t meet the requirements or may apply significant surcharges for terminating such calls.
From MR108, you gain tighter control of routing calls with invalid CLI and can simply prevent such calls from going to a specific vendor (if it is known that the vendor applies surcharges or blocks such calls). Suppose some of your customers use invalid CLI due to misconfiguration ‒ for example, an on-premise PBX sends an extension number such as “1356” as CLI instead of the E.164 number such as “27134567890”. When you route customers’ calls to vendors, you can now prohibit routing calls with invalid CLI, thus avoiding the vendor’s surcharges associated with such calls.
Avoiding revenue loss on customers with misconfigured CLI.
- The CLI validation in PortaBilling supports E.164 numbers only, so you first need to configure the number translation from the local format (e.g., “0134567890”) into E.164 format (e.g., “27134567890”).
- If CLI does not match any manually added call validation rule, it will be automatically sent for validation by an external tool – Google’s libphonenumber library.
- Toll-free and premium numbers are identified as invalid CLI by Google’s libphonenumber library.
- The CLI numbers for emergency calls are not validated at all, so these calls are always allowed regardless of whether calls with invalid CLI are allowed.
- This feature can be used for voice calls service only.
- The CLI validation is currently not available in the standalone mode (when the main site in site-redundant PortaSwitch goes down). It will be available starting from MR109.
Find the configuration steps and more details on how it works here.
Managing “role” availability to resellers
With this release, the administrators can choose which “roles” service provider’s resellers can assign to their customers and accounts, for access to the self-care web interface. Previously any customer/account role has been available to all resellers. Now an admin can selectively provide access to a customer/account role to specific resellers. Resellers on their portal can only see and assign roles for customers/accounts that they have been granted access to. Resellers who are not explicitly given permission will not be able to assign a role to their customers/accounts.
For example, an admin creates a new CloudPBX role for customers and makes it available to Reseller A. This role grants full access to CloudPBX Self-Care Portal. If Reseller A opens their portal and provisions a new customer, they will have this role in the list and will be able to assign it. However, Reseller B that has no access to this role will not even see this role in the list.
To manage customer/account role access for a reseller, the admin opens the Role panel and clicks the new Access for resellers panel. The admin can set one of the following options:
- All resellers – all resellers can see and use this role.
- Select resellers – only specific resellers from the list can see and use this role.
- No resellers – resellers cannot see this role. This option is set by default for new roles.

Service providers have tighter control over which roles the resellers use for their customers.
“Aging” details in external invoice templates
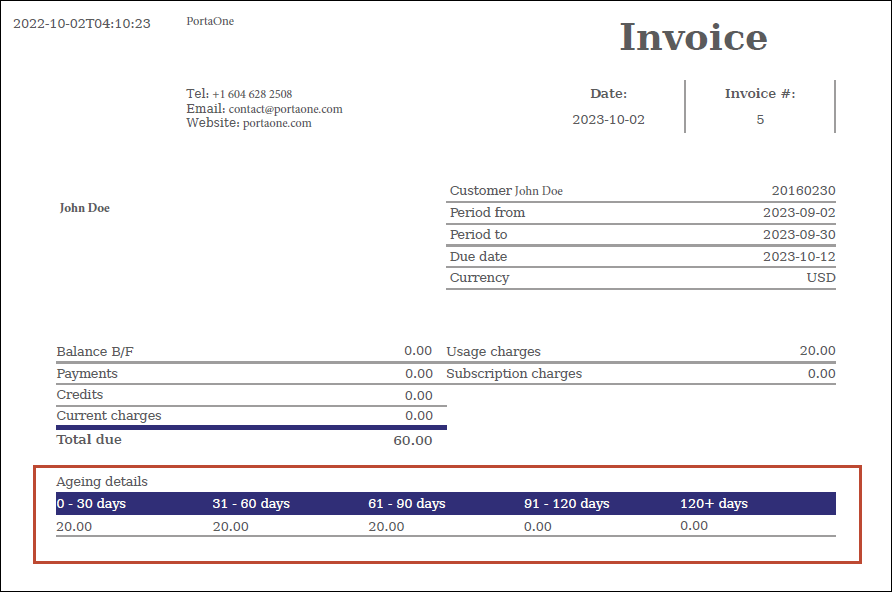
Now, service providers can include the invoice ‘aging’ details to the customer invoices that are issued using external invoice templates. If there are outstanding amounts in the previous invoices, the ‘aging’ details will show how old this debt is.
When service providers create the external invoice template, they can use the new ‘get_invoice_list’ method that returns the list of invoices with ‘aging’ details. These details are available for invoices of all types and statuses except for voided invoices, and show the following information:
- the aging period is divided into intervals such as 0-30, 31-60, 61-90, 91-120, and 120+ days. Each interval represents the number of days that have passed since the invoice was issued (defined by invoice.issue date)
- the sum of outstanding amounts for a specific aging period
Here is a preview of the invoice:
- Customers can keep track of how much they owe and for how long.
- Service providers supply transparent information on outstanding amounts of previous periods.
Customer John Doe subscribes for the Internet service in May and is charged $20 per month. He goes on vacation in July and doesn’t pay for the services for three months. In September, John receives an invoice for his Internet service with a total amount due of $60. The invoice includes aging details, showing him that:
- His $20 debt for September is up to 30 days old
- His $20 debt for August is up to 60 days old
- And his $20 debt for July is up to 90 days old
Enable the generation of invoices and the export of xDRs independently
Previously, invoice generation was dependent on whether xDRs were saved to a file which was controlled by the Generate statistics option. Now, the controls for invoice generation and xDR export are completely independent:
- Invoices will be generated when an invoice template is assigned in the customer class settings
- xDRs will be exported when the Export xDRs to a .csv file toggle is turned on
As a result, you have more flexibility in configuring the system. For example, say you don’t need to store xDRs in files as you already export xDRs from PortaBilling into an external data warehouse. In this case, you may want PortaBilling to skip the xDR export to improve the system performance. Now, you can disable the xDR export while still being able to invoice your customers.
By independently enabling/disabling invoice generation and xDR export, you gain better control of system resource usage.
Avoid unnecessary SSL certificate renewal when not using SIP over TLS
Enabling SIP over TLS requires the generation of SSL certificates in order to validate that the secure connection is established to the server that it claims to be. In order to simplify administration and prevent companies from having to obtain these certificates from outside authorities such as Verisign, PortaSwitch could generate self-sign certificates. However, if you do not use SIP over TLS, this could create occasional periods of unnecessary downtime when the system detected an approaching expiry date for the certificates and so restarted the SIP server during the next configuration update.
Now, if you do not use SIP over TLS (the SIPProxy.enable_tls_transport option is set to “No” on the Configuration server web interface), PortaSwitch will not generate or renew such certificates, allowing you to avoid that downtime.
Avoid disruptions caused by unnecessary certificate renewal.
Remembering last opened submenu per entity
In this release, when the admin navigates between entities of a specific type, such as accounts, they will be automatically directed to the last opened panel (submenu) for that entity type. For instance, if the admin opens the “Web self-care” panel within an account, the same panel will automatically open when they access any other account in the system.
Service provider Panda Telecom offers their customers the CloudPBX Self-Care Portal. Cloud PBX customers manage their PBXs via this portal.
Later on, Panda Telecom develops a separate self-care portal specifically for PBX extensions. Customer ABC, which has 10 extensions, requests the admin to provide these extensions (accounts in PortaBilling) with access to the new portal. The admin opens the first ABC’s account, navigates to Personal info > General info > Web self-care, and enters the account’s credentials. Now, the required panel (“Web self-care”) will open automatically each time the admin moves on to the next account. Previously, the admin would have had to make a number of clicks to navigate to the same panel for other accounts as well.
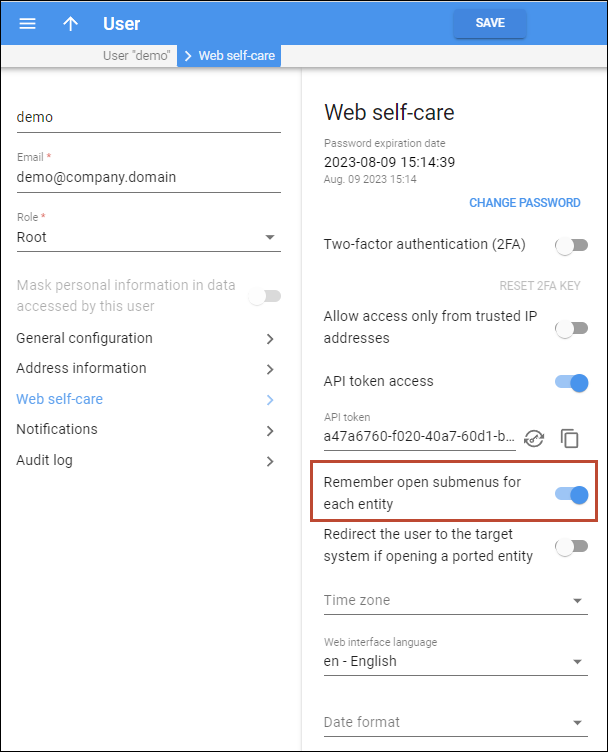
This option is enabled by default and the admin can disable it using the Remember open submenus for each entity toggle.
The option allows administrators to manage repetitive tasks effectively for multiple entities (such as updating accounts, changing subscriptions, etc.) and to immediately place them in the right panel within an entity.


