


This chapter demonstrates how to set up the PSTN-to-SIP service so that your customers will be able to receive calls on their SIP phones when someone dials their number from a fixed-line or mobile phone.
Please refer to the UI help for instructions on how to navigate and operate the web interface, as well as for detailed explanations of particular fields.
Incoming DID calls (from PSTN)
If you receive calls from your vendor via a PRI interface (E1/T1), you will need to send them to a VoIP gateway (such as Cisco or Quintum) and then forward them to PortaSIP.
The simplest and the most efficient way to set this up is to not define this gateway as your node. Instead, simply describe it as a “From vendor” connection, as explained in the next chapter.
Incoming DID calls (from VoIP vendor)
Configuration overview
- Initial configuration of PortaBilling
- Create a vendor tariff for incoming DID costs
- Enter rates
- Create a DID supplier vendor
- Define connections
- Create a customer tariff to charge your subscribers
- Enter rates
- Modify rating list for a product
- Create accounts
- Testing
1. Initial configuration of PortaBilling
If you have just installed the PortaBilling software or dedicated a new billing environment to configure the services described in this handbook, make sure to first perform the initial configuration of PortaBilling. To do this, use the Initial configuration of PortaBilling handbook.
2. Create a vendor tariff for incoming DID costs
A tariff is a single price list for calling services; in this case, for calculating how much your DID provider will charge you for delivering incoming calls to your network.
- On the navigation menu on the left, select Service catalog > Tariffs and click + Tariff.
- On the Add tariff panel, fill in the tariff details:
- Name – a short name for the tariff object; this is the name you will see in the select menus.
- Currency – indicates the currency in which the vendor charges you.
The currency for the tariff may be chosen only once, and cannot be changed later.
- Service – select Voice calls.
- Applied to – select Vendor.
- Routing – leave the Routing disabled, since no routing actually takes place for this vendor, i.e., the vendor will be sending calls to your network.
- Define prices – select per individual rate code.
- Code group set – select None.

-
Click Save.
3. Enter rates
- On the vendor tariff’s panel, click Rates and enter the rates applied to you by the DID provider. Please refer to the Basic Residential VoIP Service handbook for a detailed description of the available rate attributes.

- Click Save.
- Repeat these steps if you need to enter more rates.
Upload a rate list from a file
Please consult the instructions provided in the Rate Import section for more information regarding this.
4. Create a DID supplier vendor
This entity is required in order to keep track of your incoming DID expenses, and also to provide an adequate level of security on your network. Since every incoming call to your network must be authorized, you can create an account under the vendor which will be used for such authorization.
- In the left upper corner click
 to open the navigation menu.
- On the navigation menu, select Infrastructure, then select Vendors.

- On the Create vendor panel, fill in the vendor details. Please refer to the instructions provided in the Basic Residential VoIP Service handbook for a detailed description.
- Click Save.
5. Define connections
Connections represent the points from which calls leave or enter a network. They are directed to or from vendors where charges are incurred. In this case, a connection represents the point where calls enter your network via the PSTN gateway.
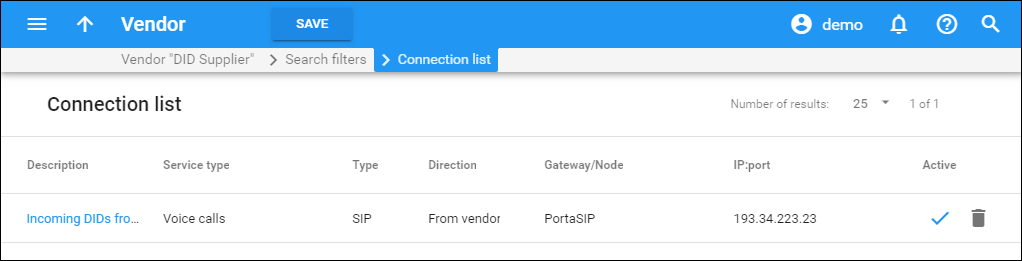
- On your vendor’s panel (DID Supplier), click Connections.
- On the Create connection panel, fill in the connection details:
- Description – type a descriptive name for this connection. It will be displayed in the list of connections.
- Service type – select Voice calls.
- Type of connections – select SIP.
- Direction – select From vendor.
- Tariff – choose the tariff that defines your termination costs for this connection/vendor.
- Active – use a slider to set this connection as active.
- Node – select PortaSIP.
- Service and rating access code – if you would like to use different rate plans for the same service based on where the call comes from, specify the corresponding access code. This allows the appropriate entry specified on the product’s Usage charges panel to be selected. For example, the default value for a “From vendor” connection (applied to calls to the PortaSIP server arriving from outside your network and terminated to one of your SIP phones) should be set to 'INCOMING'.
- Capacity – specify the Capacity value for this connection.
- Remote IP – enter the address of the vendor’s gateway.
- Vendor authorization – select the corresponding record for VoIP connections where authorization between you and the vendor is done using a SIP username and password.

- Click Save.
6. Create a customer tariff to charge your subscribers
The tariff is a single price list for calling services; in this case, for your customers’ incoming calls.
- On the navigation menu, select Service catalog > Tariffs and click + Tariff.
- On the Add tariff panel, fill in the tariff details:
- Name – type a short name for the tariff object; this is the name you will see in the select menus, (for example, SIP Subscribers - Incoming).
- Currency – this indicates the currency in which you charge your customers. Note that the currency for the tariff is chosen only once, and cannot be changed later.
- Service – select Voice calls.
- Applied to – select Customer as this tariff will be used to charge your customers.
- Managed by – select Administrator only here, since we are setting up a service without the involvement of resellers.
- Define prices – select per individual rate code.
- Code group set – select None.

- Click Save.
7. Enter rates
- On your customer tariff’s panel (SIP Subscribers - Incoming), go to Rates and click + Rate.
- On the Add rate panel, fill in the required information regarding the costs of incoming DID calls; please refer to the Enter Rates section of the Basic Residential VoIP Service handbook for a detailed description of the available rate attributes.

- Click Save.
- Repeat these steps if you need to enter more rates.
 If you
provide free incoming calls to all (or a majority of) destinations, instead
of creating zero cost rates for multiple rate codes, you can simply
create a single rate for a special “|” (pipe) rate code. If the tariff
doesn’t specify otherwise, this rate will be applied to any incoming call
and to any incoming number.

8. Modify rating list for a product
Now you must specify when the tariff you have created to charge your customers for incoming calls will actually be applied to them.
- On the navigation menu, select Service catalog and click Products.
- Go to the needed product, open the Usage charges panel and click Add.
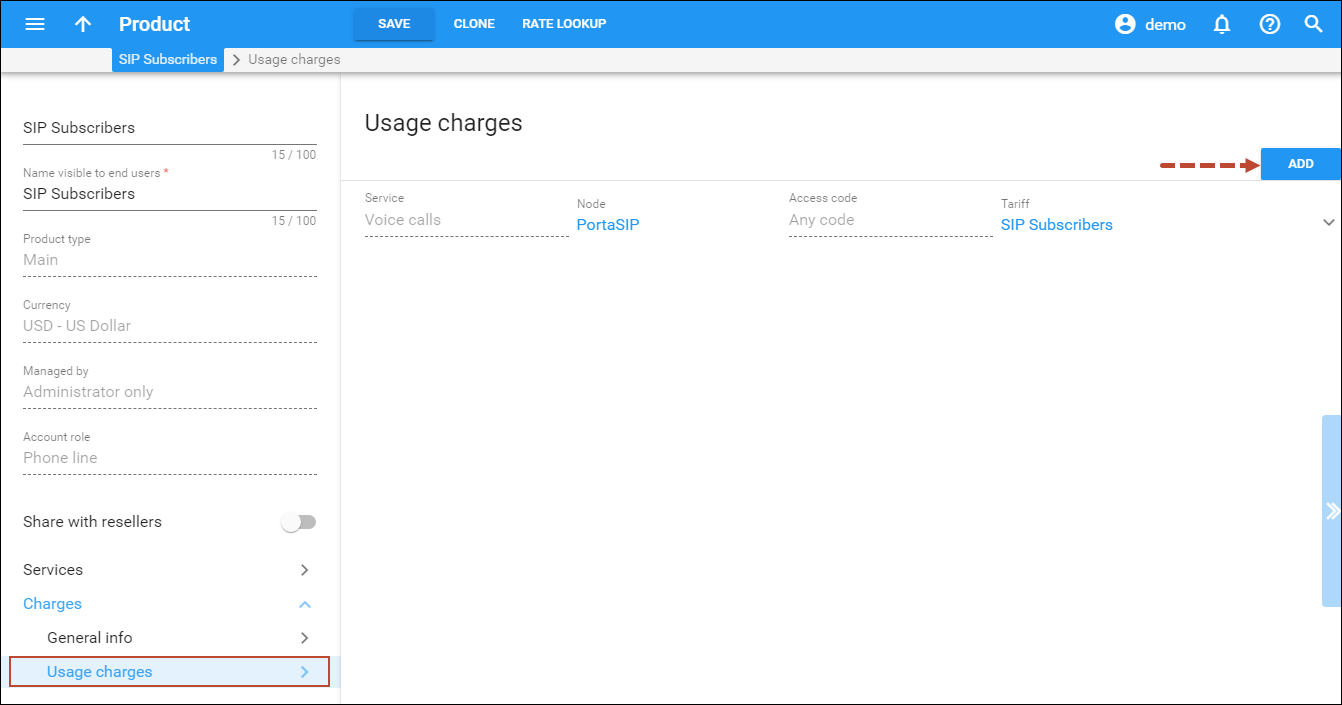
- Fill in the required information:
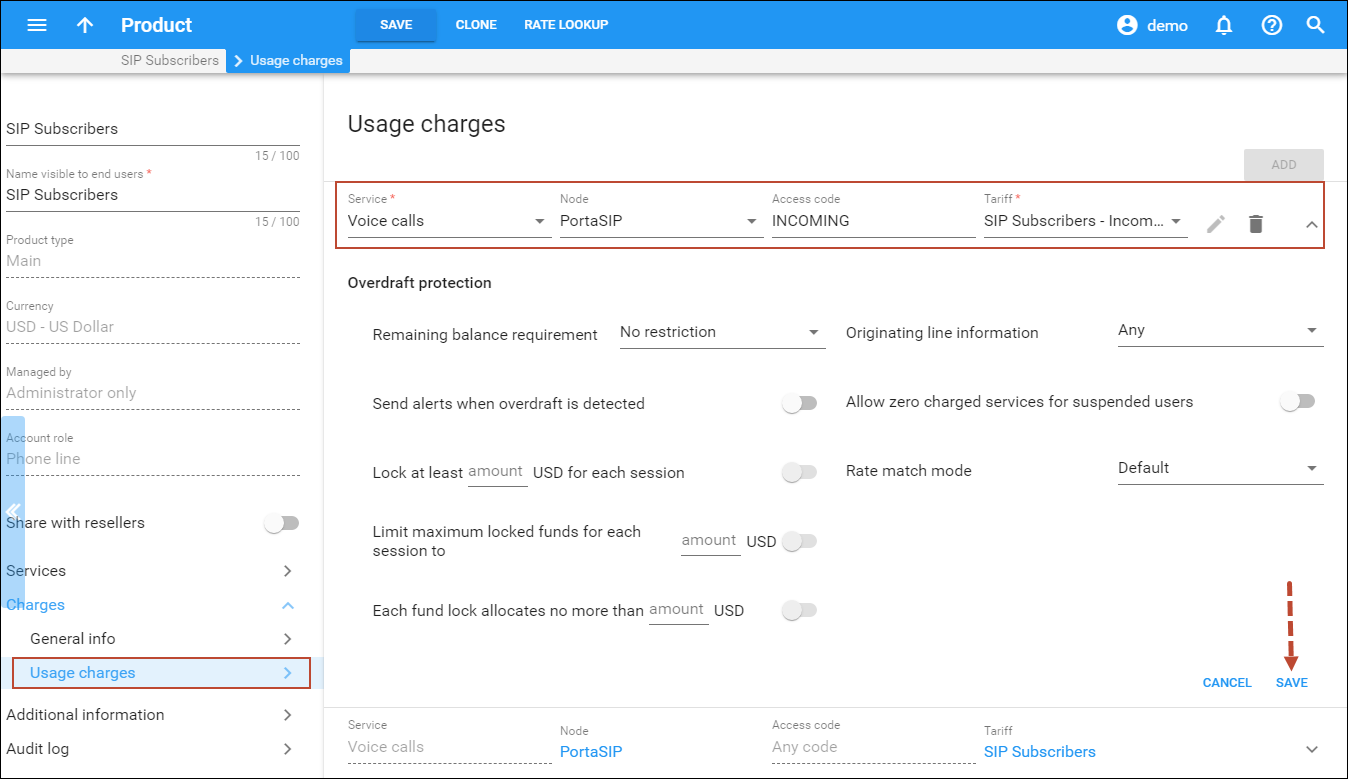
- Service – select Voice Calls.
- Node – select the PortaSIP node.
- Access code – type in INCOMING here.
- Tariff – choose the tariff that will be used to calculate the charges for incoming calls.
- Overdraft protection – to configure overdraft protection for this product, consult the Configure Overdraft Protection Section within the Product section in the Overdraft Protection Configuration handbook.
- Click Save.
9. Create accounts
Check that the retail SIP service customer is already created according to the instructions in the Basic Residential VoIP Service handbook. Create a new account for this customer, with the account ID identical to the SIP phone number (DID):
- On your customer’s panel, click Accounts.
- On the Create an account panel, specify the account’s details:
- ID – click the
 button to select a DID number from the available DID numbers list:
- When the Define the search filters dialogue window opens, specify whether to search through DIDs available in DID pool or among the DIDs assigned to this customer. Also, you can specify the geographical location and DID number pattern (e.g., specify 44 to search for DIDs with the prefix 44). Click the Next button.
- On the Choose number panel that opens, you will see a list of available DID numbers that matches your search query and the charges associated with them. The charges for DIDs from the DID pool are pre-populated from the customer’s pricing batch. Select a DID number and click the Assign button.


- Account role – the defined usage for accounts. Select Phone line from the list.
- Product – choose the main product, which you would like your account to have.
- Activation date – choose the date from which the account is usable. By default the account is activated immediately upon creation.
- Service password – together with the account ID, this password will be used to authenticate registrations and call attempts on the SIP server. It is very important to assign a secure (difficult to guess) password to prevent the account from being wrongfully entered and used to inject fraudulent calls to your network
- Type – select Credit to be used for the postpaid services.
- Balance control – define the way the balance of the account is controlled. Select Subordinate in this field.
- Subordinate – the balance will directly depend on the customer’s balance (only the customer tops up the balance);
- Individual credit limit – this account may have its own balance and credit limit (the customer credit limit still applies.)
- ID – click the
- Click Save.

General info
- On your account’s panel, click Personal info, then click General info.
- On the General info panel, fill in the account owner’s email address in the Email field. If the account owner ever forgets the password for the web self-care pages, they will be able to reset it, and a new password will be sent to this email address.
Web self-care
- On your account’s panel, click Personal info, click General info, then click Web self-care.
- On the Web self-care panel specify the following information:
- Login – account login to web self-care pages. Can be the same as account ID.
- Password – password for the web self-care pages.
- Access level – select Account self-care.
- Time zone – the time zone for the account self-care interface.
- Web Interface language – the language to be used on the account self-care web interface.
Additional info
- On your account’s panel, click Personal info, and click General info.
- On the General info panel, click Additional info, then click Auto-provisioning. On this panel you can assign a device to an account for automatic provisioning. Leave this option disabled for now.
Life cycle
- On your account’s panel, click Personal info, click General info, then click Life cycle.
- On the Life cycle panel, fill in the account information:
- Use an expiration date – this identifies the date when the account expires. Since we are setting up a postpaid service, which should function for a long time, leave this option disabled.
- Availability period after first usage, days – this defines the number of days the account remains active after its first use or recharge. Since we are setting up a postpaid service, which should function for a long time, leave this field blank.
- Availability period after last usage, days – this defines the number of days the account remains active after its last use or recharge. Since we are setting up a postpaid service, which should function for a long time, leave this field blank.
Service configuration
- On your account’s panel, click Services.
On this panel, you can activate/deactivate various features of the services provided to this account.
Please consult the PortaBilling Help for a description of parameters available here. For now you may leave these with their default values.
- Click Save.
When accounts with DID numbers are created, the DIDs are added to a customer’s pricing batch.
10. Testing
Program the parameters (phone #, password and SIP server address) into the SIP phone and make a test call.


 Back to main menu