

This handbook explains how to configure wholesale traffic exchange between virtual environments within a PortaSwitch installation.
Service providers often host smaller operators on their PortaSwitch platform. The host provider owns the infrastructure and wholesale vendor contracts, while the hosted operator manages their own customers and services in an isolated tenant environment.
GlobalNet is a service provider that owns a PortaSwitch installation and offers wholesale and retail call termination services.
SmartCom is a new GlobalNet customer planning to offer VoIP services too. GlobalNet and SmartCom sign a contract under which SmartCom operates its own virtual environment on the GlobalNet PortaSwitch system. Traffic between the two companies is handled as follows:
- When SmartCom customers make an off-net call, it is routed to the GlobalNet wholesale environment, where it’s terminated via GlobalNet vendors. GlobalNet charges SmartCom for call termination according to agreed rates.
- When GlobalNet customers make a call to SmartCom’s DID number, it is routed to the SmartCom environment, where it is delivered to the SmartCom customer. SmartCom charges GlobalNet for call termination according to agreed rates.
Because traffic flows in both directions, each party may act as either a customer or a vendor, depending on the call direction. The parties typically offset mutual charges and settle only the remaining balance instead of paying the full amounts.
Technically, according to the contract:
- SmartCom operates as a tenant in its own environment to manage services, customers, DID inventory, etc.
- Outgoing calls from SmartCom customers are routed to the GlobalNet wholesale environment.
- Incoming calls to SmartCom customers are first received by the GlobalNet wholesale environment and then delivered to the SmartCom tenant environment.
- SmartCom does not configure vendors directly; GlobalNet configures the required routing in the tenant environment.
Prerequisites
Before setting up traffic exchange between virtual environments, the GlobalNet admin must ensure the following:
- Users with an admin role are created in the SmartCom tenant environment. These users have limited permissions with no access to other virtual environments and to vendor configuration.
- The initial PortaBilling configuration is completed in the SmartCom tenant environment.
- The GlobalNet wholesale environment (including routing plans) is set up for the wholesale traffic exchange.
Preparation
Before proceeding with the configuration, make sure you have the following information:
- The list of rate codes that cover the SmartCom DID pool.
- The rate sheet that defines GlobalNet termination costs for the traffic sent to SmartCom.
- The rate sheet that defines SmartCom termination costs for the traffic sent to GlobalNet.
- IP address of the SIP cluster in the GlobalNet wholesale environment (70.68.127.185).
- IP address of the PortaSIP cluster in the SmartCom environment (193.168.0.138).
- SmartCom requirements for outgoing traffic routing, if any (routing plan).
Configuration overview
- Wholesale environment setup
- Tenant environment setup
Wholesale environment setup
This section describes how to configure call termination to and from the SmartCom tenant environment via the GlobalNet wholesale environment.
1. Configure a product for the tenant
To provide voice call services to customers, create a product that includes a customer tariff with defined call rates.
1.1 Create a customer tariff
This tariff defines the rates for terminating outgoing traffic from SmartCom to external vendors.
- Navigate to Service catalog > Tariffs.
- Click + Tariff and fill in the tariff details:
- Name – type in a short name for the customer tariff; this name will be shown within the system, e.g., “SmartCom outgoing traffic”.
- Currency – select the currency in which the customer will be charged.
- Service – select Voice calls.
- Applied to – select Customer.
- Managed by – select Administrator only.
- Define prices – select Per individual rate code.

- Click Save&Edit.
- Open the
Rates
panel in the “SmartCom outgoing traffic”.
You need a rate code to add a rate. Make sure that the necessary rate codes have been added to the system. See more details on how to create rate codes in the Initial configuration of PortaBilling handbook.
You can add rates one by one or upload them from a file. To download the file sample with all the required columns, click Rate download on the toolbar, then open the notifications tab and download. To add a rate manually, click + Add and fill in the rate details:
- Rate code – type in a specific rate code directly or select it from the list.
- Effective from – specify when the rate becomes effective. By default, this parameter is set to “immediately”. If you want this rate to take effect in the future, select “Specific time” and type in the date manually, or select it from the calendar.
- First interval, seconds – specify the first rounding interval in seconds (default is 1 second). This interval defines the minimum duration of the call that is going to be billed. For instance, if the first interval is set to 30 seconds, a call lasting between 1 and 30 seconds will be billed as a 30-second call.
- First price – specify the per-minute price for the first interval.
- Next interval, seconds – specify the next rounding interval in seconds (default is 1 second). This determines how the call duration beyond the initial interval is billed. For example, if the next interval is set to 1 second, any duration beyond the initial interval will be billed in 1-second increments. If you set the first interval to 30 seconds and the next interval to 1 second, and the call lasts for 36 seconds, the customer will be charged for 36 seconds.
- Next price – specify the per-minute price for the next interval.

1.2 Create a product
Create a product that will be assigned to the SmartCom account at step 2.4:
- Navigate to Service catalog > Products.
- Click + Add and fill in the product details:
- Name – type in a short name for the product; this name will be used within the system, e.g., “SmartCom wholesale traffic”.
- Name visible to end users – leave the suggested name as is.
- Product type – select Main product here.
- Currency – select the currency that the product will be priced in.
- Managed by – select Administrator only here, since we are setting up a service without the involvement of resellers.
- Account default ACL – leave the default Account self-care ACL.
- Account role – select IPv4 address.

- Click Save.
- Go to Product > Services and click Add a service to select services included in the product. To provide a voice call service, include the Voice calls.

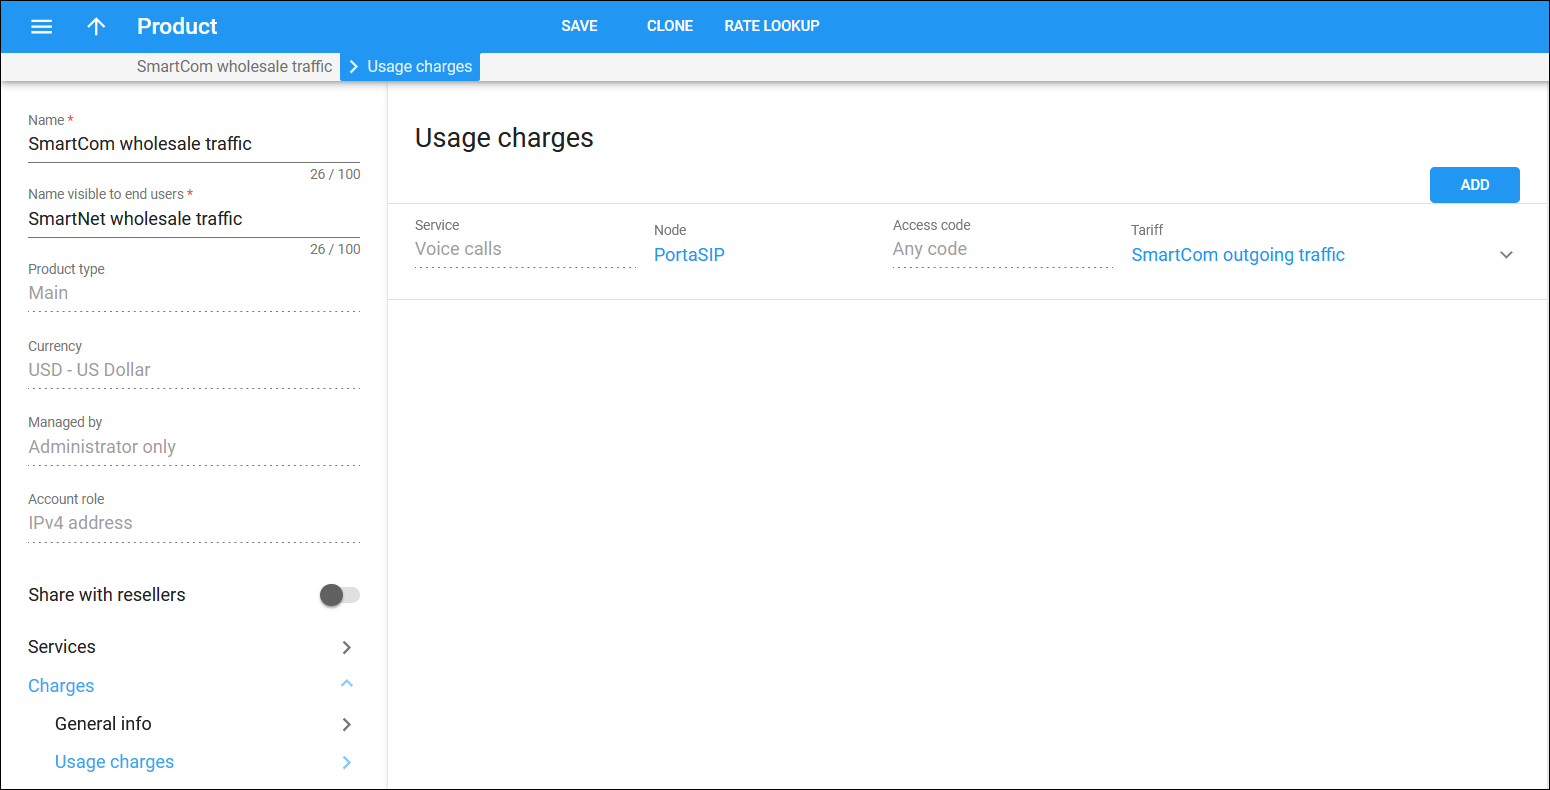
- Once you save the product details, you need to configure usage charges. On the product’s panel, click Charges, then click Usage charges.
- Click Add and fill in the required information:
- Service – select Voice calls.
- Node – select PortaSIP configured during the initial configuration.
- Access code – leave this field empty.
- Tariff – select the “SmartCom outgoing traffic” tariff, created at step 1.1.
- Overdraft protection – turn on the feature. To configure overdraft protection for this product, consult the Overdraft protection configuration handbook. In short, overdraft protection locks a certain amount of resources for each session. This enables the simultaneous consumption of the same quota across different sessions on various devices.
2. Create customer and account
2.1 Create invoice template
The SmartCom customer can have invoicing enabled to reflect charges for traffic terminated to GlobalNet.
To enable invoice generation, you must first create a template for the invoice layout.
- Navigate to My company > Templates.
- Click + Template and fill in the template details:
- Name – type a name for the template object; this will be used on the web interface, e.g., Wholesale.
- Type – select Invoice.
- Managed by – select Administrator only.
- Invoice template – define how the template is designed, e.g., Design the layout in the built-in visual editor.

- Click Save.
2.2 Create customer class
This customer class defines the invoice parameters applied to the SmartCom customer. The invoice summarizes all transactions for a given period (calls, payments, refunds, and others) and serves as the primary record of provided services and their current status.
- From the Sales section of the main menu, select Customer Classes.
- Click + Add and fill in the Create a customer class form:
- Name – provide a short name for this customer class, e.g., Wholesale termination.
- Business model – select SIP Trunking from the list.
- Currency – select the currency you want to set the Collection threshold to. When specified, this customer class can only be assigned to customers using the same currency. Once the selection is saved, it cannot be changed.
- Managed by – select Administrator only from the list.
- "From" in customer notifications – leave this option disabled. By default, customers in this customer class will receive notifications like “Invoice is overdue” or “Credit card expired” from the company’s email address specified in the Address information > Legal info panel.

- Click Save&Edit.
- On the Edit customer class panel, select Finances and click General info.
- On the General info panel, configure the following:
- Close the billing period – leave the default value. You can change the global delay for closing the billing period on the Configuration server web interface.
- Periodic xDR export:
- Export xDRs to a .csv file – leave enabled.
- Send the generated .csv files via email – choose how statistics are provided to the customer.
- Status change – for now, you may leave these options disabled. If you change this later, the changes automatically affect all customers who are already assigned to this customer class.

- From the Finances section, select Invoicing.
- From the Invoicing panel, select Regular invoices.
- Invoice template – select the “Wholesale” template, created at step 2.1.
- Generate invoice pdf – leave At the end of the billing period.
- Configure payment terms, payment collection parameters, and actions if an invoice is overdue.

- From the Finances section, select Taxation.
- On the Taxation panel, select the taxation method and specify the taxation parameters for the selected taxation method. For inclusive taxation (Tax included in the rate), select which taxes will be calculated.
- Click Save.
2.3 Create a customer
A customer represents a company using the services. Add SmartCom as a customer to handle outgoing calls from SmartCom clients. This customer’s balance reflects all charges that SmartCom pays for sending traffic to GlobalNet for termination.
To create a customer, perform the following steps:
- On the navigation menu, select Sales, then select Customers.
- On the Customer panel, click + Customer and fill in the customer details:
- Name – type a short name for the customer object; this will be used on the web interface, e.g., “SmartCom”.
- Balance control – select Postpaid in this field.
- Currency – select the currency for this customer.
- Credit limit – assign a credit limit for the customer.
- Business model – a business model defines what type of service must be provided to the customer. Select SIP trunking for this customer.
- Customer class – select the “Wholesale termination” customer class, created at step 2.2.
- Billing period – choose a billing period for the customer.
- Billing period time zone – choose a time zone in which the customer’s billing period will be closed.

- Click Save.
2.4 Create an account
An account authorizes the endpoint from which calls are sent from SmartCom for further termination. Two authorization methods are supported:
- SIP digest authentication – the most secure and robust method.
- IP-based authentication – authorization by the remote gateway or proxy IP address.
This handbook assumes IP-based authentication. In this case, the account ID must match the signaling IP address of the PortaSIP cluster in the tenant environment.
If the gateway supports SIP digest authentication, the account ID can be either an alphanumeric string or the gateway’s IP address.
- On the customer’s panel, click Accounts / DIDs.
- On the Accounts tab, click + Account, and on the General tab specify the account’s details:
- Type – select Credit.
- Account role – select IPv4 address.
- ID – specify the IP address of the PortaSIP cluster in SmartCom environment, e.g., 193.168.0.138.
- Extension number – leave this field empty.
- Balance control – select Subordinate from the list.
- Activation date – the date from which the account becomes usable.

- Go to the Products tab and select the “SmartCom wholesale traffic” product, created at step 1.2.

- Click Save.
2.5 Assign the routing plan to the account
A routing plan defines how calls are routed for specific customers. It lets GlobalNet restrict access to certain vendors or allow only selected vendors in a defined order.
Routing plans are assumed to be already configured in the GlobalNet wholesale environment. If SmartCom requires a specific routing setup, assign the appropriate routing plan to the account. If no custom routing plan is assigned, the system uses least-cost routing, which allows access to all available carriers.

3. Configure the tenant as a vendor
To deliver incoming traffic to numbers hosted by SmartCom, configure SmartCom as a vendor.
3.1 Create a vendor tariff
This tariff includes rates for terminating incoming traffic to SmartCom. PortaBilling uses these rates to calculate GlobalNet call costs for reconciliation.
- Log in to the GlobalNet wholesale environment.
- Navigate to Service catalog > Tariffs.
- Click + Tariff and fill in the tariff details:
- Name – specify a descriptive name for the tariff, e.g., “SmartCom wholesale termination”, which will be used within the system.
- Currency
– select the currency in which SmartCom charges GlobalNet.
Once the currency has been selected, it cannot be changed later.
- Service – select Voice calls.
- Applied to – choose Vendor, as this tariff describes the termination costs.
- Routing – turn on this toggle to enable the routing.
- Define prices – select Per individual rate code.

- Click Save&Edit.
- Open the Rates panel in the “SmartCom wholesale termination”.
You need a rate code to add a rate. Make sure that the necessary rate codes have been added to the system. See more details on how to create rate codes in the Initial configuration of PortaBilling handbook.
You can add rates one by one or upload them from a file. To download the file sample with all the required columns, click Rate download on the toolbar, then open the notifications tab and download. To add a rate manually, click + Add and fill in the rate details:
- Rate code – type in a specific rate code directly or select it from the list.
- Rating mode – select Flat rate.
- Effective from – specify when the rate becomes effective. By default, this parameter is set to “immediately”. If you want this rate to take effect in the future, select “Specific time” and type in the date manually, or select it from the calendar.
- First interval, seconds – specify the first rounding interval in seconds (default is 1 second). This interval defines the minimum duration of the call that is going to be billed. For instance, if the first interval is set to 30 seconds, a call lasting between 1 and 30 seconds will be billed as a 30-second call.
- First price – specify the per-minute price for the first interval.
- Next interval, seconds – specify the next rounding interval in seconds (default is 1 second). This determines how the call duration beyond the initial interval is billed. For example, if the next interval is set to 1 second, any duration beyond the initial interval will be billed in 1-second increments. If you set the first interval to 30 seconds and the next interval to 1 second, and the call lasts for 36 seconds, the customer will be charged for 36 seconds.
- Next price – specify the per-minute price for the next interval.
- Route category – choose the required route category or leave this field empty if no routing plan is applied to the customer’s account.
- Preference – this is the routing priority for the specific rate code, in which 10 is the highest priority, and 0 is the lowest (i.e., does not use a destination for routing at all). Leave the default value (5).

3.2 Create a vendor
- Navigate to Infrastructure > Vendors.
- Click + Add and fill in the vendor details:
- Name – specify a descriptive name for the vendor (e.g., “SmartCom”).
- Currency – select the currency in which SmartCom charges GlobalNet.
- Opening balance – this option is usually used when you migrate a vendor from a legacy system to PortaSwitch. Leave it as “0” here.
- Billing period – choose a billing period for the vendor. A billing period defines how often SmartCom bills GlobalNet, e.g., monthly.

- Click Save.
3.3 Define a vendor connection
The connection defines how calls leave the GlobalNet wholesale environment and are routed to the tenant environment.
To create a connection, perform the following steps:
- Open Vendor > Connections.
- Click + Add and fill in the connection details:
- Description – type in a short description for this connection, e.g., “Voice calls”.
- Service type – select Voice calls.
- Type of connections – select SIP.
- Direction – select To vendor.
- Tariff – select the “SmartCom wholesale termination” vendor tariff, created at step 1.1.
- Active – leave this toggle enabled.
- Internal – leave this toggle disabled.
- Identify gateway by – choose IP.
- Remote IP – specify the IP address of the SIP cluster in the tenant environment, e.g., 193.168.0.138. If needed, also specify the port and protocol, e.g., 5060/UDP.
- Capacity – specify the maximum number of simultaneous calls the connection can support, e.g., 500.
- Tech prefix – leave this field empty.

- Click Save.
3.4 Offset vendor balance with the customer
Since SmartCom is configured as both the vendor and the customer, exclude the SmartCom vendor from the routing list for calls sent from the SmartCom customer to prevent a call termination loop.
- For this, open SmartCom vendor settings, navigate to General configuration.
- For the Offset balance with customer option, select SmartCom customer from the list.
- In the Minimum amount to offset field, specify the threshold for automatic balance offset. When both the vendor and the associated customer balances reach this threshold, PortaBilling offsets the smaller of the two balances and decreases both balances by that amount. PortaBilling also creates xDR records for the vendor and the customer for this transaction.

- Click Save in the toolbar.
Tenant environment setup
This section of the handbook covers the setup of the environment owned by SmartCom. The configuration is performed by the GlobalNet admin.
1. Initial configuration of PortaBilling
If the GlobalNet admin has already created a new dedicated billing environment for this setup, make sure the SmartCom environment is fully prepared for configuration. To do this, the SmartCom admin must complete the initial PortaBilling configuration.
2. Configure a product
To provide voice call services to customers, create a product that includes a customer tariff with defined call rates.
2.1 Create a customer tariff
This tariff includes rates for terminating incoming traffic to SmartCom.
- Log in to the SmartCom tenant environment.
- Navigate to Service catalog > Tariffs.
- Click + Tariff and fill in the tariff details:
- Name – type in a short name for the customer tariff; this name will be shown within the system, e.g., “GlobalNet incoming traffic”.
- Currency – select the currency in which this customer will be charged.
- Service – select Voice calls.
- Applied to – select Customer.
- Managed by – select Administrator only.
- Define prices – select Per individual rate code.

- Click Save&Edit.
- Open the
Rates
panel in the “GlobalNet incoming traffic”.
You need a rate code to add a rate. Make sure that the necessary rate codes have been added to the system. See more details on how to create rate codes in the Initial configuration of PortaBilling handbook.
You can add rates one by one or upload them from a file. To download the file sample with all the required columns, click Rate download on the toolbar, then open the notifications tab and download. To add a rate manually, click + Add and fill in the rate details:
- Rate code – type in a specific rate code directly or select it from the list.
- Effective from – specify when the rate becomes effective. By default, this parameter is set to “immediately”. If you want this rate to take effect in the future, select “Specific time” and type in the date manually, or select it from the calendar.
- First interval, seconds – specify the first rounding interval in seconds (default is 1 second). This interval defines the minimum duration of the call that is going to be billed. For instance, if the first interval is set to 30 seconds, a call lasting between 1 and 30 seconds will be billed as a 30-second call.
- First price – specify the per-minute price for the first interval.
- Next interval, seconds – specify the next rounding interval in seconds (default is 1 second). This determines how the call duration beyond the initial interval is billed. For example, if the next interval is set to 1 second, any duration beyond the initial interval will be billed in 1-second increments. If you set the first interval to 30 seconds and the next interval to 1 second, and the call lasts for 36 seconds, the customer will be charged for 36 seconds.
- Next price – specify the per-minute price for the next interval.

2.2 Create a product
Create a product that will be assigned to the GlobalNet account at step 3.4 for sending incoming traffic to SmartCom:
- Navigate to Service catalog > Products.
- Click + Add and fill in the product details:
- Name – type in a short name for the product; this name will be used within the system, e.g., “GlobalNet incoming traffic”.
- Name visible to end users – leave the suggested name as is.
- Product type – select Main product here.
- Currency – select the currency that the product will be priced in.
- Managed by – select Administrator only here, since we are setting up a service without the involvement of resellers.
- Account default ACL – leave the default Account self-care ACL.
- Account role – select IPv4 address.

- Click Save.
- Go to Product > Services and click Add a service to select services included in the product. To provide a voice call service, include the Voice calls.

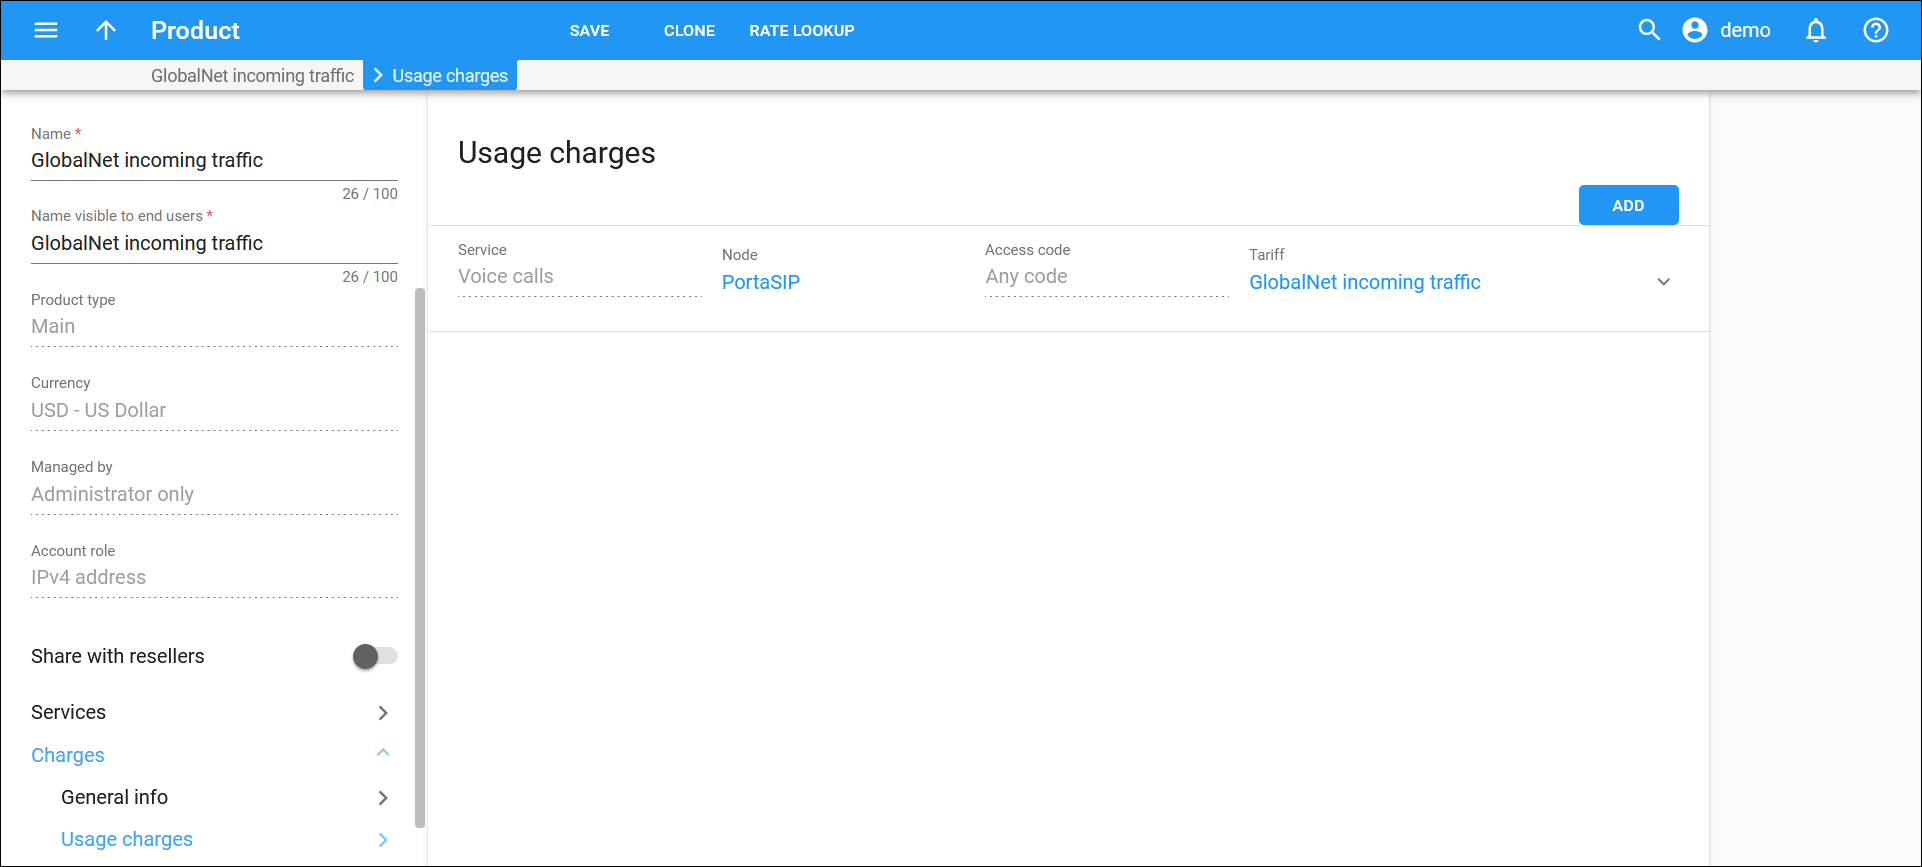
- Once you save the product details, you need to configure usage charges. On the product’s panel, click Charges, then click Usage charges.
- Click Add and fill in the required information:
- Service – select Voice calls.
- Node – select PortaSIP created during the initial configuration.
- Access code – leave this field empty.
- Tariff – select the “GlobalNet incoming traffic” tariff, created at step 2.1.
- Overdraft protection – turn on this feature. To configure overdraft protection for this product, consult the Overdraft protection configuration handbook. In short, overdraft protection locks a certain amount of resources for each session. This enables the simultaneous consumption of the same quota across different sessions on various devices.
3. Create customer and account
3.1 Create invoice template
The GlobalNet customer can have invoicing enabled to reflect charges for traffic delivered to SmartCom customers.
To enable invoice generation, you must first create a template for the invoice layout.
- Navigate to My company > Templates.
- Click + Template and fill in the template details:
- Name – type a name for the template object; this will be used on the web interface, e.g., Wholesale customers.
- Type – select Invoice.
- Managed by – select Administrator only.
- Invoice template – define how the template is designed, e.g., Design the layout in the built-in visual editor.

- Click Save.
3.2 Create customer class
This customer class defines the invoice parameters applied to the GlobalNet customer. The invoice summarizes call charges and all transactions for a given period (payments, refunds, and others) and serves as the primary record of provided services and their current status.
- From the Sales section of the main menu, select Customer Classes.
- Click + Add and fill in the Create a customer class form:
- Name – provide a short name for this customer class, e.g., Wholesale termination.
- Business model – select SIP Trunking from the list.
- Currency – select the currency you want to set the Collection threshold to. When specified, this customer class can only be assigned to customers using the same currency. Once the selection is saved, it cannot be changed.
- Managed by – select Administrator only from the list.
- "From" in customer notifications – leave this option disabled. By default, customers in this customer class will receive notifications like “Invoice is overdue” or “Credit card expired” from the company’s email address specified in the Address information > Legal info panel.

- Click Save.
- On the Edit customer class panel, select Finances and click General info.
- On the General info panel, configure the following:
- Close the billing period – leave the default value. You can change the global delay for closing the billing period on the Configuration server web interface.
- Periodic xDR export:
- Export xDRs to a .csv file – leave enabled.
- Send the generated .csv files via email – choose how statistics are provided to customers.
- Status change – for now, you may leave these options disabled. If you change this later, the changes automatically affect all customers who are already assigned to this customer class.

- From the Finances section, select Invoicing.
- From the Invoicing panel, select Regular invoices.
- Invoice template – select the “Wholesale customers” template, created at step 3.1.
- Generate invoice pdf – leave At the end of the billing period.
- Configure payment terms, payment collection parameters, and actions if an invoice is overdue.

- From the Finances section, select Taxation.
- On the Taxation panel, select the taxation method and specify the taxation parameters for the selected taxation method. For inclusive taxation (Tax included in the rate), select which taxes will be calculated.
- Click Save.
3.3 Create a customer
A customer represents a company using the services. In the tenant environment, you need to add GlobalNet as a customer to handle incoming calls to SmartCom. This customer’s balance reflects all charges for delivering traffic to SmartCom clients.
To create a customer, perform the following steps:
- On the navigation menu, select Sales, then select Customers.
- On the Customer panel, click + Customer and fill in the customer details:
- Name – type a short name for the customer; this will be used on the web interface, e.g., “GlobalNet incoming traffic”.
- Balance control – select Postpaid in this field.
- Currency – select the currency for this customer.
- Credit limit – assign a credit limit for the customer.
- Business model – a business model defines what type of service must be provided to the customer. Select SIP trunking for this customer.
- Customer class – select the “Wholesale termination” customer class, created at step 3.2.
- Billing period – choose a billing period for the customer.
- Billing period time zone – choose a time zone in which the customer’s billing period will be closed.

- Click Save.
3.4 Create an account
An account authorizes the endpoint from which calls are sent to SmartCom. Two authorization methods are supported:
- SIP digest authentication – the most secure and robust method.
- IP-based authentication – authorization by the remote gateway or proxy IP address.
This handbook assumes IP-based authentication. In this case, the account ID must match the signaling IP address of the PortaSIP cluster in GlobalNet wholesale environment.
If the gateway supports SIP digest authentication, the account ID can be either an alphanumeric string or the gateway’s IP address.
To create an account, perform the following steps:
- On the customer’s panel, click Accounts / DIDs.
- On the Accounts tab, click + Account, and on the General tab specify the account’s details:
- Type – select Credit.
- Account role – select IPv4 address.
- ID – specify the IP address of the PortaSIP cluster in GlobalNet wholesale environment, e.g., 70.68.127.185.
- Extension number – leave this field empty.
- Balance control – select Subordinate from the list.
- Activation date – the date from which the account becomes usable.

- Go to the Products tab and select the “GlobalNet incoming traffic” product, created at step 2.2.

- Click Save.
4. Configure a vendor
In this setup, GlobalNet acts as the termination provider for SmartCom. Add GlobalNet as a vendor to terminate outgoing calls from SmartCom and set the negotiated wholesale per-minute rates in the vendor tariff. PortaBilling uses these rates to calculate call costs for reconciliation.
4.1 Create a vendor tariff
The tariff is a price list for SmartCom termination costs.
- Navigate to Service catalog > Tariffs.
- Click + Tariff and fill in the tariff details:
- Name – specify a descriptive name for the tariff, e.g., “GlobalNet wholesale termination”, which will be used within the system.
- Currency
– select the currency in which GlobalNet charges SmartCom.
Once the currency has been selected, it cannot be changed later.
- Service – select Voice calls.
- Applied to – choose Vendor, as this tariff describes the termination costs.
- Routing – turn on this toggle to enable the routing.
- Define prices – select Per individual rate code.

- Click Save&Edit.
- Open the
Rates
panel in the “GlobalNet wholesale termination”.
You need a rate code to add a rate. Make sure that the necessary rate codes have been added to the system. See more details on how to create rate codes in the Initial configuration of PortaBilling handbook.
You can add rates one by one or upload them from a file. To download the file sample with all the required columns, click Rate download on the toolbar, then open the notifications tab and download. To add a rate manually, click + Add and fill in the rate details:
- Rate code – type in a specific rate code directly or select it from the list.
- Rating mode – select Flat rate.
- Effective from – specify when the rate becomes effective. By default, this parameter is set to “immediately”. If you want this rate to take effect in the future, select “Specific time” and type in the date manually, or select it from the calendar.
- First interval, seconds – specify the first rounding interval in seconds (default is 1 second). This interval defines the minimum duration of the call that is going to be billed. For instance, if the first interval is set to 30 seconds, a call lasting between 1 and 30 seconds will be billed as a 30-second call.
- First price – specify the per-minute price for the first interval.
- Next interval, seconds – specify the next rounding interval in seconds (default is 1 second). This determines how the call duration beyond the initial interval is billed. For example, if the next interval is set to 1 second, any duration beyond the initial interval will be billed in 1-second increments. If you set the first interval to 30 seconds and the next interval to 1 second, and the call lasts for 36 seconds, the customer will be charged for 36 seconds.
- Next price – specify the per-minute price for the next interval.
- Route category – leave this field empty.
- Preference – this is the routing priority for the specific rate code, in which 10 is the highest priority, and 0 is the lowest (i.e., does not use a destination for routing at all). Leave the default value (5).

4.2 Create a vendor
- Navigate to Infrastructure > Vendors.
- Click + Add and fill in the vendor details:
- Name – specify a descriptive name for the vendor (e.g., “GlobalNet wholesale vendor”).
- Currency – select the currency in which GlobalNet charges SmartCom.
- Opening balance – this option is usually used when you migrate a vendor from a legacy system to PortaSwitch. Leave “0” here.
- Billing period – choose a billing period for the vendor. A billing period defines how often GlobalNet will bill SmartCom, e.g., monthly.

- Click Save.
4.3 Define a vendor connection
The connection defines how calls leave the SmartCom environment and are routed to the GlobalNet wholesale environment for further termination to external vendors.
- Open Vendor > Connections.
- Click + Add and fill in the connection details:
- Description – type in a short description for this connection, e.g., “Voice calls”.
- Service type – select Voice calls.
- Type of connections – select SIP.
- Direction – select To vendor.
- Tariff – select the “GlobalNet wholesale termination” vendor tariff, created at step 4.1.
- Active – leave this toggle enabled.
- Internal – leave this toggle disabled.
- Identify gateway by – choose IP.
- Remote IP – specify the IP address of the SIP cluster in the wholesale environment, e.g., 70.68.127.185. If needed, also specify the port and protocol, e.g., 5060/UDP.
- Capacity – specify the maximum number of simultaneous calls the connection can support, e.g., 500.
- Tech prefix – leave this field empty.

- Click Save.
4.4 Offset vendor balance with the customer
Since GlobalNet is configured as both a vendor and a customer, exclude the GlobalNet vendor from the routing list for calls sent from the GlobalNet customer to prevent a call termination loop.
- For this, on the vendor’s panel, navigate to General configuration.
- For the Offset balance with customer option, select GlobalNet incoming traffic customer from the list.
- In the Minimum amount to offset field, specify the threshold for automatic balance offset. When both the vendor and the associated customer balances reach this threshold, PortaBilling offsets the smaller of the two balances and decreases both balances by that amount. PortaBilling also creates xDR records for the vendor and the customer for this transaction.

- Click Save in the toolbar.


