



Typical business case
Similarly to wholesale voice traffic termination, you can configure PortaSwitch to serve as an intermediate SMS aggregator: it will collect SMS traffic from your customers and deliver it to large SMS aggregators via the SMPP protocol. As the service provider and PortaSwitch owner, you earn a profit from the difference between:
- The price you charge your customers for passing the SMS traffic received from them to SMS aggregators, and
- The price you pay SMS aggregators for the SMS traffic transmission.
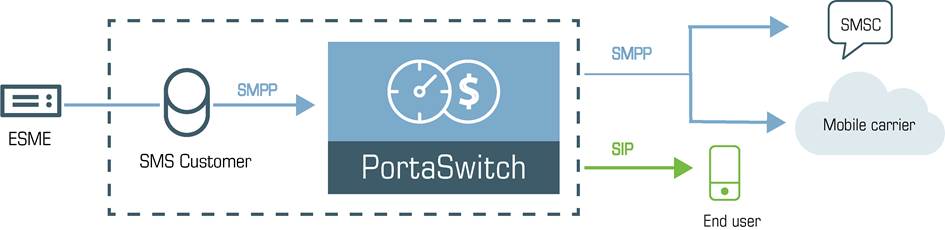
Most SMS aggregators operate with destinations in the E.212 format. This format defines a destination as a combination of the mobile country code (MCC) and the mobile network code (MNC), such as 310-410 and 310-260 for the US.
To determine whether destination numbers have been ported and to ensure that SMS messages are routed to the correct network and charged at the correct rate, enable number portability lookup.
Scenario
Customer SmartNet sends bulk SMS traffic to your network from their gateway via the SMPP protocol. You authorize SmartNet to use the IP address and re-send their SMS traffic to the SMS aggregator (e.g., http://www.lleida.net) for further delivery to subscribers.
SmartNet requires PortaSwitch to establish a binding connection with their gateway. Therefore, SmartNet is configured both as a vendor (for PortaSwitch to bind to their system as a transceiver) and as a customer, since SmartNet is charged for sending SMS traffic.
Preparation
Before proceeding with the configuration, register an account with www.hlr-lookups.com.
To configure HLR lookup, obtain the following information beforehand:
- The login and password of your HLR lookup account.
- The HLR Route name from the list of routing options. By default, the IP1 route is used.
- The HLR Storage name, if you have a dedicated storage for the lookup results configured on www.hlr-lookups.com.
Configuration overview
- Initial configuration of PortaBilling
- Enable the messaging service on the Configuration server
- Configure HLR lookup
- Enter rate codes in the E.212 format
- Create a domain service policy
- Create a service policy for a vendor connection
- Create a vendor tariff
- Create vendors
- Create a customer tariff
- Enter rates to the customer tariff
- Create a product
- Create invoice template
- Create a customer class
- Create a customer
- Create accounts
- Test routing with SMS routing simulation (optional)
- Test the whole system
Initial configuration of PortaBilling
If you have just installed the PortaBilling software or dedicated a new billing environment to configure the services described in this handbook, make sure to first perform the initial configuration of PortaBilling. To do this, use the Initial configuration of PortaBilling handbook.
Enable the messaging service on the Configuration server
- On the Configuration server, clone the existing configuration to modify it.
- Select
BillingEngine on the Configuration Tree. Enable the Messaging
Service in the ServiceTypes group.
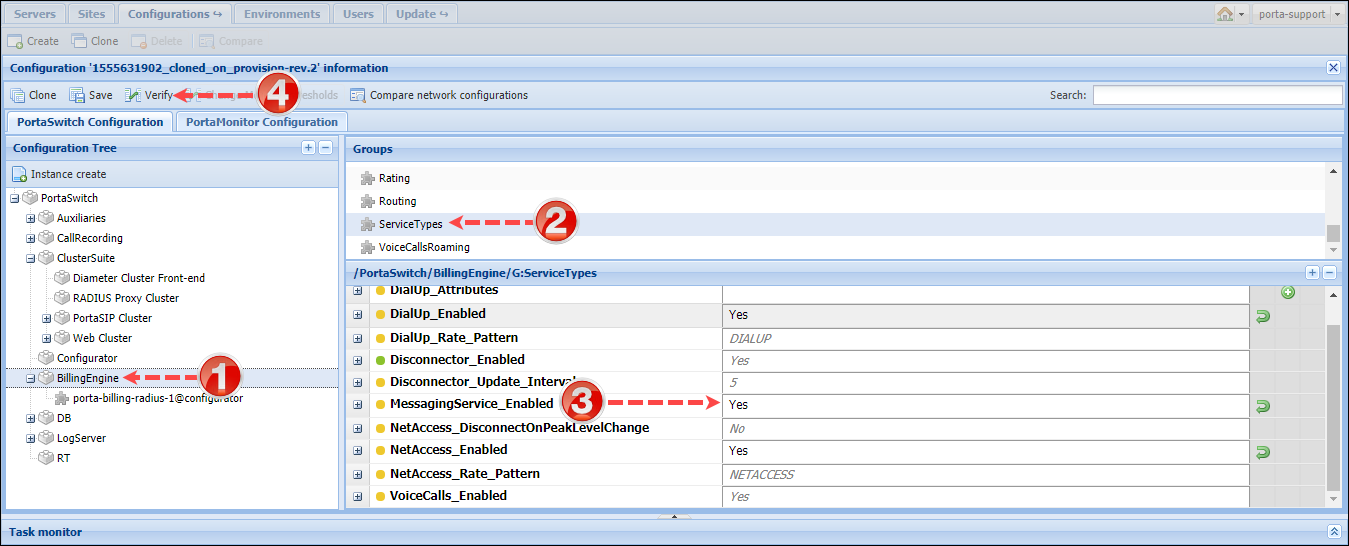
- Click
the Save button and then the
 Verify button.
 - Verify
the new configuration and click Check/Apply.
Configure HLR lookup
- On the Configuration server web interface, clone the currently active configuration to modify it.
- Set the global option NumberPortability.Enabled to Yes.

- Select a specific environment, and configure the number portability data source in the AuthoritativeSources_HLRLookupsComV1 option:
- HLRLookupsComV1_DataProvider – enter the name of your data provider, HLRLookupsCom in our example.
- HLRLookupsComV1_AuthorityDomain – leave this field empty. Optionally, you can specify an additional authoritative source identifier. This is useful if you want to set up a failover and use more than one authoritative source for the same service and destination.
- HLRLookupsComV1_Username – enter your username for http://www.hlr-lookups.com
- HLRLookupsComV1_Password – enter your password for http://www.hlr-lookups.com
- HLRLookupsComV1_Storage – enter the storage name if you configured any.
- HLRLookupsComV1_Route – enter the routing option you have chosen for HLR lookups. If you have no specific route chosen, enter IP1.
- HLRLookupsComV1_MaxCacheTTL – set the maximum cache storage duration in seconds (up to 24 hours or 86400 seconds). If the TTL for a lookup result exceeds this value, it will be overridden, limiting how long the result is stored and can be reused.
- HLRLookupsComV1_ExtraParameters – leave this field empty.

- Create rules for number portability lookup for the environment within the Rules option:
- Rules_ContextServiceType – select msg.e212.
- Rules_Prefix – optionally, you can specify a phone prefix (e.g., “1”) to apply this rule only for SMS sent to the corresponding destinations.
- Rules_AuthoritativeSource – select the source configured in step 3.

- Click Save and then
 Verify.
 - Verify the new configuration and click Check/Apply.
Enter rate codes in the E.212 format
The majority of SMS aggregators operate with rate codes that are defined in the E.212 format. This format defines rate codes as a combination of the mobile country code (MCC) and the mobile network code (MNC). Therefore, to easily operate with SMS aggregators, enter rate codes in PortaBilling in the E.212 format.
Upload rate codes in the E.212 format from a file
- On the navigation menu, go to Rate codes and click Upload on the toolbar.
- In the Upload rate codes dialog, select Default rate codes and click the arrow
 next to the E.212 rate codes format.
 - Save a set of rate codes as a .csv (comma-separated values) file.
- Open this file in Microsoft Excel or any other suitable program. Edit the data if necessary and save your changes.

- Switch back to the PortaBilling admin interface and on the Rate codes panel, click Upload again.
- In the Upload rate codes dialog, select Default rate codes.
- Select the checkbox for I have checked the default rate codes.
- Select the E.212 rate codes format checkbox and click Upload.

Manually add rate codes in the E.212 format
- On the navigation menu, go to Rate codes and click + Add to add a rate code.
- Select E.212 in the Format field.
- Fill in the rate code information. This includes the MCC and MNC codes. Start typing the code to narrow the search. The Country and Network fields will be auto-populated. You can use the Description
field to store extra information about the rate code (e.g., proper).

- Click Save.
- Repeat these steps for any additional rate codes you would like to add.
Create a domain service policy
Create a service policy that defines how PortaSIP routes and authorizes messages. Before sending a message, PortaSIP matches the recipient’s domain with the domain pattern in the service policies. The matching policy is then used to handle the message in a specific way (e.g., send it over SMPP or SIP).
- On the navigation menu, go to Service catalog > Service policies.
- Click + Policy and fill in the service policy details in the General tab:
- Service – select Messaging.
- Name – specify the name of the service policy (e.g., SMS service).
- Description – specify a short description for this service policy.
- Match policy based on – select SIP.
- Recipient domain pattern – specify a pattern according to which the service policy will be selected. Type % for the SMS service.
- Match priority – specify 5 in this field.

- Click Save & Edit.
- In the Attributes tab, go to the Processing messages over SIP/SMPP section, and specify the following attributes:
- External routing – select Enabled to send SMS traffic to off-net vendors.
- Local lookup – select Disabled.
- Outgoing AAA – select Enabled to enable outgoing message authorization and billing.
- Transport protocol – select SMPP.
- Userpart Е164 translation – select Enabled to use the dialing rules for phone number translation.

- Click Save.
Note that any service policy changes will not be applied immediately. It will take several minutes until they are propagated to PortaSIP.
Create a service policy for a vendor connection
The service policy for a vendor connection defines the specific parameters for this connection. For these parameters to apply, the service policy must be associated with the corresponding vendor connection.
- On the navigation menu, go to Service catalog > Service policies.
- Click + Policy and fill in the service policy details in the General tab:
- Service – select Messaging.
- Name – specify the name of the service policy (e.g., SMS aggregator).
- Description – provide a short text description of the service policy.

- Click Save & Edit.
- In the Attributes tab, go to the Processing messages over SIP/SMPP section and specify the following attributes:
- Bind as – select the transceiver option from the list for the option to send and receive messages.
- Transport protocol – select SMPP.
- Heartbeat interval – specify the interval (in seconds) in which ENQUIRE_LINK requests are sent to verify a connection. The zero default means no requests will be sent. Specify 30 for the SMS aggregator.

- Click Save.
In case your customer’s parameters differ, in this case, SmartNet (e.g., Heartbeat interval is 10 seconds), create a new service policy specifically for this customer.Note that any service policy changes will not be applied immediately. It will take several minutes until they are propagated to PortaSIP.
Create a vendor tariff
Vendor tariff for Lleida networks
This tariff will contain your SMS aggregator’s transmission rates.
- On the navigation menu, type Tariffs in the
 Search field.
 - Click + Tariff and fill in the tariff details:
- Name – a short name for the tariff object; this is the name you will see in the select menus (e.g., Lleida Networks).
- Currency – indicates the currency in which the SMS aggregator charges you.
The currency for the tariff may only be chosen once and cannot be changed later.
- Service – choose Messaging service here.
- Format – select the format the SMS aggregator operates with. Select E.212 from the list.
- Applied to – choose Vendor in the Applied to select menu.
- Routing – use the slider to enable this option since this tariff will be used both to calculate your costs and to route SMS messages.
- Define rates – select per individual rate code.

- Click Save.
Upload sending rates to the vendor tariff
Upload per-destination sending rates provided by your SMS aggregator from a .csv or .xsl file. As messaging services are charged per message, the rating parameters will be as follows:
- MCC/Country – destination mobile country code.
- MNC/Network – destination mobile network code.
- Unit Price – price per message (e.g., $0.01).
 You can define
route categories in the .csv file and upload the rates with the route
categories assigned to them.
You can define
route categories in the .csv file and upload the rates with the route
categories assigned to them.
Please consult the Rate import handbook for more details.
 Perform the
Create tariff and Upload sending rates
steps described above until you have created a tariff with termination
costs for each transmission partner you have.
Perform the
Create tariff and Upload sending rates
steps described above until you have created a tariff with termination
costs for each transmission partner you have.
Vendor tariff for SmartNet
SmartNet is your customer and is charged for sending SMS traffic according to the Customer tariff (which will be created later). Since PortaSwitch needs to bind to the SmartNet gateway from which it receives SMS messages, SmartNet should also be configured as a vendor with a connection. Because a vendor connection in PortaSwitch must have a tariff assigned, you need to create a “dummy” empty tariff.
- On the navigation menu, type Tariffs in the Search field.
- Click + Tariff and fill in the tariff details:
- Name – a short name for the tariff object; this is the name you will see in the select menus (e.g., SmartNet).
- Currency – indicates the currency.
The currency for the tariff may only be chosen once and cannot be changed later.
- Service – choose Messaging service here.
- Format – select the format the SMS aggregator operates with. Select E.212 from the list.
- Applied to – choose Vendor in the Applied to select menu.
- Routing – make sure this option is disabled, since this tariff will not be used for SMS message routing.
- Define rates – select per individual rate code.

- Click Save.
Create vendors
Create a vendor for Lleida networks
As your SMS transmission partner, Lleida Networks must be provisioned as a vendor in PortaBilling. To do this:
- On the navigation menu, type Vendors
in the Search field.
- Click + Add and fill in the vendor details:
- Name – type a short name for the vendor object; this will be used on the web interface (e.g., Lleida Networks).
- Currency – choose the currency in which this vendor charges you.
- Opening balance – this indicates a starting balance for the vendor; the default is zero.
- Billing period – split period for vendor statistics.

- Click Save.
When a message is sent from your network to the vendor’s gateway, the vendor performs an authorization for the message and provides you with a username and password to use for message authorization. These credentials must be stored with the “vendor authorization” info and then associated with a specific connection so that they can be used during actual message transmission.
- Create an account for digest authorization of outgoing messages.
- On your vendor’s panel (Lleida Networks), click General configuration, then click Authorization.
- On the Authorization panel, click Add and enter the credentials provided by the vendor.
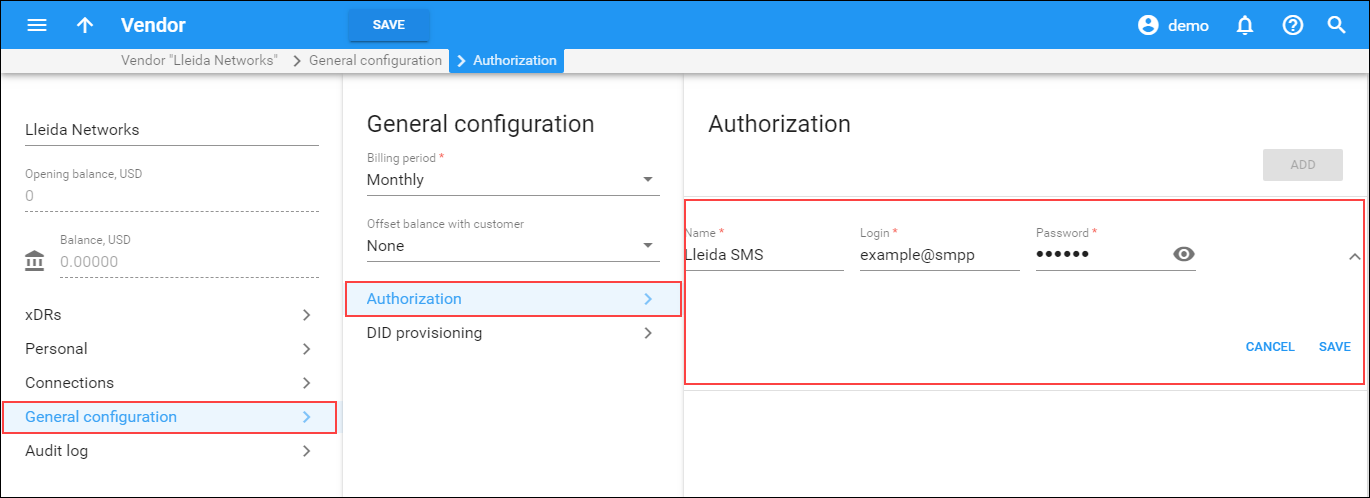
- Click Save.
Define a connection for Lleida networks
The connection is the point where SMS messages leave or enter your network and is therefore where costs are incurred.
- On your vendor’s panel (Lleida Networks), click Connections.
- On the Create connection panel, fill in the connection details:
- Description – give a short description of the connection that will be shown on the list of connections.
- Service type – select Messaging service here.
- Type of connections – select SMPP.
- Tariff – choose the tariff that defines your termination costs for this connection/vendor.
- Active – use the slider to set this connection as active.
- Gateway ID – specify the IP address or ID of the vendor’s gateway.
- Service policy – select the service policy you created for this connection (e.g., SMS aggregator).

- Click Save.
- Click General configuration panel.
- Vendor authorization – select the vendor authorization you created for this connection (e.g., Lleida SMS).
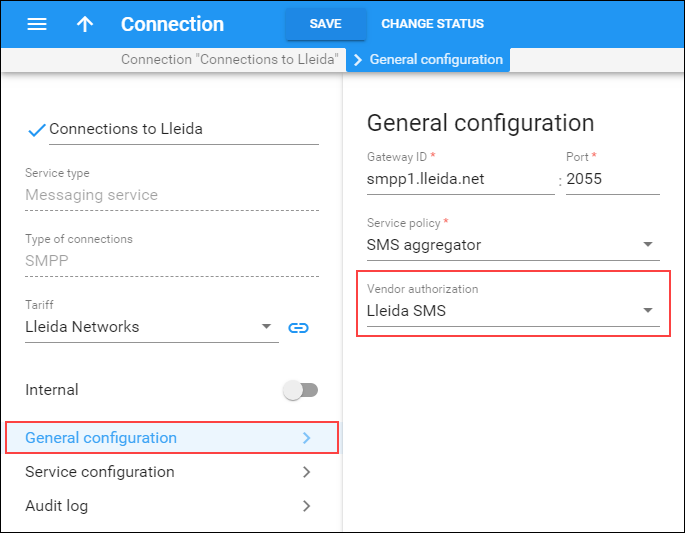
- Vendor authorization – select the vendor authorization you created for this connection (e.g., Lleida SMS).
- Click Save.
Create a vendor for SmartNet
Since your customer requires that PortaSwitch establishes a binding connection with their gateway, they must be provisioned as a vendor as well.
To do this:
- On the navigation menu, type Vendors
in the Search field.
- Click + Add and fill in the vendor details:
- Name – type a short name for the vendor object; this will be used on the web interface (e.g., SmartNet).
- Currency – choose the currency in which this vendor charges you.
- Opening balance – this indicates a starting balance for the vendor; the default is zero.
- Billing period – split period for vendor statistics.

- Click Save.
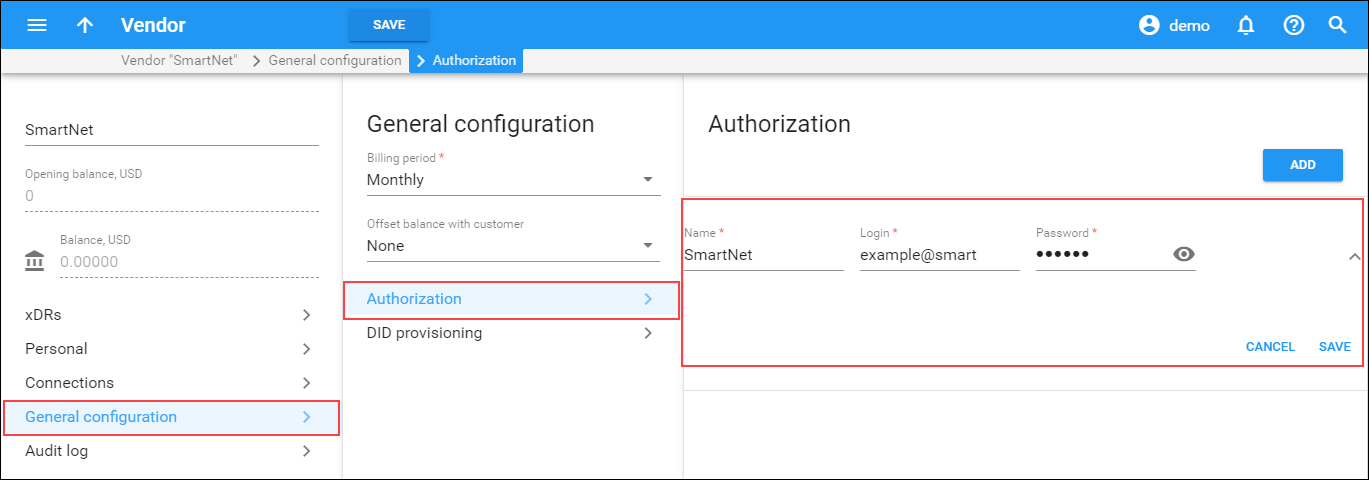
When establishing a binding connection with SmartNet, PortaSwitch sends credentials that SmartNet provides for authorization. These credentials must be stored with the “vendor authorization” info and then be associated with a specific connection so that they can be used during an actual binding procedure.
- Create an account for the digest authorization of incoming messages:
- On your vendor’s panel (SmartNet), click General configuration, then click Authorization.
- On the Authorization panel, click Add and
enter the credentials provided by the vendor.
- Click Save.
Define a connection for SmartNet
- On your vendor’s panel (SmartNet), click Connections.
- Click + Add and fill in the connection details:
- Description – give a short description for the connection that will be shown on the list of connections.
- Service type – select Messaging Service here.
- Type of connections – select SMPP.
- Tariff – choose the tariff that defines your termination costs for this connection/vendor.
- Active – use the slider to set this connection as active.
- Gateway ID – specify the IP address or ID of the vendor’s gateway (e.g., 192.143.12.6).
- Service policy – select the service policy you created for this connection (e.g., SMS aggregator).

- Click Save.
- Click General configuration panel.
- Vendor authorization – select the vendor authorization you created for this connection (e.g., SmartNet).
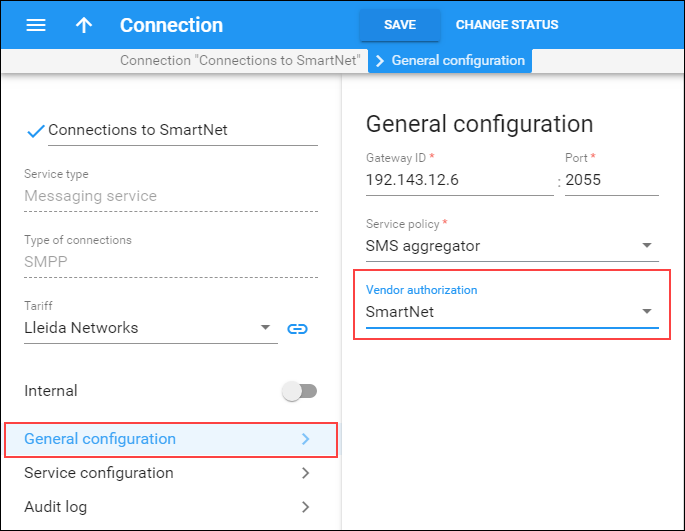
- Vendor authorization – select the vendor authorization you created for this connection (e.g., SmartNet).
- Click Save.
Create a customer tariff
This tariff will contain your customer’s rates for sending SMSs.
- On the navigation menu, type Tariffs in the Search
field.
- Click + Tariff and fill in the tariff details:
- Name – type a short name for the tariff object; this is the name you will see in the select menus (e.g., SMS delivery).
- Currency – indicates the currency in which you charge your customers.
The currency for the tariff is chosen only once and cannot be changed later.
- Service – choose Messaging service here.
- Format – select E.212 from the list.
- Applied to – select Customer, as this tariff will be used to charge your customers.
- Managed by – select Administrator only here, since we are setting up a service without the involvement of resellers.
- Define prices – select per individual rate code.

- Click Save.
Enter rates to the customer tariff
- On the Tariff panel, click + Rate and fill in the details:
- MCC/Country – select the MCC/Country pair from the list (e.g., 230 for the Czech Republic).
- MNC/Network – select the MNC/network pair from the list (e.g., 1 for T-Mobile).
You must create an entry for MCC/MNC codes in the Rate code register before creating a rate for them in the tariff.
- Unit price – price per message (e.g., $0.02).

- Click Save.
- Repeat these steps if you need to enter more rates.
Create a product
Your wholesale customers’ remote gateways are represented as accounts and are therefore billed according to the products you create for those accounts.
- On the navigation menu, type Products in the Search field.
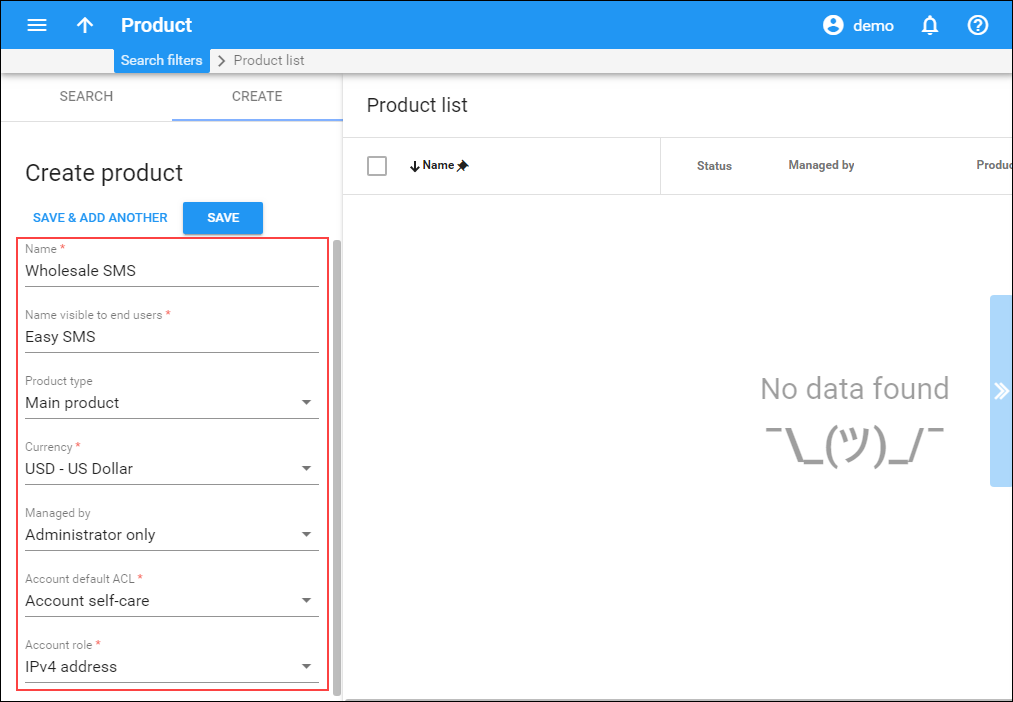
- Click + Add and fill in the product details:
- Name – type in a short name for the product object; this is the name you will then see in the select menus (e.g., Wholesale SMS).
- Name visible to end users – specify the name of the product that your customers will see on their self-care interface (e.g., Easy SMS).
- Product type – choose Main product here.
- Currency – product currency; only tariffs that share the same currency will be permitted in the rating list.
- Managed by – choose Administrator only here, since we are setting up a service without the involvement of resellers.
- Account default ACL – choose an Access Control List (ACL) for accounts with this product assigned. ACLs control which objects end users can have access to and which actions they can perform.
- Account role – select IPv4 address from the list.
- Click Save.
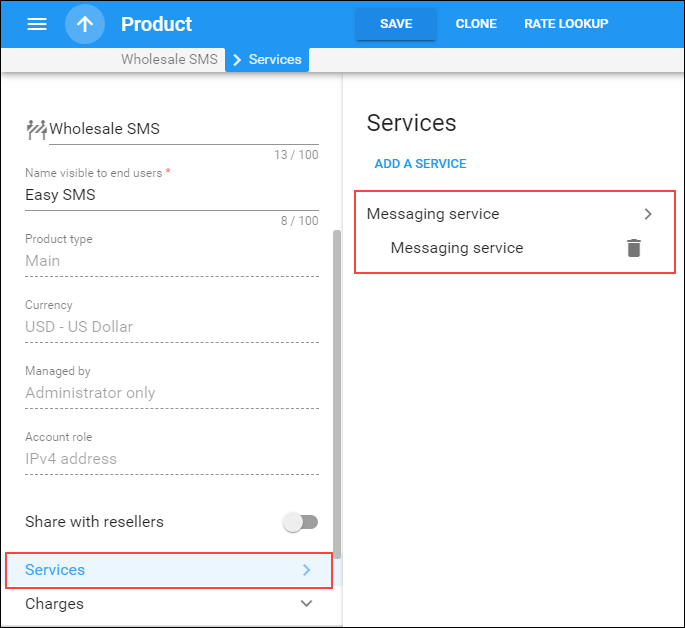
- On the Product panel, click Services and then Add a service.
- Select the Messaging service and click Add.
- Click Save.
Charges
The Charges section provides access to a group of panels where you can set up overdraft protection and define how to charge your customer for a messaging service. On the Product panel, click Charges.
General info
On the General info panel, you can define special pricing such as bundles, regular payments such as subscriptions, and set up overdraft protection.
- Overdraft protection – leave this box checked to prevent overdraft for users who use this product.
- Service availability threshold – specify the minimum amount of funds the account must contain to use the services.
- Default bundle – this allows you to assign a bundle for the product. Leave None as no bundle is specified for this service.
- Subscription – this allows you to choose a subscription plan for the product, so that this plan will be automatically applied to every account with this product assigned. Skip this step if no subscription plan is specified for this service.

Usage charges
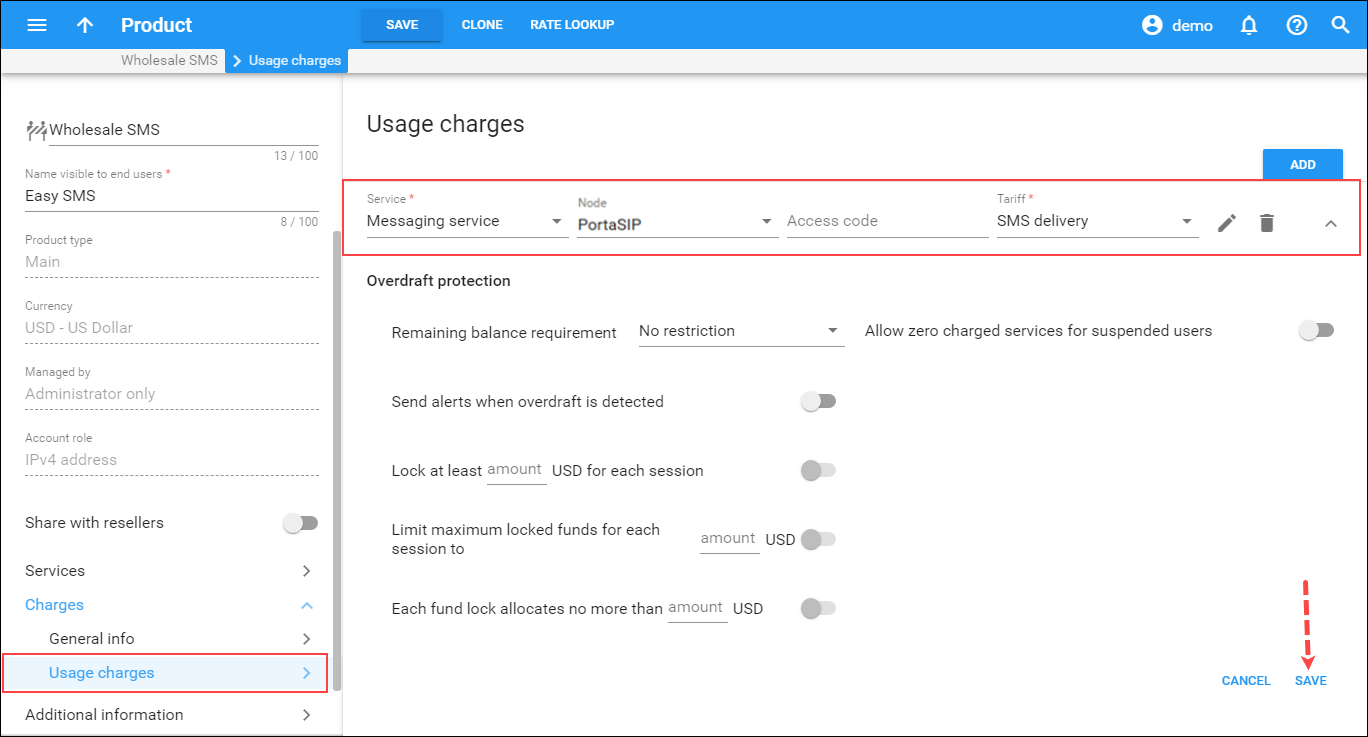
The Usage charges panel has two functions: it defines the permitted access points (nodes and access numbers) and specifies which tariff must be used for billing at each of these points.
- On the Product panel, click Charges, then click Usage charges.
- On the Usage charges panel, click Add.
- Fill in the required information:
- Service – select Messaging service from the list.
- Node – select the PortaSIP node.
- Access code – leave this field empty.
- Tariff – select the tariff that will be applied to your customers for sending SMSs (e.g., SMS delivery).
- Overdraft protection – use the slider to send alerts when overdraft is detected.
- Click Save.
Additional information
Define additional settings for the product.
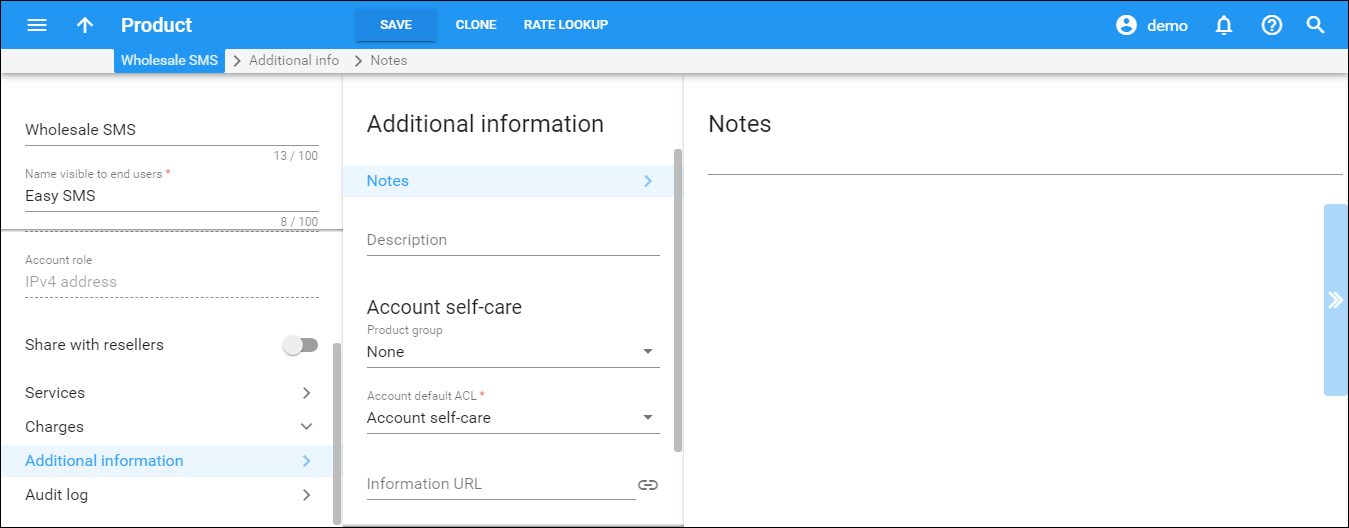
- On your product’s panel, click Additional information.
- On the Additional information panel, fill in the following product information:
- Notes – open the Notes panel to make notes about the product.
- Product group – a product group is a custom grouping of add-on products on the account self-care interface. Select None for this product.
- Account default ACL – the access level assigned by default to new accounts created with this product. The ACL determines which operations may be performed by accounts on the self-care pages. The default ACL value “Account self-care” allows all possible operations.
- Information URL – if you have an external server with a description of product features, enter the URL here (e.g., http://www.myproduct.com). Your customers will be able to go there from their self-care page.
- Description – your internal comments about the intended use of this product.
- Description visible to end users – provide a product description to be shown to end users on their self-care interfaces.
- Click Save.
Create invoice template
At the end of the billing period, PortaBilling can produce invoices for your customers. An invoice reflects all the transactions (calls, payments, refunds, subscription charges, etc.) that occurred during a specific period. It serves as the primary record of services provided to a certain customer as well as the primary record of their status. To enable invoice generation you need to create a template for the invoice layout first.
Create an invoice template as described in the Setting up a wholesale traffic exchange handbook.
Create a customer class
Customer class provides the ability to globally define a group of parameters in a centralized way, and then apply those parameters to many customers at once.
- On the navigation menu, type Customer classes in the Search field.
- Click + Add and fill in the customer class details:
- Name – type a short name for this customer class.
- Business model – select which customers this customer class will apply. Select SIP trunking from the list.
- Currency – specify the currency in which you want to set the Collection threshold. When specified, this customer class can only be assigned to customers with the same currency. Once the currency selection is saved, it cannot be changed.
- Managed by – select Administrator only.

- Click Save.
- On your customer class panel, click Finances, then click General info.
- On the General info panel, fill in general information about the customer class:
- Close the billing period – select the delay before closing the billing period.
- Configure the Periodic xDR export parameters:
- Export xDRs to a .csv file – leave this option enabled to generate statistics for customers.
- Send the generated .csv files via email – define how you will provide statistics to your customers.
- Configure the Status change parameters:
- Suspend customers – here you can specify whether PortaBilling must check whether the customer has sufficient funds for their subscription charges.
- Block debit accounts – specify whether PortaBilling must check whether a debit account has sufficient funds for their subscription charges.
- Permanently terminate customers after provisional termination – use the slider to enable the option. Specify the amount of days (e.g., 90) after which the provisionally terminated customer becomes permanently terminated.
- Configure the Other parameters:
- Description – your comments about the intended use of this customer class.

- Description – your comments about the intended use of this customer class.
- Click Save.
- On your customer class panel, click Finances, click Invoicing, then click Regular invoices.
- On the Regular invoices panel, specify the invoicing parameters for the customer class:
-
- Invoice template – select the appropriate template which will be used to create a .pdf file with the invoice for your customers (e.g., Wholesale invoice template).
- Generate invoice pdf – leave the default option At the end of the billing period to generate the .pdf files once the billing period ends.
- Send the invoice via email – select Automatically to automatically send an invoice to a customer at the end of the billing period.
Please consult the PortaBilling help for a description of other parameters available here.

-
- Click Save.
- On the Invoicing panel, click Out-of-turn invoices (optional) to enable generation of the out-of-turn invoices (to cover only a few specific items) on demand for customers that belong to this customer class. Specify the invoice template and copy the settings from Regular invoices panel.
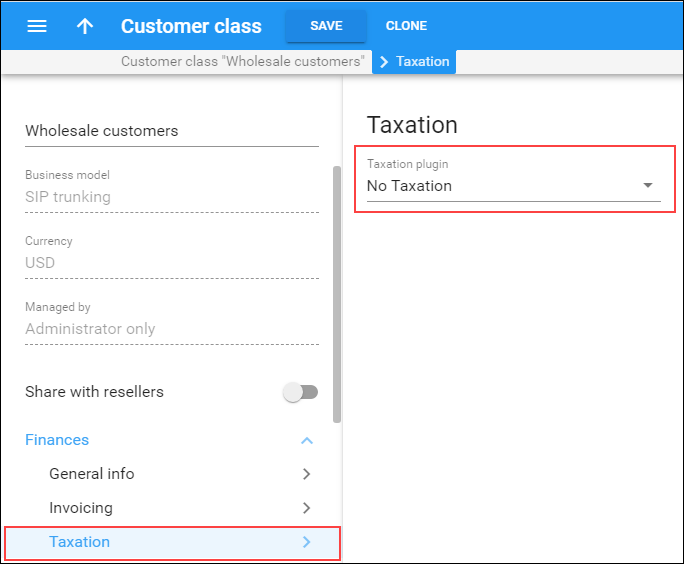
- On the Taxation panel, specify the taxation method to be applied to your customers.
- Click Save.
Create a customer
A customer is a company that sends SMS traffic for you to transmit and pays depending upon the amount of traffic sent. The customer’s contact information is used to distribute account usage information, service usage statistics, invoices, etc.
In this example, we will describe how to manually create a new customer.
- On the navigation menu, type Customers in the Search field.
- Click + Customer and fill in the customer details in the General tab:
- Balance control – specify the way the customer will pay for the service: Postpaid – after consuming the services; Prepaid – prior to consuming the services. Select Postpaid in this field.
- Name – type a short name for the customer object; this will be used on the web interface.
- Currency – choose the currency in which this customer will be billed.
- Credit limit – assign a credit limit for the customer.
- Business model – select SIP trunking for this customer. A business model defines what type of service is to be provided to the customer.
- Customer class – select the previously created customer class for wholesale customers. By choosing a specific class here the customer will automatically inherit all of the class properties (grace period, invoice template, etc.).
- Billing period – choose a billing period for the customer. A billing period defines the frequency of invoicing for this customer.
- Billing period time zone – choose a time zone in which customer’s billing period will be closed and invoices will be generated.

- Click Save.
Personal
Define the customer’s personal information (such as name, email address, etc.).
On your customer’s panel, go to General info > Basic info tab and fill in the customer’s personal information and an email address for the receipt of accounting information. After the billing period is over, a list of xDRs and other statistics will be sent to this address.
In the BCC field, type in the email address of your account representative. They will receive a copy of every outgoing email sent to the customer; this may be used for debug and archiving purposes.
Address info
In the Address info section, specify the customer’s address.
Web interface
Define credentials and preferred settings (such as language, time zone, date input and output formats) for this customer’s self-care interface.
On your customer’s panel, click General info > Web interface tab and define credentials for the customer self-care interface (such as login, password, time zone, etc.) and other preferred settings.
Subscriptions
Define whether to suspend the customer when their balance is insufficient to cover subscription charges.
On your customer’s panel, go to Finances > Financial info tab > General info section and set the Suspend on insufficient funds for subscriptions parameter. This defines whether the system must check that the customer has sufficient funds for their subscription charges.
Credit limit
On your customer’s panel, go to Finances > Credit limit tab > Warning thresholds section and define the Warning threshold parameter. The customer can be notified by email when his balance is dangerously close to the credit limit, and service will soon be blocked. The threshold can be specified:
-
- As a percentage (e.g., 90%). The warning will be sent when the customer’s balance exceeds that percentage of his credit limit. So, if the credit limit is USD 1000.00 and the threshold is 90%, a warning will be sent as soon as the balance exceeds USD 900.00. This is only applicable when the customer has a positive credit limit.
- As an absolute value. The warning will be sent as soon as the balance goes above the specified value.
To specify several credit limit warning thresholds, enter the values by clicking Add.
Invoices and taxation
Define whether to send this customer their statistics and invoices by email.
On your customer’s panel, go to Finances > Financial info tab > Invoicing configuration section and set the Send the generated .csv files via email option to Summary only. This delivers a call summary only and do not attach a details file; this could be useful in the case of a large number of calls. Other options are Full Statistics (attach a complete list of xDRs) or Do not send (this option prevents the delivery of event statistics to this customer via email).
Services
On your customer’s panel, go to Service configuration. This panel provides access to a group of panels where you can activate/deactivate various features of the voice calls service provided to the customer. This is a convenient way for managing parameters which are the same for a whole set of accounts. Instead of trying to configure them for each individual account, you can define them once at the customer level, then specify in the account configuration that the value in the customer’s configuration be used. If you wish to change this value later, you need only modify it once for the change to be automatically propagated to all accounts.
For now, you may leave these with their default values. If you change them later, these changes will automatically affect all accounts created under this customer.
Create accounts
Accounts enable the authorization of a customer’s actual endpoints. In our example, we assume that the authorization is performed by the IP address of the remote gateway/proxy.
- On your customer’s panel, go to Accounts / DIDs.
- In the Accounts tab, click + Account and fill in the account information:
- General tab:
- Type – select Credit in this field.
- Account role – select the IPv4 address from the list.
- ID – the IP address for the customer’s proxy or gateway (must be identical to the IP that is mentioned in the connection).
- Balance control – choose Subordinate, since a credit limit is controlled at the customer level.
- Activation – choose the date from which the account is usable. By default, the account is activated immediately upon creation.
- Expiration date – choose when the account expires.

- Products tab:
- Product – choose the main product that you would like your account to have.
- General tab:
- Click Save.
Service configuration
On your account’s panel, click Service configuration. On this panel, you can activate/deactivate various features of the voice calls service provided to this account (e.g., assign a routing plan, etc.).
Test routing with SMS routing simulation (optional)
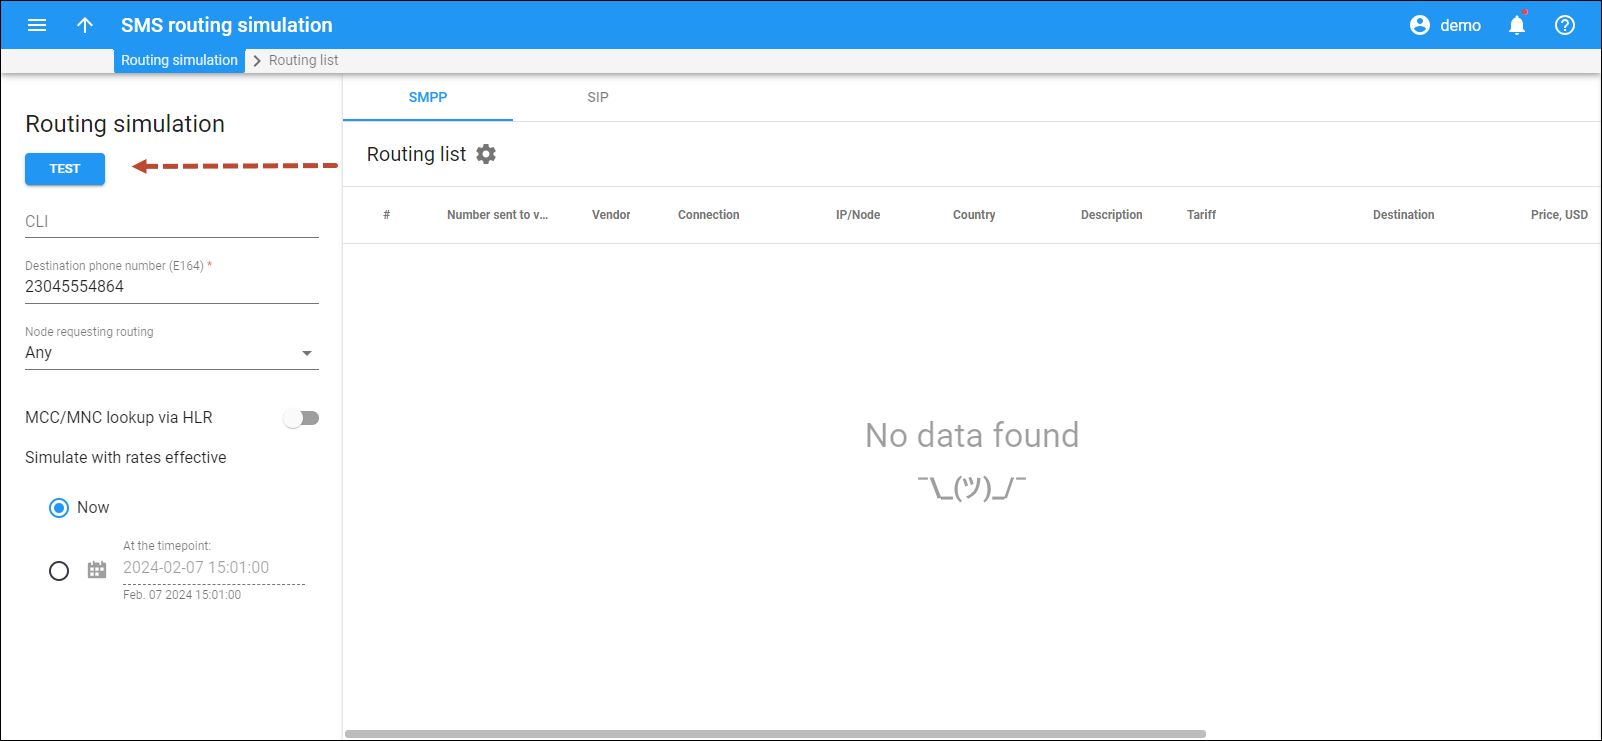
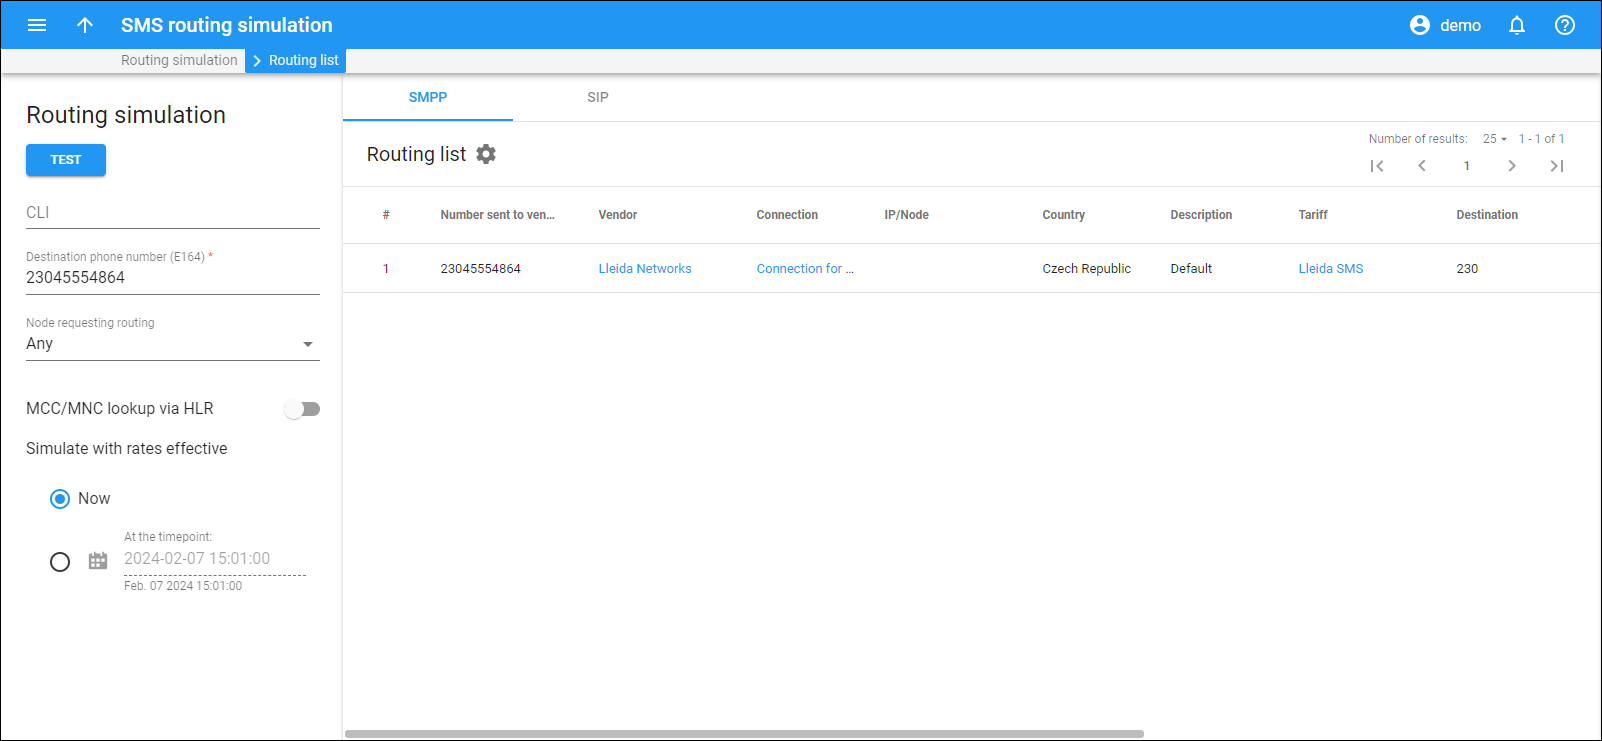
You may check the routing for an SMS in your system prior to actually sending a message. The system will perform the HLR lookup, and you will see the routing results based on the MCC/MNC codes for the destination number.
- On the navigation menu, go to Infrastructure > SMS routing simulation.
- On the Routing simulation panel, enter the destination phone number.
- Click Test to display a list of applicable routes.
Test the whole system
You can configure the SMPP client/gateway to send messages to your PortaSIP server. To do this, use the PortaSIP’s virtual IP address and port for incoming SMPP connections (which is 2775 by default).
Since authorization is performed by the SMPP client/gateway IP address, you can set any values for the SMPP login and password. Then send a message.


