Overview
PINless dialing service allows users to make cheap long-distance/international calls from their mobile or landline phones without entering a PIN by simply dialing an access number.
When a user signs up for your PINless dialing service, you register their phone number in the system and provide them with the access number they must dial. Then, when the user makes a call, the system recognizes their CLI (ANI), informs the user about their balance and asks them to enter their destination number.
You can enable user access to the service using either of these two ways:
- A user signs up for the service. You register the user’s ANI as the PINless dialing account and provide the user with the service access number to dial;
- A user purchases a PINless dialing calling card. You enable ANI authentication and auto registration options for your Prepaid card calling application. When the user dials their access number for the first time, they are asked to enter their PIN number and offered to register their ANI. From then on, they are only asked to enter their destination, entirely skipping the PIN number entry step.
This document describes how to provide PINless dialing service by creating dedicated PINless dialing accounts.
Let’s say, Amanda Doe signs up for your PINless dialing service. You add her mobile number 16041112222 as a PINless dialing account and provide her with a service access number. When Amanda dials the access number from her mobile, she hears what her current balance is and is asked to enter her destination number. After she dials the destination number, the system informs Amanda about the maximum permitted call duration and connects the call. When the call ends, the system deducts the correct amount from Amanda’s balance.
Also, Amanda is granted access to the self-care portal, so she can keep track of her calls on her own and top up her balance as necessary by using her credit card.
Configuration overview
- Initial configuration of PortaBilling
- Create a vendor tariff
- Enter rates
- Create vendors
- Define connections
- Configure access from PSTN
- Configure the IVR application
- Create a tariff for end users
- Enter rates
- Create a product
- Create a customer class
- Create a customer
- Create an account
Initial configuration of PortaBilling
If you have just installed the PortaSwitch software or dedicated a new billing environment to configure the services described in this handbook, make sure to first perform the initial configuration of PortaBilling. To do this, use the Initial configuration of PortaBilling handbook.
Create a vendor tariff
A tariff is a single price list for call services. A tariff combines:
- Conditions which are applicable to every call regardless of the called destination.
- Per destination rates.
- On the navigation menu on the left, select Service catalog and click Tariffs.
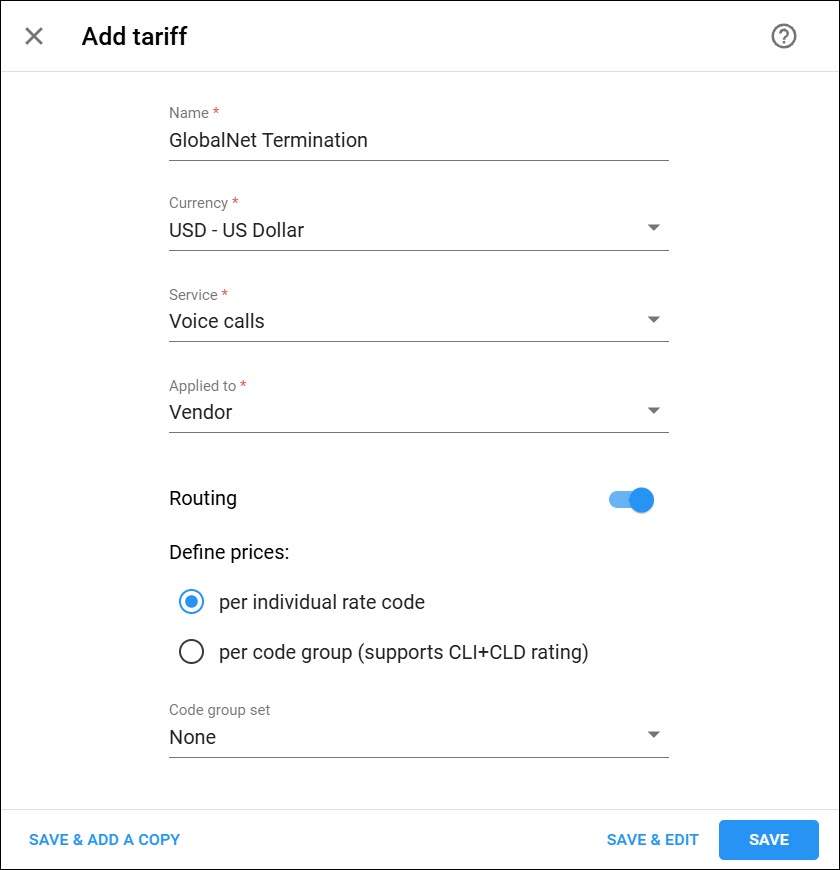
- Click + Tariff and fill in the tariff details:
-
- Name – type a short name for the tariff object; this is the name you will see in the select menus (for example, GlobalNet Termination).
- Currency
– choose the currency in which the vendor charges you.
The currency for the tariff may be chosen only once, and cannot be changed later.
- Service – choose Voice Calls here.
- Applied to – choose Vendor in the Applied to list.
- Routing – enable the Routing option for this tariff.
- Define prices – leave per individual rate code.
-
- Click Save.
Enter rates
Rates are per-destination prices. Please refer to the Call billing parameters section for more details on billing parameters.
Managing rates online
Managing rates online is very convenient for maintaining existing rate tables, as well as for reference purposes. In the case of new price lists or major updates, the offline method is better.
- On the vendor tariff’s panel (GlobalNet Termination), click Rates.
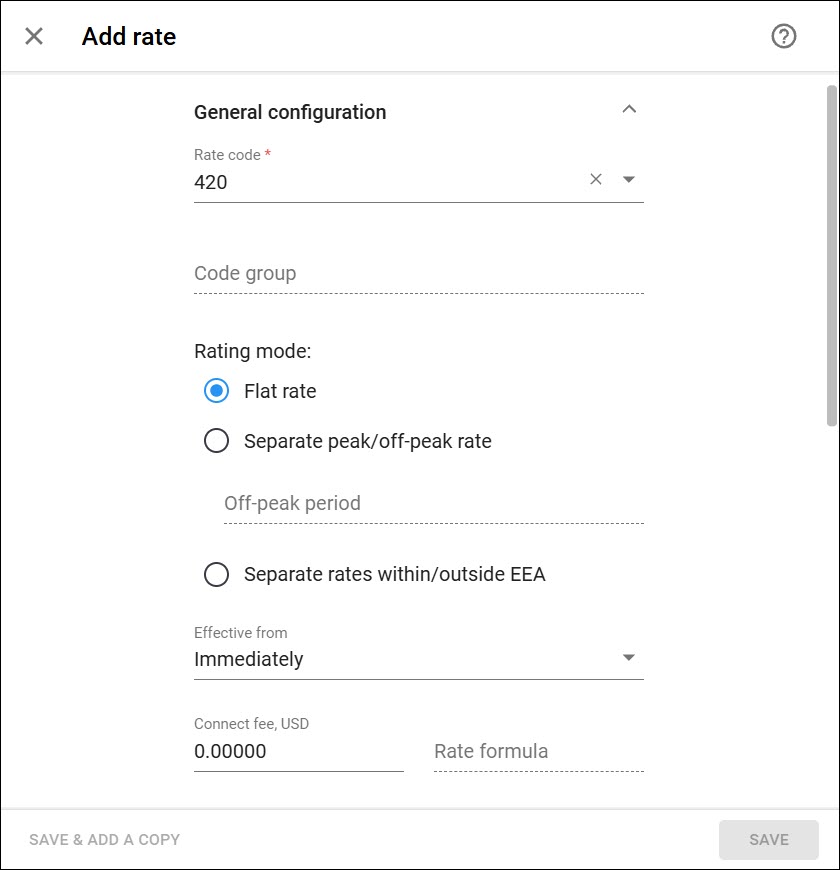
- Click + Rate and fill in the rate details:
- Rate code
– select a rate code from the list or type it in directly, e.g.,
420 for the Czech Republic destination.
You must create an entry for certain phone prefixes in the Rate code register before creating a rate for them in the tariff.
- Rating mode – select the Flat rate option here. If you want to enter different rates for the peak and off-peak periods, select the Separate peak/off-peak rate option.
- Effective
from – if you want this rate to take effect sometime in the future,
you can either type in a date manually, or use the calendar.
When using the calendar, you can specify that the date you are entering is in a different time zone than your present one. PortaBilling will then automatically adjust the time.
- First interval, seconds – type a first billing unit in seconds.
- First price – type a per minute price for a first interval.
- Next interval, seconds – type the next billing unit in seconds.
- Next price – type a per minute price for the next interval.
- Route category – you can split your available routes into several categories, such as “High quality,” “Premium,” etc., then create routing plans for your customers. Use the Default route category for now.
- Preference – the routing priority for the specific rate code. 10 is the highest priority, 0 is the lowest (e.g., do not use this rate code for routing at all). For now, you can just set all of your vendor rates at preference 5, and the system will organize available routes according to cost (LCR).
- Huntstop
– when enabled, instructs the system to not try any routes with a lower
preference.
- Rate code
– select a rate code from the list or type it in directly, e.g.,
420 for the Czech Republic destination.
- Click Save.
- Repeat these steps if you need to enter more rates.
Managing rates offline
You also can upload rates from a file in .csv, .xls or .xlsx format – please consult the Rate import handbook for more details.
 Perform the
Create tariff and Enter rates steps described above until
you have created a tariff with the termination costs for each termination
partner you have; these tariffs are created as “Applied to: Vendor”.
Perform the
Create tariff and Enter rates steps described above until
you have created a tariff with the termination costs for each termination
partner you have; these tariffs are created as “Applied to: Vendor”.
Create vendors
This step is only required if you have not entered information about your vendors into the system before. Vendors are your termination partners or the providers of incoming toll-free lines and DID numbers.
- On the navigation menu, select Infrastructure, then select Vendors.
- On
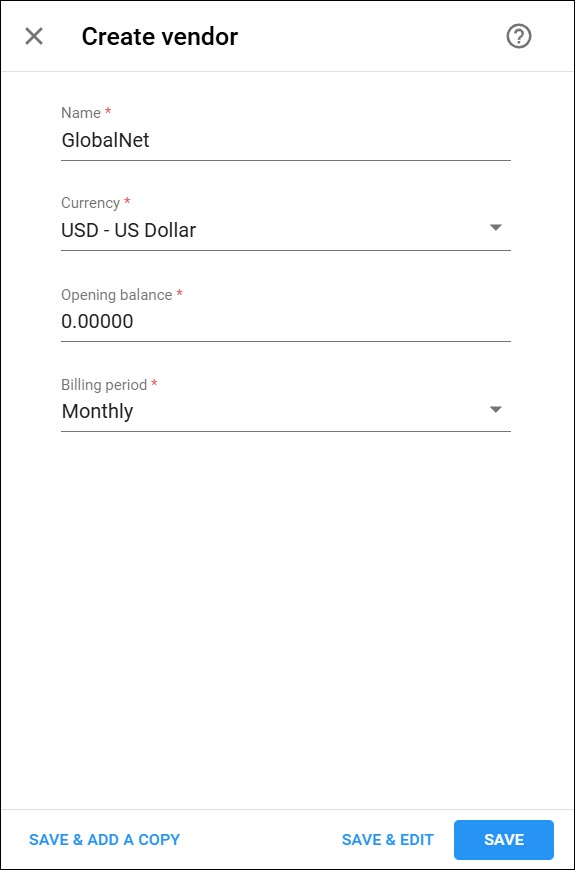
the Vendor list panel, click + Add and fill in the vendor details:
- Name – type a short name for the vendor object; this will be used on the web interface (for example, GlobalNet).
- Currency – choose the currency in which this vendor charges you.
- Opening balance – this indicates a starting balance for the vendor; the default is zero.
- Billing
period – split period for vendor statistics.
- Click Save.
Define connections
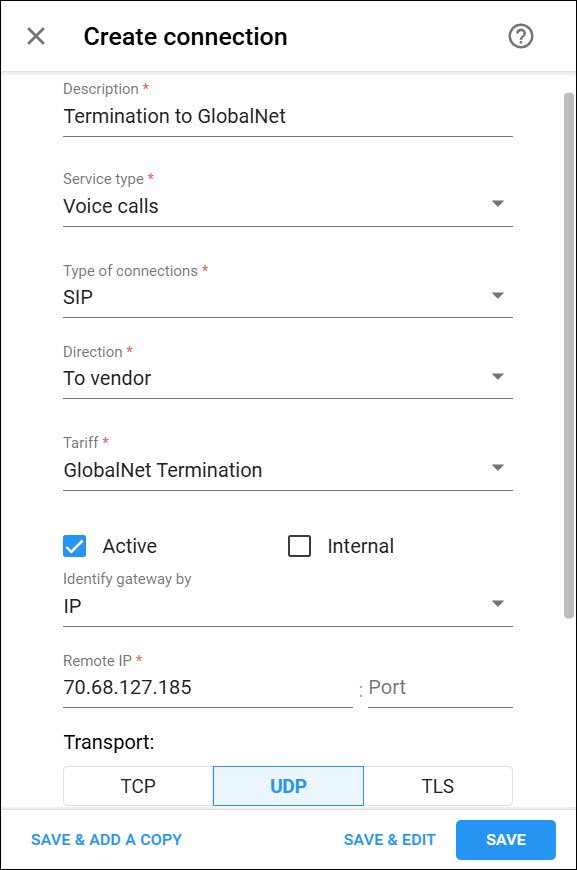
- On your vendor’s panel (GlobalNet), click Connections.
- On
the Connection list panel, click + Add and fill in the connection details:
- Description – type a descriptive name for this connection. It will be displayed in the list of connections.
- Service type – select Voice Calls.
- Type of connections – select SIP.
- Direction – select To vendor.
- Tariff – choose the tariff that defines your termination costs for this connection/vendor.
- Active – use the slider to set this connection as active.
- Identify
gateway by – choose how to identify the gateway: IP, gateway ID or
both. Specify the IP address and/or ID of the vendor’s gateway or switch.
- Click Save.
- Repeat these steps to add more connections to this vendor.
Configure access from PSTN
Since the main purpose of this service is to give your customers access to your prepaid application from PSTN (by dialing your access number from their landline or mobile phone), you have to ensure that calls to that access number are delivered properly to your network and then handed over to PortaSIP IVR.
Please refer to the instructions in the Incoming calls from DID provider (manual configuration) section for complete details about how to set up the vendor and the connection.
Configure the IVR application
First you need to define that when a call is made to the access number of your prepaid calling card service, PortaSIP launches the corresponding IVR application for handling the call.
Set up the IVR application
Set up the IVR Application for the virtual PortaBilling environment where you use this application.
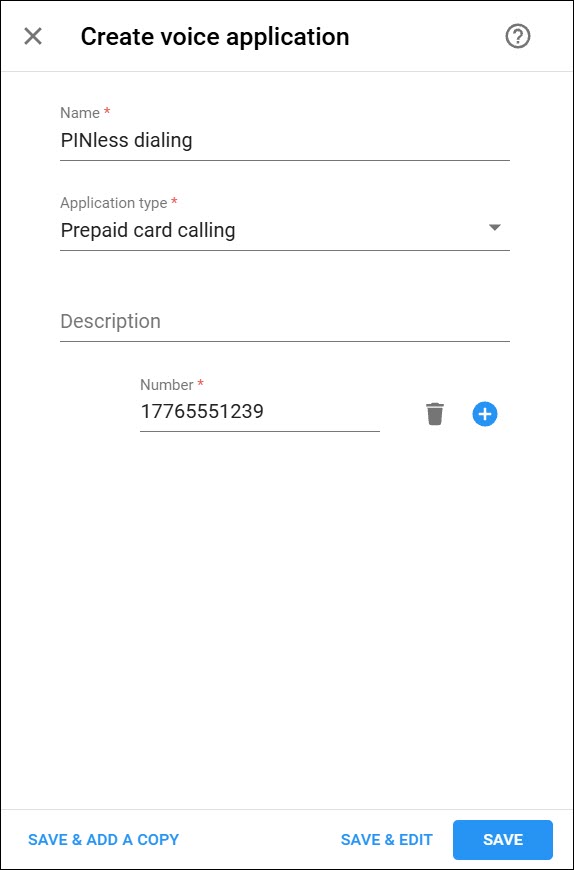
- On the navigation menu, select Voice calls processing and go to Voice applications.
- On
the Voice application list panel, click + Add and fill in the following fields:
- Name – specify the IVR application’s name (e.g., PINless dialing).
- Application type – choose Prepaid card calling.
- Number – type in the number to be dialed by an end user or click
the
 button
to select a DID number from the available DID numbers list. Click the
button
to select a DID number from the available DID numbers list. Click the
 Add icon to add more
Entry points.
Add icon to add more
Entry points.
- Click Save.
You can clone multiple entities to customize the application parameters (such as IVR languages or whether ANI authorization is performed), according to your requirements.
Customize the parameters of the IVR application
To support PINless dialing, the prepaid application should have the ANI authentication feature enabled. Then if the ANI number of the incoming call matches the ID of an account, this account is the one placing the call (and will be charged when the call is completed). The customer will immediately be asked to enter a destination, skipping the PIN entry step.
- On the Voice application panel, go to the Authentication, Authorization, Accounting section and select Authentication.
- On
the Authentication panel use a slider to enable ANI authentication
feature.
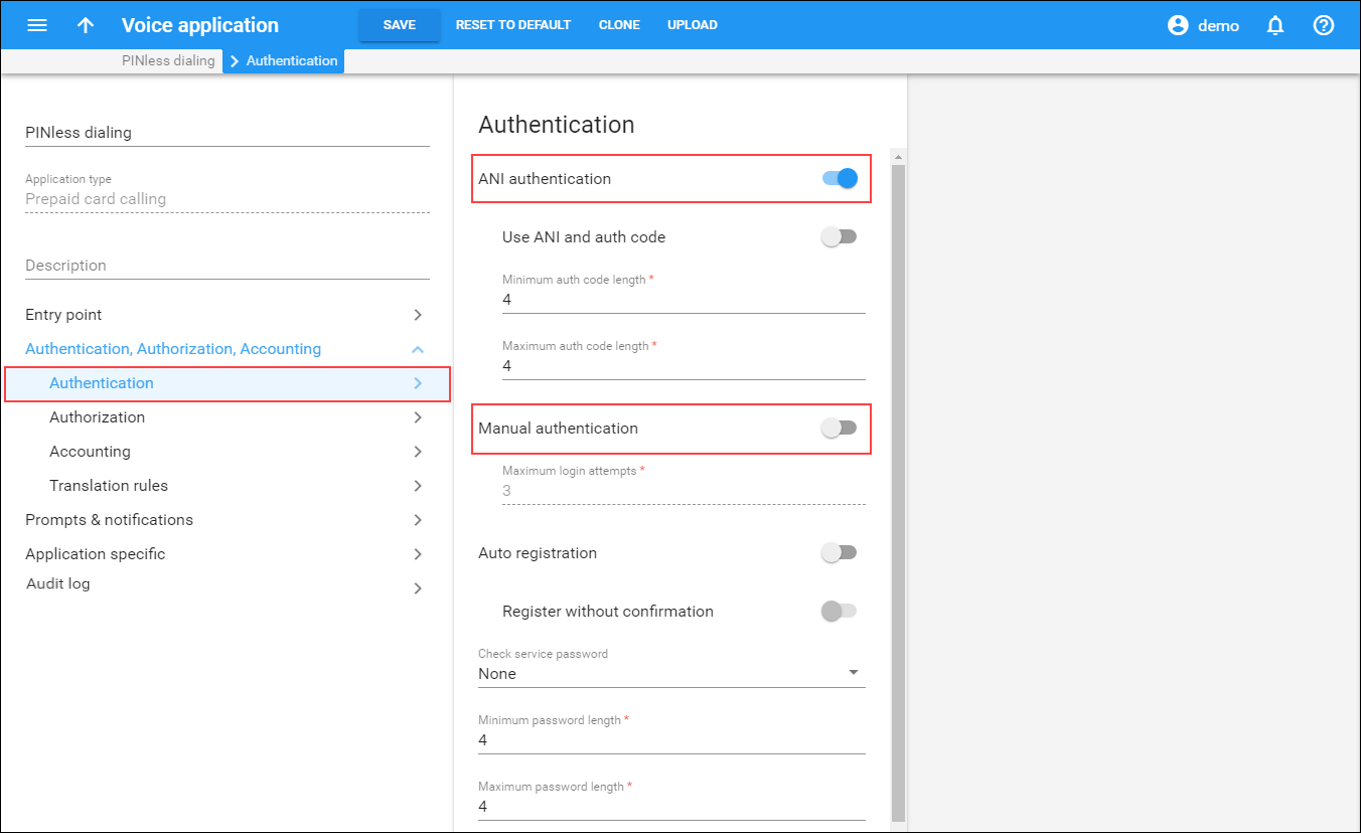 The Manual authentication option must be disabled for this scenario.
 - Click Save.
When you provide both residential VoIP and PINless dialing services, you will have two types of accounts in the system, and the account ID will contain the phone number:
- “Normal” SIP accounts. When someone in your network dials the number, the system will recognize that the call should be delivered to one of the IP phones connected to PortaSwitch – and will never be sent out to the PSTN.
- ANI accounts. The situation here is exactly the opposite: when someone in your network dials this number, the call will be sent out to the PSTN.
In order to avoid confusion between these two types of accounts (which may result in calls being routed improperly) and allow both your administrators and the PortaBilling routing engine to clearly distinguish between ANI accounts and regular SIP accounts, the PINless account role has been introduced.
When you create an account with the PINless account role, PortaBilling automatically adds the suffix ‘@ani’ for your ANI authentication accounts.
For example, if you would like to allow your customer to use his cell phone with ANI 16041112222 for ANI authentication, you would create the PINless account 16041112222@ani for this customer.
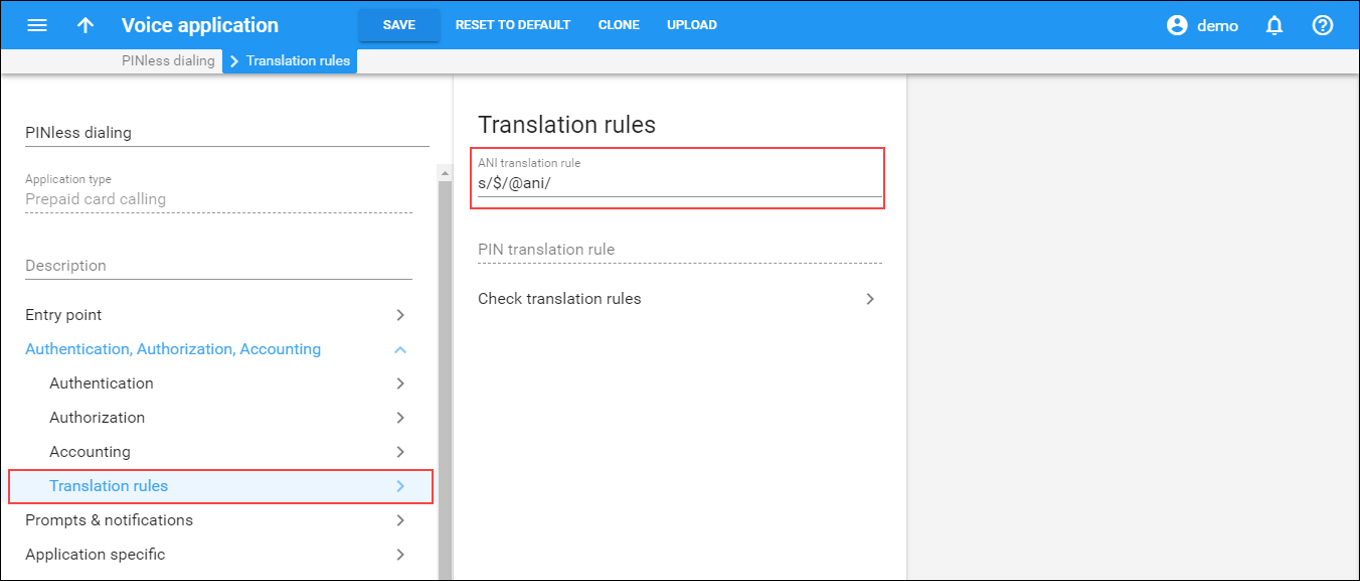
You can also set up the ANI translation rule as a regular expression in the ANI translation rule field.
- On the Voice application panel, go to the Authentication, Authorization, Accounting section and select Translation rules.
- On the Translation rules panel type s/$/@ani/ in the ANI translation rule field. This will instruct the system to add @ani suffix to the ANI number of the incoming call and search for an ANI@ani account (e.g., 16041112222@ani) for authentication and authorization.
- Click Save.
IVR languages
Configure in which languages the IVR will communicate with the customer.
- On the Voice application panel, go to Prompts & notifications and select Language.
- Click
the Select languages button to launch the dialog box for
the language selection.
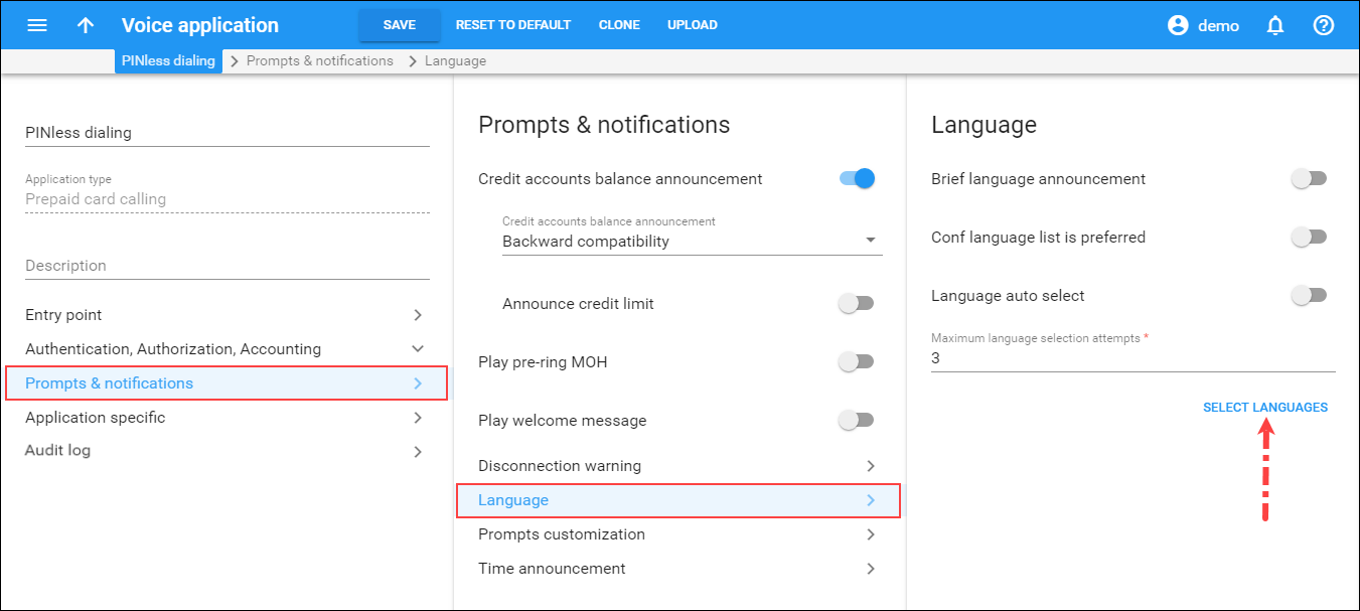
- In
the Select languages box, choose the language (or several
languages) you wish to use for voice prompts. In this case, the IVR’s
first prompt will be the language selection prompt “Please press 1 for
English, 2 for Russian, 3 for German, etc.” To choose all languages at
once, select the line All available on top. Then click the Select
button.
You can also change the languages order by moving
 icon
up and down.
icon
up and down.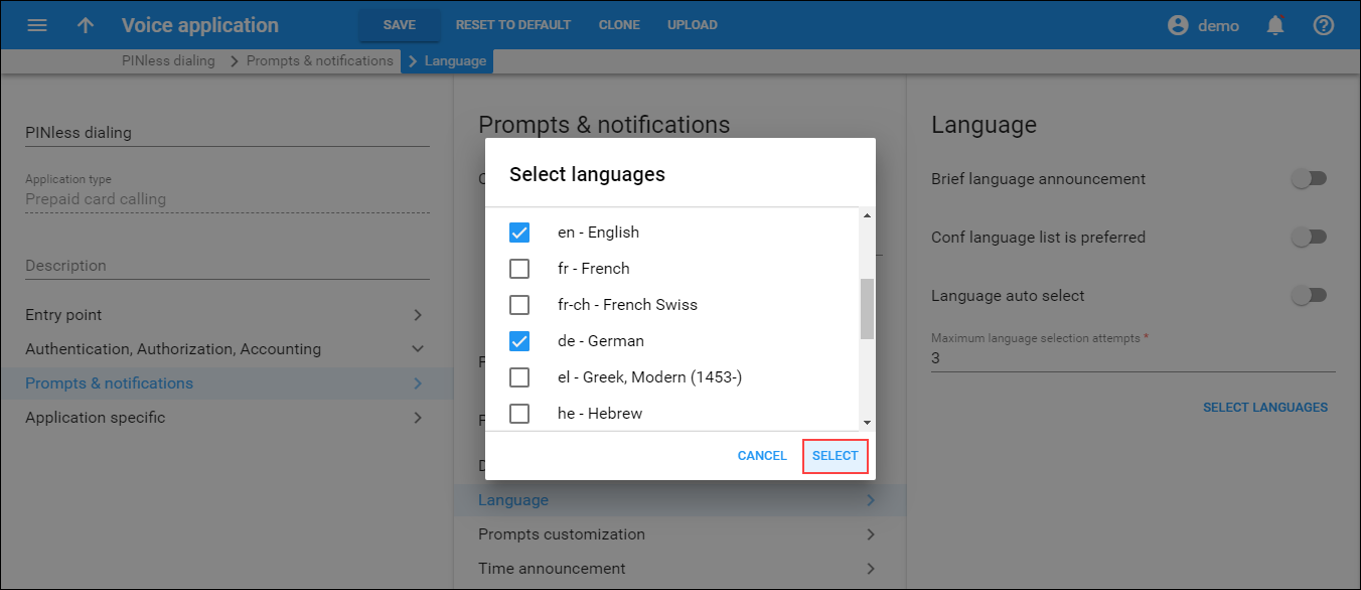
- Click Save.
Custom brand prompts
Configure the IVR application to use your brand prompts instead of default ones. Please refer to the How to configure custom brand prompts section for a detailed configuration description.
Prepaid card IVR configuration parameters
See the Prepaid calling IVR applications section to read more about the prepaid card IVR configuration parameters.
Create a tariff for end users
- On the navigation menu, select Service catalog and click Tariffs.
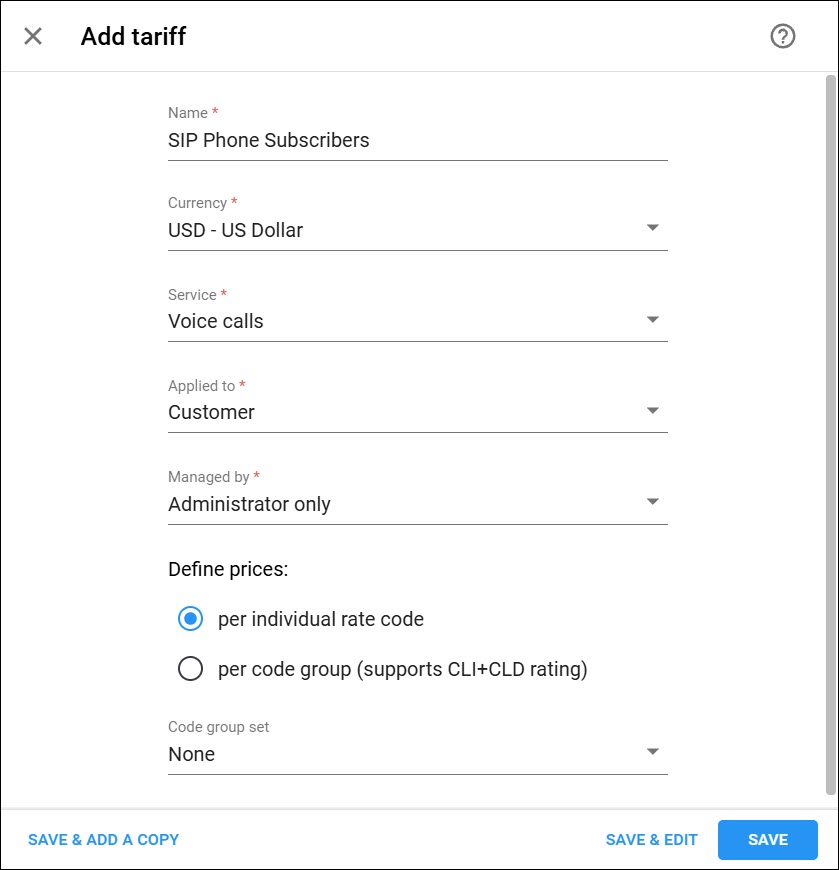
- Click + Tariff and fill in the tariff details:
- Name – type a short name for the tariff object; this is the name you will see in the select menus (for example, SIP Phone Subscribers).
- Currency
– this indicates the currency in which you charge your customers.
The currency for the tariff is chosen only once, and cannot be changed later.
- Service – select Voice Calls.
- Applied to – select Customer as this tariff will be used to charge your customers.
- Managed by – select Administrator only here, since we are setting up a service without the involvement of resellers.
- Define prices – leave per individual rate code.
- Click Save.
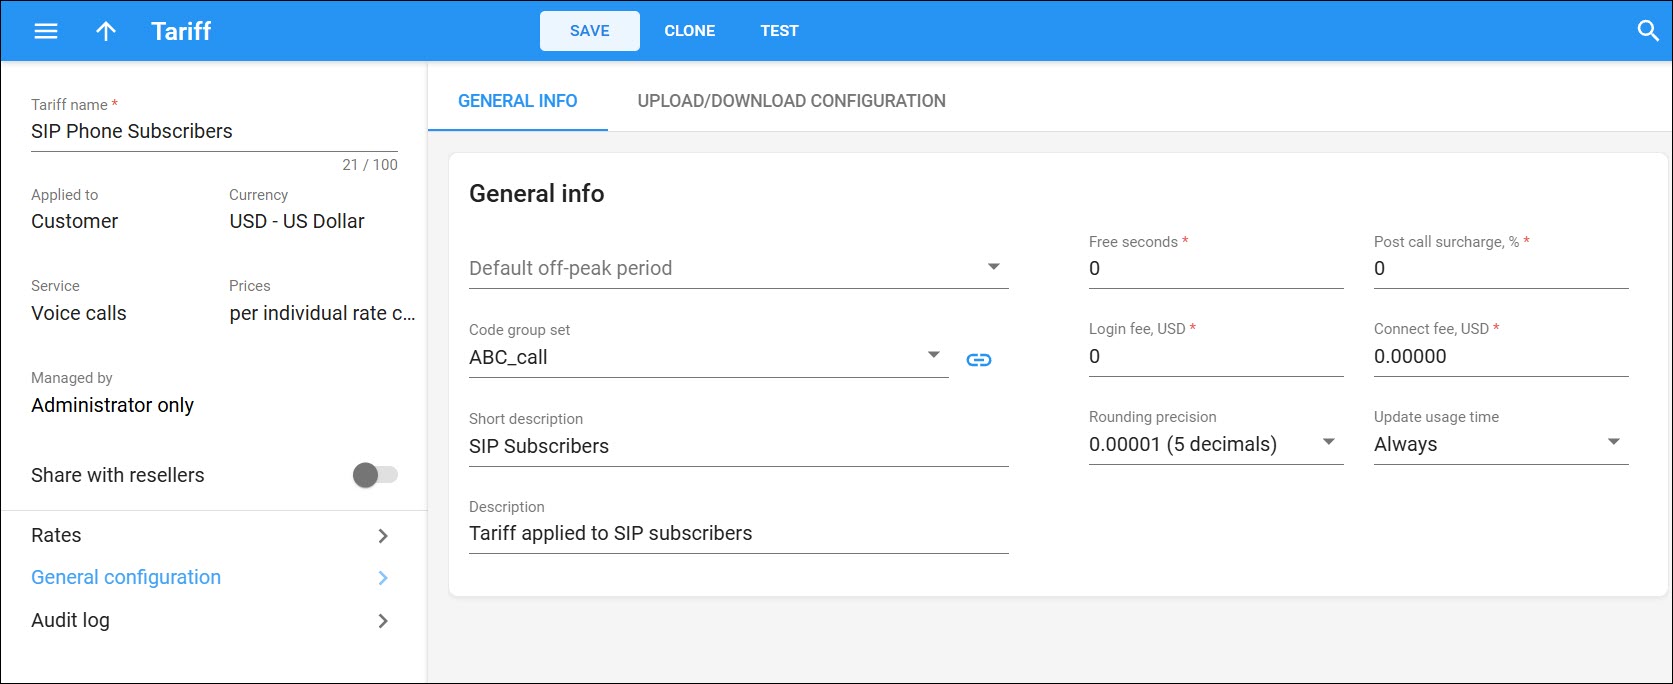
- On
your customer tariff’s panel (PINless dialing), click General
configuration > General info tab and fill in the following information:
- Default off-peak period – if you do not differentiate between peak and off-peak rates, just choose None; otherwise, select one of the previously defined off-peak periods.
- Code group set – if you wish to enter rates in the tariff not for every individual prefix, but for a whole group of prefixes at once, you should create a code group set and code groups beforehand. Leave this select menu empty for now.
- Rounding precision – select the number of decimals to round the charged amount in an individual xDR. (e.g., select 0.01 (2 decimals), so that 1.16730 rounds to 1.17).
- Short description – type a short tariff description. This will be shown in the rate lookup on the admin interface and the self-care pages for your accounts and customers.
- Description
– type an extended tariff description.
- Click Save.
Enter rates
- On your customer tariff’s panel (PINless dialing), click Rates.
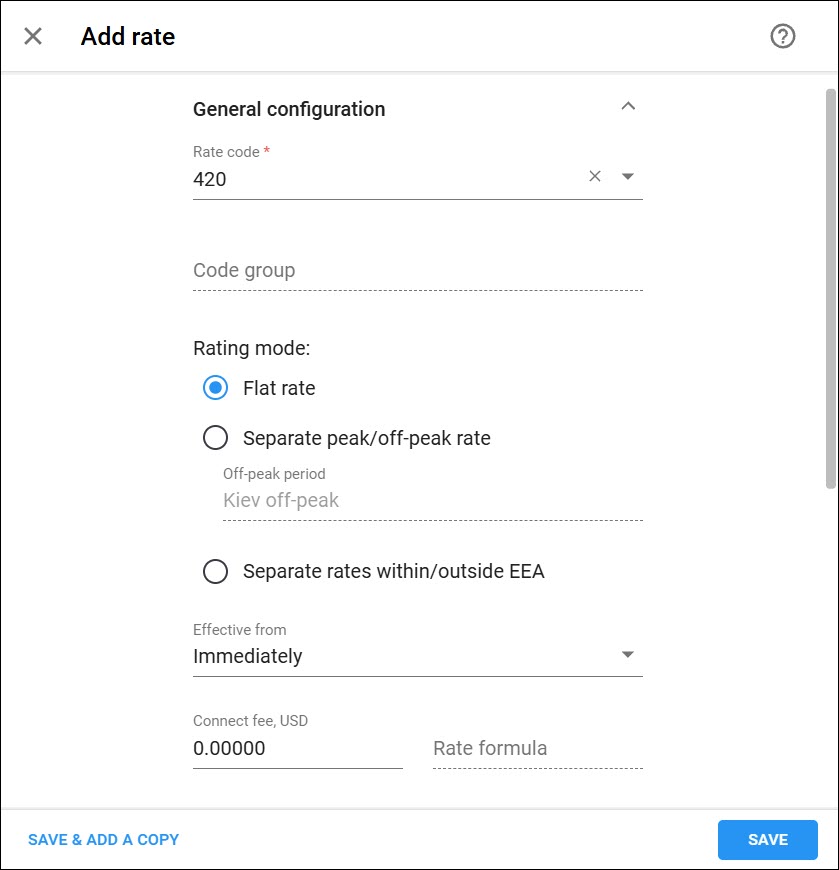
- Click + Rate and fill in the rate details:
- Rate code
– Select a rate code from the list or type it directly, e.g.,
420 for the Czech Republic destination.
You must create an entry for certain phone prefixes in the Rate code register before creating a rate for them in the tariff.
- Rating mode – select the Flat rate option here. If you want to enter different rates for the peak and off-peak periods, select the Separate peak/off-peak rate option.
- Effective
from – if you want this rate to take effect sometime in the future,
you can either type in a date manually, or use the calendar (click on
the DD-MM-YYYY link).
When using the calendar, you can specify that the date you are entering is in a different time zone than your present one. PortaBilling will then automatically adjust the time.
- First interval, seconds – type a first billing unit in seconds.
- First price – type a per minute price for the first interval.
- Next interval, seconds – type the next billing unit in seconds.
- Next
price – type a per minute price for the next interval.
- Rate code
– Select a rate code from the list or type it directly, e.g.,
420 for the Czech Republic destination.
- Click Save.
- Repeat these steps to enter more rates.
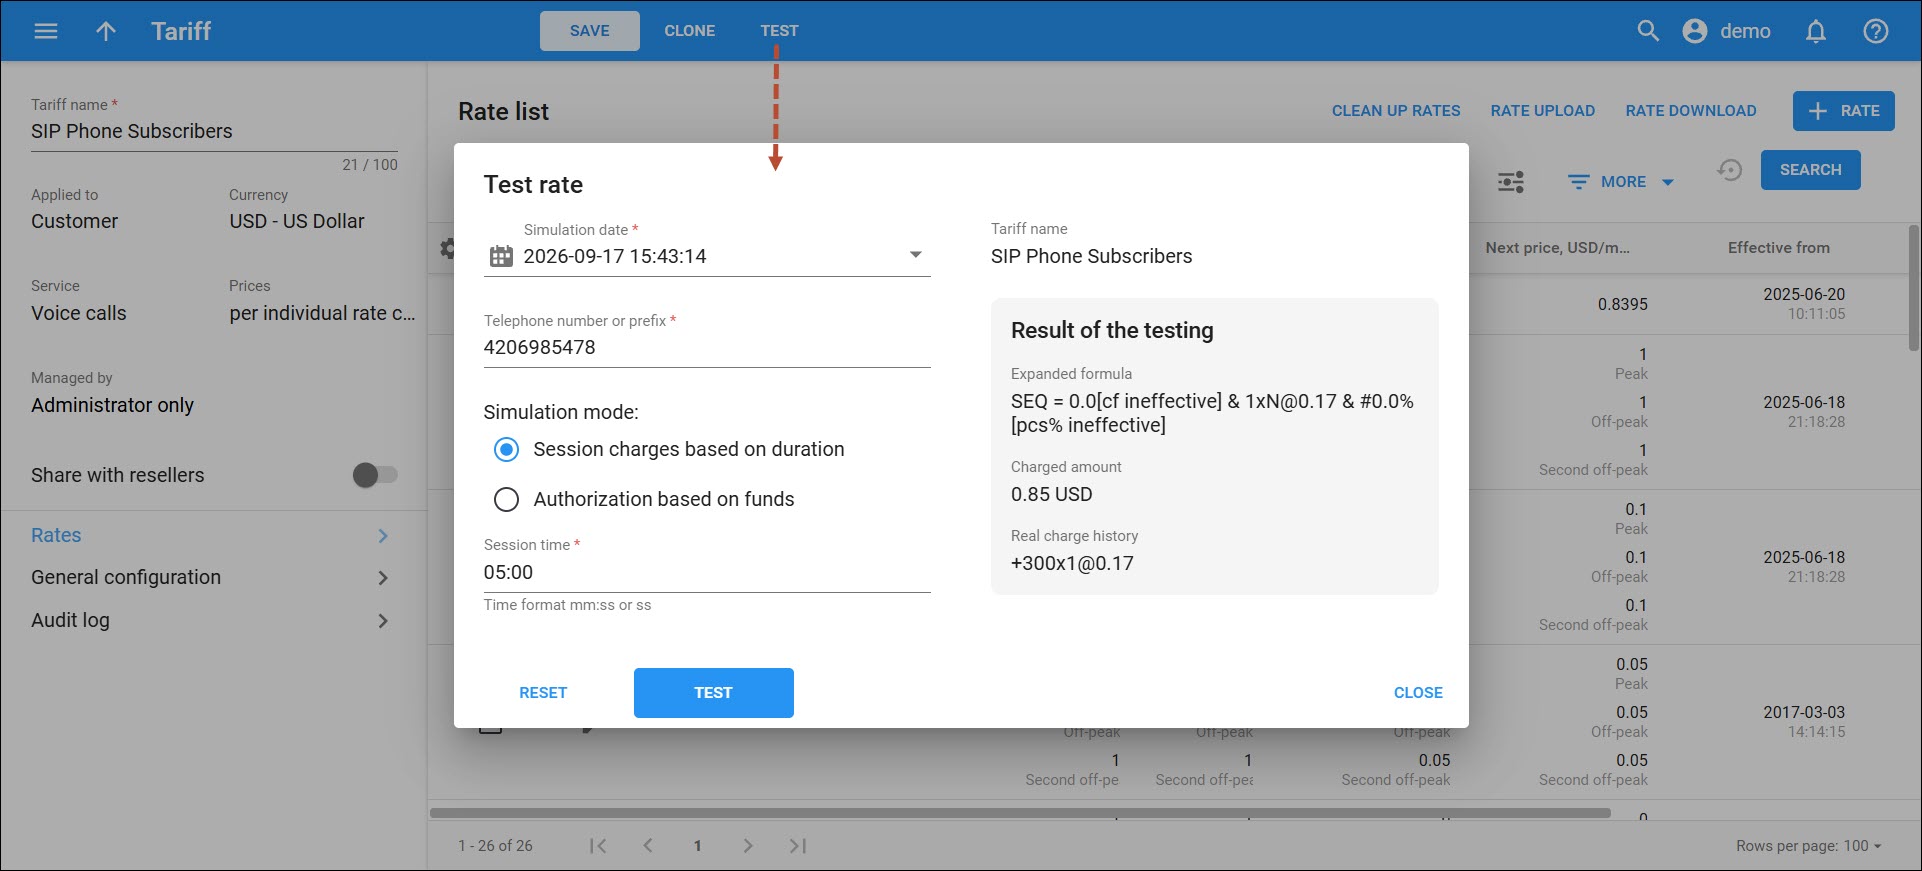
Test rate configuration (optional)
- While on your customer tariff panel, click Test.
- Type in the phone number for which you would like to test the rating, as well as the estimated call duration, and then click Test.
- You
will now see the estimated amount charged for this call, as well as a
detailed explanation of the rating process.
Create a product
Prepaid cards will be issued for a specific product. Products are a powerful feature that defines different ways to bill an account. Product definition is always done in these steps: product definition, service definition and configuration, and creation of the rating list.
- On the navigation menu, select Service catalog and click Products.
- In
the Product list tab, click + Product and fill in the product details:
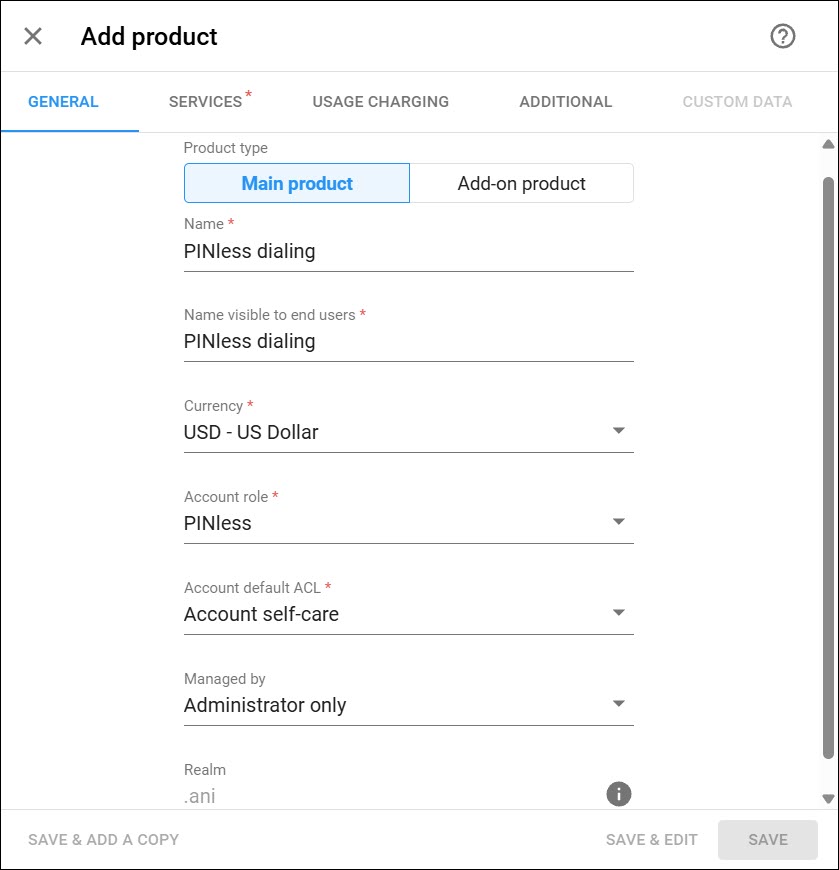
- General tab:
- Product type – select Main product here.
- Name – type an internal product name that will be shown on the administrator interface.
- Name visible to end users – type a name of the product that will be shown to end users on their self-care interfaces.
- Currency – choose a currency the product will be priced in.
- Account role – select PINless from the list.
- Account default ACL – choose an Access Control List (ACL) for accounts with this product assigned. ACLs control which objects end users can access to and which actions they can perform.
- Managed
by – select Administrator only here, since we are setting up
a service without the involvement of resellers.
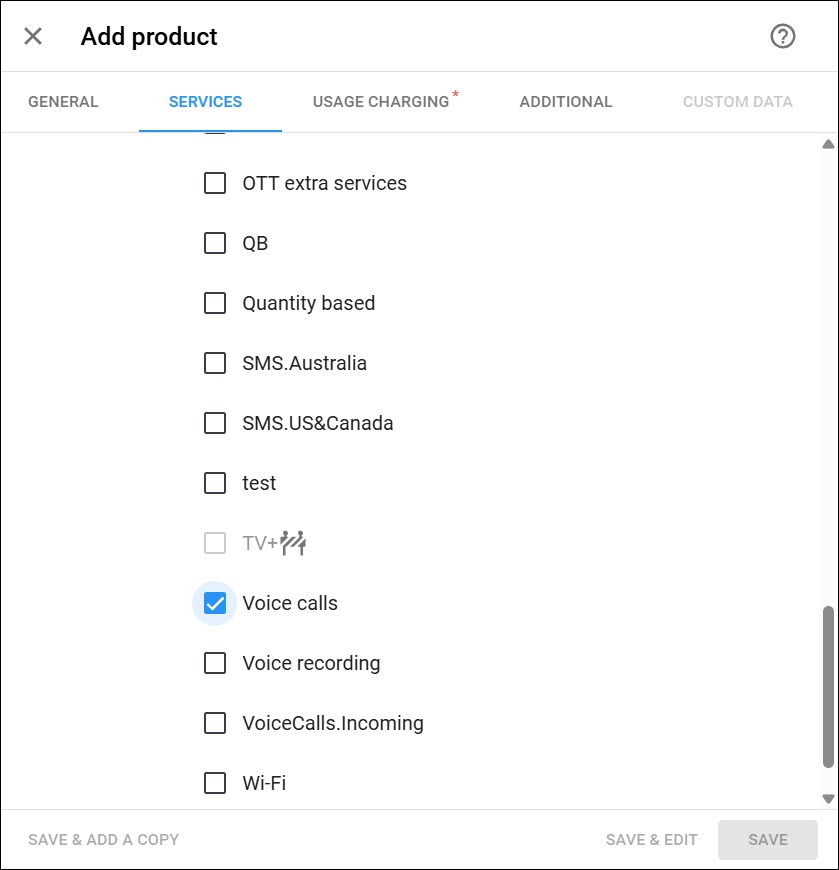
- Services tab:
- Select the checkbox for Voice calls service.
- Select the checkbox for Voice calls service.
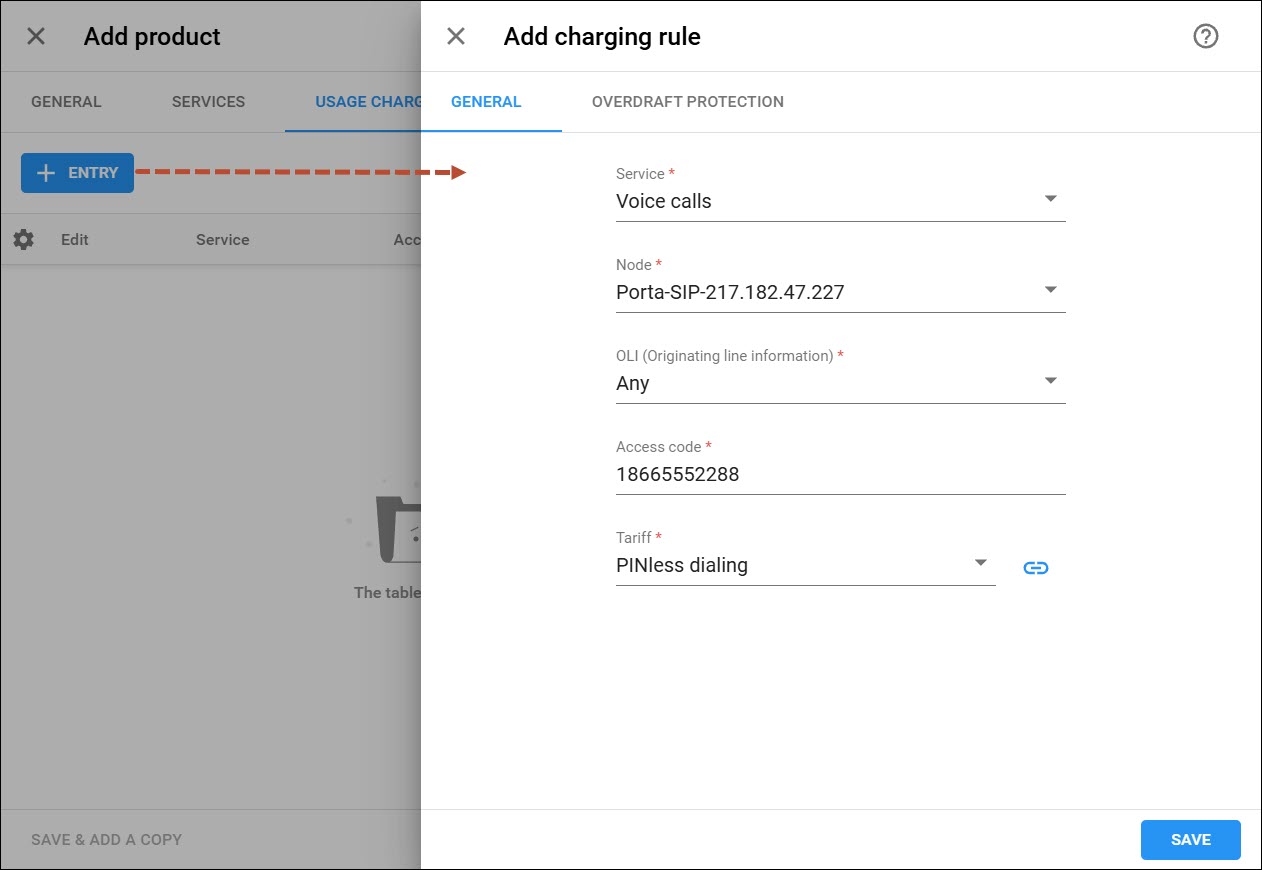
- Usage charging tab:
- Click + Entry and fill in the required information:
- Service – select Voice Calls.
- Node – select the PortaSIP node.
- OLI (Originating line information) – select Any.
- Access code – type the access number that you have added for the IVR application. (e.g., 18665552288).
- Tariff – choose the tariff that will be applied to your prepaid calling card customers.
- Overdraft
protection – to configure overdraft protection for this product, consult
the Configure overdraft protection section within the product section
in the Overdraft
protection configuration handbook.
If you use several access numbers for the IVR application, you must add a rating entry for each of them.
- Click + Entry and fill in the required information:
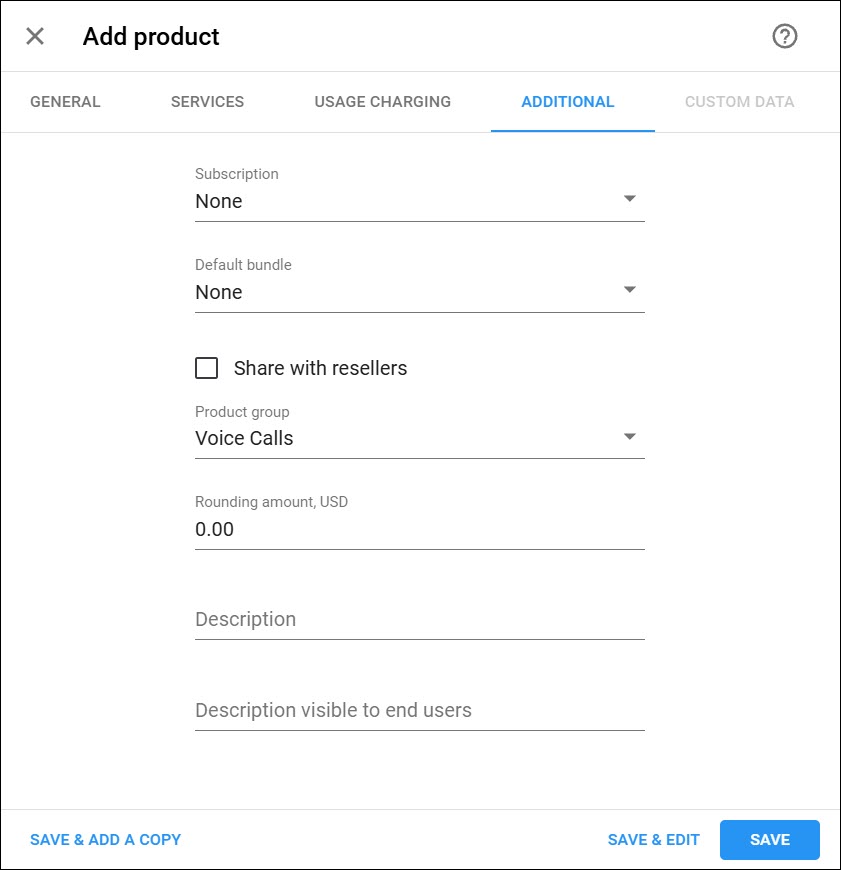
- Additional tab:
- In this tab you can fill in the following product
information:
- Product group – a product group is a custom grouping of add-on products on the account self-care interface. Select None for this product.
- Description – your internal comments about the intended use of this product.
- Description visible to end users – provide a product description to be shown to
end users on their self-care interfaces.
- In this tab you can fill in the following product
information:
- General tab:
- Click Save.
Create a customer class
A customer class provides the ability to define a group of parameters in a centralized manner, and then apply those parameters to many customers simultaneously.
- On the navigation menu, select Sales, then select Customer classes.
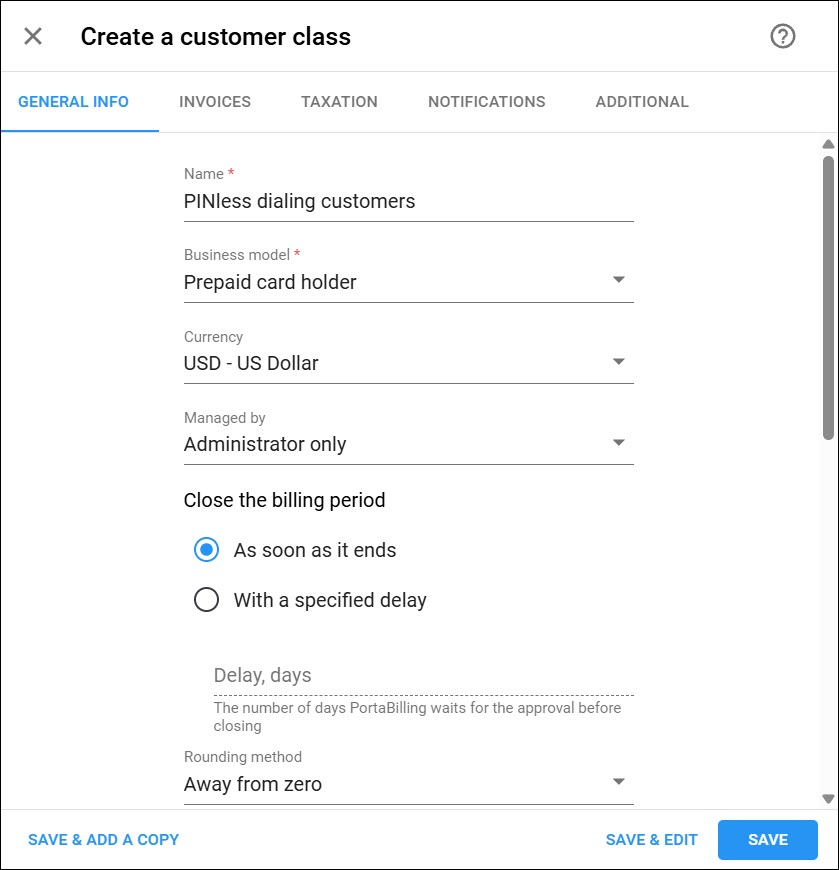
- Click + Customer class and fill in the customer class details:
- Name – type a short name for this customer class.
- Business model – select which customers this customer class will apply. Select Prepaid cards holder from the list.
- Currency – specify the currency in which you want to set the Collection threshold. When specified, this customer class can only be assigned to customers with the same currency. Once the currency selection is saved, it cannot be changed.
- Managed
by – select Administrator only.
- Click Save.
Create a customer
A customer is an owner of accounts. The customer’s contact information is used to distribute account usage information, call statistics, invoices, and so on. Since PINless dialing is a prepaid service, in this example we will describe how to create a prepaid customer.
- On the navigation menu, select Sales, then select Customers.
- Click + Customer and fill in the customer details:
- General tab:
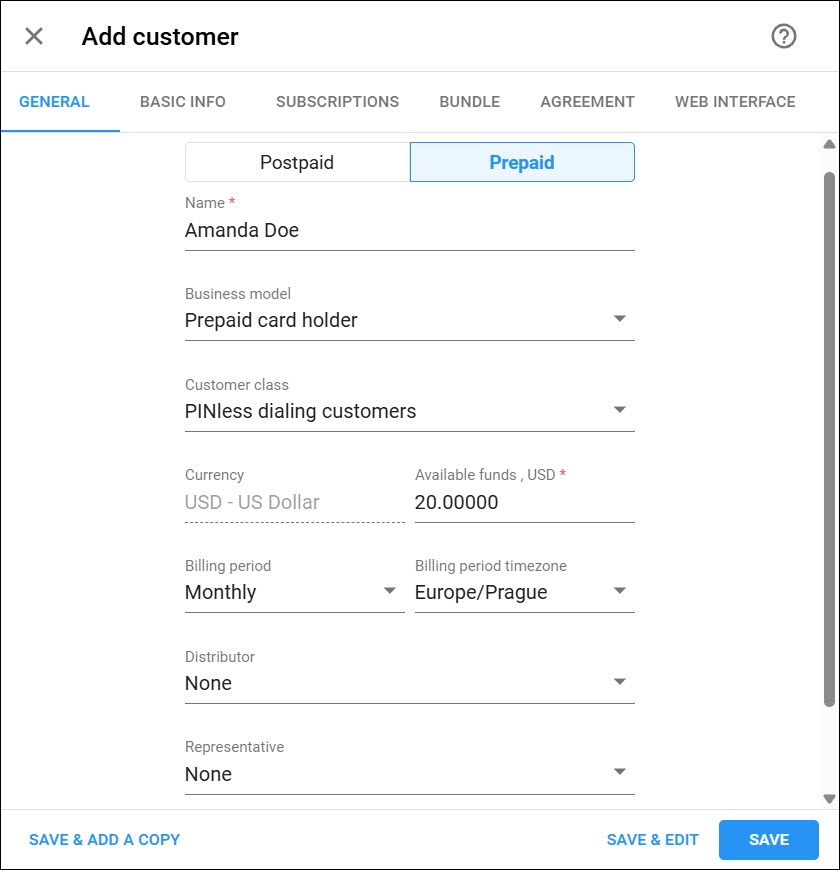
- Balance control – select Prepaid.
- Name – type a short name for the customer object; this will be used on the web interface.
- Business model – a business model defines what type of service is to be provided to the customer. Select Prepaid card holder for this customer.
- Customer class – customer class allows you to define a policy for automated payment collection. By choosing a specific class here the customer will automatically inherit all of the class properties (grace period, invoice template, etc.). Select the previously created customer class (PINless dialing customers).
- Currency – choose the currency in which this customer will be billed.
- Available funds – specify the amount a customer has paid you when signing up.
- Billing period – choose a billing period for the customer. A billing period defines the frequency of invoicing for this customer.
- Billing
period time zone – choose a time zone in which customer’s billing
period will be closed and invoices will be generated.
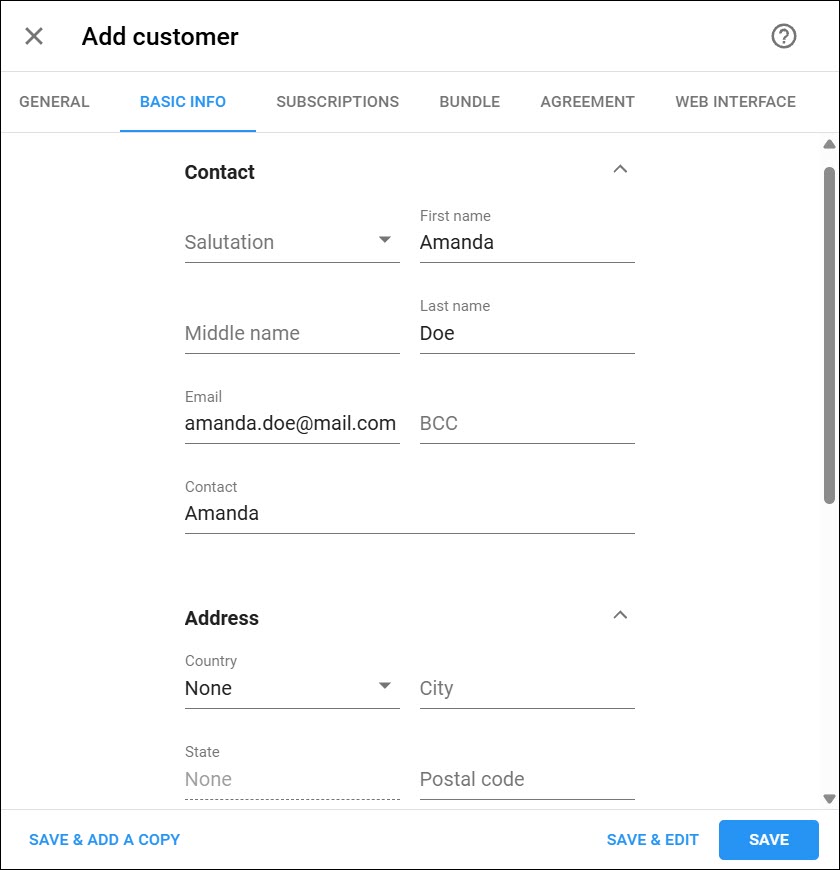
- Basic info tab:
- Fill in the customer’s personal information
and an email address for the receipt of accounting information. After
the billing period is over, a list of xDRs and other statistics will be
sent to this address.
- Fill in the customer’s personal information
and an email address for the receipt of accounting information. After
the billing period is over, a list of xDRs and other statistics will be
sent to this address.
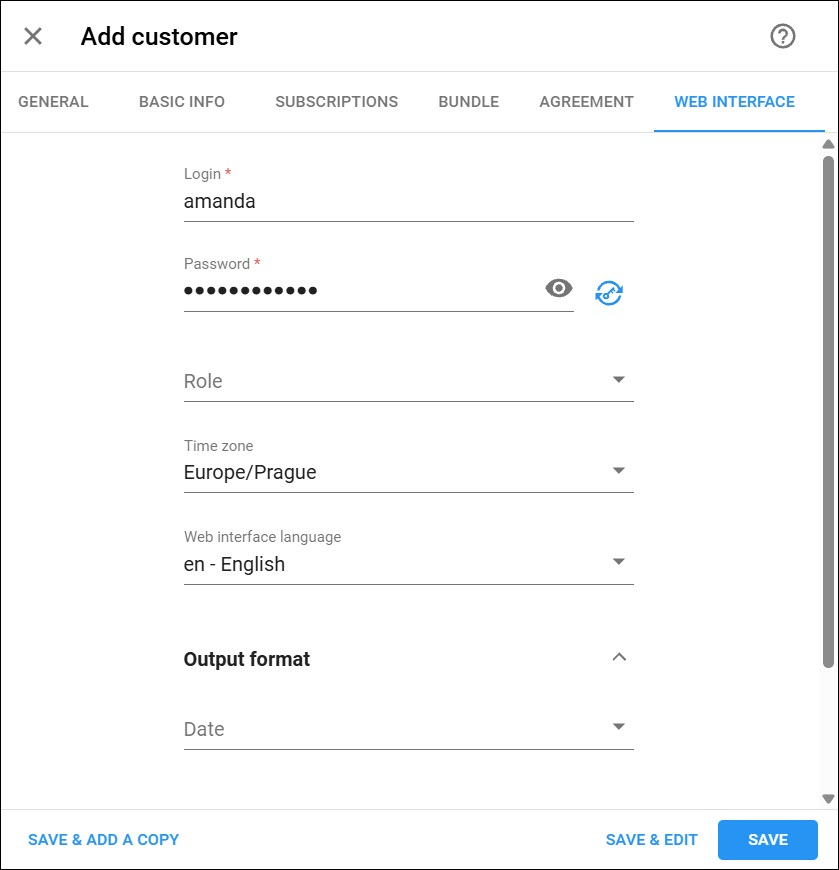
- Web interface tab:
- Define credentials and preferred settings (such as language, time zone, date input and output formats) for this customer’s self-care interface.
- Define credentials and preferred settings (such as language, time zone, date input and output formats) for this customer’s self-care interface.
- General tab:
- Click Save.
Create an account
An account identifies the end user who uses the service. In the case of the PINless dialing service, the account is a PINless account with a unique @ani suffix.
- On your customer panel, click Accounts / DIDs.
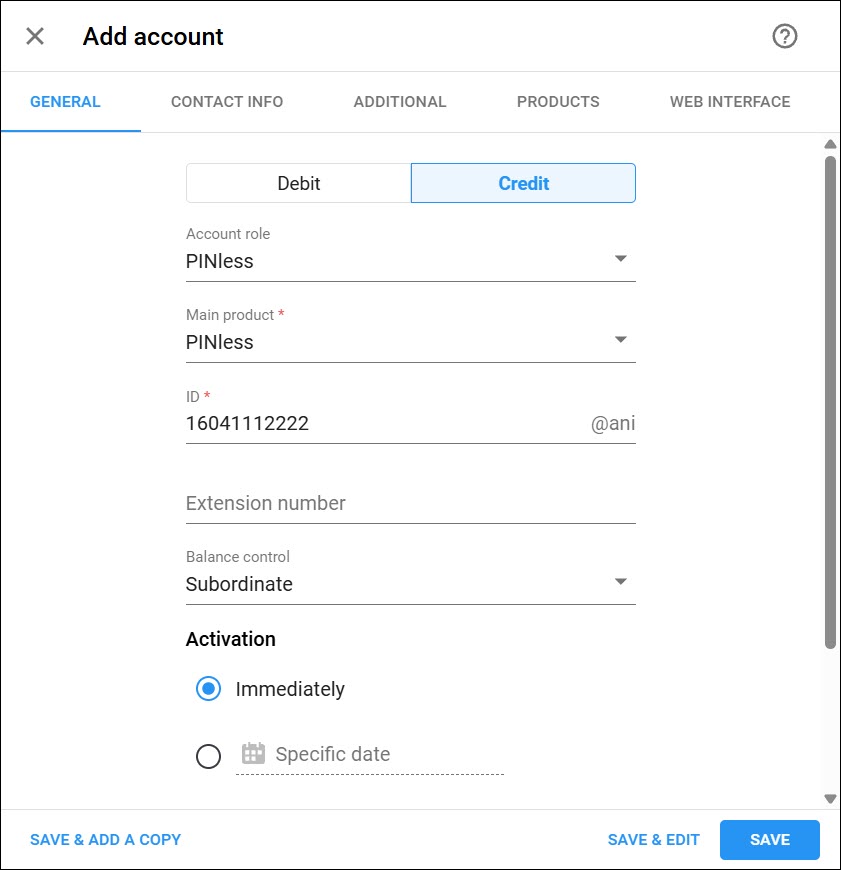
- Click + Account and fill in the account details in the General tab:
- Type – select Credit.
- Account role – select PINless.
- Main product – select the product you just created (PINless dialing).
- ID – type the customer’s mobile number (e.g., 16041112222).
- Balance control – select Subordinate.
- Activation – leave the default value as is. The account will immediately
be activated.
- Click Save.
Amanda can now use the service.
Give Amanda the customer self-care portal credentials (login: amandadoe, password: yUS867) so that she can keep track of her calls, balance and top up her funds on her own, as needed.