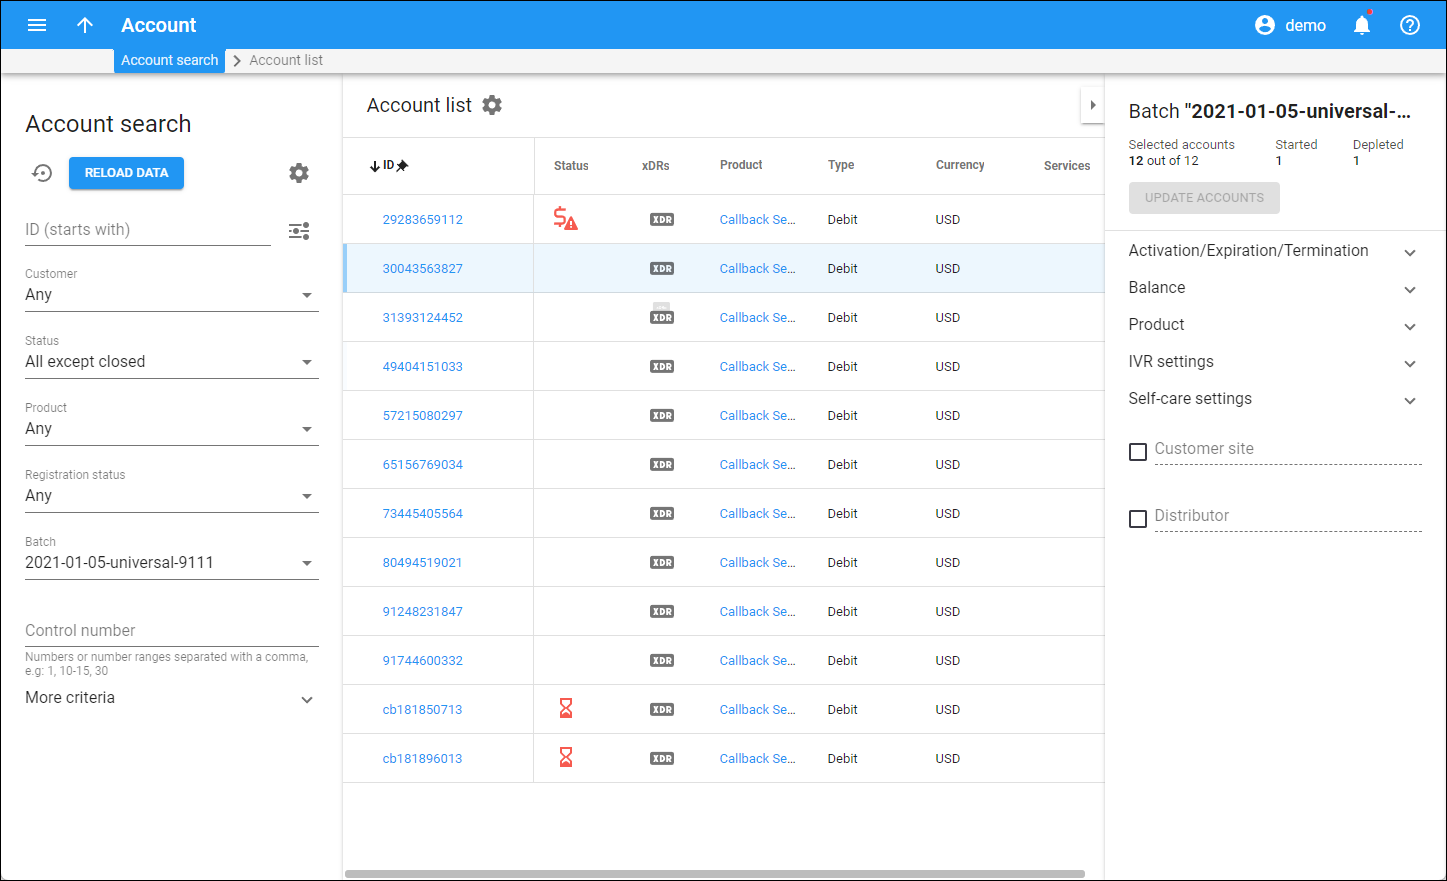
To update multiple accounts, filter the specific batch of accounts you want to modify on the Account search panel. The actions remain read-only until you filter the accounts by a specific batch.
At the top of the panel, you can see the name of the filtered batch and the total number of Selected, Started, and Depleted accounts:
- Selected – this shows the number of filtered accounts in the selected batch.
- Started – this shows how many accounts have been used at least once (by making a successful call/session or having been used in successful IP phone registration).
- Depleted – this is the number of accounts that have been used up (have zero funds or the amount of funds is less than the rounding amount specified in the product configuration).
To update accounts, select attributes to update from the dropdown checkbox menu and set the required values next to them. Once you click Update accounts, you can see the list of applied filtering criteria and the settings to be changed in the confirmation dialog window.
Activation/Expiration/Termination
Activation date
You can change the already set activation date for accounts. To set a new activation date, click Calendar ![]() or specify the date manually in the YYYY-MM-DD format.
or specify the date manually in the YYYY-MM-DD format.
Note that the activation date is set in the customer’s billing time zone.
Expiration date
Define the date when the accounts can no longer be used. Note that this date is in the customer’s billing time zone.
You can activate expired accounts, click Calendar ![]() to define a new expiration date or specify the date manually in the YYYY-MM-DD format.
to define a new expiration date or specify the date manually in the YYYY-MM-DD format.
Availability period after first usage, days
Specify the number of days the accounts remain active after the first usage or recharge.
Activate all accounts with the “Inactive” status
Turn on the toggle and the accounts with the “Inactive” status will be activated immediately after applying the changes.
Change status to
- Blocked – once you block accounts, no services are provided. Accounts still have access to their self-care pages. Blocked accounts are not subject to maintenance charges though subscription fees still apply.
- Unblocked – restore the accounts from being blocked.
- Terminated – no services can be used and service access cannot be restored. No further operations are possible with these accounts.
Balance
- Opening balance – defines the amount of money a debit account has for service usage.
- Charge – use this transaction to manually charge the account for a specific service it used.
- Refund – use this transaction to refund the payment received from the account earlier.
Product
-
Product – choose the main product for the accounts. The product defines which services are provided to end users.
-
Add-on product – choose one or several add-on products associated with the accounts’ main product. Add-ons enable access to certain service features (e.g., call waiting) and have a recurring cost (subscription) associated with them.
Charging period
Select the charging period to apply a specific multi-month prepaid plan, e.g., for 6 months of use.
This field is available if the list of prepaid plans is configured in the in-advance subscription assigned to the main and/or each add-on product.
IVR settings
- Associated number – specify the number to be sent back to the IVR to confirm authorization. For example, it might be a redirect to a technical support number in an IVR application. For prepaid accounts, it might be a quick-dial number.
- Unified messaging – enable or disable access to the Unified messaging system for the filtered accounts. You can set this option as defined by the product or override the product settings by choosing Yes/No.
- Preferred IVR language – select the preferred IVR language from the language list.
Self-care settings
- Time zone – set the time zone for the accounts’ web self-care pages. When an account owner accesses the web self-care page to see a list of their calls, the time is shown in the appropriate time zone.
- Role – select the role to assign to the filtered accounts. A role contains a set of permissions to access web self-care components: tabs, features, etc. Each account is created with the default role. To create a new role, go to My company > Access control > Roles.
Customer site
Choose a specific customer site so that the site parameters (e.g., number of simultaneous calls) will apply to the filtered accounts.
A customer site defines a group of accounts managed as a single entity. This allows you to apply certain configuration parameters or service restrictions to the accounts in that group. To add a customer site, go to Customer > Sites > Add a site.
Distributor
You can assign a specific distributor to the group of accounts. Note that the distributor will be charged once the activation is complete.


