Design invoices with a user-friendly external service
There are many online services available in the market offering versatile tools for invoice PDF files branding and customization. These tools include convenient visual editors, a variety of fonts, the ability to add barcodes and QR codes, and more. You can send dynamic data to these services via the API to produce PDF files for multiple invoices. Each of these services uses its own proprietary API. Add-on Mart acts as a mediator, enabling PortaBilling to connect with any of these services by translating API calls.
Now, you can leverage best-of-breed tools to design invoice PDF files by integrating with such external services via the Add-on Mart.
To use the integration with an external template service, you need to:
- Sign up for an account with the external service (such as CraftMyPDF)
- Subscribe for the corresponding module in Add-on Mart
- Configure the integration:
- Obtain the API key from the external service and enter it on the Add-on Mart module’s Configuration UI
- If it’s the first module you activate, specify the Add-on Mart credentials in PortaBilling
Say you design an invoice template in CraftMyPDF by uploading your logo, adjusting the layout, and adding the variables that will be populated with the PortaBilling data. The layout editor provides a quick preview of the invoice with test data. Once you’re satisfied with the invoice’s appearance, you can start using this template.
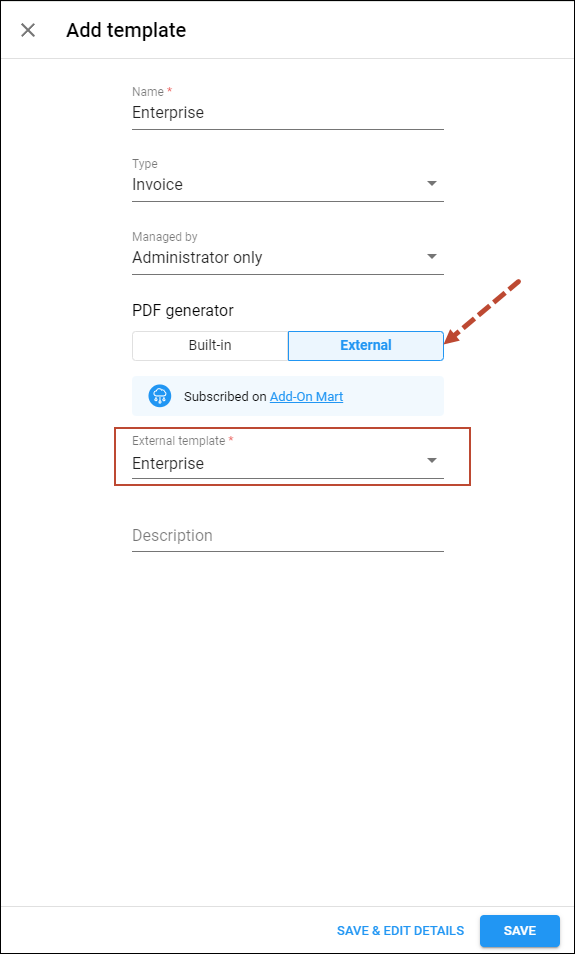
All templates created through the external service will be automatically displayed alongside other templates within the PortaBilling system.
You can assign the template to a specific customer class or individual customer.
You have a flexible tool to quickly design invoices according to your business branding and requirements.
Call center supervisor role
A new role, the “Hunt Group Supervisor,” has been introduced in PortaBilling. This role is designed to provide supervisors with access to the call center management portals such as the PortaOne’s Cloud PBX Self-Care Portal. While call center admins have access to data from all hunt groups, the new role allows you to restrict call center supervisors’ access within the portal exclusively to data pertaining to the hunt groups they supervise and agents within these groups. This ensures that both call center admins and supervisors overseeing only specific hunt groups can use the same portal securely and efficiently.
In a call center with two help desks serving clients from different locations, there are distinct agent teams: “English,” supervised by John, and “Spanish,” supervised by Paula. Both supervisors oversee their team performance by checking statistics and by joining agents’ calls and can manage the hunt group and extension settings.
To enable John and Paula to manage these tasks through the Cloud PBX Self-Care Portal, the call center admin adds John and Paula as supervisors to respective hunt groups (referred to as “ring groups” on the portal). Then, the admin creates portal users for John and Paula with the “Hunt Group Supervisor” role.
When logging into the portal and reviewing the list of agents and their active calls, John will only have access to the “English” hunt group, while Paula will only be able to manage the “Spanish” hunt group. This ensures that John and Paula will only see the information, such as the list of agents’ active calls or call statistics, relevant to their respective teams.
- Supervisors can concentrate solely on the hunt groups they oversee, have less distractions, and save time when accessing the necessary information on the portal.
- Service providers can improve their cloud call center solution to better suit call center needs.
Find more details on how it works and the configuration steps here.
Park/retrieve calls using a single key on IP phones
Now, PBX customers can program softkeys on their IP phones that support Busy Lamp Field (BLF) to quickly and conveniently park and retrieve calls with a single button.
Usually, any line key on the IP phone can be configured as a call parking slot. For instance, two parking slots can be configured as line key 1 and line key 2 on a ten-line IP phone. When a receptionist sees the LED indicator on their IP phone signaling that parking slot 1 is available, they can press line key 1 to park a call. There is no need to remember a special service code and enter it in combination with the extension. Parked calls can be retrieved by pressing a key from any IP phone with the same parking slot configured. If automatic retrieval is enabled and a parked call has not been retrieved within the defined timeout, it automatically returns to the phone that was used to park the call.
Say there are ten IP phones throughout the hospital, each configured with two parking slots. Lisa, the receptionist in the hospital, answers a call from a patient using the IP phone at reception. The patient wishes to speak to Dr. Johnson. Lisa sees that the LED indicators for park keys 1 and 2 on her phone are green, indicating both these slots are available for call parking. She parks the call by pressing line key 1, placing the patient on hold. Consequently, the LED indicator for line key 1 turns solid red on the receptionist’s phone as well as on the other nine IP phones showing that there’s a parked call in slot 1.
Lisa then makes an announcement via the public address system: “Dr. Johnson, there’s a call for you on line 1.” Dr. Johnson, who is in the intensive care unit, hears the announcement and picks up the IP phone there. He sees the solid red LED indicator for line key 1 on his phone and presses the line key to connect with the patient. If Dr. Johnson decides to continue this conversation at his desk, he can park the call again, then go to his office and retrieve the call on the IP phone there.
IP phones must support BLF functionality and have programmable keys. The BLF has been tested with IP phone models listed in the SIP devices with supported BLF section.
PBX users can manage calls faster without having to remember and manually dial parking/retrieving codes and extensions.
Find the configuration details here.
Branding web interfaces
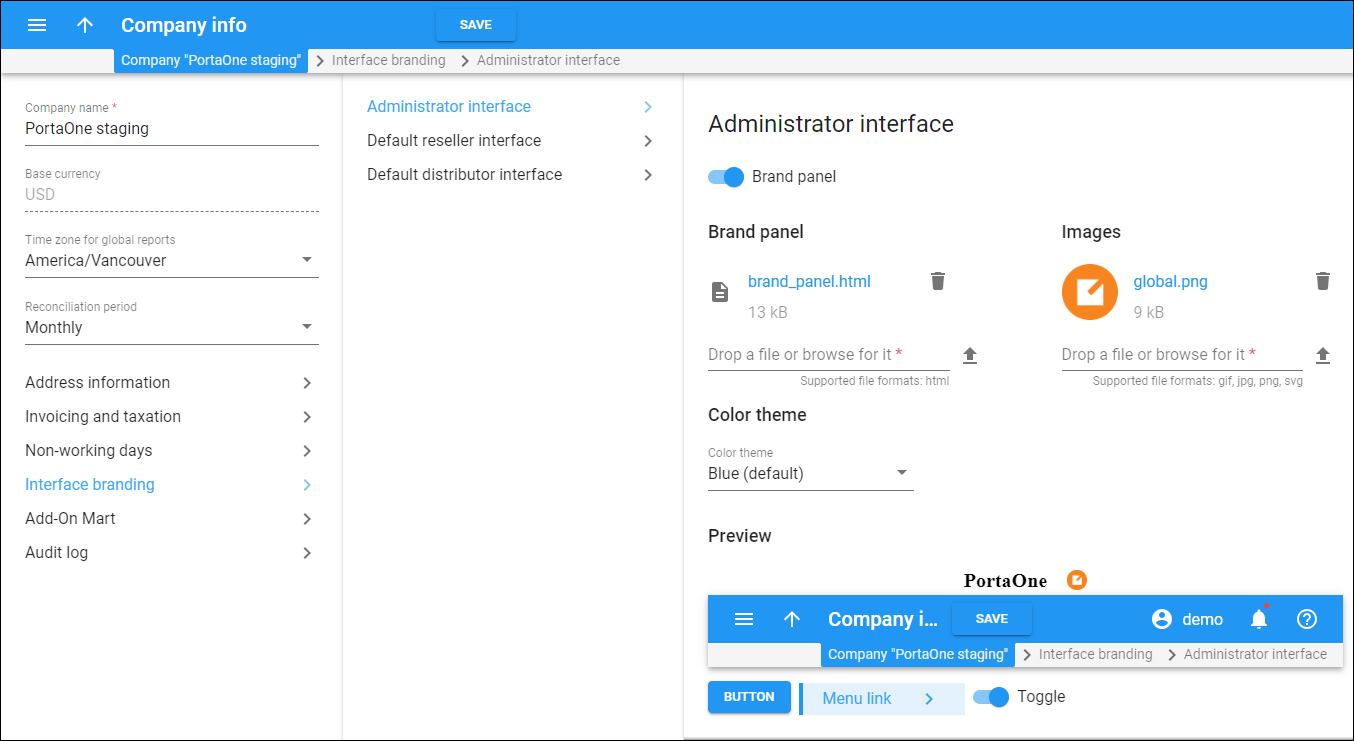
With this release, you can customize the PortaBilling web interfaces for your admins, resellers, and distributors. For instance, you can ensure that your company’s name and logo appear on all web pages of these interfaces.
White labeling helps you manage distinct brand identities and meet the specific needs of each reseller when selling across multiple brands.
Additionally, you can change the PortaBilling color theme to fit your brand colors. The distinct color theme can help your admins to clearly distinguish between the systems when they manage more than one. To visually differentiate between the staging and production systems, you can use the green theme for the production system and leave the default blue color for the staging system.
Staging
Production
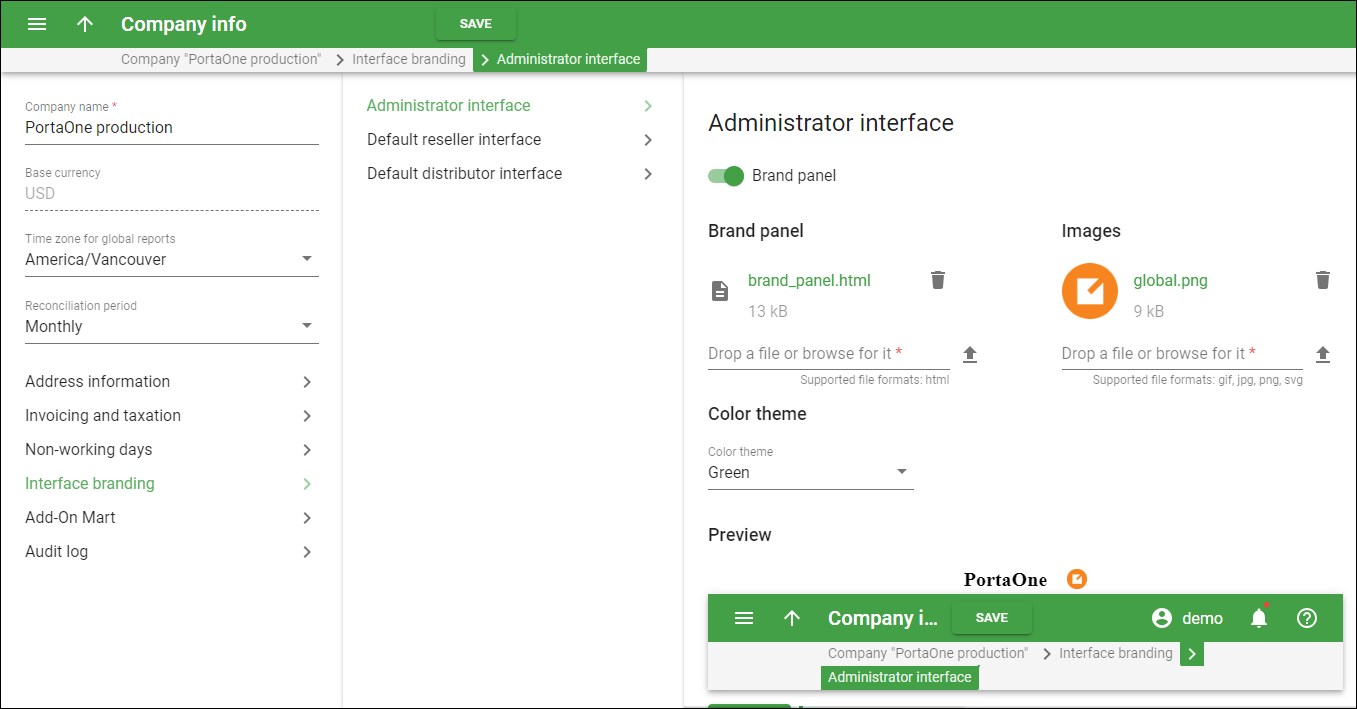 See the configuration details here.
The possibility to brand the interface for the representative is going to be added in future releases.
This enhancement enables you to increase brand awareness and minimize the chances of human error.
Independent configuration of Add-on mart services for service providers and resellers
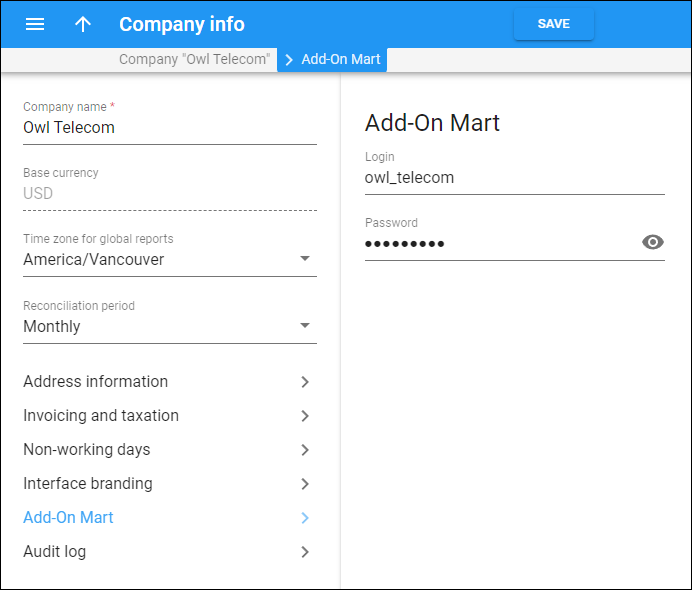
Now you and your resellers can configure Add-on Mart services independently. For example, even if you, as a service provider, do not use a specific Add-on Mart module, your reseller can activate it on their own.
To use Add-on Mart services, PortaSwitch must be set up to connect with the Add-on Mart cloud infrastructure (AMCI) using specific credentials. Upon subscribing to an Add-on Mart module and obtaining these credentials, your admins can enter them directly on the PortaBilling web interface. Similarly, resellers who subscribe to an Add-on Mart module, will receive their own credentials to enter on their reseller portal.
- You can provide more flexibility for your resellers.
- Your admins can save time on Add-on Mart services configuration and coordination with resellers.
Instant access to the built-in API documentation
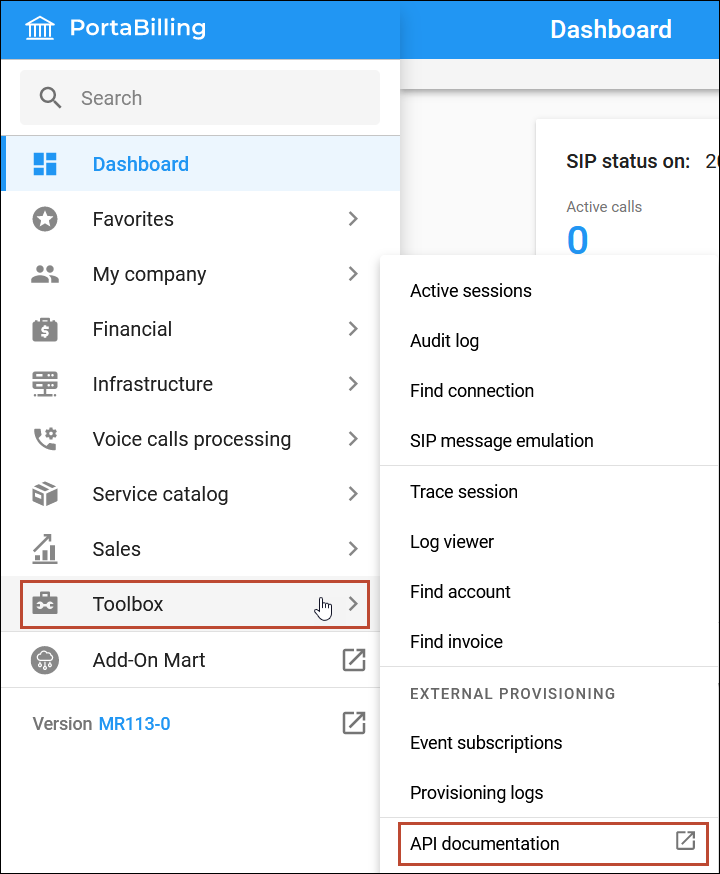
Starting with this release, the built-in API documentation is accessible directly from the PortaBilling main menu. The built-in API documentation allows developers to explore available methods with their parameters, view request/response examples, and execute test requests.
For instance, if your developer wants to prepare some data for tests on the PortaBilling web interface, they can now easily reference and test the necessary PortaBilling API methods and scenarios on the built-in API documentation page.
To access it, simply go to the Toolbox on the main menu and click on API documentation.
Having the link to the API documentation one click away saves time for developers.
Additional clarity for the Vendor’s xDR list
Starting with this release, admins can save time investigating unsuccessful call attempts:
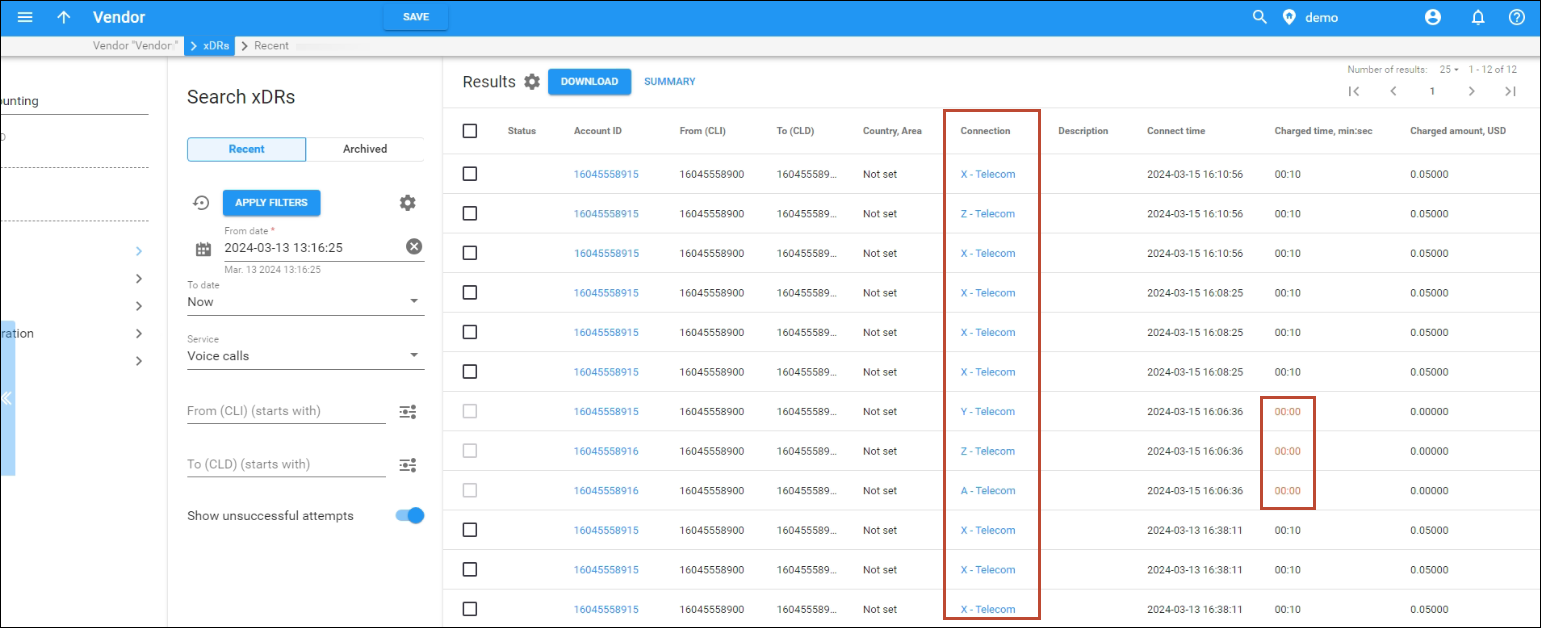
- The new Connection column has been added to the xDRs results panel for voice calls. It displays information about the vendor connection through which a routing attempt was made, and it also serves as a hyperlink to the connection details page.
- Additionally, unsuccessful call attempts display the Charged time and Charged duration in orange on both the xDRs results panel and the Details dialog.
Suppose an admin needs to investigate failed call attempts made through a specific vendor. When the admin navigates to the vendor’s xDRs page, they can quickly identify failed call attempts by the distinct color in the Charged time column. Additionally, admin can observe that seemingly identical xDRs represent call attempts made through different vendor connections.
This enhancement enables admins to save time while troubleshooting unsuccessful call attempts.


