



This handbook demonstrates how to configure PortaBilling for integration with the partner platform by the example of EPC (Evolved Packet Core) by ZTE. PortaBilling supports ZTE provisioning of LTE/3G services to EPC and supports quota control for these services. Note that by combining the PortaBilling system with ZTE equipment, some of the possibilities are limited, e.g., only simple billing without real-time authorization is available; the service policy configuration (e.g., quota control, etc.) is defined on the ZTE side (which requires additional human and system resources), etc.
PortaBilling serves as the BSS system in this configuration. It manages customer data (including unified balance), service configuration details, product/rate tables, etc. PortaBilling allows ISPs to fine-tune a wide range of LTE features according to their business needs, and therefore it provides more flexibility and optimizes resources. Please refer to the LTE сonfiguration handbook to learn more about how to configure basic LTE service on the PortaBilling platform.
To proceed with the LTE configuration based on integration with ZTE, follow the steps described below. This handbook provides the settings required on the PortaBilling side only.
In this handbook, the following scenario is considered: the ISP provides 2 Gb of mobile Internet traffic for a $5 monthly fee. The Internet quota is defined on the ZTE side while end users are charged by PortaBilling.
Configuration overview
- Setup on the Configuration server web interface
- Enable the external systems provisioning framework
- Create the LTE service
- Create a service policy
- Set up the service package:
- Add SIM cards into SIM inventory
- Configure a mobile Internet subscriber:
1. Setup on the Configuration server web interface
1.1 Enable the NetAccess service type.
1.2 Configure Diameter (Gy) settings on the Configuration server
These settings are necessary to allow the PortaBilling server and your gateway (router, modem) to exchange packages via the Diameter protocol. Refer to the LTE сonfiguration handbook for detailed instructions.
2. Enable the External Systems Provisioning Framework
ESPF (External Systems Provisioning Framework) is the event handler framework for provisioning service configuration and for account management operations done in PortaBilling to the mobile carrier’s core.
It consists of events that are processed by handlers – special Perl modules. The events processing results are sent to the carrier’s core. You can configure ESPF event handler module according to the requirements of your business model independently.
To enable the ESPF event handler on the PortaBilling web interface, complete the following steps:
- Go to Infrastructure and select Event handlers.
- Click + Event handler and fill in the details:
- Name – type the event handler name, e.g., “AricentHSS”.
- Type – select AricentHSS.
- Leave the Enabled checkbox selected on to create an active handler.

- Click Save.
When a PortaBilling administrator makes changes for an account (creating, blocking, changing product/Internet access policy, etc.), PortaBilling immediately provisions updated data to the ZTE HSS (Home Subscriber Server) or ZTE SPR (Subscription Profile Repository). HSS then provides centralized user authentication across the network and SPR manages users’ service policies. This way, user data is always up-to-date in ZTE.
3. Create the LTE service
Services provide a way to define how charges are calculated (e.g., whether customers are charged based on the time they stay online or by the amount of data transferred) and how these are then presented on the invoices.
Create the LTE service. It will enable you to provision Internet services for your end users.
- On the navigation menu go to Service catalog and select Services.
- Open
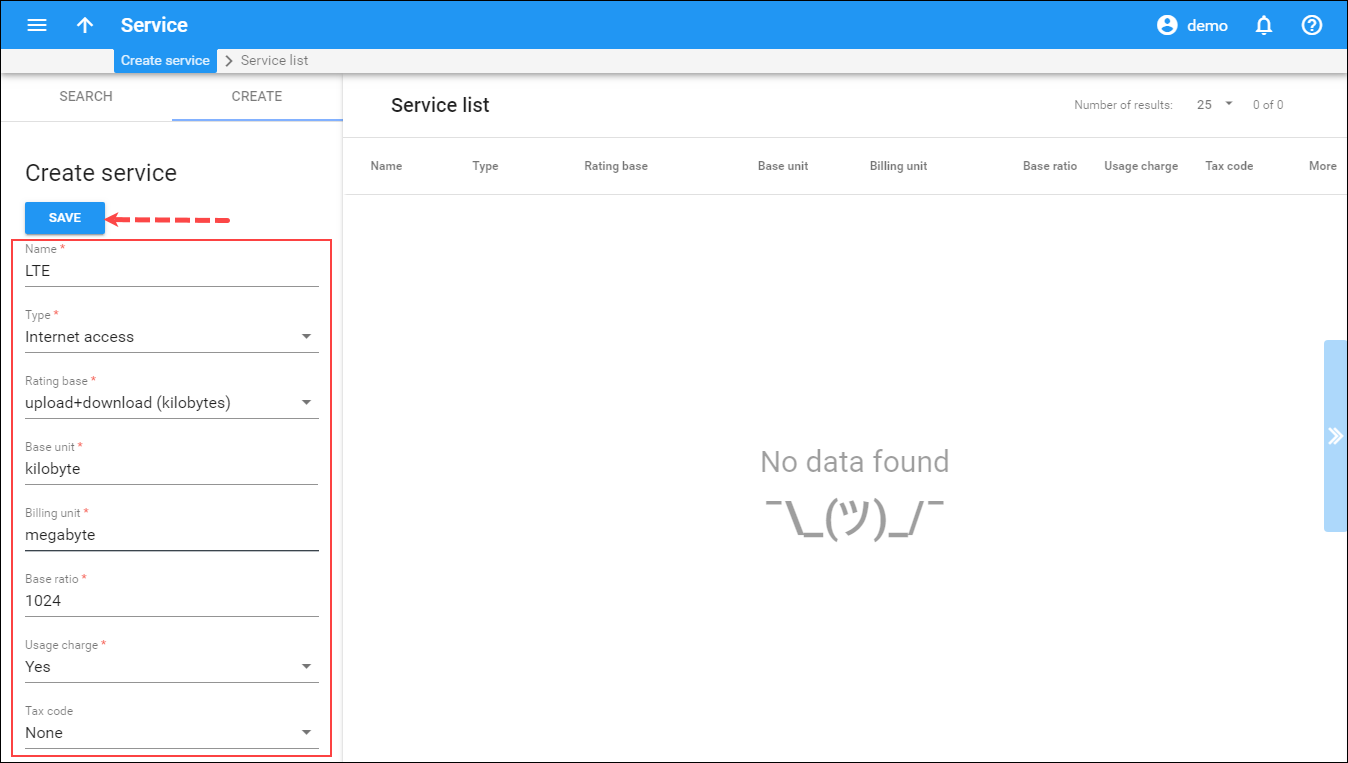
the Create service panel and fill in the required information:
- Name – a short descriptive name for this service that will be used in select menus and shown on the customer self-care pages. Type LTE into this field.
- Type – select Internet access.
- Rating base – select upload+download (kilobytes).
- Base unit – select kilobyte.
- Billing unit – select megabyte. This will be shown on statistics pages and on invoices.
- Base ratio – 1024.
- Usage charge – select Yes here.
- Click Save.
4. Create a service policy
A policy is a collection of rules and parameters that define how an end user is allowed to access the Internet service.
- On the navigation menu, select Service catalog and click Service policies.
- On
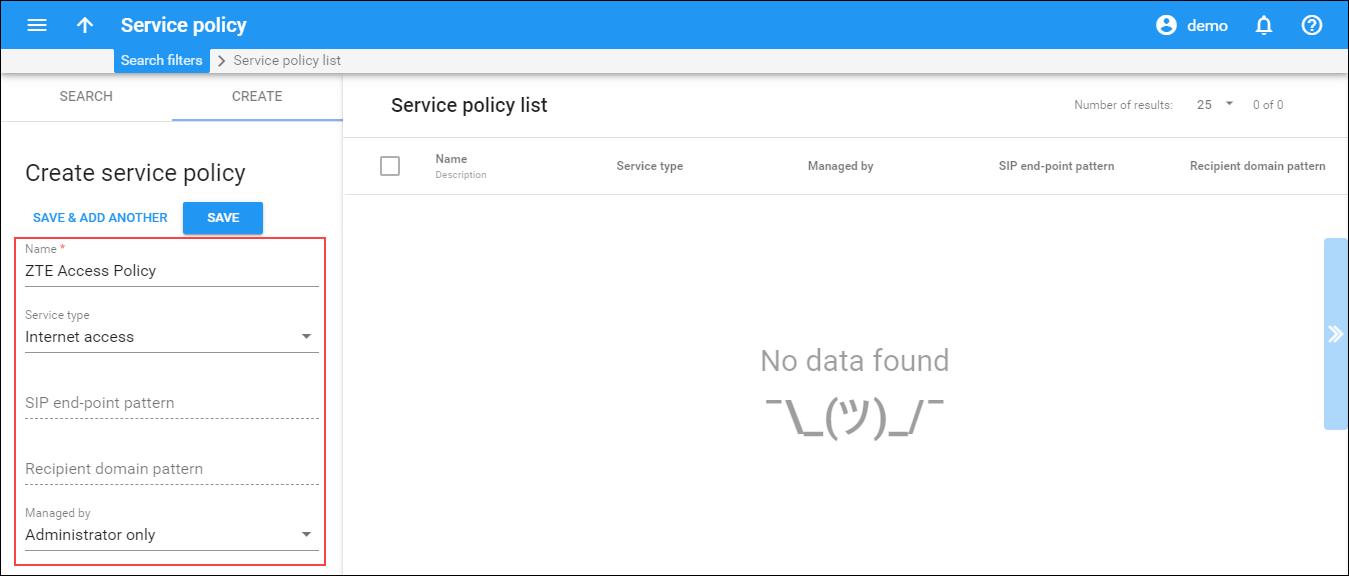
the Create service policy panel, fill in the Service policy
details:
- Name – define a name that matches the speed policy on the network side (e.g., ZTE Access Policy).
- Service type – select Internet access.
- Managed by – choose Administrator only here.
- Click
Save.
- On the Access policy panel, mark the access types on the table and specify their download and upload rates. Please refer to the Broadband internet access services handbook for detailed information about how to configure access types.
- On
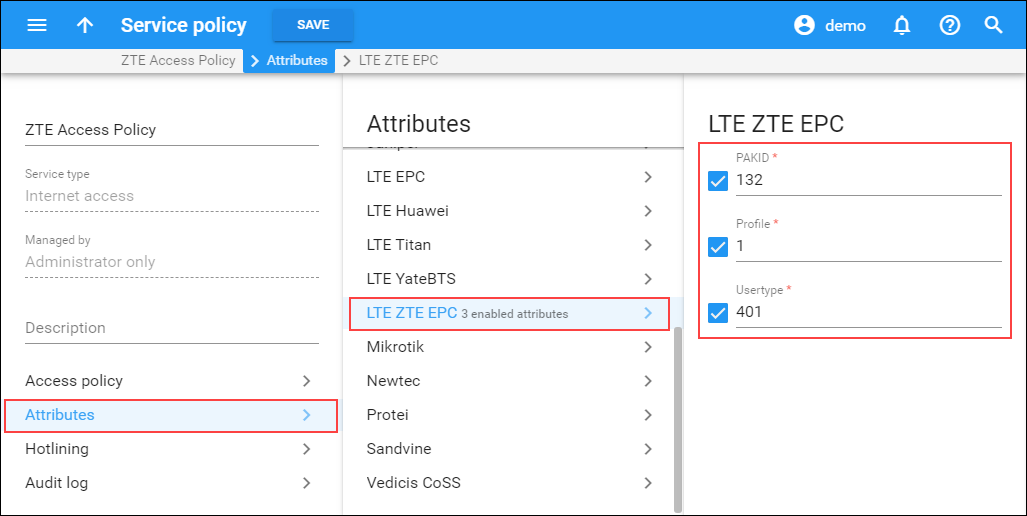
the Attributes panel, select LTE ZTE EPC and configure the
ZTE specific parameters:
- Profile – specify the service configuration value defined in HSS (Home Subscriber Server).
- Usertype – specify the rank of the end user as defined in RCP (Resource and Charging Control Platform). For example, user type 1 represents a gold subscriber; user type 2 represents a silver subscriber, and so on.
- PAKID
– specify the package ID in ZTE SPR (Subscription Profile Repository).
These packages are
configured on the LTE side and define amount of Internet traffic, quality
of service, bandwidth rules, access to sites, etc.
- Click Save.
5. Set up the service package
5.1 Create a customer tariff
According to the current business scenario, end users are charged via subscription plan. That is why real tariffs and rates are not required. Create an empty tariff to make it possible to create a product later on.
- On the navigation menu, select Service catalog and click Tariffs.
- Click + Tariff and fill in the tariff details:
- Name – type in a short name for the tariff object; this is the name you will see in the select menus.
- Currency – select the currency in which you will charge your customers.
- Service – select LTE.
- Applied to – select Customer.
- Managed
by – select Administrator only.

- Click Save.
5.2 Create a subscription
According to the current business scenario, end users are charged a defined monthly amount of money via subscription. To do this, create a new subscription plan.
- On the navigation menu, select Service catalog and click Subscriptions.
- Click + Subscription plan and fill in the required information:
- General tab:
- Name – the name of the subscription.
- Name visible to end user – the name of the subscription plan shown to end users on their self-care interfaces and invoices.
- Currency – indicates which currency is used for pricing information. A subscription
plan can only be applied to a product, account, or customer using this
same currency.
The currency for the subscription plan may only be chosen once and cannot be changed later.
- Managed by – select Administrator only.
- Activation mode – defines when the subscription will be considered active (and charges will begin to apply): either simply from the date it is entered into the system, or you may postpone it until the date when the customer actually uses the account for the first time. Select Upon the account’s first usage.
- Subscription charges applied – select In advance, to apply subscription charges to the account/customer balance during the first days of the billing period.
- Periods in advance – specifies for how many periods advance charges should be made. Type in 1.
- Can be applied more than once – select
this checkbox to assign the same subscription multiple times to one account.
You can only use
this option when you are adding a new subscription plan. For new subscriptions,
the Can be applied more than once
option is off by default (so that subscription charges are not applied
multiple times for the same account).

- Fees tab:
- Activation fee – the value charged for every new subscription upon startup. Leave “0” to waive the activation fee.
- Monthly fee – specify the fee value that will be applied to your customers
every month.

- General tab:
- Click Save.
5.3 Create a product
Accounts for specific products will be issued for accessing your Internet services.
- On the navigation menu, select Service catalog and click Products.
- Click + Add and fill in the product details:
- Name – type in a short name for the product object; this is the name you will then see in the select menus.
- Name visible to end users – specify the name of this product that your customers will see on their self-care interface.
- Product type – select Main product here.
- Currency – choose a currency the product will be priced in.
- Managed by – select Administrator only here, since we are setting up a service without the involvement of resellers.
- Account default ACL – choose an Access Control List (ACL) for accounts with this product assigned. ACLs control which objects end users can access to and which actions they can perform.
- Account role –
select Mobile to associate this product with mobile subscribers.

- Click Save&Edit.
- Go to Services and click Add a service.
- In the Select services to add dialog, select LTE and Mobile
network provisioning, click Add.
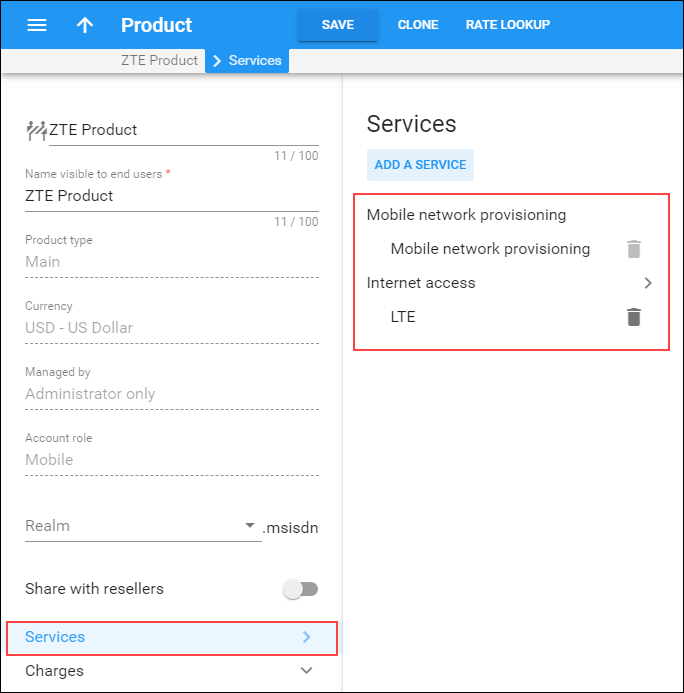
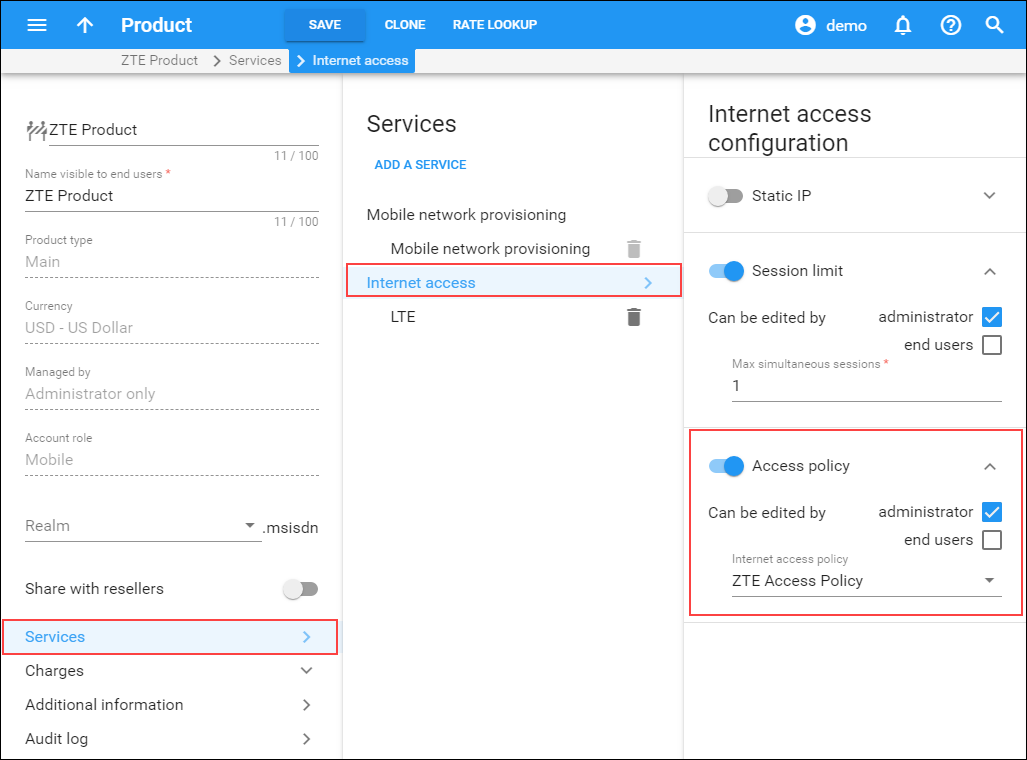
- To configure the LTE service, click Internet access and configure the following:
- Access policy – turn on the toggle if you need to define an Internet access policy and set different bandwidths for different times of day.
- Internet access policy –
select the access policy you created earlier
(e.g., ZTE Access Policy).
- Configure general info:
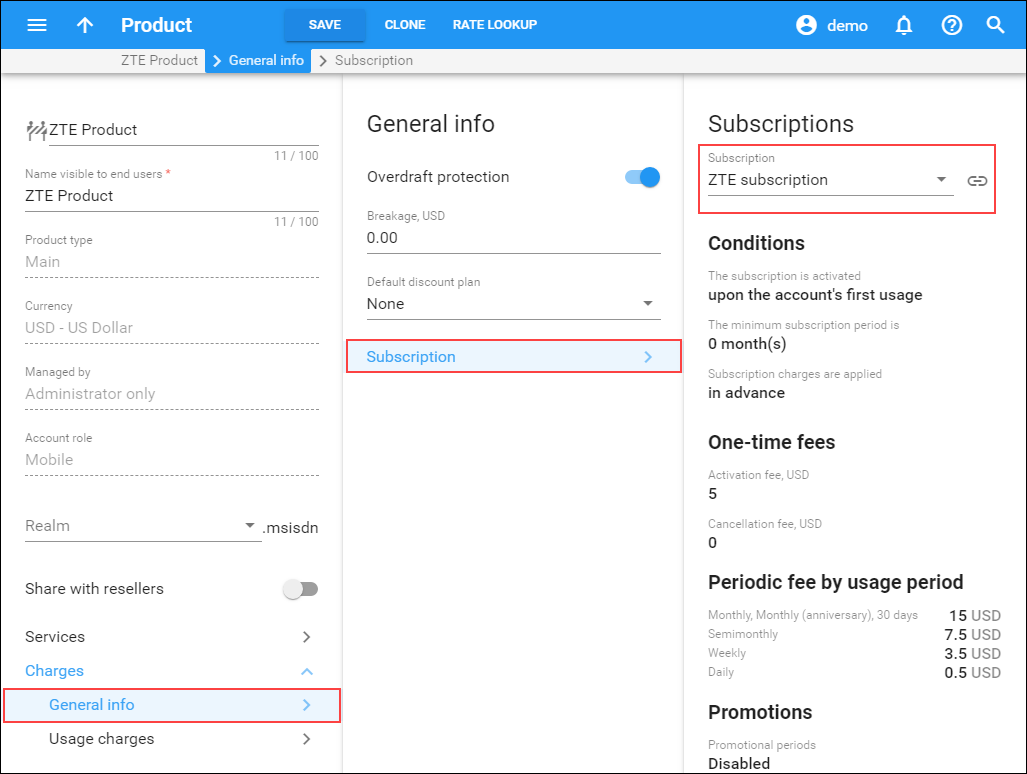
- Go to Charges > General info and fill in the details:
- Subscription
– to bundle the required subscription with the product, select previously
created ZTE subscription plan from the list of subscription plans
- Subscription
– to bundle the required subscription with the product, select previously
created ZTE subscription plan from the list of subscription plans
- Click Save.
- Go to Charges > General info and fill in the details:
- Configure usage charges:
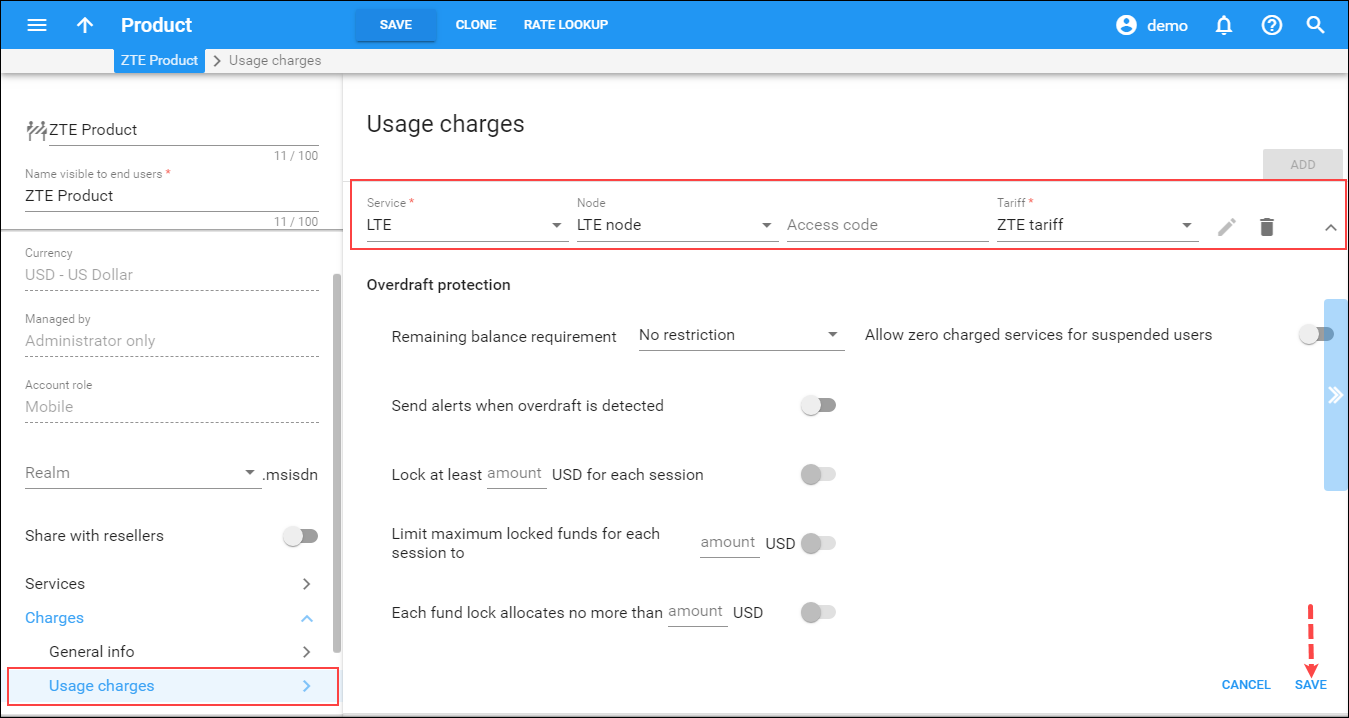
The rating list has two functions: it defines permitted access points (nodes and access numbers) and specifies which tariff should be used for billing in each of these points.
- On the Usage charges panel, click Add.
- Fill
in the required information:
- Service – select LTE.
- Node – select LTE node.
- Access code – leave this field empty for the basic SIP service.
- Tariff – select the previously created ZTE tariff.
- Overdraft
protection – to configure overdraft protection for this product, consult
the Configure overdraft protection section within the product section
in the Overdraft
protection configuration handbook.
- Click Save.
6. Add SIM cards into the SIM card inventory
Refer to the Enter SIM cards into the SIM card inventory section of the MVNO service provisioning handbook to find out how to add SIM cards into the SIM card inventory.
7. Configure a mobile Internet subscriber
7.1 Create a customer
A customer is an owner of accounts. Customer contact information is used for distributing account usage information, Internet access statistics, invoices, etc. You usually need to create one customer per each retail prepaid ZTE user.
- On the navigation menu, select Sales, then select Customers.
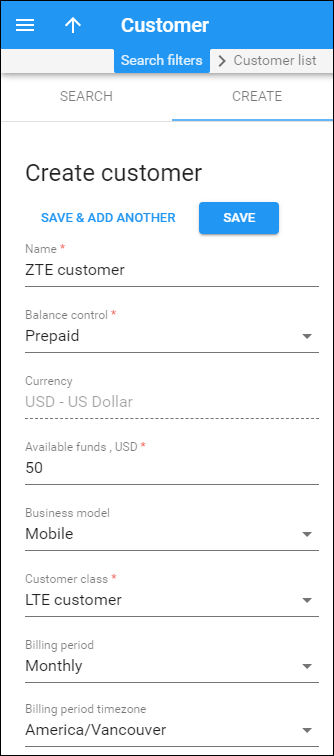
- On
the Create customer panel, fill in the customer details:
- Name – type a short name for the customer object; this will be used on the web interface.
- Balance control – select Prepaid in this field.
- Currency – choose the currency in which this customer will be billed.
- Available funds – the amount of funds available for the customer to spend on services.
- Business model – a business model defines what type of service is to be provided to the customer. Select Mobile for this customer.
- Customer class – customer class allows you to define a policy for automated payment collection. By choosing a specific class here the customer will automatically inherit all of the class properties (grace period, invoice template, etc.). Select the previously created customer class.
- Billing period – choose a billing period for the customer. A billing period defines the frequency of invoicing for this customer.
- Billing
period time zone – choose a time zone in which customer’s billing
period will be closed and invoices will be generated.
- Click Save.
7.2 Create an account
You need to create an account for each device that has a unique SIM card.
- On your customer’s panel, click Accounts.
- On
the Create an account panel, specify the account’s details:
- ID – the ID to be used to authorize Internet access. You can type in the user’s phone number manually or provision it from the DID inventory.
- Account role – select Mobile.
- IMSI
– click on the IMSI icon
 and
select one of the available SIM cards from the SIM Card Inventory dialog
box.
and
select one of the available SIM cards from the SIM Card Inventory dialog
box. - Product – select the ZTE Product here.
- Activation date – the date from which the account is usable.
- Type – select Credit for your postpaid Internet users.
- Balance
control – select Subordinate from the list.
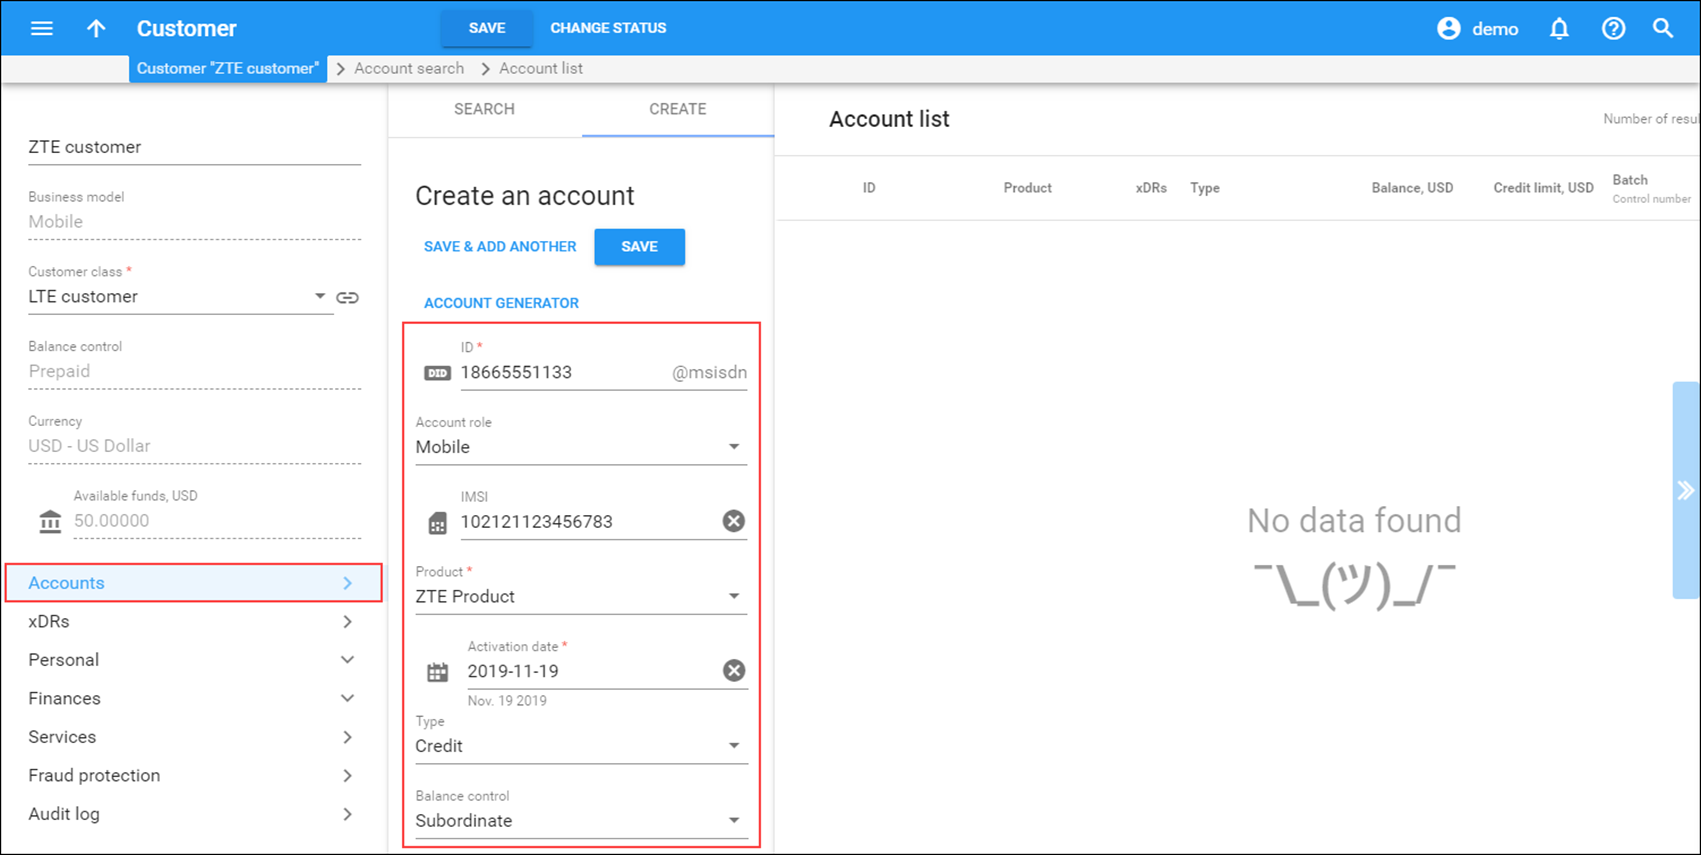
- Click Save to create an account.


