



To stay competitive in the market, CSPs must ensure that customers enjoy services both on their home network and while visiting other countries. Roaming charges are higher than domestic ones; therefore, real-time billing for service usage is crucial, as it prevents customers from overspending.
PortaBilling supports real-time billing for services used in roaming. To bill for data usage, PortaBilling selects a tariff rate based on the MCC-MNC codes that identify the subscriber’s visiting network. Note that the ASN-GW must send the 3GPP-SGSN-MCC-MNC attribute in Diameter (Gy) requests.
To bill for voice calls and SMSs, PortaBilling uses the identification of the roaming zone and visiting network to match the correct tariff in the product and calculate the charges. This billing model is supported with the third-party CAMEL gateway and the third-party SMSC, respectively.
To grant access to users for the services you must first provision their data to the mobile core. Thus, depending on what mobile core equipment you have or have access to (HLR/HSS, PCRF, etc.), you must configure them and then configure data provisioning in PortaBilling. The HSS, PCRF configuration is out of the scope of this document since it depends on which equipment you have.
This chapter demonstrates how to set up real-time billing for roaming services.
Scenario
An MVNO operates in the UK on a 4G network. They have roaming agreements with mobile carriers in the US, Canada and Australia. The US and Canada belong to roaming zone 1. Australia belongs to roaming zone 2.
The MVNO’s roaming service bundle includes voice calls, SMS and Internet services charged as follows:
|
From |
Home network |
Zone 1 |
Zone 2 |
|
To |
|||
|
Home network |
0.03 |
0.2 |
0.4 |
|
Zone 1 |
0.2 |
0.6 |
0.95 |
|
Zone 2 |
0.35 |
1.0 |
0.8 |
|
Incoming calls from |
0 |
0.5 |
0.7 |
|
SMS |
0.05 |
0.3 |
0.5 |
|
Internet access |
0.1 |
0.5 |
0.7 |
Preliminary Configuration
In this handbook, we assume that you already configured your mobile service provisioning with real-time user authorization on your home network. Please refer to the Voice calls service configuration for MVNO handbook for detailed information about how to configure and provide voice calls, SMS and Internet access services in the home network.
Configuration overview
- General configuration
- Roaming voice calls configuration
- Roaming Internet service configuration
- Roaming SMS service configuration
- Product configuration
- Account provisioning
General configuration
Configure Diameter module on the Configuration server
PortaBilling communicates with the mobile core via the Diameter protocol. Therefore, you must set up the Diameter module in PortaBilling.
- On the Configuration server web interface, clone the currently active configuration.
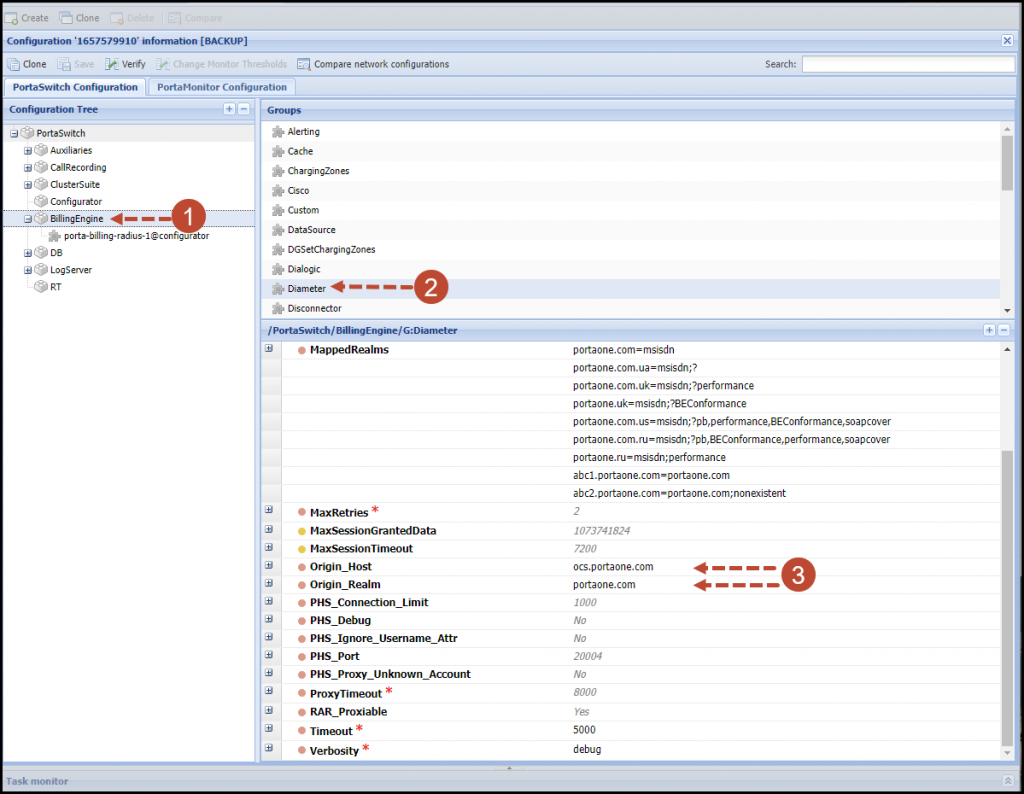
- From the configuration tree, select BillingEngine -> Diameter and configure the following parameters:
- Enabled – select Yes.
- Origin_Host – specify the domain name of your billing node (recommended format: hostname.domainname). This is used to identify the node in data communications.
- Origin_Realm – specify your billing node realm.
- Select BillingEngine> NetAccess and configure the following parameters:
- RateMatchWithE212 – select Yes. This is required to calculate charges based on the E.212 rate pattern.
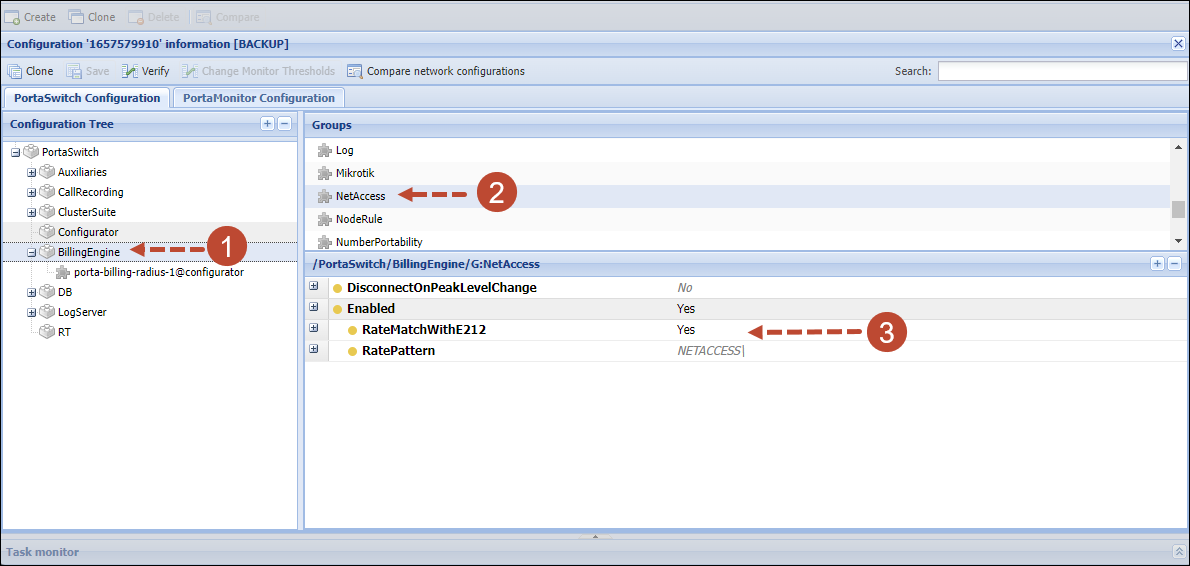
- RateMatchWithE212 – select Yes. This is required to calculate charges based on the E.212 rate pattern.
- To identify users’ roaming zones, select BillingEngine -> Custom and enter the following string in the LoadModules option:
roamingzone=Porta::Extra::RoamingAccessCode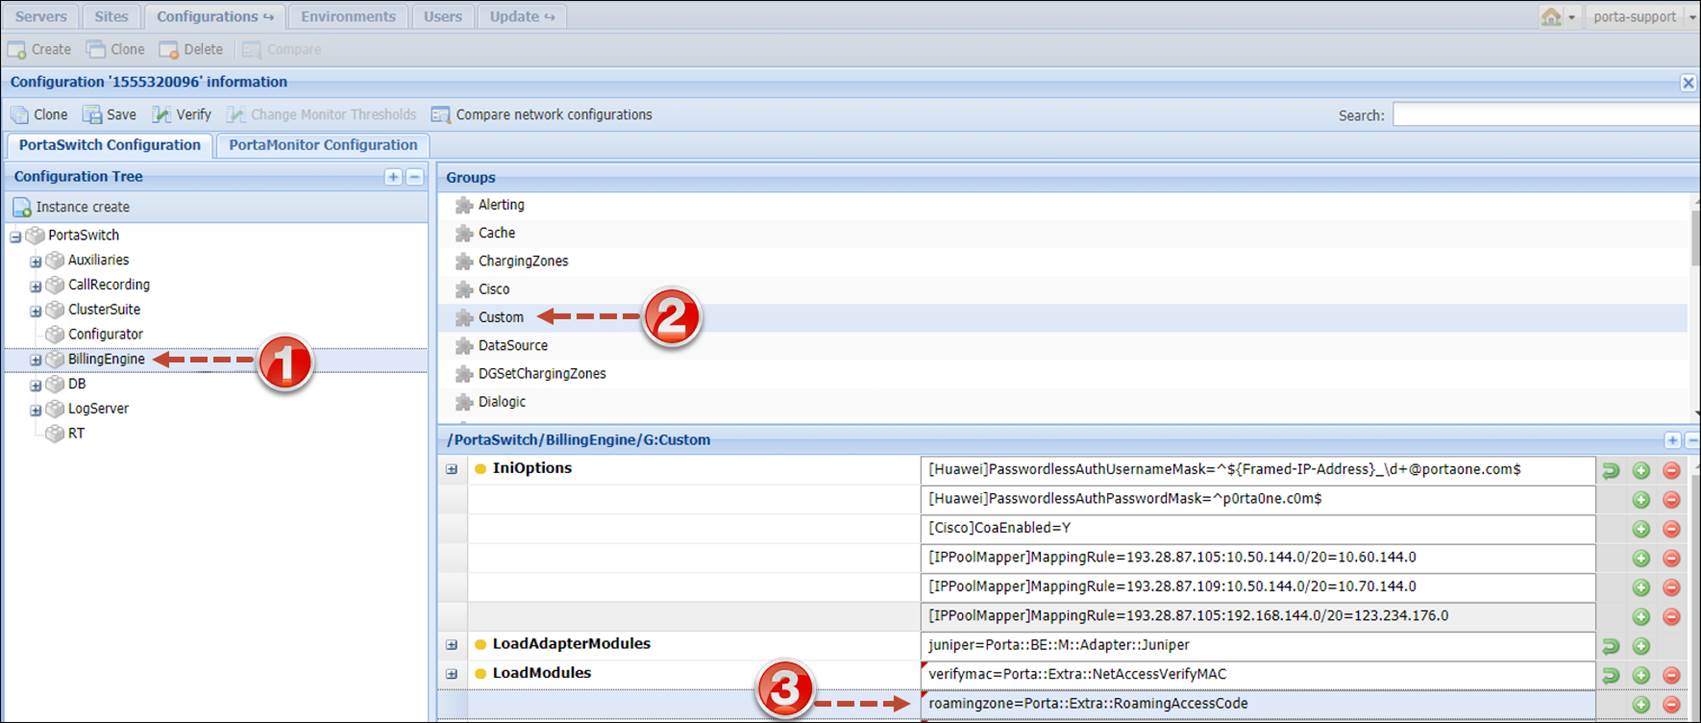
- Click Save.
- Click Save and then Verify.
- Verify the new configuration and click Check/Apply to apply it.
Note that the RADIUS service needs to be reloaded, so for best results, apply the configuration during an off-peak time.
Create services
Services provide a way to define how charges are calculated (e.g., whether customers are charged based on the time they stay online or by the amount of data transferred) and how these are then presented on invoices.
Create custom services for voice calls
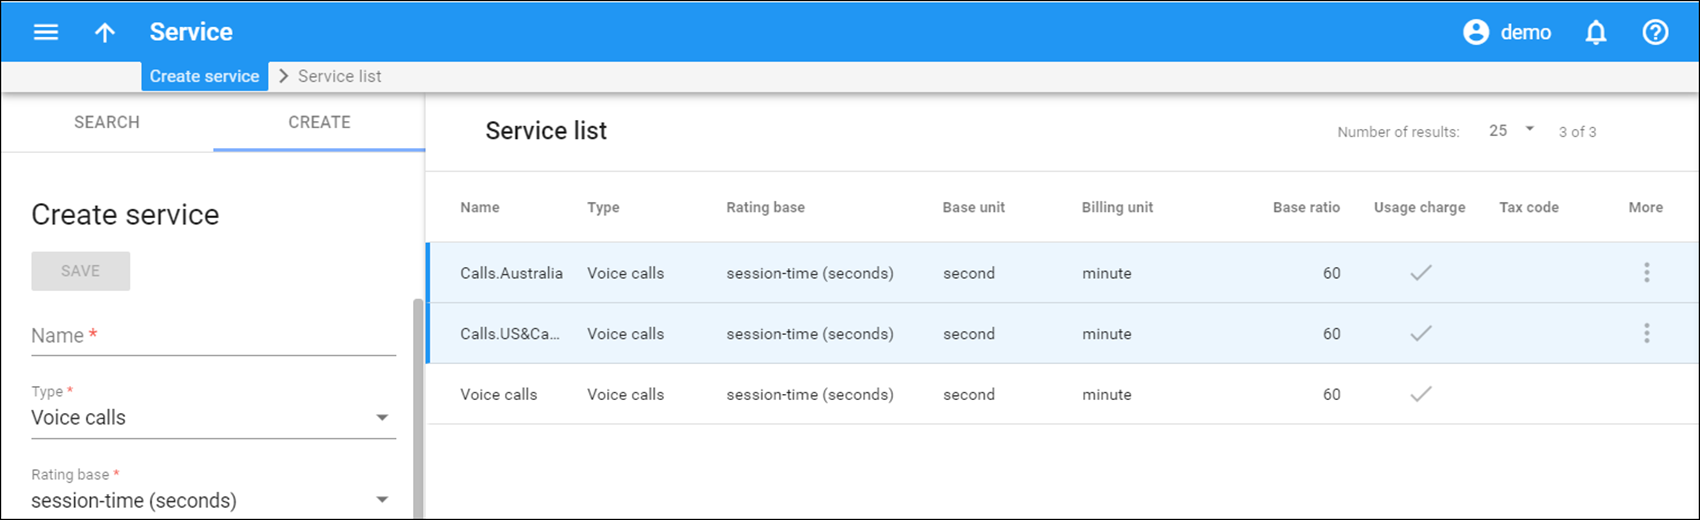
To present xDRs for voice calls grouped per roaming zone and present them on customer invoices and in the xDR history separately, create a custom Voice calls service type for each roaming zone.
- From the navigation tree, select Service catalog -> Services.
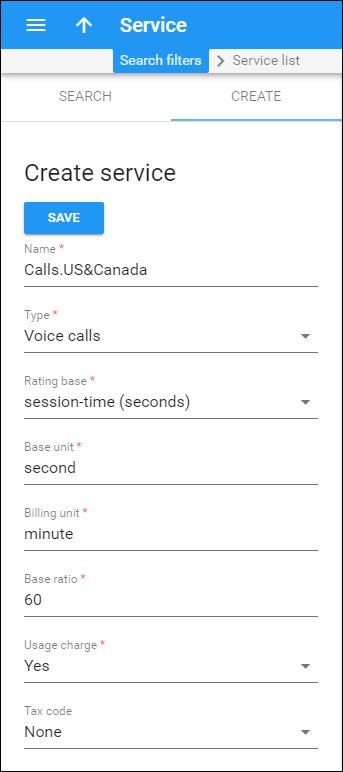
- Switch to Create panel and fill in the Create service details:
- Name – give a name to your service. E.g., Calls.US&Canada.
- Type – select Voice calls from the list.
- Other fields are pre-populated. You may leave them as they are.
- Click Save.
- Repeat step 2 and create another service to group calls made/received while roaming in Australia.
Create the LTE service
To provide Internet access on the LTE network you must create the LTE service. Complete the Create the LTE service step from the LTE configuration handbook.
Create custom services for SMS
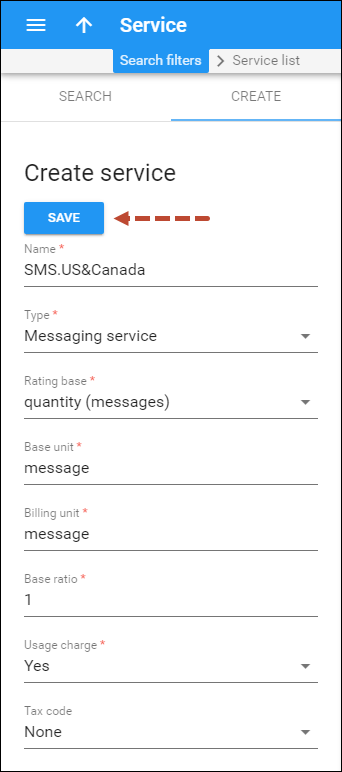
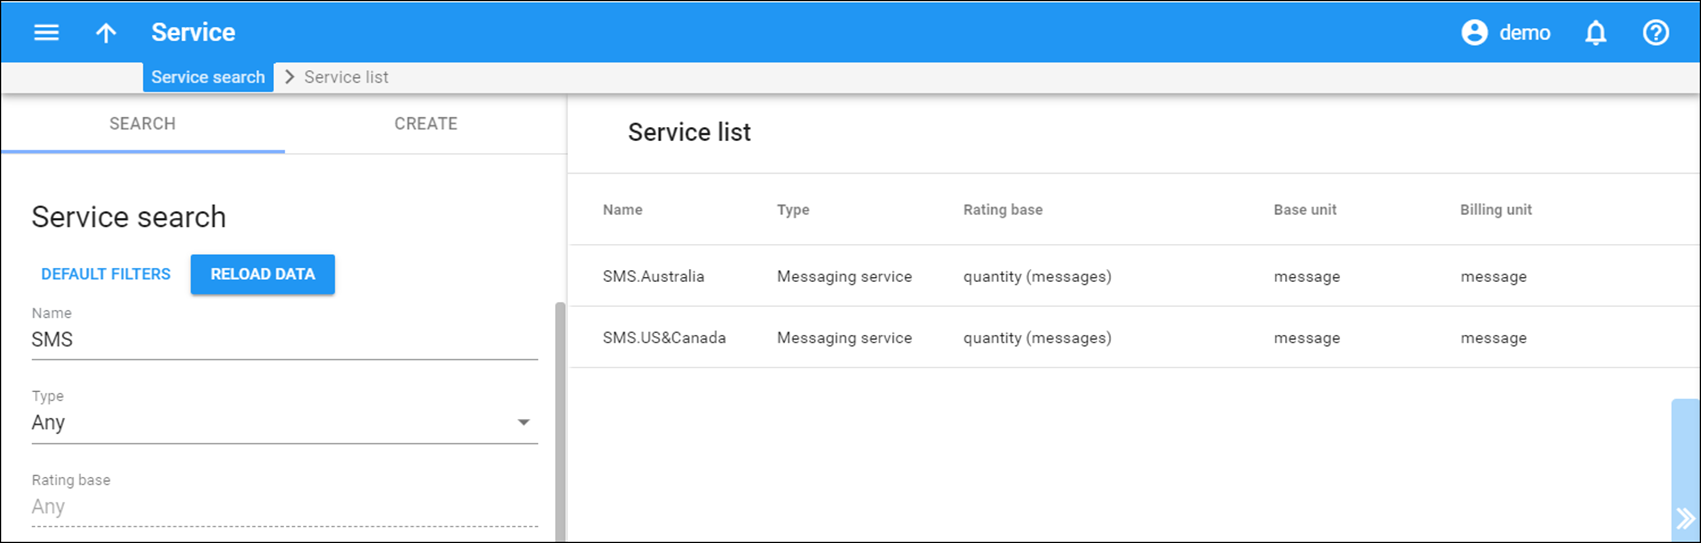
To group xDRs for SMSs per roaming zone where the service is used and present them on invoices and in the xDR history, create a separate service for each roaming zone with the Messaging service service type.
- From the navigation tree, select Service catalog -> Services.
- Switch to Create panel and fill in the Create service details:
- Name – give a name to your service. E.g., SMS.US&Canada.
- Type – select the Messaging service from the list.
- Other fields are pre-populated. You may leave them as they are.
- Click Save.
- Repeat step 2 and create another service to group xDRs sent from Australia.
Create the code group set
To bill users for roaming calls and SMSs, PortaBilling must identify the user’s network and roaming zone it belongs to. For this purpose, it looks up the number of application server (for voice calls) or the serving SMSC (for SMS) among the code groups in the “Roaming Zone” code group set. The matched code group serves to identify the user’s roaming zone and to match the appropriate roaming tariff.
At this step, you must create the “Roaming Zone” code group set and the code groups for each roaming zone under it. In our example, there are two code groups:
- Zone1 – for US and Canadian destinations;
- Zone2 – for Australian destinations.
Create the “Roaming Zone” code group set and create the required number of code groups under it as described in the Create a code group set and a code group step.

Assign rate codes to code groups
Now you add rate codes to their corresponding code groups.
Assign rate codes manually
- On the Code group page, click the default All rate codes.
- Filter rate codes using one or several search filters.
- Select the rate codes you want to include in the code group and click Assign to group.
- Select the code group (e.g., Zone1 for the US and Canadian destinations) and click Assign.
- Repeat steps 1-4 to assign Australian destinations to the Zone2 code group.

Upload rate codes from a file
Alternatively, you can upload rate codes to code groups from a file.
- Prepare the file for upload. The file structure must be the following:
Field
Description
Action
Add or delete; encoded as ‘+’ and ‘-‘ or ‘add’ and ‘remove.’
Dest_Group_Name
The name of the code group which the prefix will be added to or removed from.
Prefix
The destination prefix to add to or remove from the code group.
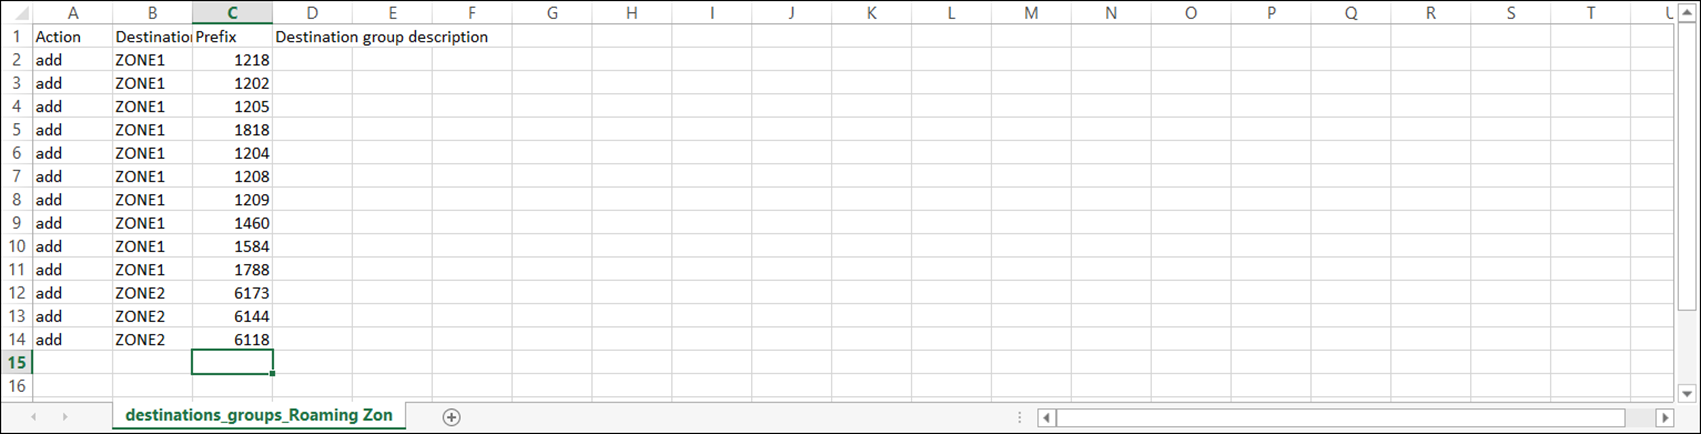 Column headers are important! Make sure the field names and formatting in your upload file are correct.
 - Open the Code group set and click Upload in the toolbar.
- In the Upload code groups dialog, select the code group set where to upload rate codes to and either drag your file or define the path to it by clicking the Browse button.
- Click Upload.

Roaming voice calls configuration
Create tariffs for end users
We assume that you have already configured “home” tariffs with domestic rates for outgoing and incoming calls. At this step, you create tariffs to charge customers for making and receiving calls while roaming. Since charges differ for every roaming zone, create separate tariffs for service usage in the US&Canada and in Australia. To separate xDRs per roaming zone and show them on invoices and in the xDR history as grouped, create roaming tariffs for the corresponding custom services – Calls.US&Canada and Calls.Australia, respectively.
Thus, your roaming tariff list for end users looks like this:
- A tariff to charge for outgoing calls made from the US&Canada;
- A tariff to charge for incoming calls received in the US&Canada;
- A tariff to charge for outgoing calls made from Australia;
- A tariff to charge for incoming calls made from Australia.
To create a tariff, perform the following steps:
- From the navigation menu, select Service catalog > Tariffs and click + Tariff.
- On the Add tariff panel, fill in the tariff details:
- Name – a short name for the tariff object; this is the name you see in select menus.
- Currency – indicates the currency in which the vendor charges you.
- Service – select Calls.US&Canada here.
- Applied to – select Customer, as this tariff is used to charge your customers.
- Managed by – select Administrator only, since we are setting up a service without the involvement of resellers.
- Define prices – select per individual rate code.
- Code group set – select None.

- Click Save.
- Repeat steps 1-3 to create a tariff to charge for incoming calls received while a user roams in the US and Canada (e.g., US&Canada roaming inbound).
- Repeat steps 1-3 to create a tariff to charge for outgoing calls made from Australia (e.g., Australia roaming outbound). Select the corresponding service you created (Calls.Australia in our example) during tariff creation.
- Repeat steps 1-3 to create a tariff to charge for incoming calls received while a user roams in Australia (e.g., Australia roaming inbound). Select the corresponding service you created (Calls.Australia in our example) during tariff creation.

Enter rates
Add rates to the created tariffs.
In this example, we show how to manually add rates. In case of entering a large number of rates, use the Rate Upload tool. Please refer to the Rate import handbook for guidelines.
To add rates manually, perform the following steps:
- While on the tariff page, navigate to Rates and click + Rate.
- On the Add rate panel, fill in new rate information:
- Rate code – start typing the rate code.
- Rating mode – select Flat rate.
- First price – specify the price for this rate code.
- Click Save or Save & Add a copy to add more rates.

Roaming Internet service configuration
Create tariff for end users
Now you create the tariff with the charges you apply to customers for using LTE services while roaming:
- On the navigation menu on the left, select Service catalog > Tariffs and click + Tariff.
- On the Add tariff panel and specify the information about a new tariff:
- Name – a short name for the tariff object; this is the name you see in select menus.
- Currency – choose the currency in which you charge customers.
- Service – select the LTE service.
- Applied to – choose Customer.
- Define prices – select per individual rate code.
- Code group set – select None.

- Click Save. The tariff page opens.
- Go to the Rates panel and click + Rate.
- Add the rate for the NETACCESS rate code to charge users for Internet usage in the home network. On the Add rate panel, enter the following:
- Rate code – type NETACCESS.
- Unit price – price for interval per billing unit (in this example, per megabyte). Enter $0.1.
- Click Save.

Upload rates for E.212 rate codes
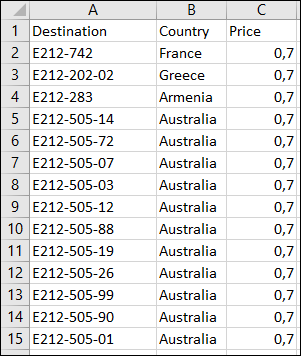
- Prepare the file for upload. The file structure must correspond to the table below:
Field
Description
Destination
The rate code in the E212-MCC-MNC format.
If you want to add a rate for the Default rate code, specify it in the E212-MCC format.
Country
The country to which the rate code belongs.
Destination description
The short description for the rate code (e.g., area).
Price
The unit price.
- On the Rates panel in your tariff, click Upload.
- Follow the rate upload wizard steps as described in the Rate import handbook and complete the rate upload. The result of the rate upload looks like the following:

Create a service policy
A service policy is a set of parameters that defines user access to the network. It also contains configuration attributes required to provision the NAS you use in your network infrastructure.
To apply a service policy to the user, configure it in the PCRF with the required parameters (e.g., QoS, speed limits, etc.). Then configure the service policy in PortaBilling and assign it to the user’s account. The service policy name must be the same in both systems. You also configure the user’s profile in the HSS that is used to activate their SIM and therefore provide them network access.
When PortaBilling provisions user data to the HSS and PCRF, the user is granted access to the network according to the service policy.
At this step, we show the configuration of the service policy for Internet access and the provisioning of the Protei HSS and PCRF.
- On the navigation menu, select Service catalog -> Service policies.
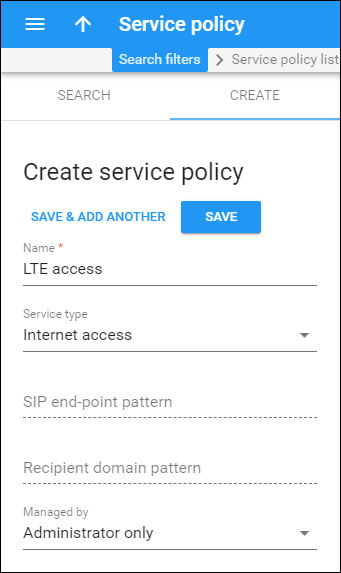
- On the Create service policy panel, fill in the service policy details:
- Name – specify the service policy name. It must be the same as the service policy you configured in the PCRF.
- Service type – select Internet access.
- Managed by – choose Administrator only here.
- Click Save.
- On the Attributes tab, specify the Protei configuration attributes:
- gprs_package – the code of the GPRS package configured in Protei PCRF.
- hlr_profile – the user’s profile ID configured in Protei HLR.
- On the Hotlining tab define on what condition the user is redirected to the captive portal and provide the captive portal’s URL.
- Click Save.
Roaming SMS service configuration
Create tariffs for end users
At this step, you must create two tariffs to charge users for sending SMSs:
- From the US & Canada;
- From Australia.
To separate xDRs per roaming zone and show them on invoices and in the xDR history as grouped, create the roaming tariffs for the corresponding custom services – SMS.US&Canada and SMS.Australia, respectively.
To create a tariff, perform the following steps:
- On the navigation menu on the left, select Service catalog > Tariffs and click Add tariff.
- On the Add tariff panel, fill in the tariff details:
- Name – a short name for the tariff object; this is the name you see in select menus.
- Currency – choose the currency in which you charge customers.
- Service – select Messaging service.
- Applied to – select Customer.
- Define prices – select per individual rate code.
- Code group set – select None.

- Click Save. The tariff page opens.
- Upload rates to the tariff following the instructions from the Rate import handbook.
- Repeat steps 1-4 and create the roaming tariffs for SMSs sent from the US and Canada for their respective services.

Likewise, create a roaming tariff for SMSes sent from Australia.

Product configuration
Create a bundled product
End users use accounts issued for specific products to access the services you provide. Products are powerful tools that define different ways for billing an account for one or several included services. Product definition is always realized through these steps: product definition, service definition and configuration, and creating a rating list.
When a user makes a call or sends an SMS from abroad, PortaBilling looks up the prefix of the country where the user is roaming in the Roaming Zones code group set. The code group serves to identify the user’s roaming zone. This code group name must match the access code defined for the usage charges record in the product configuration. Thus, PortaBilling uses this name to select the roaming tariff and charge the subscriber.
- On the navigation menu on the left, select Service catalog > Products.
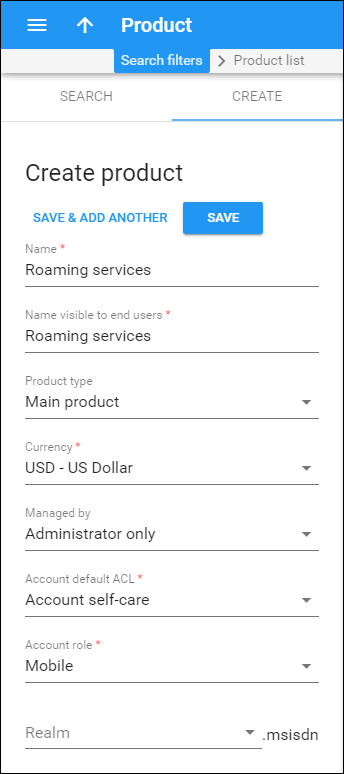
- On the Create product panel fill in the new product details:
- Name – type in the internal name of the product.
- Name visible to end-users – specify the name of the product that your customers see on their self-care interface.
- Product type – select Main product here.
- Currency – specify the currency used for the product; only tariffs sharing the same currency are permitted in the rating list.
- Managed by – select Administrator only here, since a service is being set up without the involvement of resellers.
- Account role – select Mobile from the list, since this product is intended for use by mobile subscribers.
- Realm – in order to differentiate products for mobile services from other products, they are created by default with a @msisdn realm. You may further distinguish them by defining a subrealm. Leave this field empty.
- Click Save. The product page opens.
Services
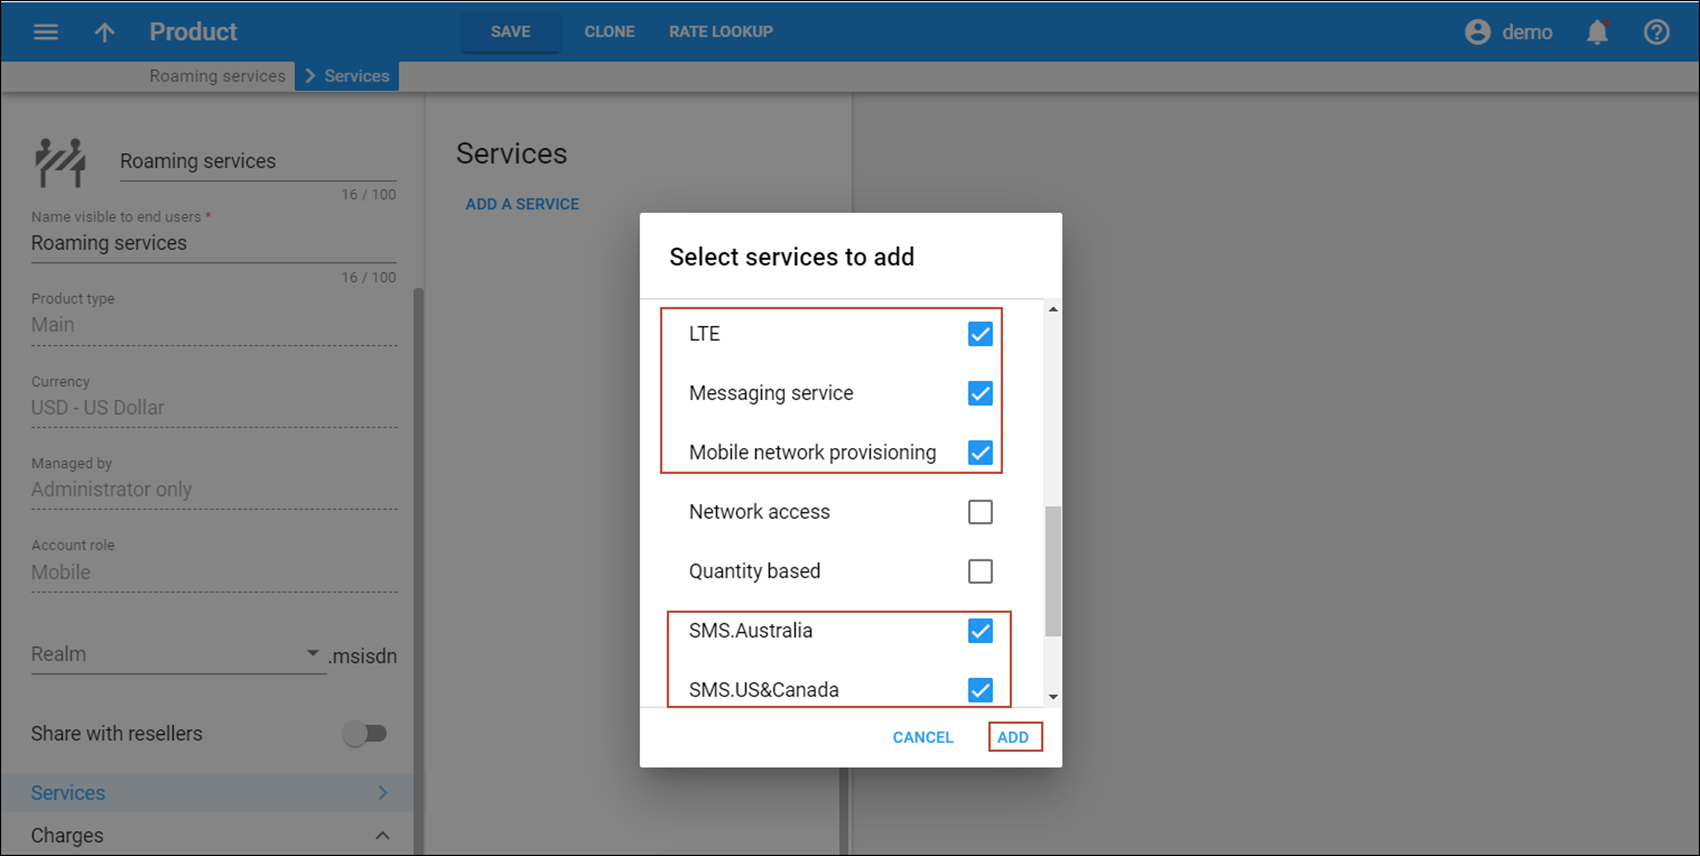
- Go to the Services panel and click Add a service.
- Select the Voice calls, Calls.US&Canada, Calls.Australia, LTE, Messaging services, Mobile network provisioning, SMS.US&Canada and SMS.Australia services from the Select services to add list and click Add.
- Select the Internet access service type to open its configuration panel.
- Enable the Access policy toggle and select the Internet access policy you created earlier.
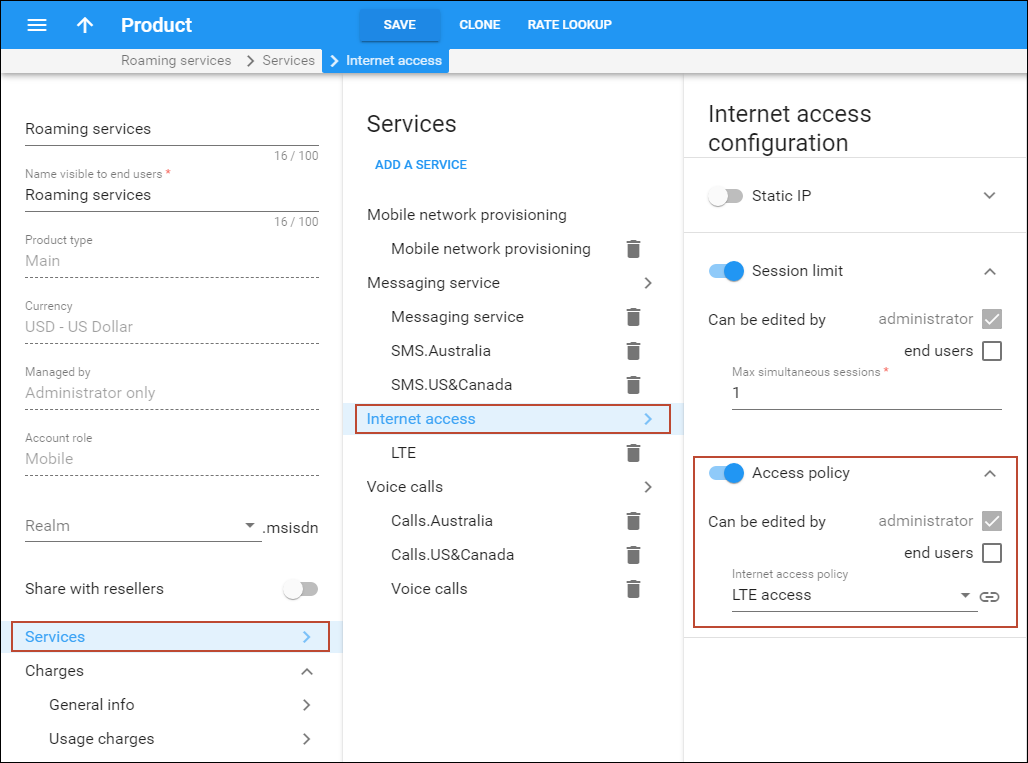
Usage charges
The usage charges list has two functions: it defines the permitted access points (nodes and access numbers) and it specifies which tariff must be used for billing for each of these points.
Add usage charges records for each service you provide.
Add usage charges for the LTE service
- Click Charges -> Usage charges and click Add to add a new rating record.
- Сonfigure the rating entry for the LTE service:
- Service – select LTE.
- Node – select the LTE node here.
- Access code – leave this field blank.
- Tariff – select your roaming LTE tariff.
- Click Save.
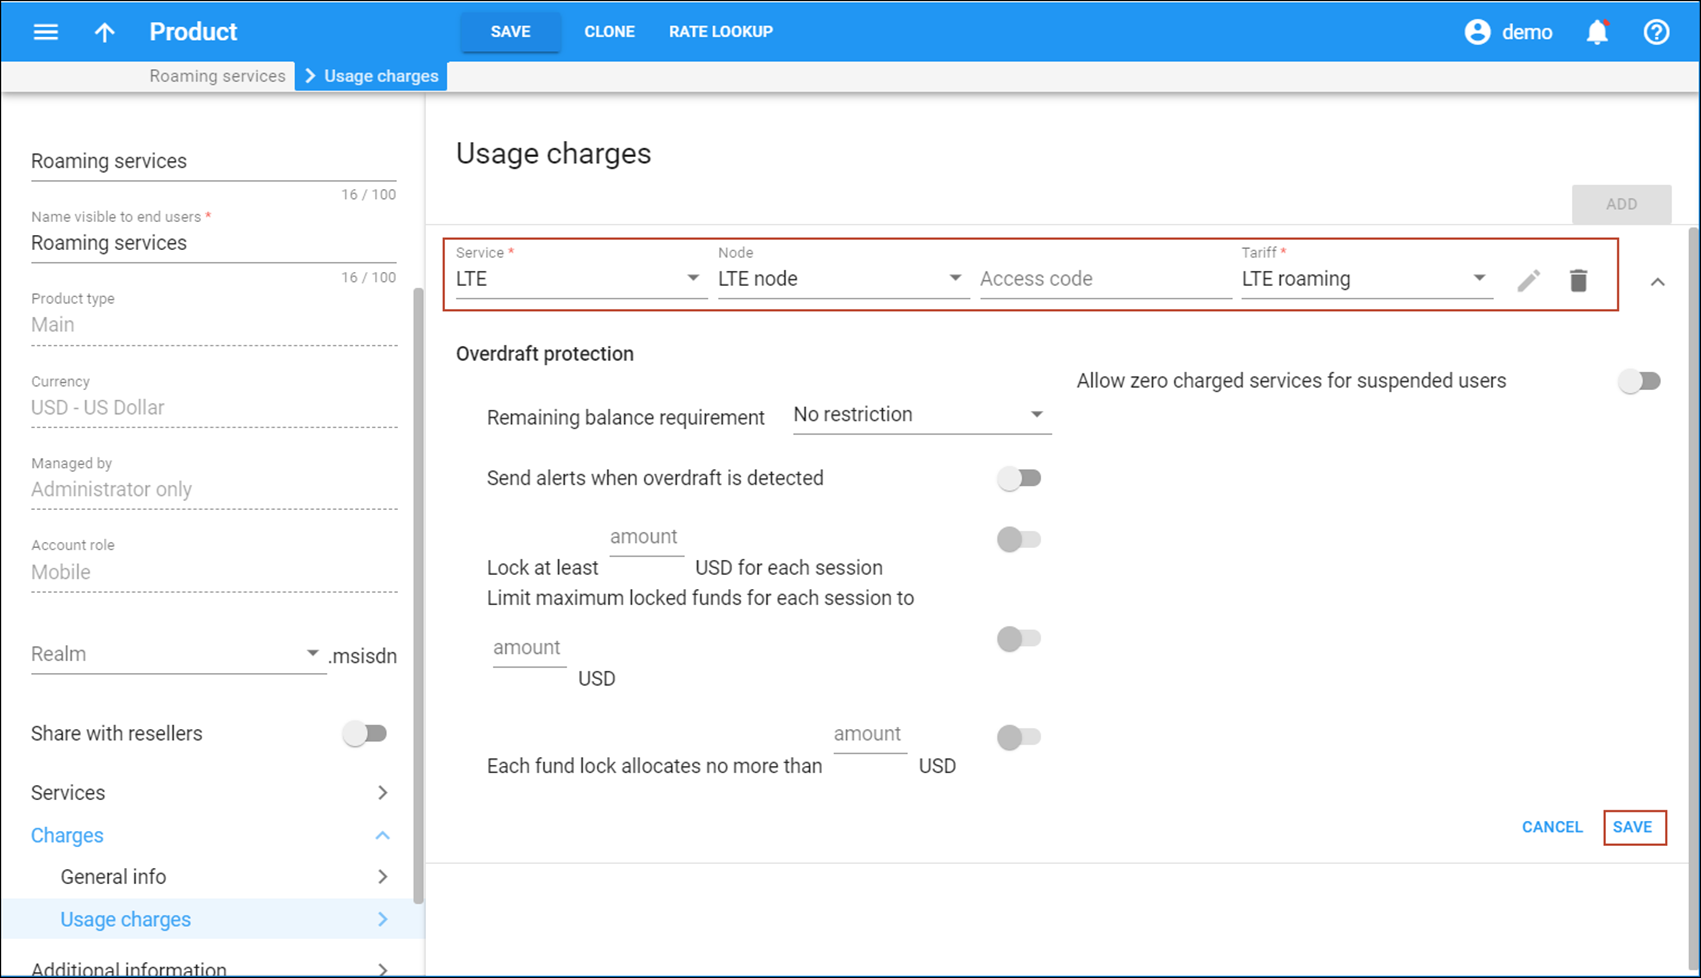
Add usage charges for SMS services
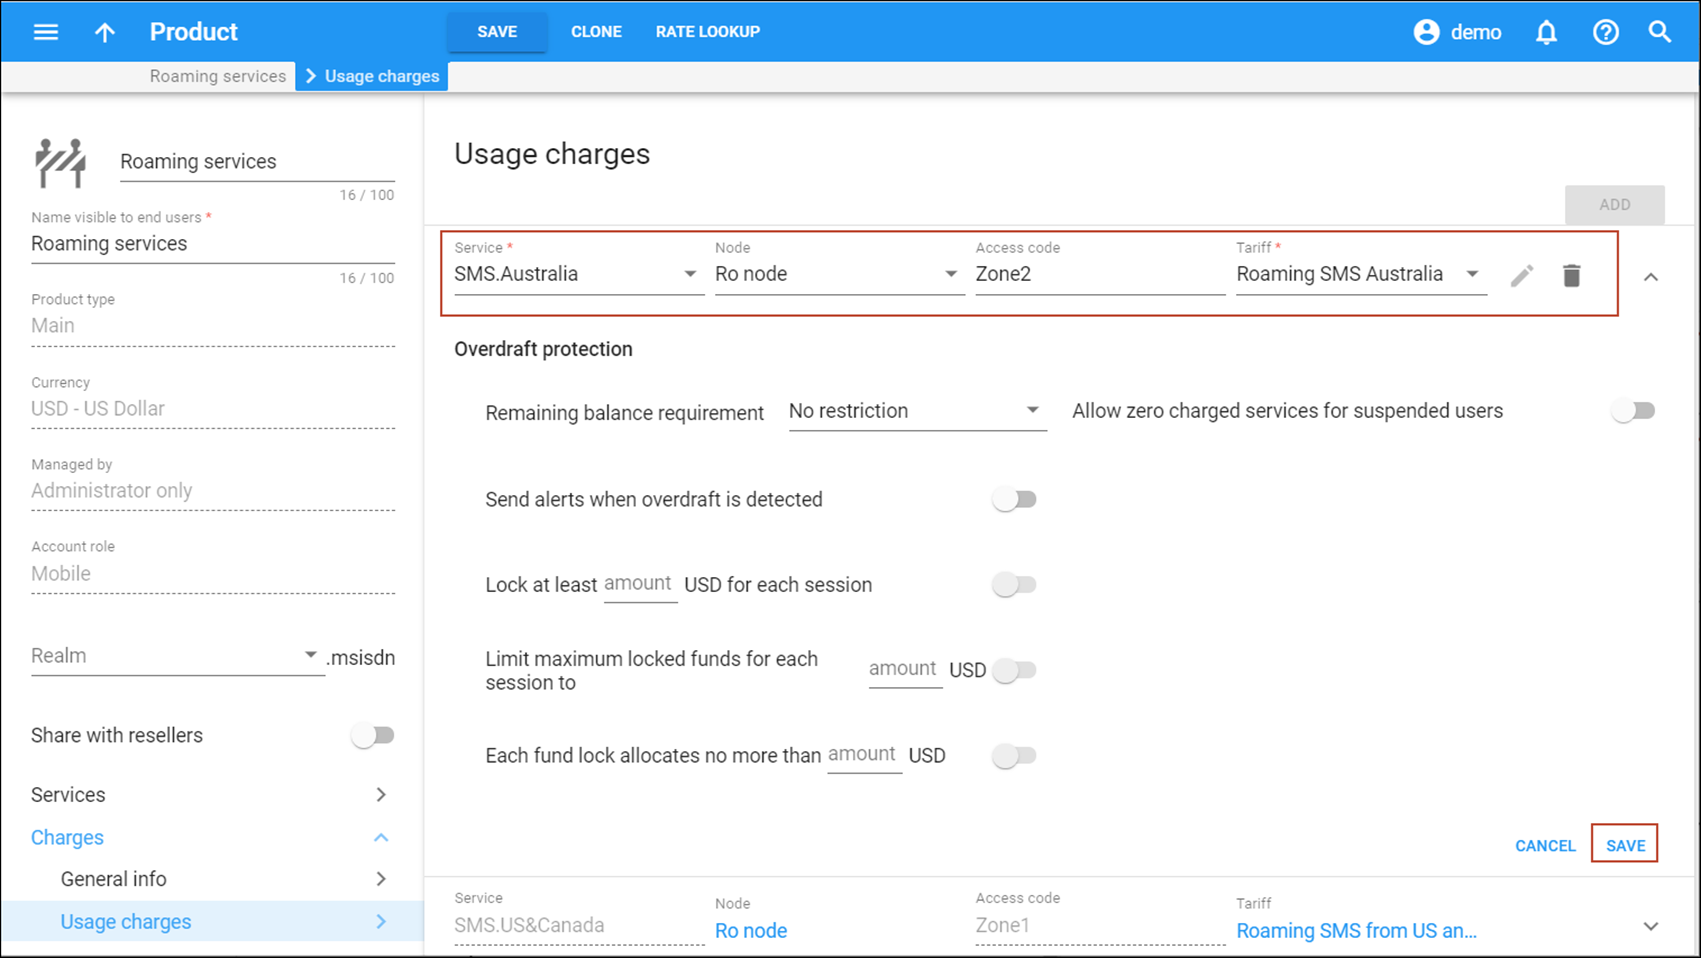
- Click Add and configure the rating entry for the SMS services:
- Service – select SMS.US&Canada.
- Node – select the SMS node here.
- Access code – specify Zone1 here. This is the name of the code group that the US and Canadian rate codes belong to.
- Tariff – select your roaming tariff for SMS services used in the US & Canada.
- Click Save.

- Repeat step 10 to add a rating entry for the SMS sent from Australia.
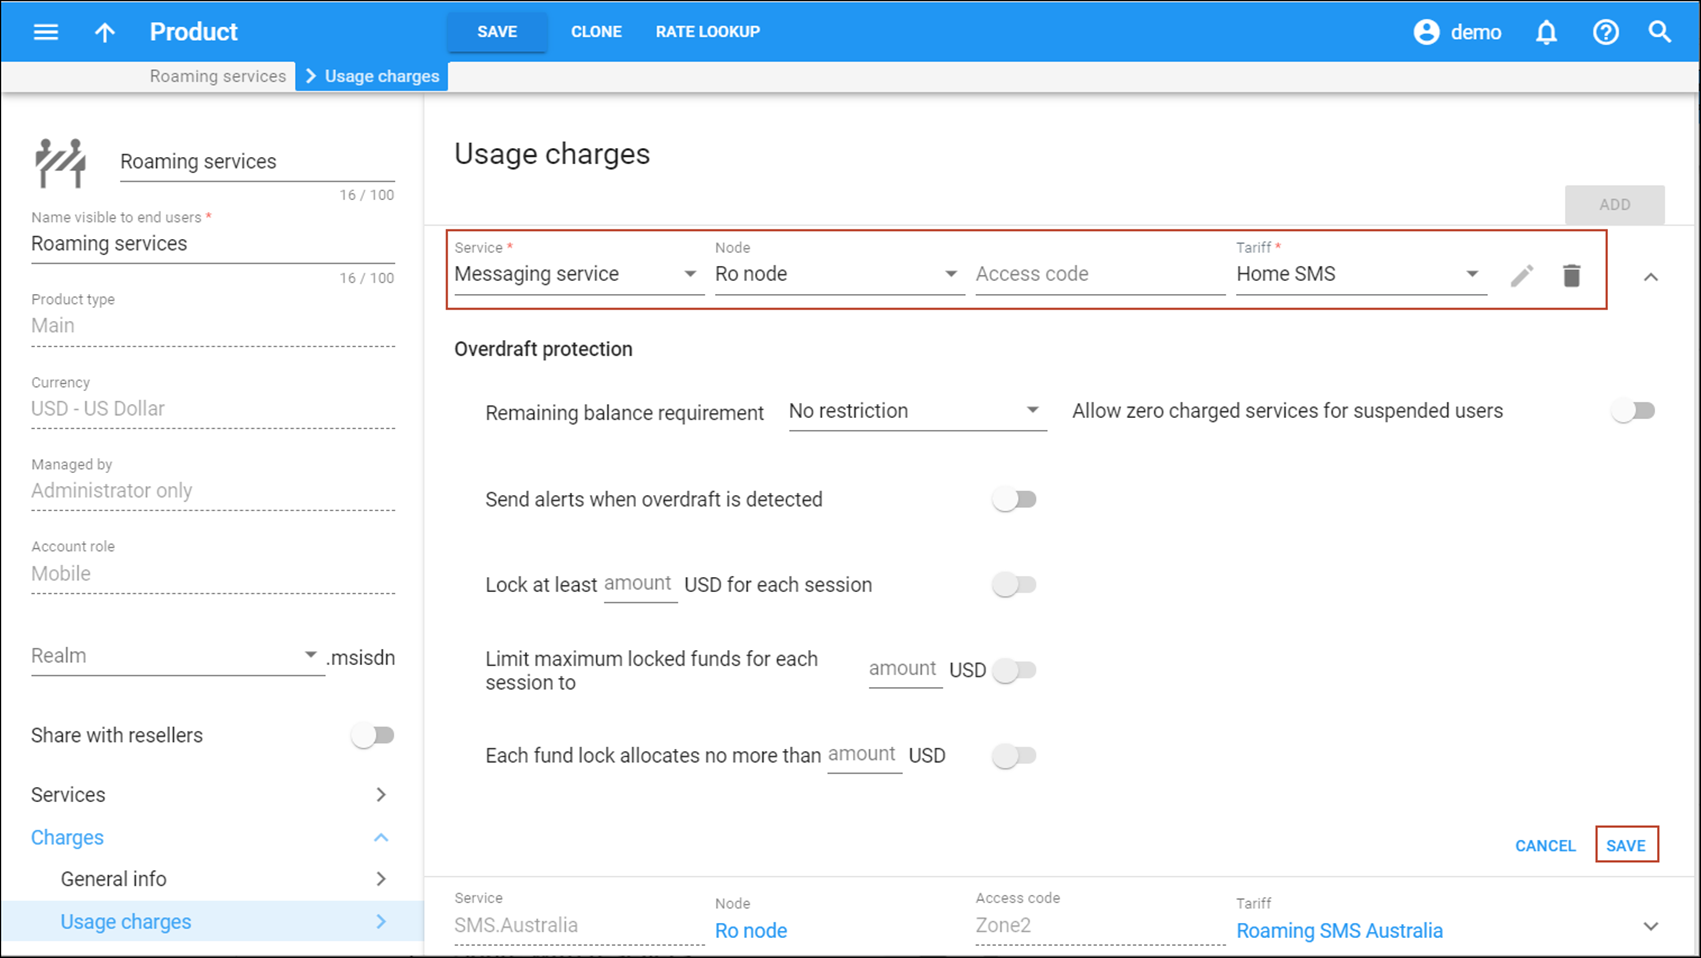
- Click Add and configure the rating entry for the home SMS service:
- Service – select Messaging service.
- Node – select the SMS node here.
- Access code – leave it empty. Home SMSs are charged using the standard SMPP access code.
- Tariff – select your tariff for SMS services used in the home network.
- Click Save.
Add usage charges for voice calls
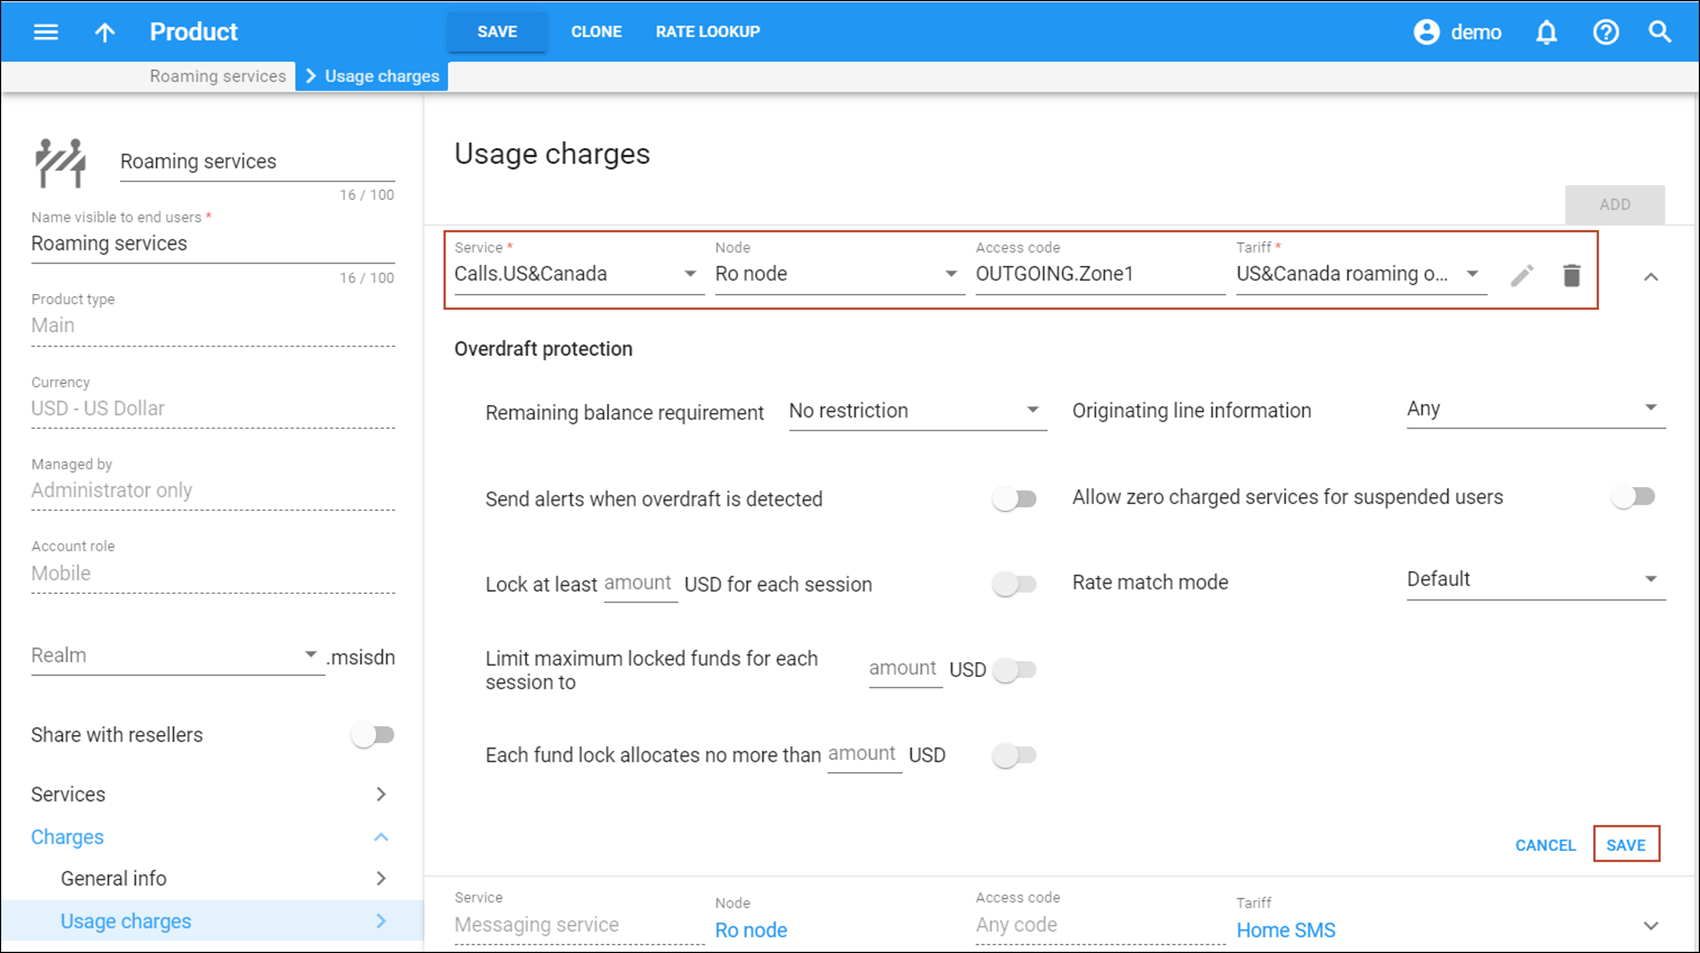
- Click Add to add a rating entry for outgoing calls made in the US and Canada:
- Service – select Calls.US&Canada.
- Node – select the node here.
- Access code – specify OUTGOING.Zone1 here.
- Tariff – select your roaming tariff for outgoing calls used in the US & Canada.
- Click Save.
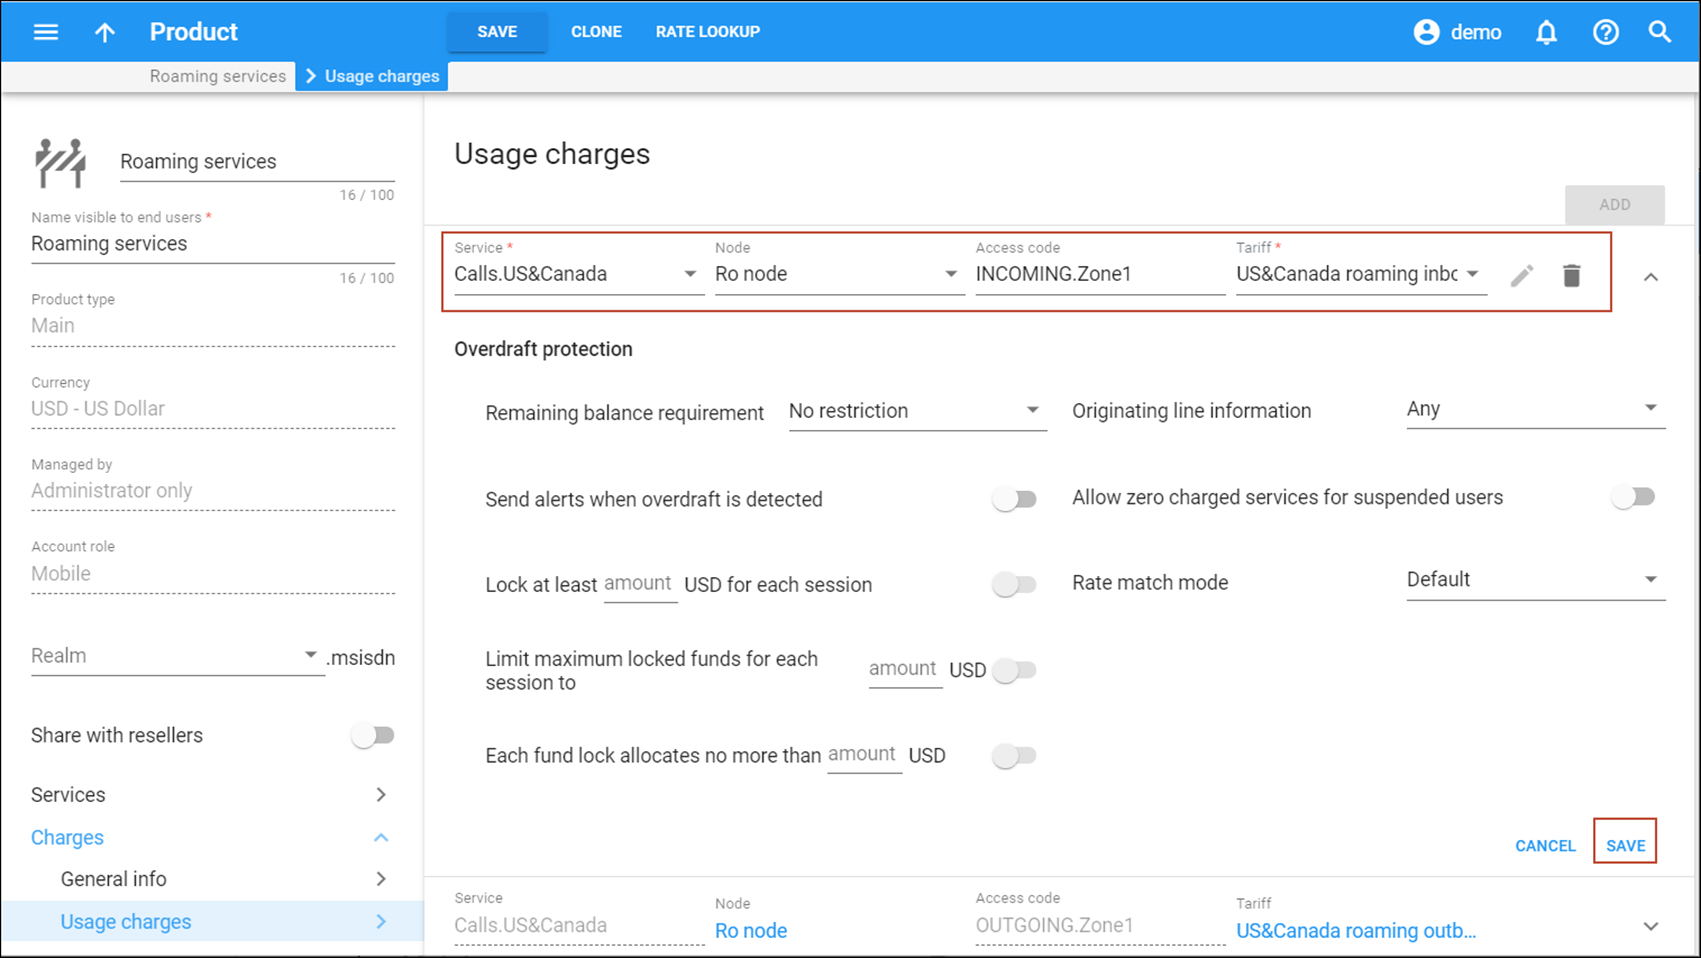
- Repeat step 13 to add a rating entry for incoming calls received in the US and Canada and specify INCOMING.Zone1 as the access code.
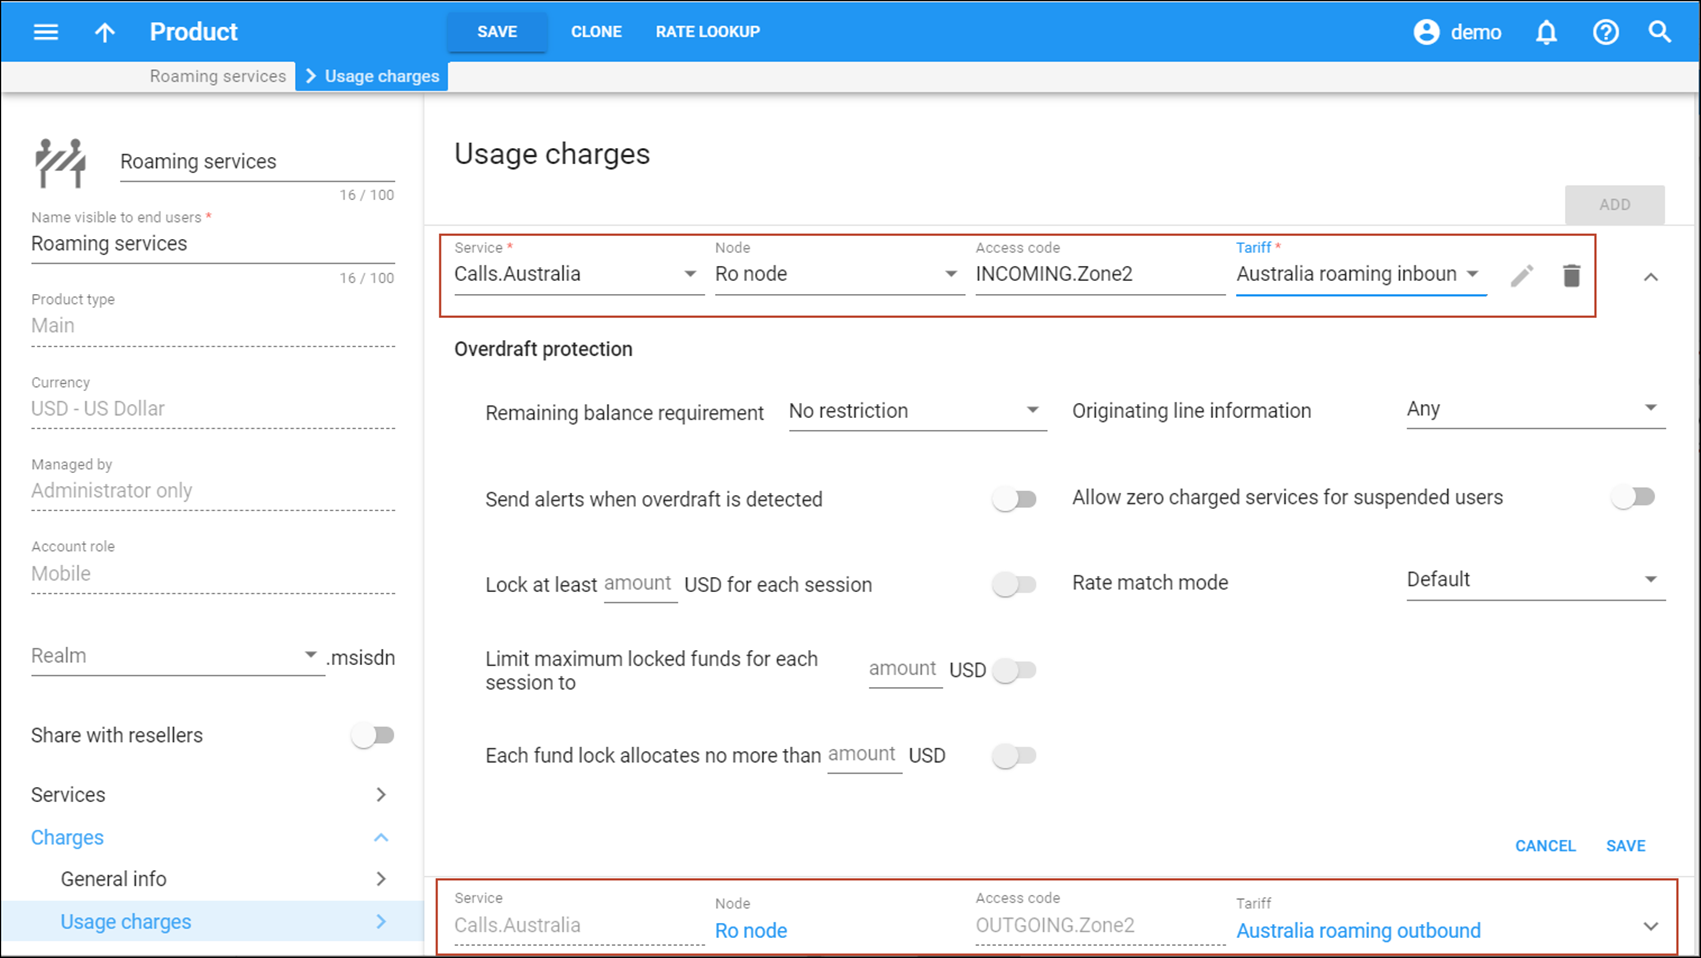
- Click Add to add a rating entry for outgoing calls made from Australia:
- Service – select Calls.Australia.
- Node – select the node here.
- Access code – specify OUTGOING.Zone2 here.
- Tariff – select your roaming tariff for outgoing calls used in Australia.
- Click Save.
- Repeat step 15 to add a rating entry for incoming calls received while roaming in Australia and specify INCOMING.Zone2 as the access code.
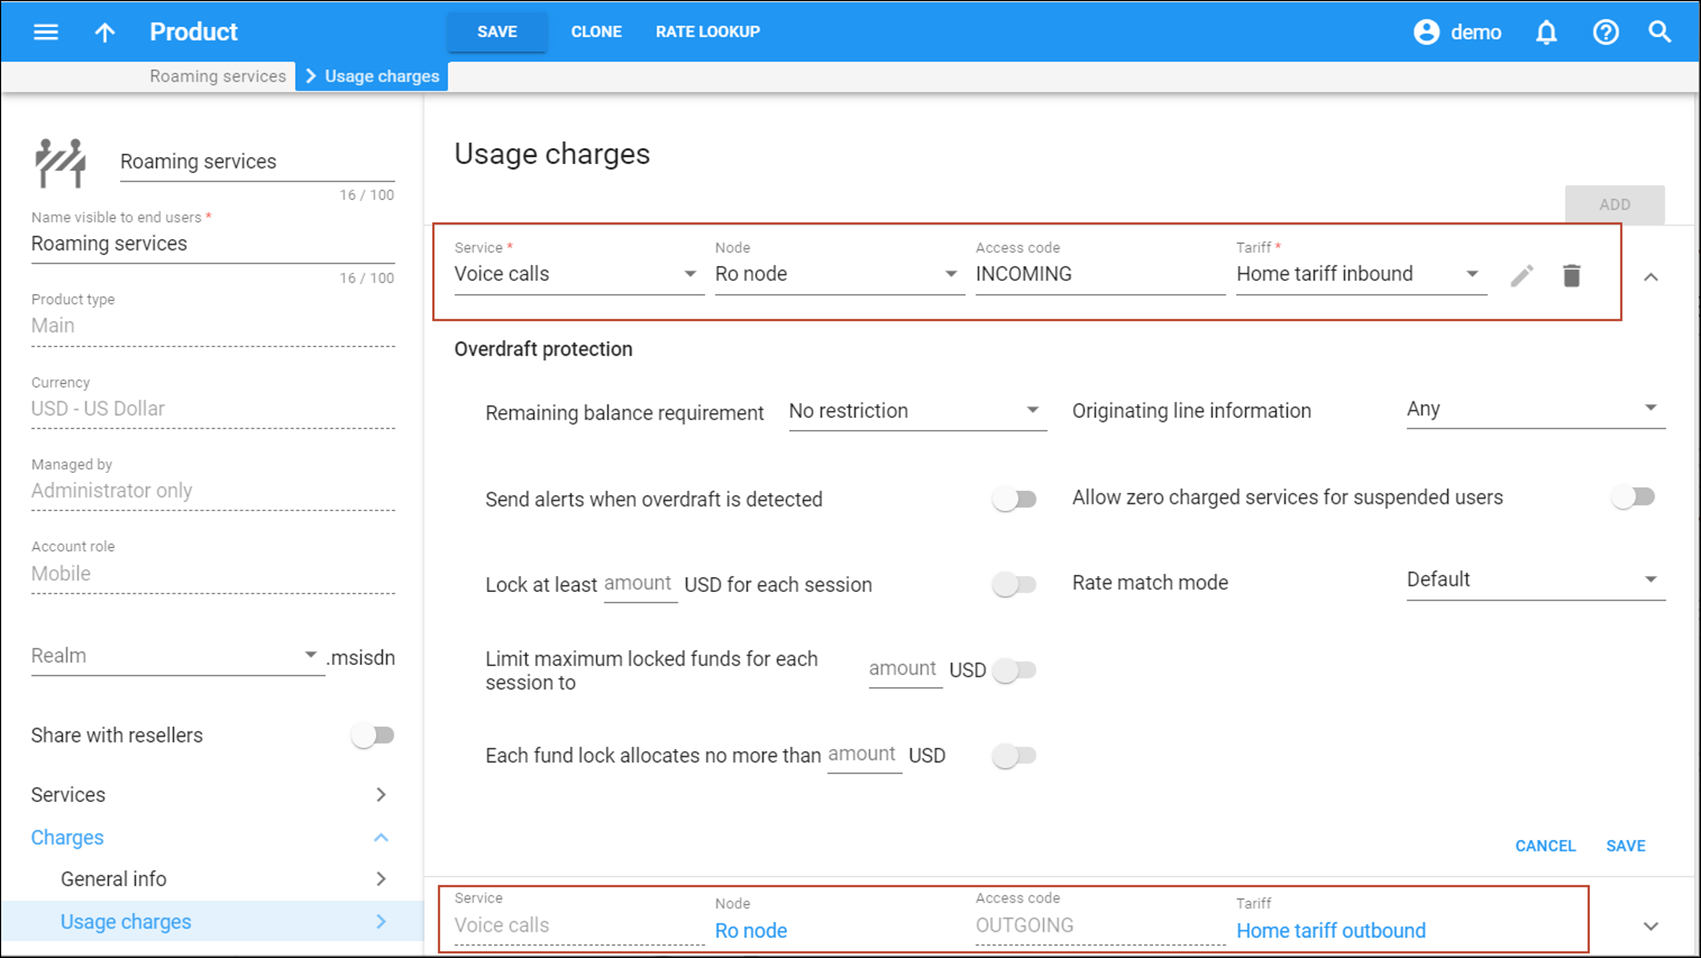
- Likewise, create rating entries to charge for the Voice calls service used in the home network. Select Voice calls from the Service list and specify OUTGOING and INCOMING as access codes for the corresponding rating entries.
- Click Save on the toolbar.
Account provisioning
Create a customer class
Please refer to the Create a customer class step in the Real-time user authorization and charging for wireless operators handbook to create a customer class for your mobile subscribers.
Create a customer
A customer is an owner of accounts. Use the customer’s contact information to distribute account usage information, call statistics, invoices, etc.
- On the navigation menu, select Sales -> Customers.
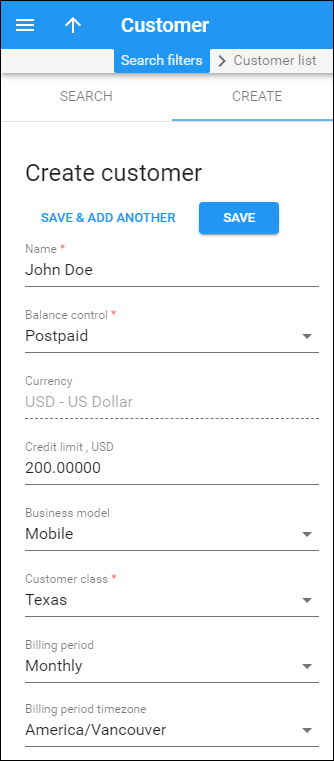
- On the Create customer panel specify their main information:
- Name – short name for the customer object used on the web interface.
- Balance control – specify the way the customer pays for the service: Select Postpaid in this field.
- Currency – the currency in which this customer is billed. This is defined by the customer class selected.
- Credit limit – specify the credit limit for the customer.
- Business model – select Mobile from the list.
- Customer class – select the previously created customer class.
- Billing period – frequency of invoice generation. For more details about different available billing periods, see the PortaBilling Administrator Guide.
- Billing period time zone – this is the time zone in which a customer’s billing period is closed and invoices generated.
- Click Save.
- Follow the instructions in the Real-time user authorization and charging for wireless operators handbook and define other customer-related information like address, contact information, web self-care credentials, etc.
Create accounts
- While on the customer page, go to the Accounts panel.
- On the Create account panel, fill in the new account details:
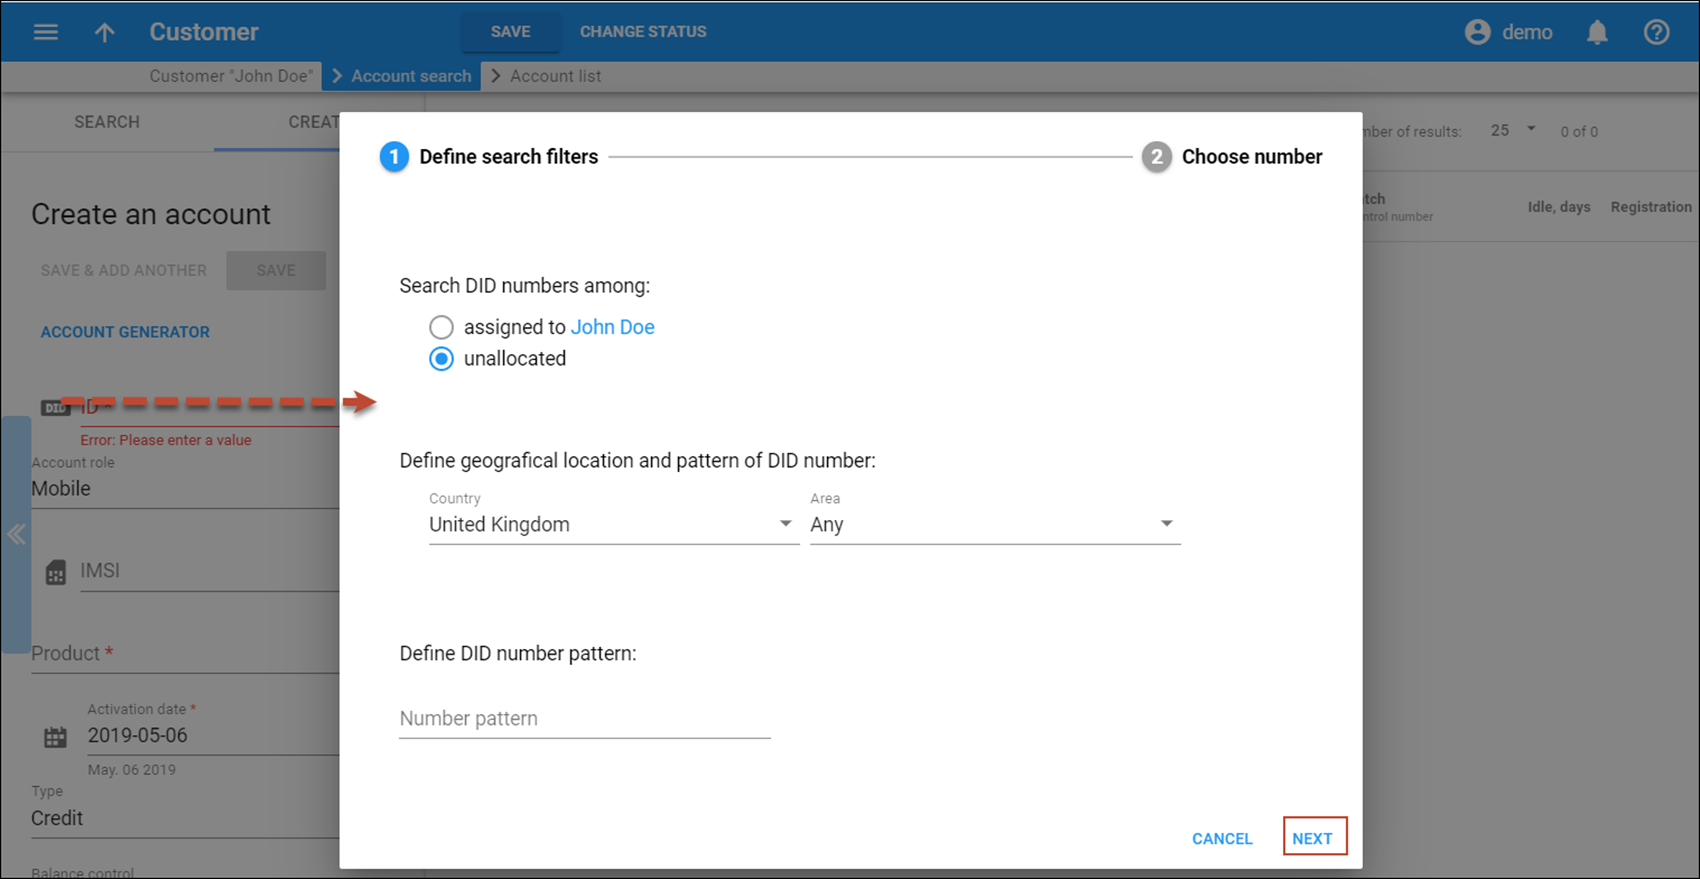
- ID – click the DID icon next to the ID field.
- Select the unallocated option, specify the DID number search filters in the dialog box and click Next.
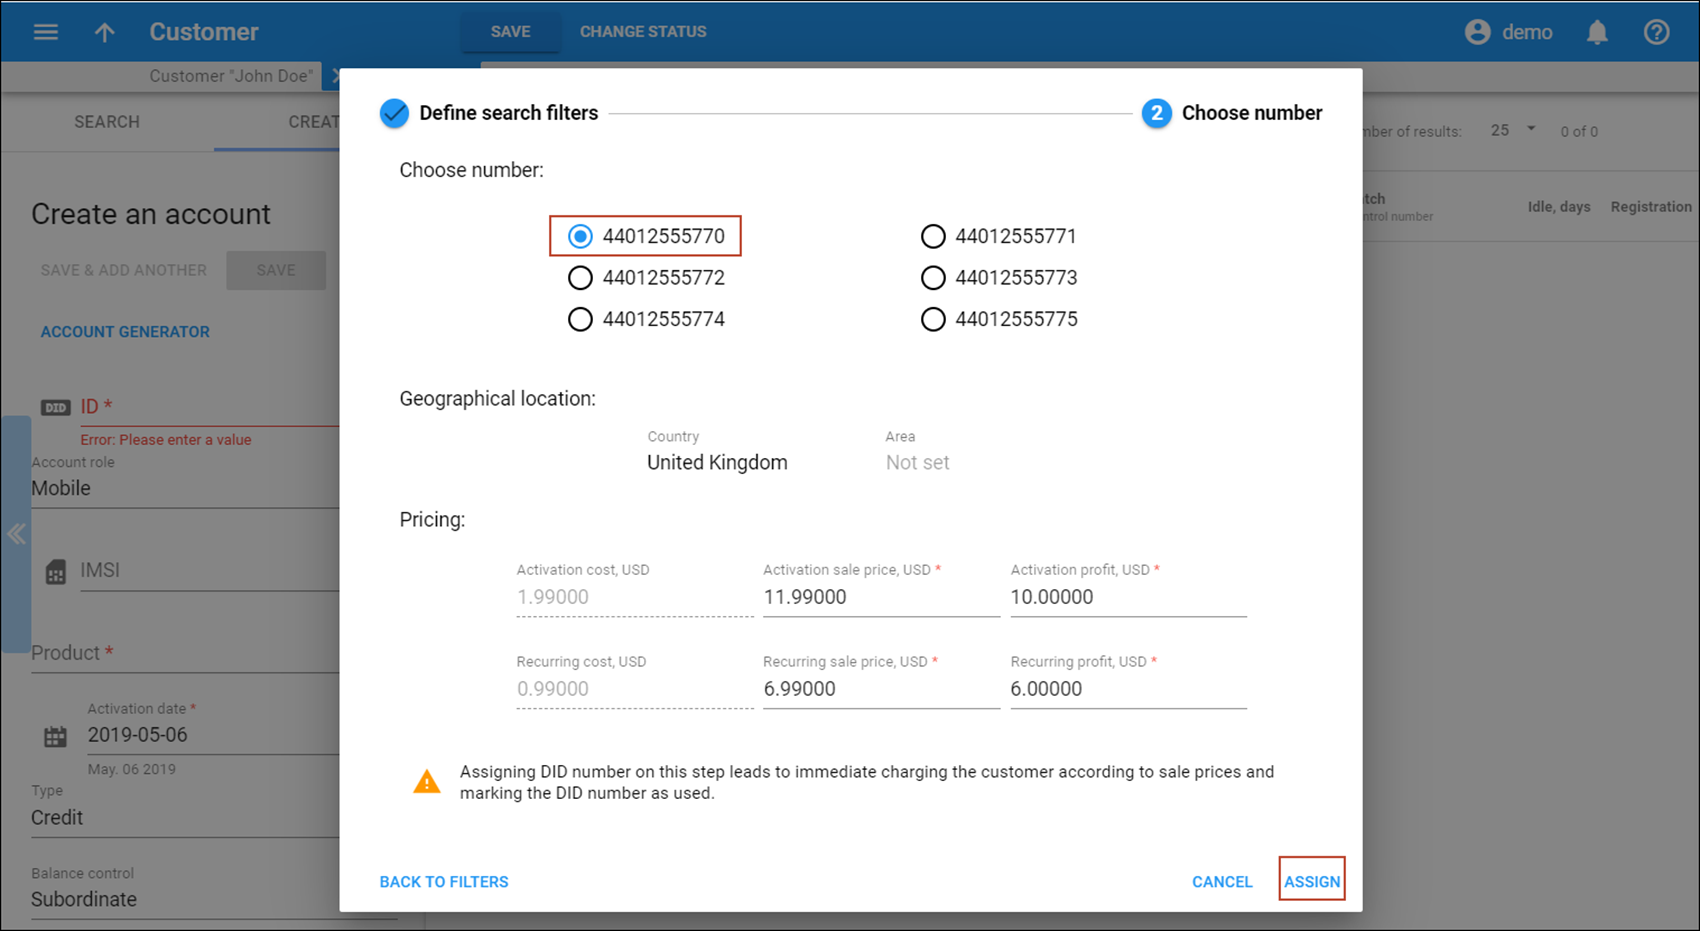
- Select the number to assign to the customer and click Assign.
- IMSI – click the SIM card icon and specify the SIM card search filters. Click Continue.
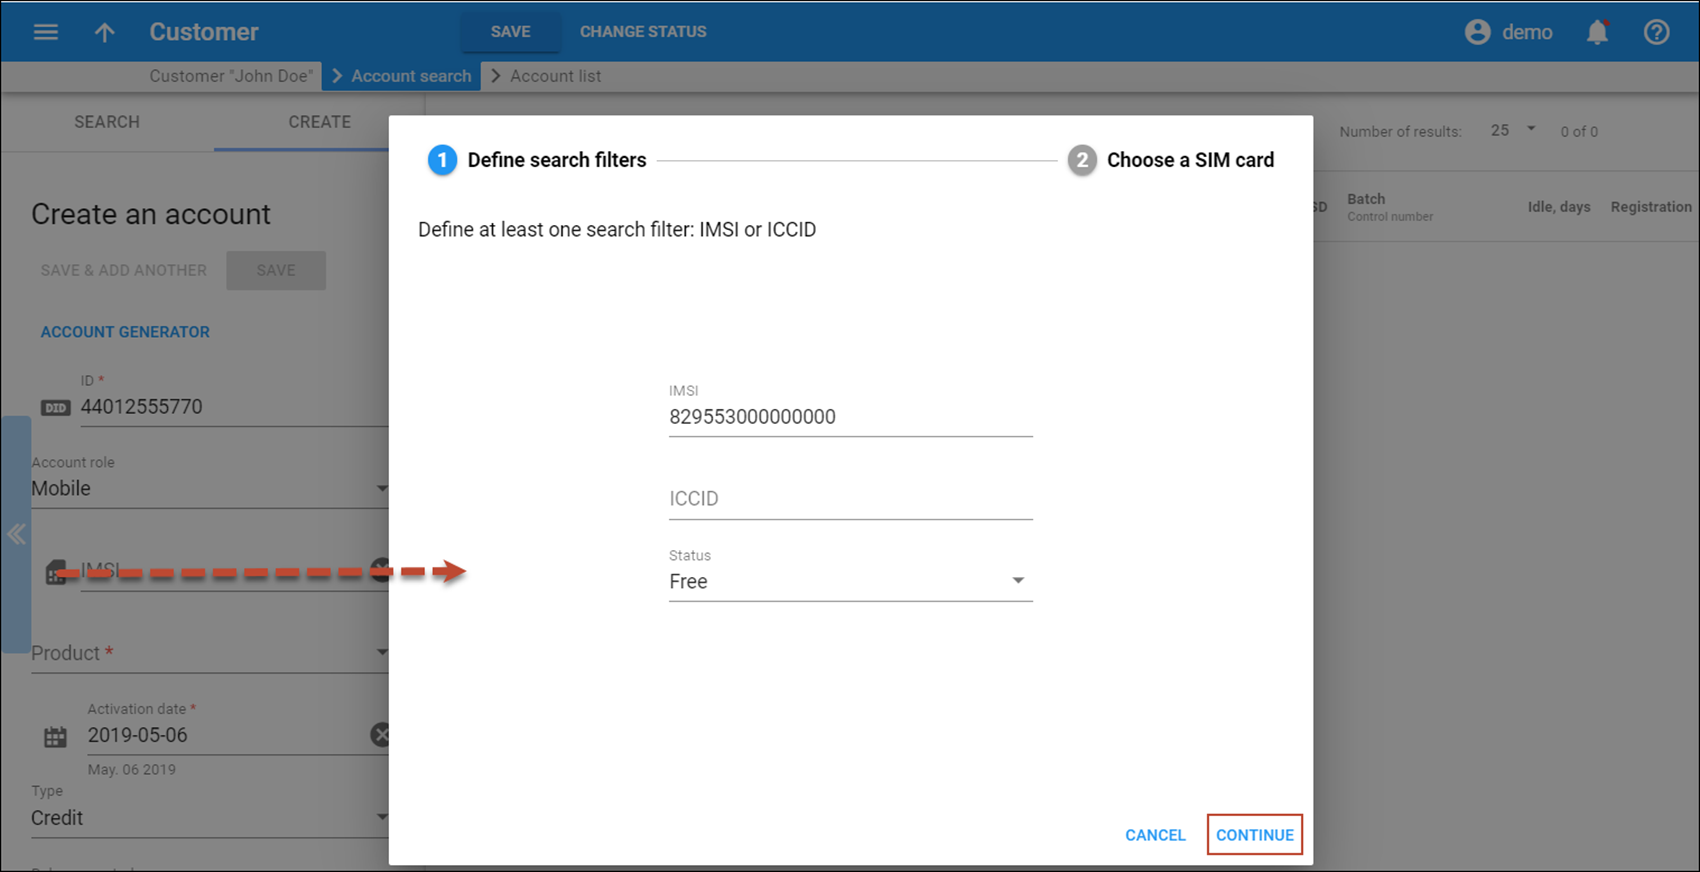
- Select the SIM card and click Assign.
- Product – select the product you created.
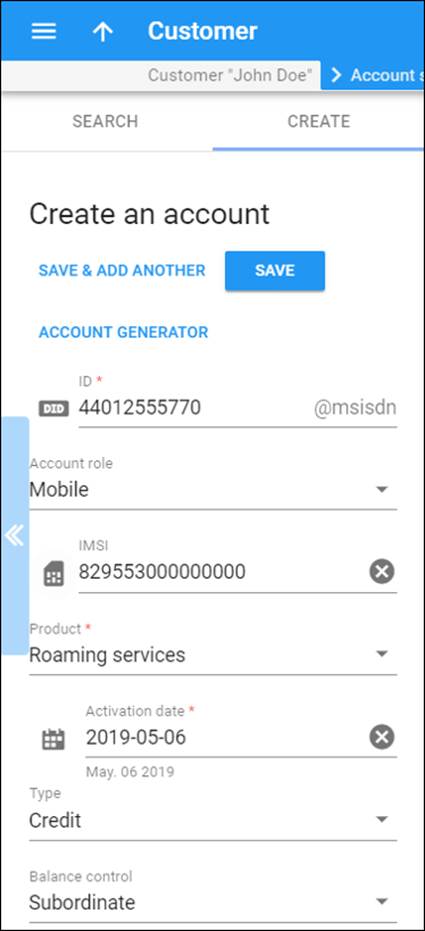
- Click Save.


