



Overview
The market for prepaid services includes tourists, immigrant communities, mobile populations such as military personnel and others.
All of these users can gain cheap and immediate access for long-distance or international calling services from a payphone, mobile or landline, regardless of their location. All they must do is purchase a prepaid calling card at any supermarket and/or other type of retail outlet.
Each card has an access number that a user must first dial, then the user enters a personal identification number (PIN) to access the service. In PortaBilling, PIN represents a prepaid card number.
Prepaid calling card flow
- Customer dials access number
- The system prompts the customer to enter the prepaid card number
- Customer enters prepaid card number
- The system announces the current balance and prompts the customer to enter the destination number
- Customer dials the destination number
- The system announces the maximum permitted call duration
- The call is connected
- After the call ends, the customer’s balance is reduced accordingly
System components interaction
|
Customer |
PortaSIP |
IVR |
PortaBilling |
| Dials the access number | |||
| Accepts the call and launches the IVR | |||
| Plays voice prompts (“Welcome…”), asks user to enter his PIN | |||
| Enters their PIN | |||
| Attempts to authenticate this PIN | |||
| Sends authentication request using RADIUS protocol (User-Name equals PIN) | |||
| Checks that such account exists in the database, that it is not blocked or expired, and that it is allowed to use the service at this location. Upon success, returns account’s balance and other data. Also keeps information about this call in memory to prevent multiple logins with the same account ID | |||
| If authentication is unsuccessful, asks to re-enter PIN or hangs up. Otherwise, tells customer his current balance and prompts him to enter phone number he wishes to call | |||
| Enters destination number | |||
| Attempts to authorize call to the destination | |||
| Sends authorization request using RADIUS protocol (User-Name equals PIN, Called-Station-ID equals number dialed by customer) | |||
| Checks that account is allowed to call this destination, calculates maximum possible call duration based on account balance and rate for this destination | |||
| If authorization has failed, prompts user to enter another number or hangs up. Otherwise, tells customer maximum allowed call duration and tries to call destination number | |||
| Sends the outgoing call to the dispatching node where it is then routed according to the settings (LCR, carrier preferences, etc.) | |||
| When call is connected, sets timer to the maximum allowed call duration | |||
| Speaks on the phone | |||
| Warns customer when he has only 1 minute left and, if timer hits zero and customer is still talking, disconnects the call | |||
| After call is disconnected, sends accounting information about the outgoing call using RADIUS | |||
| Bills the account, customer and vendor for the outgoing call | |||
| Hangs up | |||
| Sends accounting information about the incoming telephony call | |||
| Bills the vendor of the incoming portion of the call (to calculate the cost of an incoming toll-free call), unlocks the session for this account |
Sometimes an incoming call for a prepaid card service arrives to your network via IP. For instance, say you bought an access number in a country where you do not own any network infrastructure; so instead of using E1 or T1 lines, a telco in that country will forward calls to you using SIP. In this case using a Cisco GW may be cumbersome, since you first have to convert the IP call to PSTN and then send it back via IP. Instead, you can run the built-in prepaid IVR application on PortaSIP. It is associated with a PSTN access number delivered directly to PortaSIP via IP and allows you to offer a purely IP-based solution for prepaid calling card services.
Configuration overview
- Initial configuration of PortaBilling
- Create a vendor tariff
- Enter rates to the vendor tariff
- Create a vendor
- Define connections
- Configure access from PSTN
- Set up an IVR application
- Create a tariff for end users
- Enter rates to the customer tariff
- Create a product
- Create a customer class
- Create a customer
- Generate accounts
- Account management
Initial configuration of PortaBilling
If you have just installed the PortaBilling software or dedicated a new billing environment to configure the services described in this handbook, make sure to first perform the initial configuration of PortaBilling.
Create a vendor tariff
A tariff is a single price list for call services.
- In the navigation menu on the left, select Service catalog > Tariffs and click + Tariff.
- On the Add tariff panel, fill in the tariff details:
- Name – type a short name for the tariff object (for example, GlobalNet Termination); this is the name you will see in the select menus.
- Currency – choose the currency in which the vendor charges you.
The currency for the tariff may be chosen only once, and cannot be changed later.
- Service – select Voice calls.
- Applied to – select Vendor.
- Routing – turn on the toggle to enable routing for this tariff.
- Define prices – select per individual rate code.
- Code group set – select None.

- Click Save.
Enter rates to the vendor tariff
- Open the created tariff and navigate to Rates.
To add a rate, you need to specify a rate code (phone prefix). Make sure that the needed rate codes have been added to the system. See more details on how to create rate codes in the Initial configuration of PortaBilling handbook.
You can add rates one by one or upload them from a file. To download the file sample with all the required columns, click Rate download on the toolbar, then open the notifications tab and click Rate download.
- To add a rate manually, click + Rate and fill in the rate details:
- Rate code – type in a specific rate code or select it from the list.
- Rating mode – select Flat rate. To enter different rates for the peak and off-peak periods, select the Separate peak/off-peak rate option.
- Effective from – specify when the rate becomes effective. By default, this parameter is set to “immediately”. If you want this rate to take effect in the future, select “Specific time” and type in the date manually, or select it from the calendar.
- First interval, seconds – specify the first rounding interval in seconds (default is 1 second). This interval defines the minimum duration of the call that is going to be billed. For instance, if the first interval is set to 30 seconds, a call lasting between 1 and 30 seconds will be billed as a 30-second call.
- First price – specify the per-minute price for the first interval.
- Next interval, seconds – specify the next rounding interval in seconds (default is 1 second). This determines how the call duration beyond the initial interval is billed. For example, if the next interval is set to 1 second, any duration beyond the initial interval will be billed in 1-second increments.
- Next price – specify the per-minute price for the next interval.
Please refer to the Call billing parameters section for more details on billing parameters.
- Route category – you can split your available routes into several categories, such as “High quality,” “Premium,” etc., then create routing plans for your customers. Use the Default route category for now.
- Preference – the routing priority for the specific rate code. 10 is the highest priority, 0 is the lowest (i.e., do not use this rate code for routing at all). For now, you can just set all of your vendor rates at preference 5, and the system will organize available routes according to cost (LCR).
- Huntstop
– when enabled, instructs the system to not try any routes with a lower
preference.

- Click Save.
- Repeat steps 2-3 if you need to enter more rates.
 Perform the
Create Tariff and Enter Rates steps described above until
you have created a tariff for calculating the termination costs for each of your termination partners; these tariffs are created as “Applied to: Vendor”.
Perform the
Create Tariff and Enter Rates steps described above until
you have created a tariff for calculating the termination costs for each of your termination partners; these tariffs are created as “Applied to: Vendor”.
Create a vendor
This step is only required if you have not entered information about your vendors into the system before. Vendors are your termination partners or the providers of incoming toll-free lines and DID numbers.
- In the navigation menu, select Infrastructure > Vendors and click Add.
- On the Create vendor panel, fill in the vendor details:
- Name – type a short name for the vendor object (for example, GlobalNet); this will be used in the web interface.
- Currency – choose the currency in which this vendor charges you.
- Opening balance – this option is usually used when you migrate a vendor from a legacy system to PortaSwitch. Leave “0” here.
- Billing period – choose a billing period for the vendor. A billing period defines how often the vendor will bill you, e.g., monthly.

- Click Save.
Define connections
- On your vendor’s panel (GlobalNet), navigate to Connections and click Add.
- On the Create connection panel, fill in the connection details:
- Description – type a descriptive name for this connection. It will be displayed in the list of connections.
- Service type – select Voice calls.
- Type of connections – select SIP.
- Direction – select To vendor.
- Tariff – choose the tariff that defines your termination costs for this connection/vendor.
- Active – select the checkbox to set this connection as active.
- Identify gateway by – choose how to identify the gateway: IP, gateway ID, or both. Specify the IP address and/or ID of the vendor’s gateway or switch.
- Capacity
– specify the maximum number of simultaneous sessions the connection can
support.

- Click Save.
- Repeat steps 1-3 to add more connections to this vendor.
Configure access from PSTN
Since the main purpose of this service is to give your customers access to your prepaid application from PSTN (by dialing your access number from their landline or mobile phone), you have to ensure that calls to that access number are delivered properly to your network and then handed over to PortaSIP IVR.
Please refer to the instructions in the Incoming calls from DID provider (manual configuration) section for complete details about how to set up the vendor and the connection.
Set up an IVR application
First you need to define that when a call is made to the access number of your prepaid calling card service, PortaSIP launches the corresponding IVR application for handling the call.
Create an IVR application
Create an IVR application in the virtual PortaBilling environment where it will be used.
- In the navigation menu, select Voice calls processing > Voice applications and click Add.
- On
the Create voice application panel, fill in the following fields:
- Name – specify the IVR application’s name (e.g., Prepaid cards).
- Application type – choose Prepaid card calling.
- Number – type in the number to be dialed by an end user or click DID
 to select a DID number from the available DID numbers list. Click Add
  to add more numbers.

- Click Save.
You can clone multiple entities in order to customize the application parameters (such as IVR languages or whether ANI authorization is performed), according to your requirements.
Customize the IVR application parameters
Translation rules
- Open the created Voice application, go to the Authentication, Authorization, Accounting section and select Translation rules.
- On
the Translation rules panel, type s/$/@pin/ in the PIN
translation rule field. This will instruct the system to add @pin
suffix to the PIN number a user dials and search for a PIN@pin account
(e.g., 66617778897@pin) for authentication and authorization.

IVR languages
Configure in which languages the IVR will communicate with the customer.
- On the Voice application panel, go to Prompts & notifications and select Language.
- Click Select languages.
- In
the Select languages dialog, choose the language (or several
languages) you wish to use for voice prompts. In this case, the IVR’s
first prompt will be the language selection prompt “Please press 1 for
English, 2 for Spanish, 3 for German, etc.” To choose all languages at
once, select the line All available on top. Then click Select.

You can change the order of the languages by moving the Order
 icon up or down.
 - Click Save.
Group access numbers
You can group all of the access numbers that you provide for prepaid card calling under a single rating entry within a product. For this define the Group access code prefix within your IVR application settings. Then add this prefix value (i.e., LOCAL) to the Access code field of the product’s rating entry during the product’s configuration.
When a call arrives, the system then adds this prefix to the IVR access number (e.g., LOCAL.16047899001) and uses this combination to authorize a call.
- On the Voice application panel, go to the Authentication, Authorization, Accounting section and select Authorization.
- In
Group access code prefix, type the prefix value (e.g., LOCAL).

- Type this prefix (i.e., LOCAL) as the Access code value for the product’s rating entry during the product’s configuration.
Custom brand prompts
You can configure the IVR application to use your brand prompts instead of default ones. Please refer to the How to configure custom brand prompts section for a detailed configuration description.
See the Prepaid calling IVR applications section for more information about the prepaid card IVR configuration parameters.
Create a tariff for end users
- In the navigation menu, select Service catalog > Tariffs and click + Tariff.
- On
the Add tariff panel, fill in the tariff details:
- Name – type a short name for the tariff object (for example, Prepaid cards); this is the name you will see in the select menus.
- Currency
– select the currency in which you charge your customers.
The currency for the tariff is chosen only once, and cannot be changed later.
- Service – select Voice calls.
- Applied to – select Customer as this tariff will be used to charge your customers.
- Managed by – select Administrator only here, since we are setting up a service without the involvement of resellers.
- Define prices – select per individual rate code.
- Code group set – select None.

- Click Save.
- Open the tariff you created and go to General configuration. On the General info tab, you can specify additional settings:
- Default off-peak period – if you differentiate between peak and off-peak rates, select one of the previously defined off-peak periods.
- Code group set – if you wish to enter rates in the tariff not for every individual prefix, but for a whole group of prefixes at once, you should create a code group set and code groups beforehand. Leave this field empty for now.
- Short description – type a short tariff description. This will be shown in the rate lookup on the admin interface and the self-care pages for your accounts and customers.
- Description – type an extended tariff description.
- Rounding precision – instead of calculating xDRs with a 5-decimal-place precision, round up xDR amount values (e.g., to cents, so that 1.16730
becomes 1.17).

- Click Save.
Enter rates to the customer tariff
- Open the created customer tariff and navigate to Rates.
You can add rates one by one or upload them from a file. To download the file sample with all the required columns, click Rate download on the toolbar, then open the notifications tab and click Rate download.
- To add a rate manually, click + Rate and fill in the rate details:
- Rate code – type in a specific rate code or select it from the list.
- Rating mode – select Flat rate. To enter different rates for the peak and off-peak periods, select the Separate peak/off-peak rate option.
- Effective from – specify when the rate becomes effective. By default, this parameter is set to “immediately”. If you want this rate to take effect in the future, select “Specific time” and type in the date manually, or select it from the calendar.
- Connect fee – you can specify the amount that will be charged immediately upon connection.
- Rate formula – this shows how charges for calls are calculated, including the defined connect fee.
- First interval, seconds – specify the first rounding interval in seconds (default is 1 second). This interval defines the minimum duration of the call that is going to be billed. For instance, if the first interval is set to 30 seconds, a call lasting between 1 and 30 seconds will be billed as a 30-second call.
- First price – specify the per-minute price for the first interval.
- Next interval, seconds – specify the next rounding interval in seconds (default is 1 second). This determines how the call duration beyond the initial interval is billed. For example, if the next interval is set to 1 second, any duration beyond the initial interval will be billed in 1-second increments. If you set the first interval to 30 seconds and the next interval to 1 second, and the call lasts for 36 seconds, the customer will be charged for 36 seconds.
- Next price – specify the per-minute price for the next interval.

- Click Save.
- Repeat steps 2-3 if you need to enter more rates.
Test rate configuration (optional)
- While on your customer tariff panel, click Test.
- Type
in the phone number for which you would like to test the rating, as well
as the estimated call duration, and then click Test.

- You will see the estimated amount charged for this call, as well as a detailed explanation of the rating process.
Create a product
- In the navigation menu, select Service catalog > Products and click + Product.
- On the Add product panel, fill in the product details:
- General tab:
- Product type – select Main product.
- Name – type an internal product name that will be shown on the admin web interface.
- Name visible to end users – type a name of the product that will be shown to end users on their self-care interfaces.
- Currency – choose a currency the product will be priced in.
- Account role – select Prepaid card from the list.
- Account default ACL – choose an Access Control List (ACL) for accounts with this product assigned. ACLs control which objects end users can access to and which actions they can perform.
- Managed
by – select Administrator only here, since we are setting up a service without the involvement of resellers.

- Services tab:
- Define which service types are included in the product. A service type is a description of the physical service provided to end users. Select Voice calls here.

- Define which service types are included in the product. A service type is a description of the physical service provided to end users. Select Voice calls here.
- Usage charging tab:
- Click + Entry.
- Charging rules have two functions: they define permitted access points (nodes and access numbers) and specify which tariff should be used for billing in each of these points. On the Add charging rule panel, fill in the required information:
- Service – select Voice calls.
- Node – select the PortaSIP node.
- OLI (Originating line information) – select Any.
- Access code – type the access number that you have added for the IVR application (e.g., 18665551122). If you defined the Group access code prefix within your IVR application settings, add this prefix value (i.e., LOCAL) to the Access code field.
- Tariff
– choose the tariff that will be applied
to your prepaid calling card customers.

- Switch to the Overdraft
protection tab to configure overdraft protection for this product. Consult
the Configure overdraft protection section within the product section
in the Overdraft
protection configuration handbook.

If you use several access numbers for the IVR application, you must add a rating entry for each of them. - Additional tab:
- Description – you can specify your internal comments about the intended use of this product.
- Description
visible to end users – provide a product description to be shown to
end users on their self-care web interface.

- General tab:
- Click Save.
Create a customer class
A customer class lets you define a set of parameters once and apply them to multiple customers at the same time.
- In the navigation menu, select Sales > Customer classes and click + Customer class.
- On
the Create a customer class panel, fill in the customer class details:
- Name – type a short name for this customer class.
- Business model – select which customers this customer class will apply. Select Prepaid card holder from the list.
- Currency – optionally, select a currency. If specified, the customer class can only be assigned to customers that use the same currency. Once saved, the selected currency cannot be changed.
- Managed by – select Administrator only.

- Click Save.
Create a customer
A customer is an owner of accounts. Although you will not issue invoices for the prepaid calling card service, you will need at least one customer object to keep all of the prepaid card accounts organized in one location.
- In the navigation menu, select Sales > Customers and click + Customer.
- On the Add customer panel, fill in the customer details:
- Balance control – select Prepaid.
- Name – type a short name for the customer object; this will be used on the web interface.
- Business model – a business model defines what type of service is to be provided to the customer. Select Prepaid card holder for this customer.
- Customer class – customer class allows you to define a policy for automated payment collection. By choosing a specific class here the customer will automatically inherit all of the class properties (grace period, invoice template, etc.). Select the previously created customer class.
- Currency – choose the currency in which this customer will be billed.
- Available funds – this is the amount of funds that a user can spend on services. Since Prepaid cards are debit accounts with individual balances, they are not affected by customer's available funds. Thus, you can leave the default zero value as is.
- Billing period – choose a billing period for the customer. A billing period defines the frequency of invoicing for this customer.
- Billing
period time zone – choose a time zone in which customer’s billing
period will be closed and invoices will be generated.
Be aware that when you create a customer with zero available funds, the system displays the No available funds status. This status is important for the customer’s credit accounts. It indicates that services are unavailable for credit accounts until a customer’s balance is topped up.

Generate accounts
PortaBilling account management is based on batches and control numbers. A batch is a named set of accounts. By giving descriptive names to batches you can keep your accounts well organized. (Examples of batch names: “FLEX CARD 10$”, “EASY CALL 5$”.) Accounts in each batch are automatically numbered by control numbers, starting with one. If you are generating more accounts for an existing batch, PortaBilling will continue control number assignment from the next available number in the sequence.
Available account management options:
- Single account
- Whole batch
- Batch + list of control numbers
- Batch + range of control numbers
It’s a good idea to print the batch and control number on the prepaid card and keep a card distribution register, so that later you can block some specific cards in case of fraud, or give extra promotional credit to some customers.
You can also distribute all of your cards as blocked, so that the dealer will call your support and request card activation only once the card is sold to a customer. Of course, the dealer should not be able to see the PIN at any time – this is why we need an alternate way of identifying a card, i.e., by batch and control number.
To generate a batch of accounts, perform the following steps:
- On your customer’s panel, go to Accounts and click Account generator
 on the toolbar.

- On the Account generation panel, enter the information about accounts.
- General tab:
- Account role – the defined usage for the account. Select Prepaid card from the list.
- Opening balance – the initial balance on the card.
- Product – select the product for prepaid cards you have created.
- Quantity – number of accounts (prepaid cards) to be generated.
- Batch – accounts are grouped into batches. If Add a new batch is selected, all accounts will be placed into a new batch. Otherwise, an existing batch should be selected from the drop-down list.
- New
batch name – type a name for the new batch.

- Life cycle:
- Requires manual activation – it is normal practice to generate all prepaid cards as inactive so they cannot be misused before being sold to the dealer or end customer. You can always activate the whole batch of cards or an individual card later. If you plan to assign the cards to a distributor later on, the cards must be generated as inactive. Select the checkbox to generate inactive cards.
- Activation – define the date from which the accounts are usable.
- Expiration date – define the date on which the accounts expire.
- Availability period after first usage, days – defines the number of days the account remains active after its first use or recharge.
- Availability
period after last usage, days – defines the number of days the account
remains active after its last use or recharge.

- Additional tab:
- Generation method – the Random method means that every account is assigned a unique, randomly-generated PIN.
- ID length – specify the total ID length (PINs). This is the number of digits, including the ID prefix (e.g., 10). In order to avoid problems with the prepaid card print-shop, PortaBilling doesn’t generate account numbers that lead with a zero. Also, PortaBilling only allows the generation of a batch with feasible parameters. For example, it is impossible to generate a batch of 1,000 accounts with an ID length of 4 and an ID that starts at 55.
- ID prefix – specify which digits lead to generate accounts that start with the same digit string. Note that an ID prefix is part of an ID length. If you enter 12 and an ID length of 10, account IDs (PINs) will look like this: 12NNNNNNNN, where N = random digits.
- Service password – to improve security, you can use an account password during authentication, in addition to a PIN. If you choose Empty, no password will be assigned to the account, and the password check will be switched off during authentication. Choosing Empty is recommended by default. If you decide to use passwords, then please use the Auto-generated digits only option, since then the password can be entered in the IVR via phone keys.
- Distributor
– you can assign a specific distributor to this group of accounts.

- Web interface:
- Credentials – if you choose Auto-generated, your customer will use his account ID (PIN) to log in to the self-care pages; a random password for web access will be assigned for each account. If you choose Empty, the account owner will not be able to use the self-care pages at all until a login has been assigned for his account; no password will be assigned, so account owners will be able to log in to the web interface simply by providing their account ID (PIN).
- Time zone – when an account owner accesses the web self-care pages to see a list of his calls, the time will be shown in the time zone most appropriate for him.
- Web
interface language – the language to be used on the account self-care
web interface.

- General tab:
- Click Generate.
Account generation tasks are executed every few minutes, and it may take a while to generate large numbers of accounts.
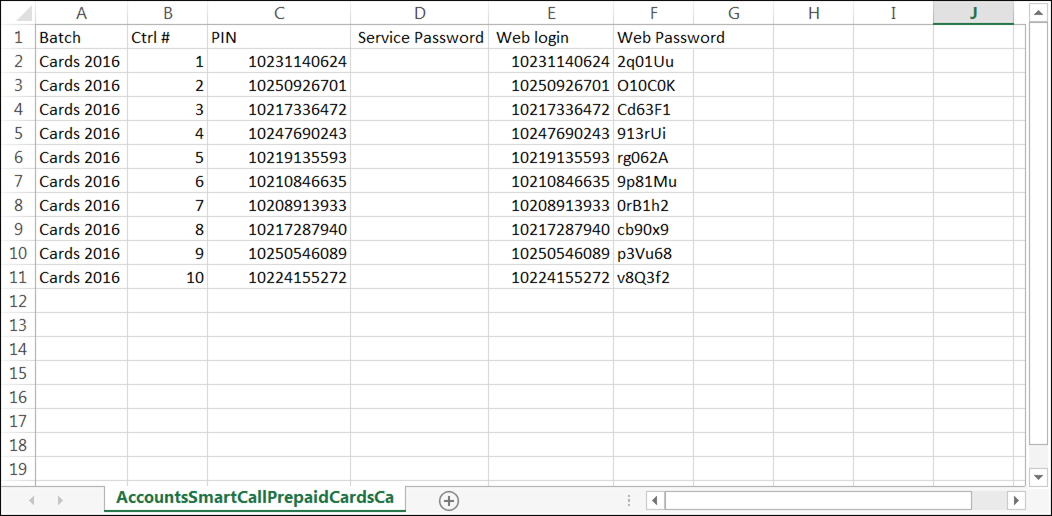
 In case the
original email message was lost or accidentally deleted, the file containing
generated accounts is stored on the PortaBilling web (admin) server in the
/porta_var/<Server_IP>/ directory, sub-directory cards.
In case the
original email message was lost or accidentally deleted, the file containing
generated accounts is stored on the PortaBilling web (admin) server in the
/porta_var/<Server_IP>/ directory, sub-directory cards.
Account management
Let’s assume that you want to activate a specific account.
- On your customer’s panel, go to Accounts.

- Specify one or more of the search criteria and click Search.
- Open the account you want to update.
- On the account’s panel, click Change status.
- In the Change account status? dialog, select Active and click Change.

Batch account update
To change status or apply new settings to a group of accounts within a batch at a time, use the Batch account update functionality.
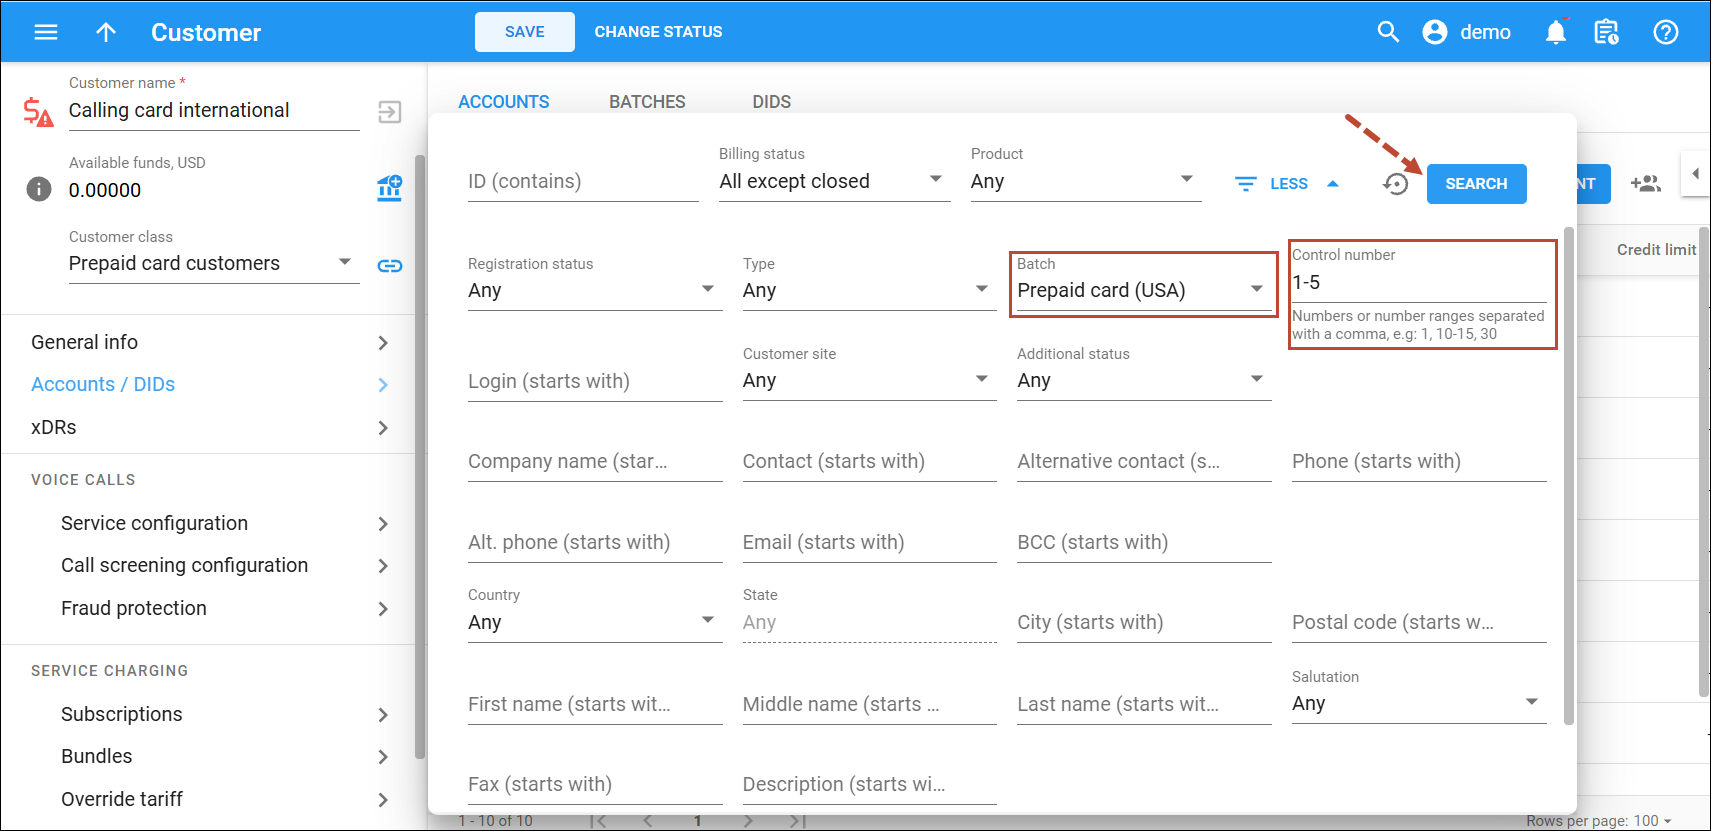
Let's assume that you want to activate a range of accounts with control numbers from 1 to 5 and add $5 to their balance.
- On your customer’s panel, click Accounts.
- To open advanced search criteria, click More
 .
.

- Select a specific batch of accounts and control numbers (e.g., 1-5). To update specific accounts in a batch, apply additional filtering options such as registration status, etc. Filtering by custom fields is not supported for batch account
update. Click Search.
- The Batch account update panel pops up automatically after you filter the accounts by batch. You can also open it by clicking the button on the top right on the Accounts tab. The actions remain read-only until you apply the batch filters.

- Select attributes to update and set the required value next to it.

- Click Update accounts. The confirmation dialog shows the applied filtering criteria and the settings to be changed.

- Click Update to apply changes.
 You can only change an opening balance on an account before it is used. This change will not be reflected in the xDRs. For example, if you create a prepaid account worth $10 and then realize that you actually sold it to a customer for $15 and then you add an extra $5 to the card, it will appear to the customer as if the card originally had $15 on it.


