



This feature allows you to perform additional verification of outgoing tolls on international calls. Especially in the case of a single phone being shared among multiple users, this feature enables individual accountability on each user’s account. Note that calls between cloud PBX extensions and calls to other IVR applications (e.g., to voicemail) bypass the additional authorization.
Below you will find configuration examples for each case:
Example 1. Allow toll calls only after additional authorization
Configure an IVR application
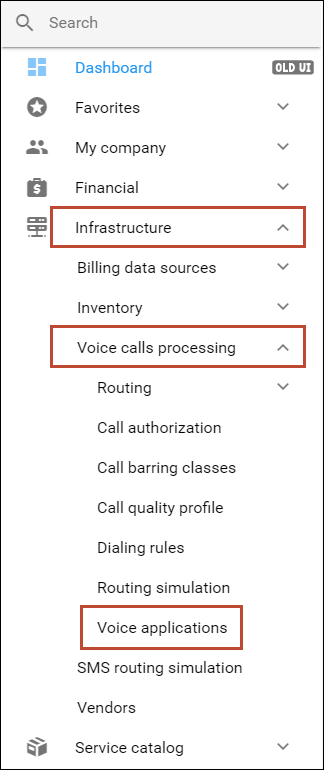
- On the navigation menu, select Infrastructure, then select Voice calls processing and go to Voice applications.
- Click + Add and fill in the following fields:
- Name – specify the IVR application’s name (e.g., Corporate PIN Authentication).
- Application type – choose Pass-through IVR.

- Click Save&Edit.
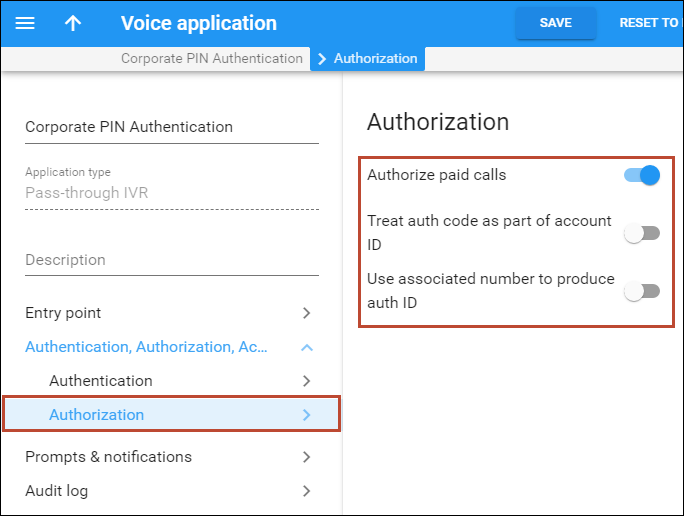
- Go to Authorization and enable the Authorize paid calls option. This will enable additional authorization for toll calls.
- Click Save.
Create a rate code
This step is only required if you have not previously defined the required destination. In that case, you will need to create an UMIVRPASS rate code for calls to the Pass-through IVR application.
- On the navigation menu, select Service catalog, select Rate codes, and then select Rate codes.
- Click Add and fill in the rate code information:
- Format – select Custom from the list.
- Prefix – type in UMIVRPASS.
- Description – enter useful information about the service being provided (e.g., Pass-through IVR application), since this is what your clients will see on their xDR Summary pages.

- Click Save.
Modify a customer tariff
For a customer to be authorized for an outgoing call, they must first call the IVR application. To make this happen, add the UMIVRPASS rate code you have just created to the customer tariff.
- On the customer tariff’s panel, click Rates.
- Click + Rate, select UMIVRPASS in the Rate code field. Specify a zero price in the First price and Next price fields.

- Click Save.
Configure calls via IVR on account
This configuration requires a credit limit for the customer. If you have already set the credit limit for the customer, you may go directly to the Accounts panel to continue the configuration. Otherwise, set a reasonable credit limit for the customer.
- Go to an account that requires additional authorization.
- Open Service configuration > Outgoing calls.
- Enable the Call via IVR option, then select the above-created Voice application.

- Go to Fraud detection configuration and enable the IVR authentication option. Specify the authentication code that the account user should input to make a toll call.

This example shows you the configuration for the following scenario. Customer has a shared phone line, 12121234567, in the office hall. Every office worker has their own authentication code for making toll calls (e.g., 7614, 1027, 5423, etc.).
When an employee makes a toll call, they are prompted to enter an additional authentication code (7614, 1027 or 5423) to specifically identify who they are so that calls can be properly authorized against individual accounts and later shown on a combined invoice.
When one of the employees makes an outgoing call to another SIP phone within the same PBX environment or makes a toll-free call, the call is then initiated without additional authorization.
In this scenario, only the main account, 12121234567, is provisioned on the SIP phone. For user identification, additional accounts should also be created with IDs that include the phone number followed by the # symbol and an authentication code (e.g., 12121234567#7614, 12121234567#1027 or 12121234567#5423, etc.).
To set up this functionality follow the instructions below:
- This configuration requires a credit limit for the customer. If the credit limit is already set you may go directly to the Account info page to continue the configuration, otherwise set a reasonable credit limit for the customer.
- Repeat the Configure an IVR application, Add rate code and Modify a customer tariff steps from Example 1.
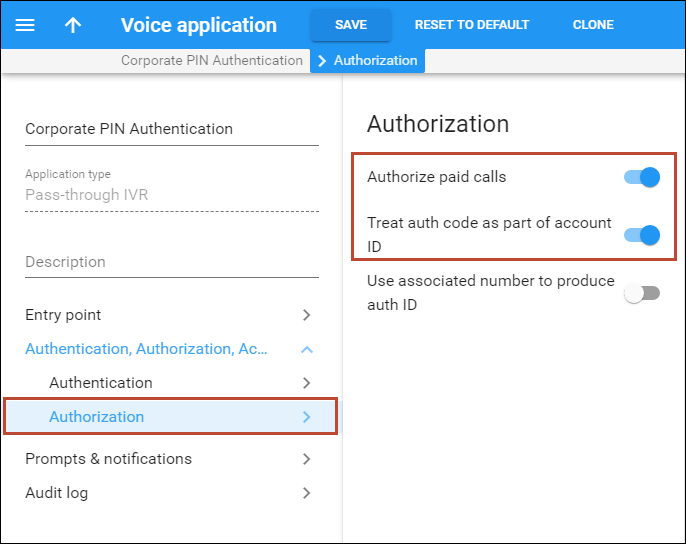
- On the Authorization panel enable the following options:
- Authorize paid calls to enable additional authorization for toll calls. The IVR application will request that the account user should input the authentication code.
- Treat auth code as part of account ID for billing outgoing calls to separate accounts which are made from a shared phone.
- On the account’s panel, go to Service configuration > Outgoing calls.
- Enable the Call via IVR option, then select the above-created Voice application.

- Create additional individual accounts that include a phone number followed by the # symbol and an authorization code (e.g., 12121234567#7614) and click Save.



