



...Configure data provisioning to NetNumber
North American MVNOs use the NetNumber database for accurate SMS and MMS routing. This entails storing their DIDs in NetNumber and keeping them up-to-date.
This section shows how to configure integration with NetNumber within PortaBilling.
Configure provisioning on the Configuration server
- Go to the Configuration server and clone the configuration.
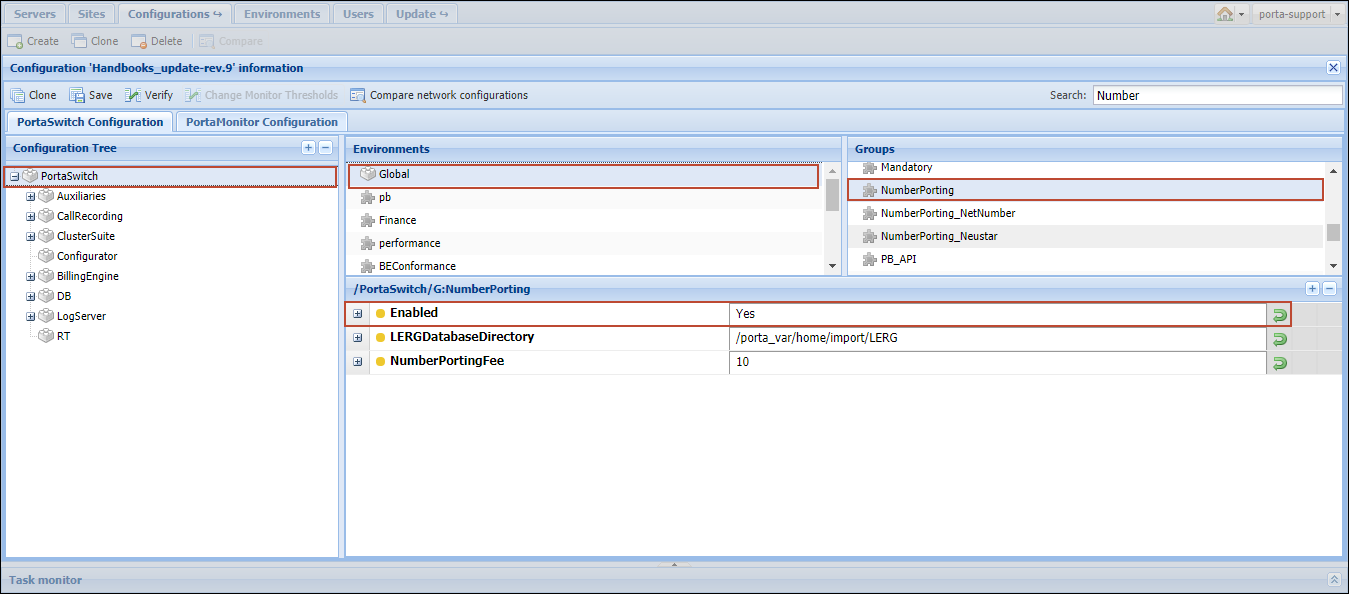
- Select PortaSwitch on the Configuration Tree, then select NumberPorting.
- Enable number porting functionality by selecting
Yes:
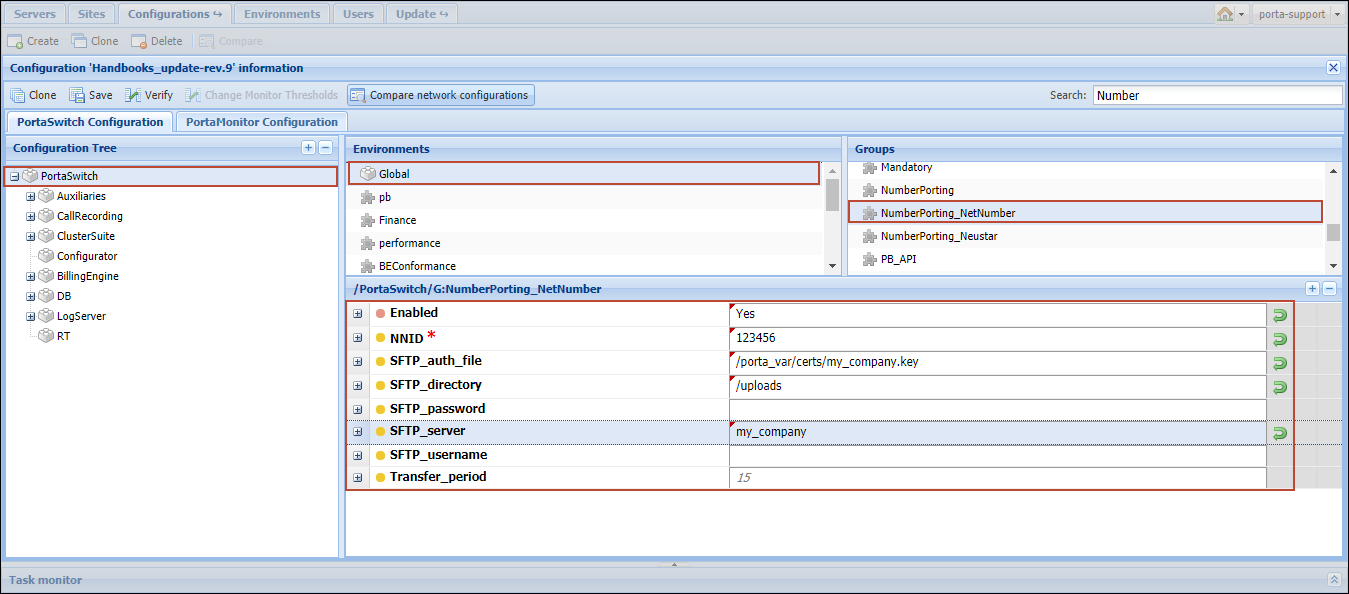
- Select the NumberPorting_NetNumber
group and fill in the following fields:
- Enabled – select Yes.
- NNID – specify your ID number provided by NetNumber.
- SFTP_auth_file – provide the path to the NetNumber SFTP authorization file.
- SFTP_directory – specify your remote directory on the NetNumber server.
- SFTP_password – specify the NetNumber SFTP server password.
- SFTP_server – specify the NetNumber SFTP server IP address or its domain name.
- SFTP_username – specify the username information for the NetNumber SFTP server.
- Transfer_period
– specify the frequency of data transfer (in minutes).
- Click the Save button first, then the Check button.
- Verify the new configuration and click the Check/Apply button.
Enable events for ESPF (External system provisioning framework)
- On the PortaBilling web interface, go to Infrastructure and select Event handlers.
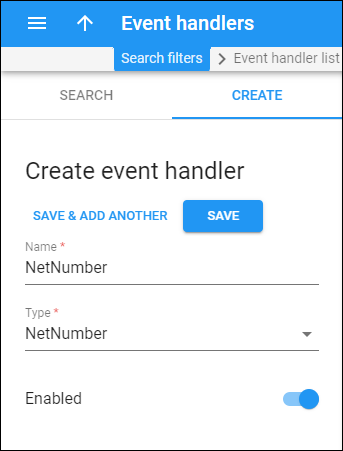
- Open the Create event handler tab and fill in the details:
- Name – type the event handler name, e.g., “NetNumber”.
- Type – select NetNumber.
- Leave the Enabled toggle on to create an active handler.
- Click Save.
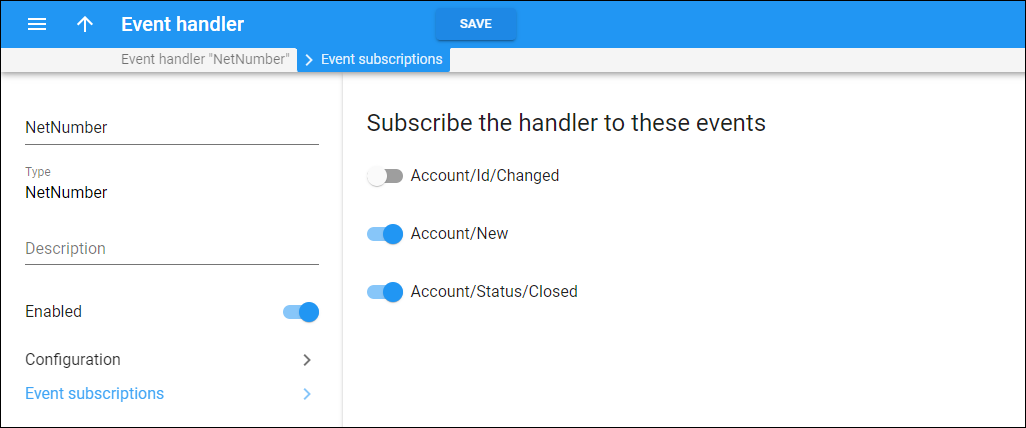
- Open the created event handler and go to Event subscriptions. Turn on the toggle for specific events to subscribe to these events.
- Click Save.
...Create an account for combined mobile and SIP services access
When a phone number assigned as an alias is authenticated, PortaBilling retrieves information about the main account and uses its balance, product and other parameters for all further operations.
Let’s say that your PBX customer ABC company wishes that their employees have one phone number for internal communication and another one for mobile services.
To do this, modify the configuration of the main product that is used for accessing SIP services and include access to the mobile services as described in the steps above.
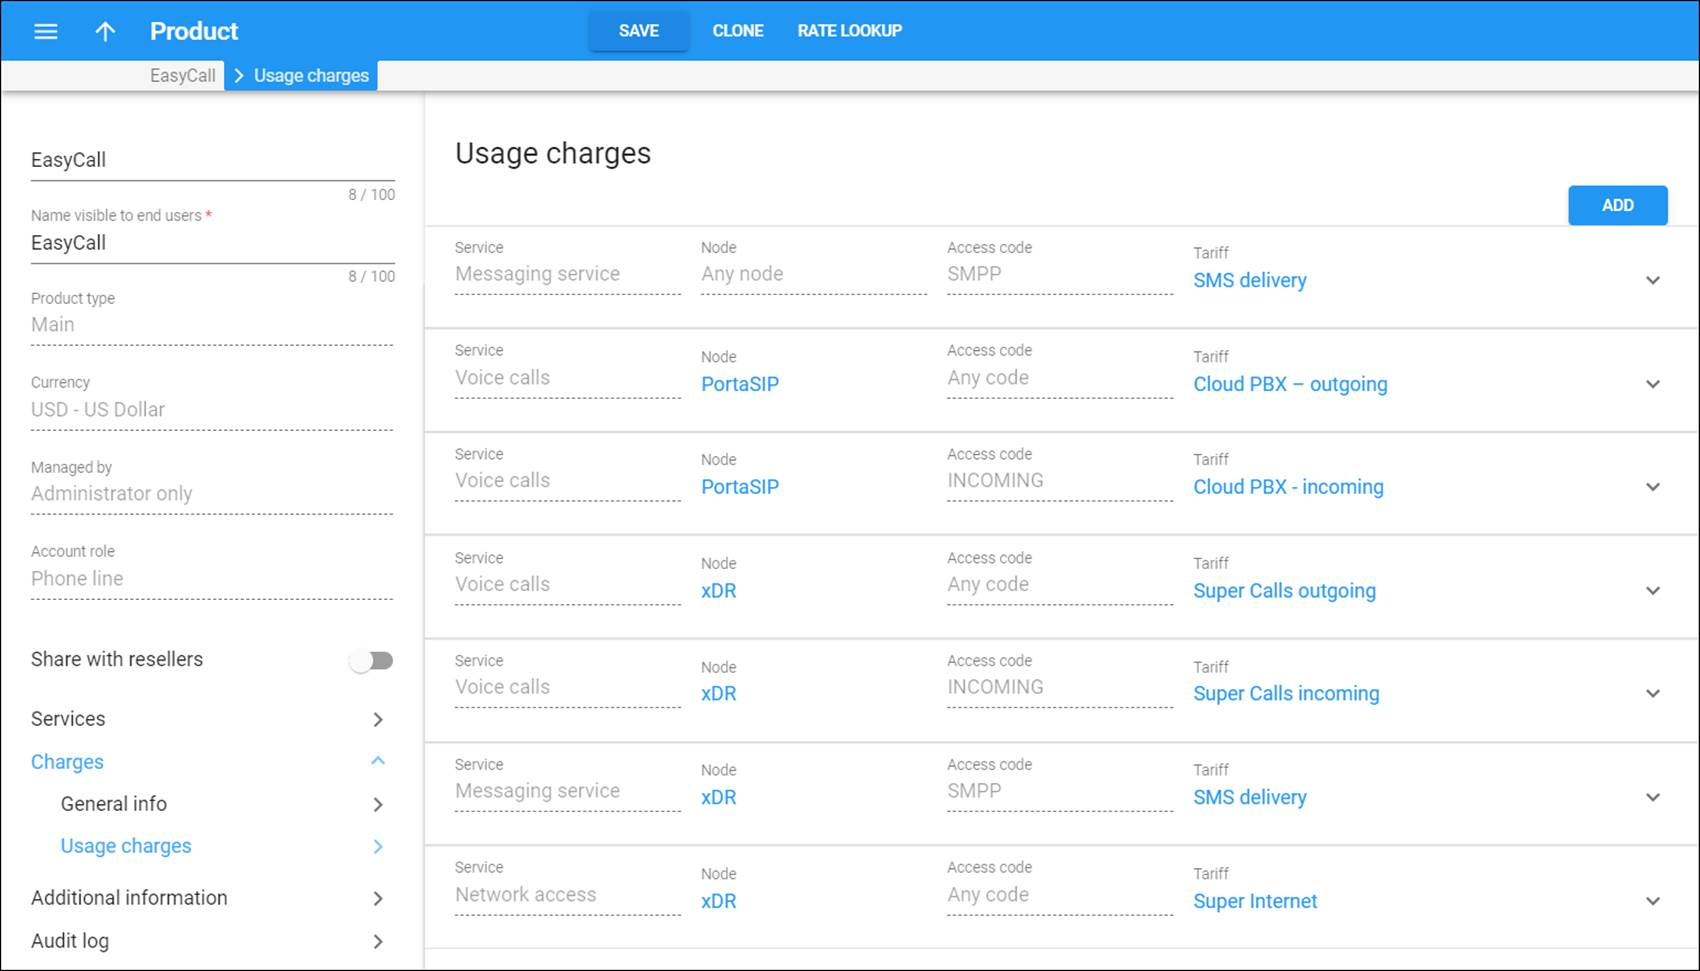
To differentiate among phone numbers used for SIP services and those used for mobile, it is necessary to assign an alias with the mobile account role to the account. This is done by first creating an add-on product with a mobile account role and then assigning this add-on to the main account.
- Create
an add-on product with the Mobile account role and associate it
with the main product.
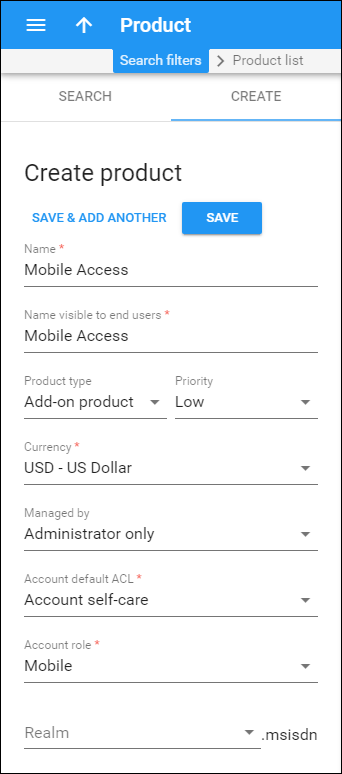
- Click Save.
- From
the Edit product panel select Additional information.
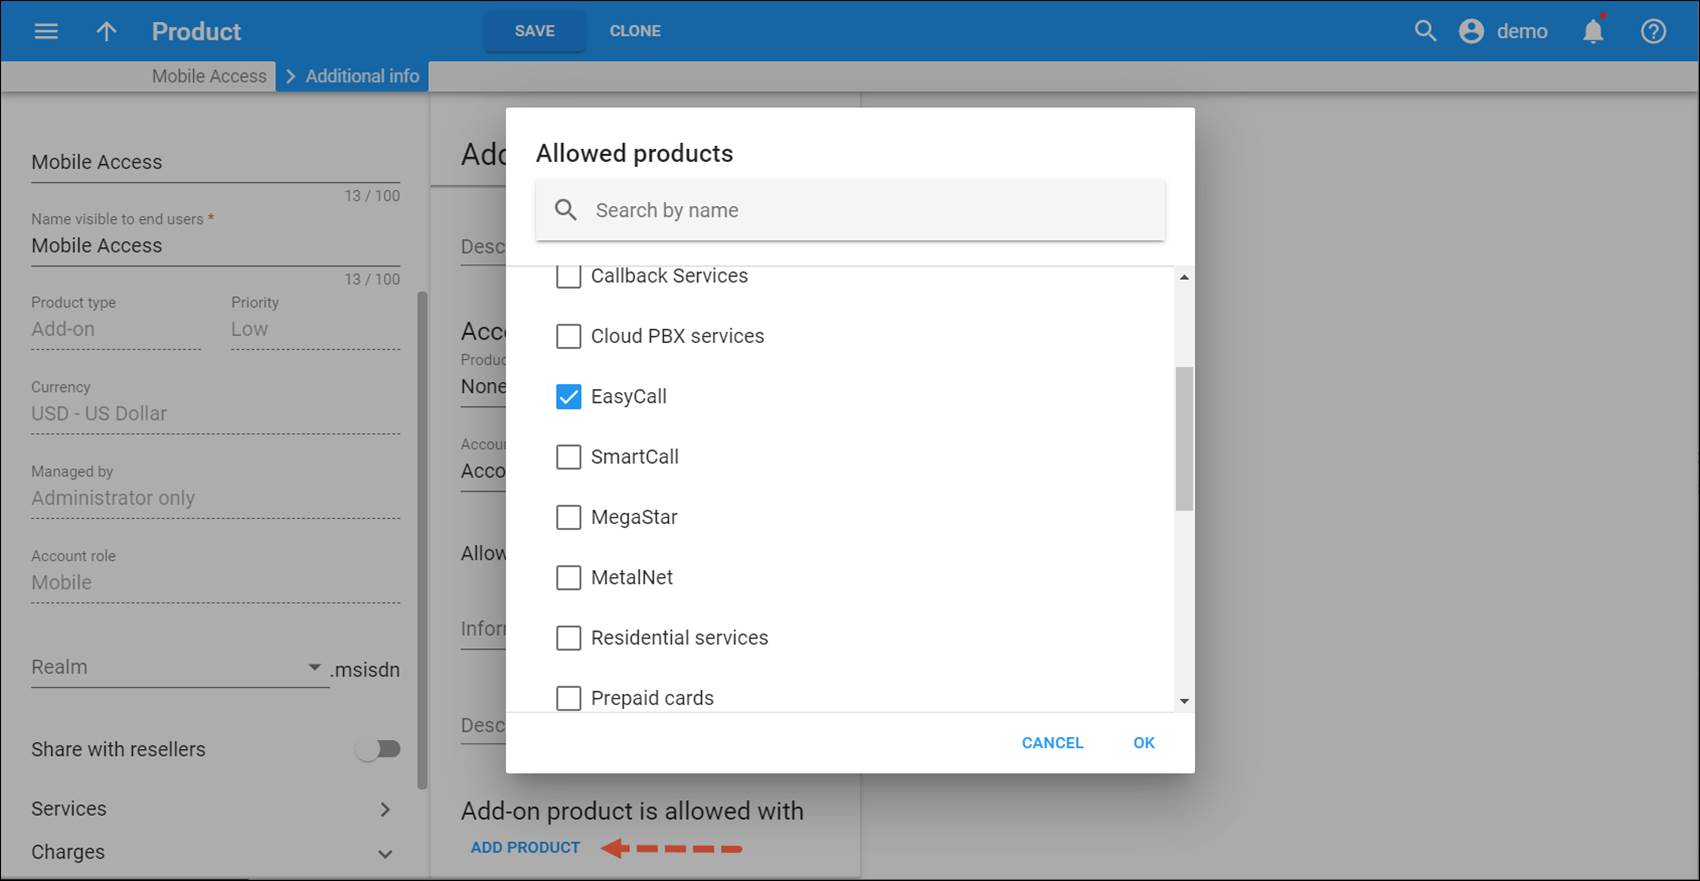
- On the Additional information panel click Add product for the Add-on product is allowed with option.
- Select the main product and click OK.
- Click Save.
- Find
the account you wish to modify and on the Edit account panel select
Finances, then Add-on products.
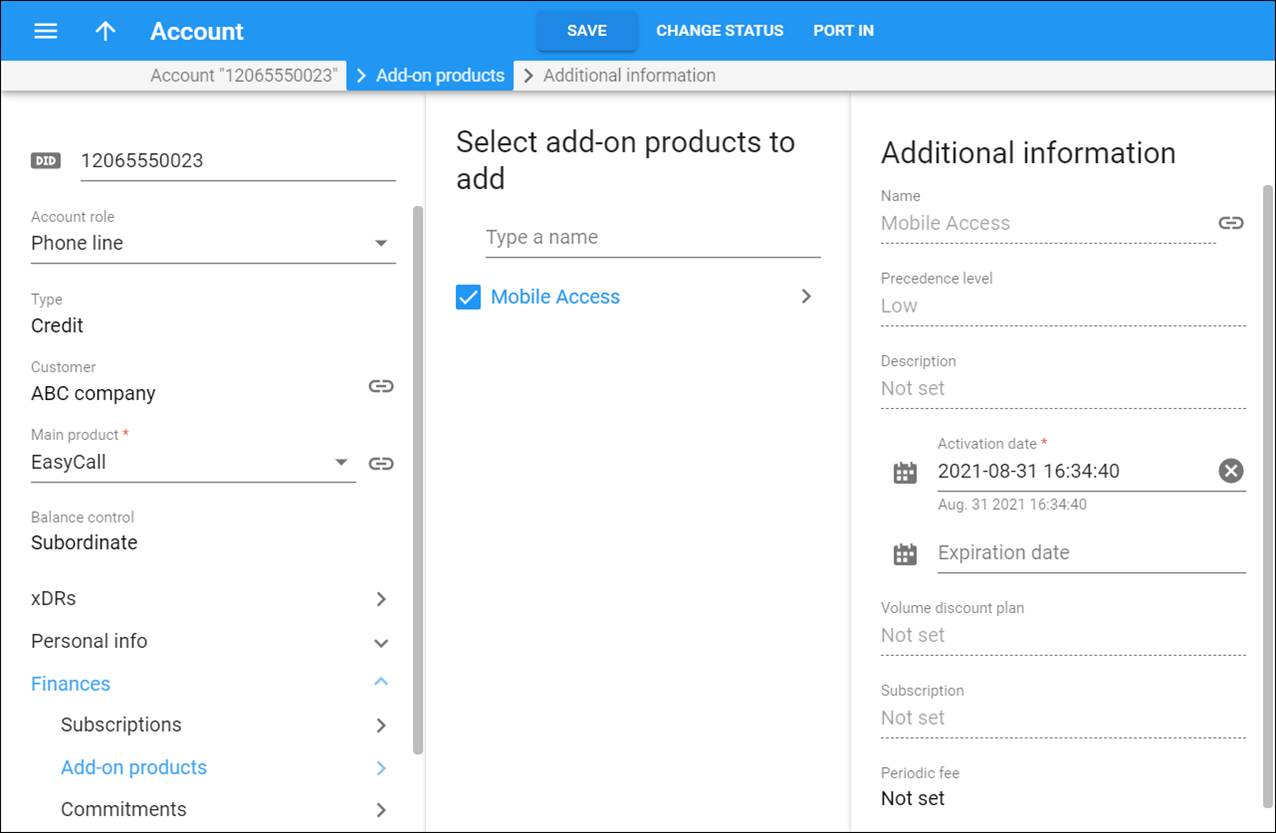
- On the Select add-on products to add panel select the add-on product to be used with the main one for the SIP services.
- Click Save.
- From
the Personal info section select Account alias. Fill
in the alias details on the Alias create panel:
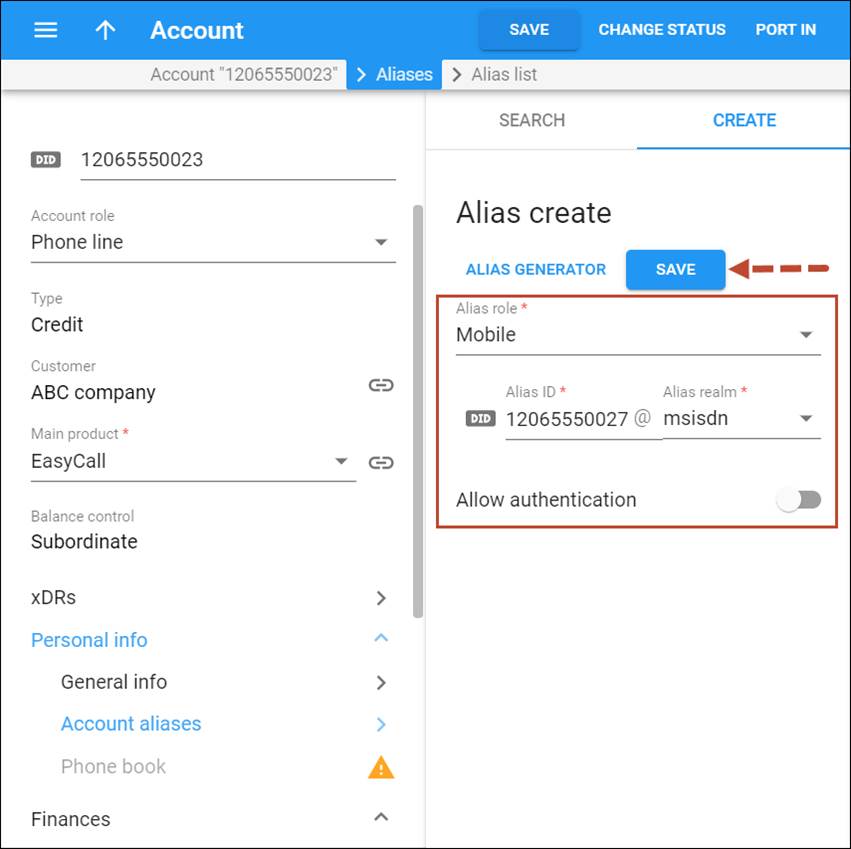
- Account role – select Mobile.
- Alias ID – type in the mobile phone number or provision it from the DID inventory.
- Select MSISDN realm.
- Click Save.
- On the Account toolbar click Save.
…Generate mobile accounts in bulk for SIM cards distribution
“Prepaid starter packs” are often printed to distribute SIM cards. They contain a combination of a mobile number (MSISDN) and a SIM card number (IMSI). When you need to prepare data for “Prepaid starter packs,” generate a batch of mobile accounts via the Account generator. Each account in a given batch is assigned a combination of MSISDN and IMSI from the corresponding inventory. Mobile accounts are initially generated as inactive to prevent misuse of SIM cards if they are stolen or lost (and later recovered by a third party).
You can assign a batch of accounts to a specific distributor before generation. The distributor sells SIM cards and activates the corresponding accounts via the web self-care interface. After purchase, the prepaid SIM cards can be used right away.
Let’s say distributor John Smith wants to sell SIM cards in his grocery store. You need to provide John with 100 $10 SIM cards (“Prepaid starter packs”). To do this, create a batch of 100 inactive debit accounts with a $10 initial balance each and assign this batch to the distributor.
To generate mobile accounts, follow these steps:
- Create a customer as an account holder to keep accounts organized in one location.
- On the customer’s panel, click Accounts.
- On the Account list panel, click Account generator.
- In
the Account generation dialog, fill in the information about accounts:
a. Initial configuration
- Account role – select Mobile.
- Type
– select Debit.
Only debit accounts can be generated as inactive and assigned to a distributor.
- Product – select the product for the mobile services created.
- Quantity – set the number of accounts (SIM cards) to be generated.
- Batch – select a batch for the accounts generated. This batch includes accounts grouped together according to some criteria. If Add a new batch is selected, the generated accounts are placed in a new batch. Otherwise, an existing batch is selected from the drop-down list.
- New
batch name – type a name for the new batch.

b. Optional configuration
- Opening balance – this is the initial balance available on the account. Type ‘10’ here to create accounts with a $10 balance each.
- Requires manual activation – switch on the Requires manual activation toggle switch to create inactive accounts.
- Generation method – by default, each account in a batch is assigned a mobile number (MSISDN) and a SIM card (IMSI) from the corresponding inventory.
- Pricing batch – select the pricing batch to take MSISDN numbers from the DID/MSISDN inventory.
- Use MSISDN from – here define where PortaBilling retrieves the MSISDN numbers from. The MSISDN inventory option means that the accounts are generated with available MSISDNs. If there are reserved MSISDNs for the customer, select The assigned to Customers option.
- Assign MSISDN sequentially starting with – the default option is The first one available, but choose a specific starting number for the consecutive range of MSISDN numbers assigned to accounts generated.
- Assign IMSI sequentially starting with – the default option is The first one available, but choose a specific starting number for the consecutive range of SIM cards (IMSI) assigned to the accounts generated.
- Service password – choose Empty for mobile accounts.
- Distributor
– assign this batch of accounts to the distributor who has been provided
with SIM cards.


- Click Generate.
Once the account generation task is completed, 100 inactive $10 accounts are visible in the customer’s Account list.

The new accounts are available on the distributor’s web self-care interface and are ready to be sold.
The distributor’s commission for activation and further account topup per SIM card is automatically reflected in PortaBilling. Refer to the Configuring a Distributor for Prepaid Services handbook for more details.



