



This handbook demonstrates how to configure cloud PBX services so that your customers will be able to communicate within the PBX environment. It will also assist you in creating phone lines, adding extensions and hunt groups, and finally configuring different call forwarding scenarios.
Please refer to the PBX feature summary section in the PortaSIP Administrator Guide to read more about hosted cloud PBX features available in PortaSwitch.
For more information
about available fields, click  at
the top-right corner.
at
the top-right corner.
Initial configuration of PortaBilling
If you have just installed the PortaBilling software or dedicated a new billing environment to configure the services described in this handbook, make sure to first perform the initial configuration of PortaBilling. To do this, use the PortaBilling Initial Configuration handbook.
Checklist
Use this checklist to check off the operations you have completed while performing the system setup according to the instructions in this chapter. Please be sure to perform all of the operations in the order designated (all of the boxes should be checked), otherwise, the service will not work.
|
Operation |
Done |
|
Rating configuration (Customer) |
|
|
Create a tariff (referred to below as tariff A) which will be used to calculate the charges for outgoing calls from the customer’s PBX environment |
|
|
Enter rates in tariff A, covering the destinations where the accounts can call. A zero cost rate for the special VOICEONNETRX rate code should also be added to this tariff |
|
|
Create a tariff (referred to below as tariff B) that will be used to calculate the charges for incoming calls |
|
|
Enter a zero cost rate for the special ‘|’ (pipe) rate code in tariff B. This rate will be used to calculate the charges for incoming calls |
|
|
Create a subscription plan and configure it as described in the Charging for Value-added Services section |
|
|
Create a cloud PBX product |
|
|
Create a rating entry for this product, associating the Voice calls service and tariff A with the PortaSIP node and empty Access code |
|
|
Create one more rating entry for this product, associating the Voice calls service and tariff B with the PortaSIP node and INCOMING Access code |
|
|
Assign a subscription plan to your cloud PBX product |
|
|
Account provisioning |
|
|
Create a retail customer who will use the PBX service |
|
|
Upload phone numbers |
|
|
Create phone lines |
|
|
Add new extensions |
|
|
Create hunt groups |
Create customer tariffs
To provide cloud PBX services successfully, you should create two customer tariffs. These tariffs will be used for separate charging of outgoing and incoming calls.
Follow the steps below to create the tariff that will be applied to customers for making outgoing calls:
- On the navigation menu, go to Service catalog > Tariffs.
- Click + Tariff and fill in the tariff details:
- Name – type a short name for the tariff object; this is the name you will see in the select menus, (for example, Cloud PBX – outgoing).
- Currency – this indicates the currency in which you charge your customers.
The currency for the tariff is chosen only once, and cannot be changed later.
- Service – select Voice calls.
- Applied to – select Customer as this tariff will be used to charge your customers.
- Managed by – select Administrator only here, since we are setting up a service without the involvement of resellers.
- Define prices – select Per individual rate code.

- Click Save.
- Repeat these steps to create the tariff that will be used to calculate the charges for making incoming calls.

Enter rates
You should specify the rates for the two tariffs created in the previous section.
- Rates for the tariff that will be applied to customers for making outgoing calls should cover the destinations where the accounts of one customer can call. These are used to calculate the charges for outgoing calls. Additionally, a zero rate for the special VOICEONNETRX rate code should also be added to this tariff. This rate will be used to produce zero charges for outgoing calls between accounts within the same IP Centrex environment.
- For the tariff that will be applied to customers for making incoming calls, only a zero rate for the ‘|’ (pipe) rate code should be added. This rate will be used to produce zero charges for all incoming calls.
Managing rates online
- On the navigation menu, go to Service catalog > Tariffs.
- Use the search filters to locate the tariff you created for outgoing calls (Cloud PBX – outgoing). Specify one or more search criteria listed there and click Search.
- On the tariff list panel, click the customer tariff name, which is also a link that redirects you to the edit tariff panel.
- On the customer tariff panel (Cloud PBX – outgoing), click Rates.
- Click + Rate and fill in the rate details:
- Rate code – select VOICEONNETRX.
- Rating mode – select Flat rate. To enter different rates for the peak and off-peak periods, select the Separate peak/off-peak rate option.
- Effective from – specify when the rate becomes effective. By default, this parameter is set to “immediately”. If you want this rate to take effect sometime in the future, select “Specific time” and type in the date manually, or select in the calendar.
- First interval, seconds – specify the first rounding interval in seconds (default is 1 second). This interval defines the minimum duration of the call that is going to be billed to the customer. For instance, if the first interval is set to 30 seconds, a call lasting between 1 and 30 seconds will be billed as a 30-second call.
- First price – set the zero price if you are not going to charge for calls between extensions in the same PBX environment.
- Next interval, seconds – specify the next rounding interval in seconds (default is 1 second). This determines how the call duration beyond the initial interval is billed.
- Next price – set the zero price.

- Click Save.
- Open the tariff for incoming calls (Cloud PBX – Incoming) and go to Rates.
- Click + Rate and fill in the rate details:
- Rate code – select |.
- Rating mode – select Flat rate. To enter different rates for the peak and off-peak periods, select the Separate peak/off-peak rate option.
- Effective from – specify when the rate becomes effective. By default, this parameter is set to “immediately”. If you want this rate to take effect sometime in the future, select “Specific time” and type in the date manually, or select in the calendar.
- First interval, seconds – specify the first rounding interval in seconds (default is 1 second).
- First price – set the zero price if you are not going to charge customers for incoming calls.
- Next interval, seconds – specify the next rounding interval in seconds (default is 1 second). This determines how the call duration beyond the initial interval is billed.
- Next price – set the zero price.

- Click Save.
Create subscription plans
In order to charge your customers for additional services, create subscription plans and perform their configuration as described in the Charging for Value-added Services handbook.
Create a product
- On the navigation menu, select Service catalog > Products.
- On the Product list panel, click + Add and fill in the product details:
- Name – type an internal product name that will be shown on the administrator interface.
- Name visible to end users – type a name of the product that will be shown to end users on their self-care interfaces.
- Product type – select Main product here.
- Currency – choose a currency the product will be priced in.
- Managed by – select Administrator only here, since we are setting up a service without the involvement of resellers.
- Account default ACL – choose an Access Control List (ACL) for accounts with this product assigned. ACLs control which objects end users can access to and which actions they can perform.
- Account role – select Phone line since this product is intended for making and receiving calls.
If you use a CloudPBX Self-Care Portal, you must select the Universal account role when creating a product in the PortaSwitch web interface. This is necessary because when you add a new extension via the CloudPBX Self-Care Portal, the system automatically creates an account with the Universal role. If the product uses a different account role, the portal won’t allow you to assign it to the newly created extension.

- Click Save.
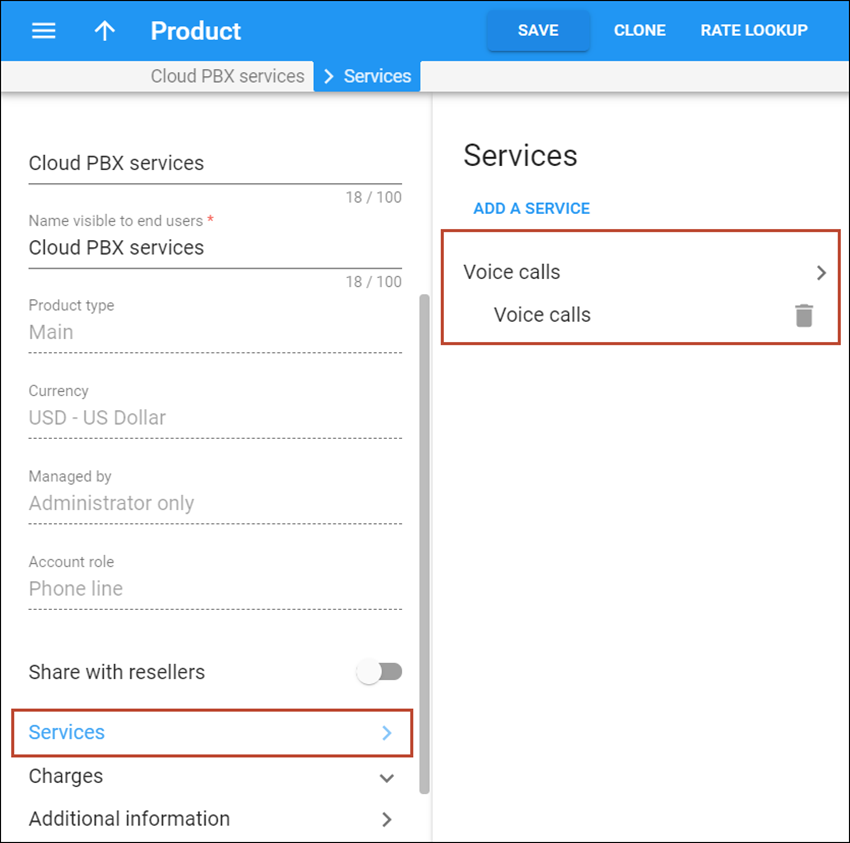
Included services
Define which service types are included in the product. A service type is a description of the physical service provided to end users.
To add a service type:
- On your product’s panel, click Services.
- On the Services panel, click Add a service.
- In
the Select services to add dialog box, select Voice calls
and click Add.
Create rating entries for the cloud PBX product
The product rating list has two functions: it defines permitted access points (nodes and access numbers) and specifies which tariff should be used for billing for each of these points. The rating list consists of rating entries.
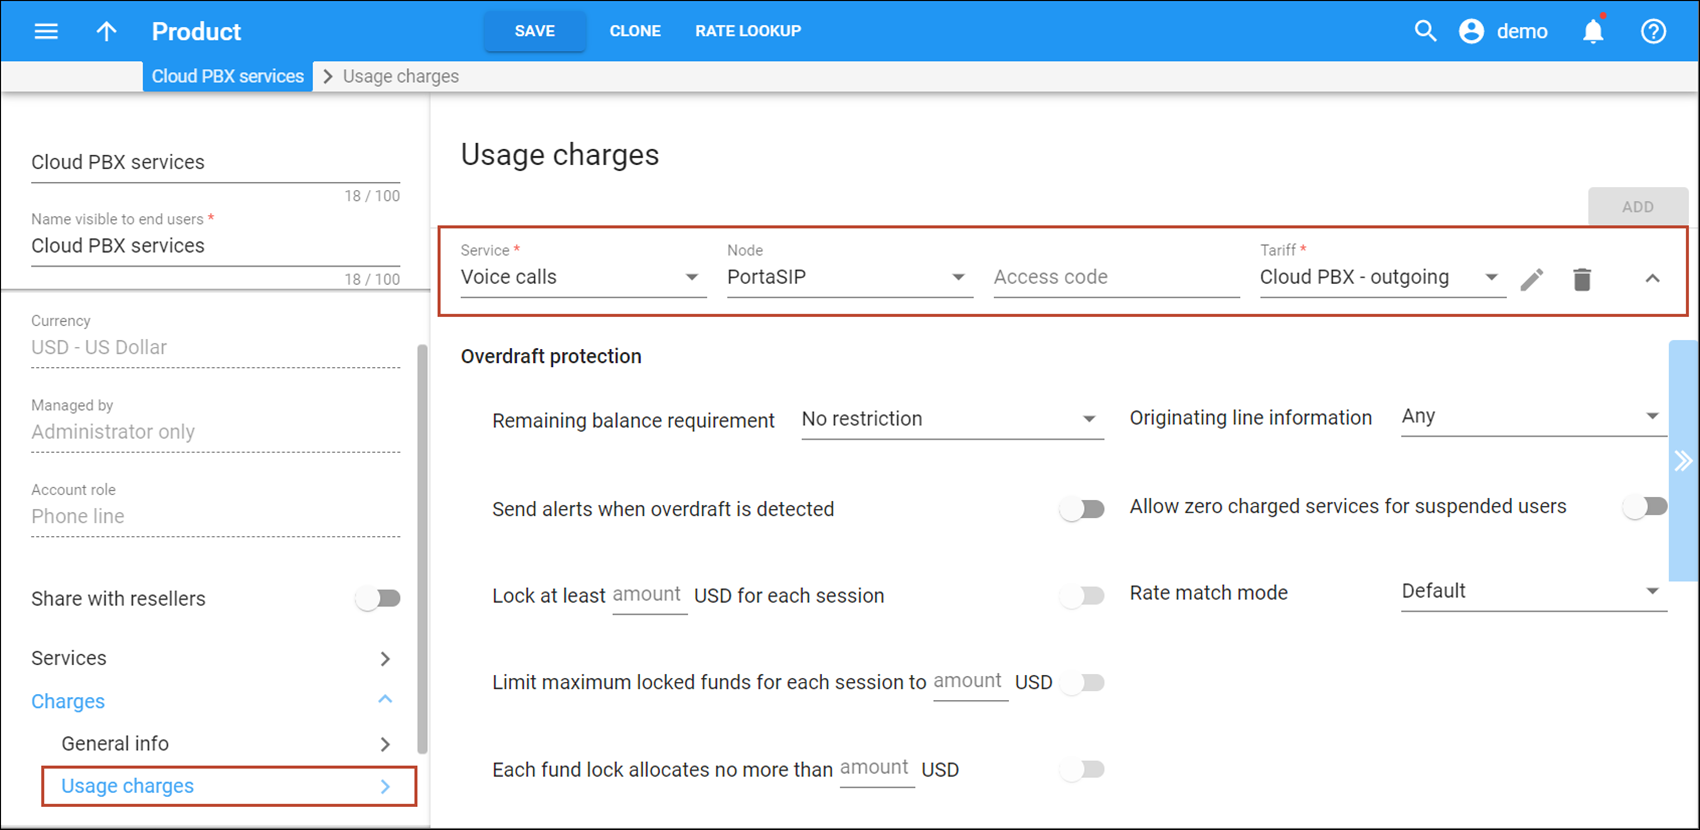
- On your product’s panel, click Charges, then click Usage charges.
- On the Usage charges panel, click Add.
- Fill in the required information:
- Service – select Voice calls.
- Node – select the PortaSIP node.
- Access code – leave this field empty for the basic SIP service.
- Tariff – choose the tariff that will be used to calculate the charges for outgoing calls.
- Overdraft protection – to configure overdraft protection for this product, consult
the Configure Overdraft Protection Section within the Product section in the Overdraft
Protection Configuration handbook.
- Click Save.
- On the Usage charges panel, click Add to add the second rating entry.
- Fill in the required information:
- Service – select Voice calls.
- Node – select the PortaSIP node.
- Access code – type INCOMING in this field.
- Tariff – choose the tariff that will be used to calculate the charges for incoming calls.
- Overdraft protection – to configure overdraft protection for this product, consult the Configure Overdraft Protection Section within the Product section in the Overdraft Protection Configuration handbook.
- Click Save.
Assign a subscription plan to the cloud PBX product
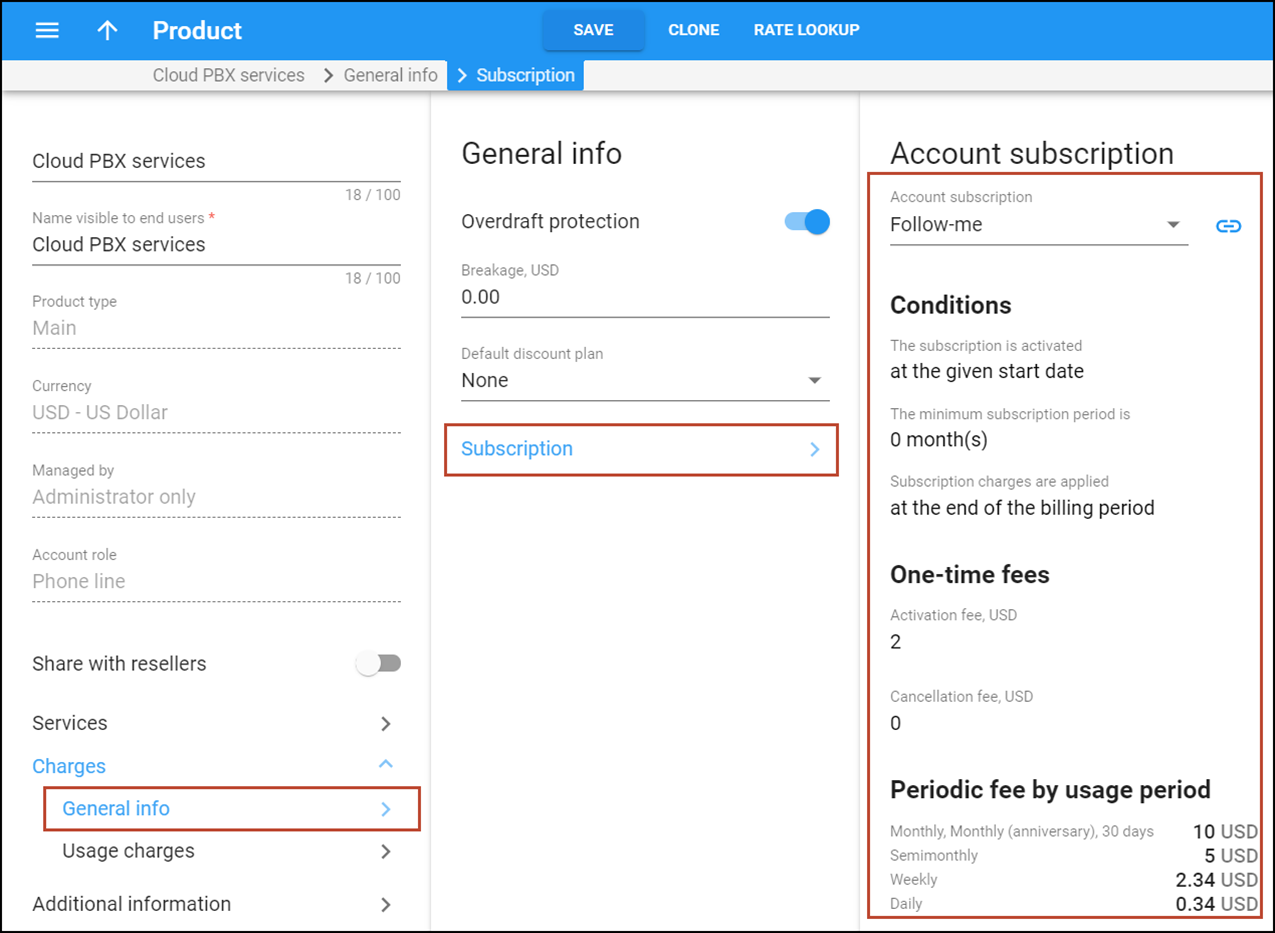
With subscription plans, you can charge customers recurring (e.g., monthly) fees for using the service. The chosen subscription will be applied to every account with this product assigned. On your product’s panel, click Charges, then click General info.
- On
the Charges panel, choose a subscription plan from the Subscription
list.
- Click Save.
Create a customer class
Customer class provides the ability to define a business model and a group of parameters in a centralized way, and then apply those parameters to many customers at once.
- On the navigation menu, select Sales, then select Customer classes.
- On the Customer class list panel, click + Add and fill in the customer class details:
- Name – type a short name for this customer class.
- Business model – select which customers this customer class will apply to. Select Cloud PBX from the list.
- Currency – specify in which currency you charge the customers of this customer class. When specified, this customer class can only be assigned to customers with the same currency. Note that you can define the currency only when you create the customer class and can’t change it later.
- Managed by – select Administrator only.

- Click Save.
Refer to the Create a Customer Class section of the Basic Residential VoIP Service handbook and complete the customer class creation.
Create a customer
A customer is your client (an individual or a company) to whom you provide services.
To create a new customer:
- On the navigation menu, select Sales, then select Customers.
- Click + Customer and fill in the customer details in the General tab:
- Balance control – specify the way the customer will pay for the service: Postpaid – after consuming the services; Prepaid – prior to consuming the services. Select Postpaid here.
- Name – type a short name for the customer object; this will be used on the web interface.
- Currency – choose the currency in which this customer will be billed.
- Credit limit – assign a credit limit for the customer.
- Business model – a business model defines what type of service is to be provided to the customer. Select Cloud PBX for this customer.
- Customer class – customer class allows you to define a policy for automated payment collection. By choosing a specific class here the customer will automatically inherit all of the class properties (grace period, invoice template, etc.). Select the previously created customer class.
- Billing period – choose a billing period for the customer. A billing period defines the frequency of invoicing for this customer.
- Billing period time zone – choose a time zone in which customer’s billing
period will be closed and invoices will be generated.

- Click Save.
Personal info
Define the customer’s personal information (such as name, email address, and etc.).
On your customer’s panel, go to General info. In the Basic info tab, fill in the customer’s personal information and an email address for the receipt of accounting information. After the billing period is over, a list of xDRs and other statistics will be sent to this address.

Web self-care
Define credentials and preferred settings (such as language, time zone, date input and output formats) for this customer’s self-care interface.
On your customer’s panel, go to General info. In the Web self-care tab, define credentials for the customer self-care interface (such as login, password, time zone) and other preferred settings.

Credit limit
On your customer’s panel, go to Finances. In the Credit limit tab, define the Warning threshold parameter. The customer can be notified by email when his balance is dangerously close to the credit limit and service will soon be blocked. The threshold can be specified:
- As a percentage (e.g., 90%). The warning will be sent when the customer’s balance exceeds that percentage of his credit limit. So, if the credit limit is USD 1000.00 and the threshold is 90%, a warning will be sent as soon as the balance exceeds USD 900.00. This is only applicable when the customer has a positive credit limit.
- As an absolute value. The warning will be sent as soon as the balance goes above the specified value.

Invoices and taxation
Define whether to send this customer their statistics and invoices by email.
On your customer’s panel, go to Finances. In the Financial info tab, set the Send the generated .csv files via email option to Summary only. This delivers a call summary only and do not attach a details file; this could be useful in the case of a large number of calls. Other options are Full Statistics (attach a complete list of xDRs) or Do not send (this option prevents the delivery of event statistics to this customer via email).

Services
On your customer’s panel, go to Service configuration in Voice calls section.
The Service configuration panel provides an access to a group of panels where you can activate/deactivate various features of the voice calls service provided to the customer.
This is a convenient way for managing parameters which are the same for a whole set of accounts. Instead of trying to configure them for each individual account, you can define them once at the customer level, then specify in the account configuration that the value in the customer’s configuration be used. Should you wish to change this value later, you need only modify it once for the change to be automatically propagated to all accounts.

Please consult the PortaBilling help for a description of parameters available here. For now, you may leave these with their default values. If you change them later, these changes will automatically affect all accounts created under this customer.
Upload phone numbers in DID inventory
Perform the configuration of the DID Inventory according to the instructions provided in the Managing Available Phone Numbers (DID Inventory) handbook.
Create phone lines
A phone line is a PortaSwitch account provisioned on a port on an IP phone/ATA so that it allows the sending and receiving of calls via PortaSwitch.
- On your customer’s panel, click Accounts / DIDs.
- Click + Account and fill in the account information.
- General tab:
- Type – select Credit in this field.
- Account role – select Phone line from the list.
- ID – SIP ID, e.g., the phone number that will be used to log in to the SIP server and receive incoming calls.
Click DID
 to select a DID number from the available DID numbers list:
 - When the Define search filters sidesheet opens, specify whether to search through DIDs available in DID pool or among the DIDs assigned to this customer. Also, you can specify the geographical location and DID number pattern (e.g., specify 120 to search for DIDs with the prefix 120). Click Next.
- On the Choose number panel that opens, you will see a list of available DID numbers that match your search query and the charges associated with them. The charges for DIDs from the DID pool are pre-populated from the customer’s pricing batch. Select a DID number and click the Assign button.


- Service password – together with the account ID, this password will be used to authenticate registrations and call attempts on the SIP server. It is very important to assign a secure (difficult to guess) password to prevent the account from being wrongfully entered and used to inject fraudulent calls to your network.
- Balance control – define the way the balance of the account is controlled. Subordinate – the balance will directly depend on the customer’s balance (only the customer tops up the balance); Individual credit limit – this account may have its own balance and credit limit (the customer credit limit still applies). Select Subordinate in this field.
- Activation date – set the date from which the account becomes active. The default value is Immediately.
- Expiration date – set the date when the account expires. The default value is Never.

- Products tab:
- Product – select the main product, which you would like your account to have.
- General tab:
- Click Save.
Account info
On the account’s panel, go to General info. In the Basic info tab, fill in the account owner’s email address in the Email field. If the account owner ever forgets the password for the web self-care pages, they will be able to reset it, and a new password will be sent to this email address.
Web self-care
On the account’s panel, go to General info. In the Web self-care tab, define credentials for the account self-care interface (such as login, password, time zone, etc.).
Additional info
On the account’s panel, go to General info. In the Auto-provisioning tab, you can assign a device to an account for automatic provisioning. Leave this option disabled for now.
Life cycle
On the account’s panel, go to General info > Additional info tab. In the Life cycle section, you can fill in the account life cycle information :
- Expiration date – this identifies the date when the account expires. Since a postpaid service is set up, which should function for a long time, leave this option disabled.
- Availability period after first usage, days – this defines the number of days the account remains active after its first use or recharge. Leave this field blank.
- Availability period after last usage, days – this defines the number of days the account remains active after its last use or recharge. Leave this field blank.
Service configuration
On the account’s panel, go to Service configuration in the Voice calls section. On this panel, you can activate/deactivate various features of the voice calls service provided to this account.
Please consult the PortaBilling help for a description of parameters available here. For now, you may leave these with their default values.
Repeat these steps if the customer has more than one phone line (extension).
To create many accounts at once and allocate proper DID numbers to all of them, use the Account generator. Please refer to the Create a Group of Accounts subsection of the Create an Account section in the Managing Available Phone Numbers (DID Inventory) handbook.
Add new extensions
Once accounts have been created, they can be assigned to individual extensions. This is done by an end user. Please consult the Create Extensions subsection of The Auto Attendant Configuration section in the Configuring the Auto Attendant Functionality handbook for more information about creating new extensions.
Add hunt groups
Adding hunt groups is done by an end user. Please consult the Create Hunt groups subsection of The Auto Attendant Configuration section in the Configuring the Auto Attendant Functionality handbook for more information about creating new hunt groups.
Call forwarding
You can choose the desired forwarding mode for an account from the Forward Mode list on the Service Configuration panel. Configuring call forwarding is usually performed by an end user on the account self‑care interface. Please consult the Phone Lines section of the PortaBilling help for more information. If you would like to configure call forwarding from the admin interface, please refer to the ... configure call forwarding? section of the How to... handbook.


