



The idea of emergency services is to allow users to dial a single short emergency number (e.g., 112) and have their calls and locations be quickly delivered to the relevant emergency services center. The users’ location is identified by the users’ number.
There might be several emergency service agencies within a country or city. Therefore, it is crucial to route the call to the emergency services center closest to the caller’s physical location.
Caller locations are stored in the countrywide central emergency database. When a call arrives at an emergency services center, the caller’s address is retrieved from the database and automatically displayed to the operator so the emergency team is quickly directed to the caller.
In PortaBilling, emergency call handling is performed by a special emergency module. When a user dials an emergency number, PortaBilling recognizes the call as an emergency, searches for the corresponding record in the database and detects the emergency center number associated with the user to redirect the call to that number.
To retrieve the correct emergency center number, PortaBilling uses a special mapping key – an emergency administrative unit associated with each account. An emergency administrative unit defines the user location as a combination of their country and region pattern (e.g., a city or a ZIP code, etc.) and then that is associated with their corresponding emergency service center’s number.
As the service provider, you must regularly update the central emergency database with any changes to ensure that user location information is correct.
PortaBilling is also integrated with Intrado Inc. – the largest E911 service provider in the US and Canada. Please refer to the Setting Up Emergency Services (E911) with Intrado handbook for detailed instructions on how to set up emergency services with Intrado.
This chapter demonstrates how to configure emergency call handling based on user location information.
Example
As an example, we will enable emergency services for existing residential customer John Doe’s account. He lives at St. Halvards plass 191, 0192, in Oslo, Norway.
There are three emergency numbers in Norway: 110, 112 and 113. Depending upon which number John dials, his calls are routed as follows:
- Calls to 110 are routed to 4723270171;
- Calls to 112 – to 4724172012, and
- Calls to 113 – to 4722597601.
Emergency service center number detection is based on the user’s ZIP code and city.
Configuration overview
- Enable emergency module on the Configuration server
- Create the EMERGENCY rate code
- Upload emergency administrative units to PortaBilling
- Create a vendor tariff
- Enter rates
- Create a vendor
- Define connections
- Modify rates in customer tariff
- Enable emergency service for the account
Enable emergency module on the Configuration server
- Go to the Configurations tab on the Configuration server.
- Clone
the active configuration to modify it.
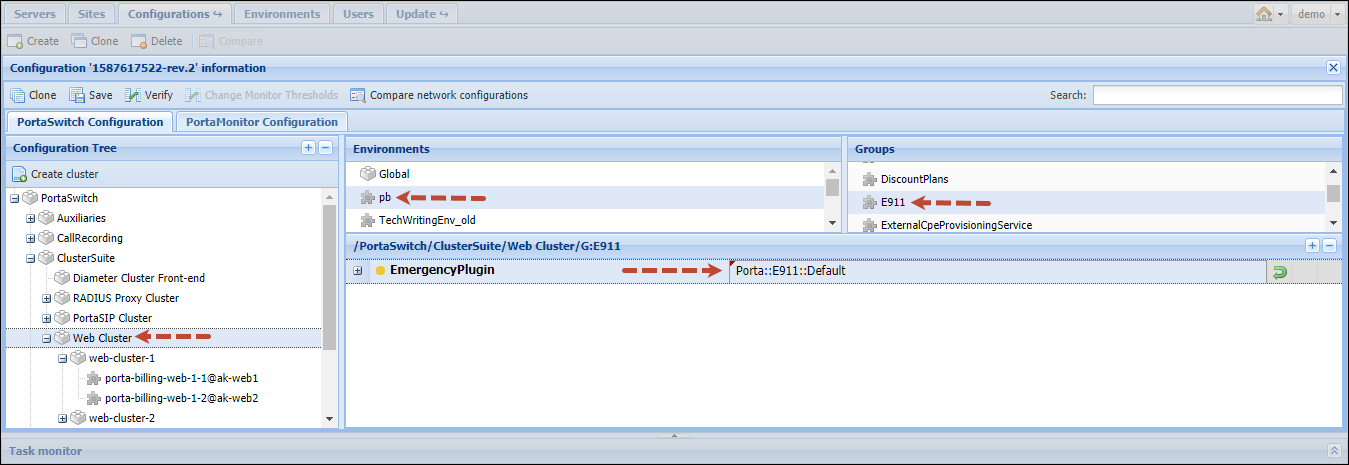
- From the configuration tree select Auxiliaries -> WebCluster and select the E911 group for the required billing environment.
- Select Porta::E911::Default from the EmergencyPlugin list.
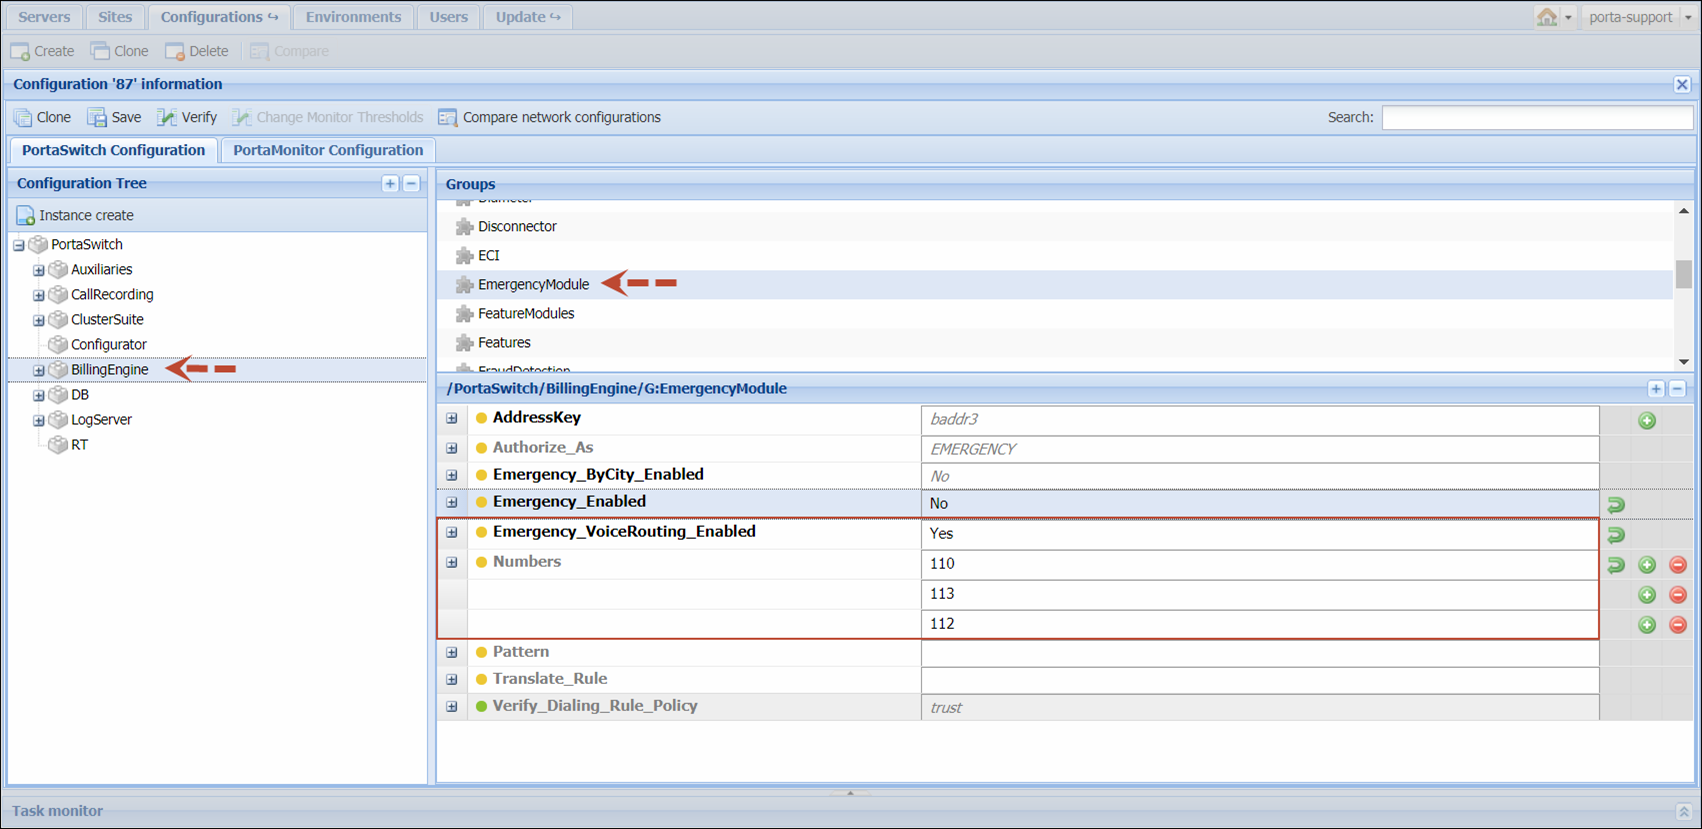
- From the Configuration tree choose BillingEngine and select the EmergencyModule group.
- Configure
the following options in the EmergencyModule group:
- Emergency_VoiceRouting_Enabled – set Yes here.
- Numbers
– specify the list of numbers that are used for emergency in your country
(in our example those are 110, 112 and 113).
The EmergencyModule.Verify_Dialing_Rule_Policy option in the Configuration server web interface defines whether PortaBilling verifies each call marked as emergency (check) or allows calls to any emergency number specified in the dialing rule without verification (trust). If you install MR130 or a later version from scratch, the default value is check. Make sure this option is set according to your requirements.
- Click
the Save button and then the
 Verify button.
 - Verify the new configuration and click the Check/Apply button.
Create the EMERGENCY rate code
This step is only required if you have not previously defined the necessary rate code. If not, you will need to create a symbolic EMERGENCY rate code.
- On the navigation menu, select Service catalog > Rate codes.
- On the Rate code list panel, click + Add and specify the new rate code details:
- Format – select Custom.
- Prefix – type in EMERGENCY.
- Country – leave the default value here.
- Subdivision – leave the default value here.
- Description
– enter some useful information about the service being provided (e.g.,
Emergency services), since this is what your clients will see on
their xDR history pages.

- Click Save.
Upload emergency administrative units to PortaBilling
At this step you need to upload the list of emergency administrative units that identify user locations and will serve to detect the emergency service center number when a user dials an emergency number.
In our example, the emergency service center number is detected by the city and the ZIP code John Doe lives in. Thus, the emergency administrative unit will have the following format: no.Oslo.0192.
Prepare the file with emergency administrative units
Prepare a file with emergency administrative units in .csv, .xls or .xlsx format. The format of the file should be as shown in the table below:
|
Field |
Mandatory |
Format |
Description |
|
Action |
Yes |
Text |
One of the following:
|
|
i_emergency_unit |
Yes |
Number |
The unique ID of the emergency administrative unit. Not mandatory when adding units |
|
Emergency unit ID |
Yes |
Text |
The user location information defined as the combination of a country and the region pattern (e.g., a city) separated by a dot. Possible formats:
Example: us.MA.Boston |
|
Country code |
Yes |
Text |
Two-letter country code (ISO 3166-1 alpha-2) |
|
Name |
Yes |
Text |
The visible name for the emergency administrative unit. It will be displayed in the list of units on the web interface. Each unit must have a unique name |
|
Routing number |
Yes |
Number |
The default number where emergency calls will be routed |
|
Routing number rule |
No |
Text |
The rule according to which calls will be redirected based on the number dialed. It is defined as a regular expression (e.g., s/^110$/23270171/) |

Upload the file to PortaBilling
- Log in to your web server using ssh.
- Copy
the file to the web server using the following command:
sudo scp user@remote.host:/full_path_to_certificate/Emergency_Units.csv /home/porta-admin/

user@remote.host
password:

Emergency_Units.csv                                       100%  421    42.9KB/s   00:00
- Upload
the file to the database by sending the API request as follows:
> curl -ki https://<web_server_IP>/rest/EmergencyUnit/upload_emergency_units/ -F auth_info='{"login":"<login>", "password":"<password>"}' -F params='{"with_result_list":1}' -F upload_file=@Emergency_Units.csv
Create a vendor tariff
A tariff is a single price list for calling services or for your termination costs. A tariff combines:
- conditions which are applicable for every call regardless of the called destination;
- per rate codes.
- On the navigation menu, select Service catalog > Tariffs.
- Click + Tariff and fill in the tariff details:
- Name – type a short name for the tariff object; this is the name you will see in the select menus (for example, Emergency calls termination).
- Currency
– choose the currency in which the vendor charges you.
The currency for the tariff may be chosen only once, and cannot be changed later.
- Service – choose Voice calls here.
- Applied to – choose Vendor in the Applied to list.
- Routing – enable the Routing option for this tariff.
- Define prices – select per individual rate code.

- Click Save.
Enter rates
At this step, it is necessary to add rates to the tariff. The tariff applied to your vendor will contain the rates for the local emergency center numbers to which emergency calls will be routed.
- On the vendor tariff’s panel, go to Rates, click + Rate, and fill in the rate details.
- On
the Add rate panel, fill in the rate details:
- Rate code – select a rate code from the list or type it in directly.
- Rating mode – select Flat rate here.
- Effective from – if you want this rate to take effect sometime in the future, you can either type in a date manually or use the calendar.
When using the calendar, you can specify that the date you are entering is in a different time zone than your present one. PortaBilling will then automatically adjust the time.
- First interval, seconds – type a first billing unit in seconds.
- Next interval, seconds – type the next billing unit in seconds.
- First price – type a per minute price for the first interval.
- Next price – type a per minute price for the next interval.
- Route category – you can split your available routes into several categories, such as “High quality”, “Premium”, etc., then create routing plans for your customers. Use the Default route category for now.
- Preference – the routing priority for the specific destination. 10 is the highest priority, 0 is the lowest (i.e., do not use this destination for routing at all).
- Huntstop – when enabled, instructs the system not to try any routes with a lower preference.

- Click Save.
- Repeat these steps to enter more rates.
Create a vendor
Now it is necessary to create a vendor that will handle emergency calls arriving from your network.
- On the navigation menu, select Infrastructure > Vendors.
- On the Vendor list panel, click + Add and fill in the vendor details:
- Name – type a short name for the vendor object; this will be used on the web interface (for example, Emergency vendor).
- Currency – choose the currency in which this vendor charges you.
- Opening balance – this indicates a starting balance for the vendor; the default is zero.
- Billing
period – split period for vendor statistics.

- Click Save.
When a call is sent from your network to the vendor’s gateway, the vendor performs an authorization for the call. Authorization can be done based on your PortaSIP IP address (in this case, you just need to supply that information to the vendor, and no further action is required on your part) or the vendor can provide you with a SIP username and password to use for call authorization. These credentials should be stored with the “vendor authorization” info and then associated with a specific connection so that they can be used during actual call processing.
- In this case, it is necessary to create an account for digest authorization
of outgoing calls:
- On the vendor’s panel, click General configuration, then click Authorization.
- On the Authorization panel, click Add and
enter the credentials provided by the vendor.

- Click Save.
Define connections
This connection represents the point from which calls leave your network and are directed to the vendor where charges are incurred.
- On the vendor’s panel, click Connections.
- On the Connection list panel, click + Add and fill in the connection details:
- Description – type a descriptive name for this connection. It will be displayed in the list of connections.
- Service type – select Voice calls.
- Type of connections – select SIP.
- Direction – select To vendor.
- Tariff – choose the tariff that defines your termination costs for this connection/vendor.
- Active – use the slider to set this connection as active.
- Identify gateway by – choose how to identify the gateway: IP, gateway ID or both. Specify the IP address and/or ID of the vendor’s gateway or switch.
- Capacity
– specify the maximum number of simultaneous session this connection can
support.

- Click Save.
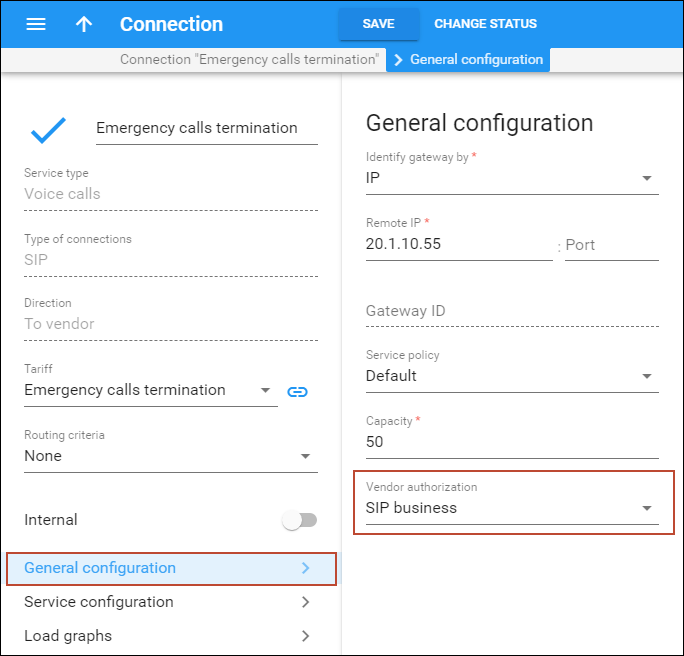
- On the connection’s panel, click General configuration.
- Vendor
authorization – select SIP business for digest authorization
of outgoing call from your accounts.
- Vendor
authorization – select SIP business for digest authorization
of outgoing call from your accounts.
- Click Save.
Modify rates in customer tariff
At this step it is necessary to make sure that emergency calls made by your customers are treated as emergency calls and billed accordingly. In order to do this, the special rate code EMERGENCY rate needs to be added to the tariff applied to your SIP subscribers.
- On the navigation menu, select Service catalog > Tariffs.
- Use the Tariff search panel to locate the tariff you created for outgoing calls (SIP subscribers). Specify one or more of the search criteria listed there and click Search.
- Click the customer tariff name, which is also a link that redirects you to the edit tariff panel.
- On
the tariff panel (SIP subscribers), go to Rates, click + Rate, and fill in the rate details:
- Rate code – type in EMERGENCY.
- Rating mode – select Flat rate here.
- First interval, seconds – type a first billing unit in seconds.
- Next interval, seconds – type the next billing unit in seconds.
- First
price – specify a zero price since emergency calls are always free
of charge.

- Click Save.
Enable emergency service for the account
- On the navigation menu, select Sales > Customers.
- Use the Customer search panel to locate the customer you wish to modify (John Doe). Specify one or more of the search criteria listed there and click Search.
- Click the customer name, which is also a link that redirects you to the edit customer page.
- Go to Accounts/DIDs and select the account you wish to edit.
- On the account page, go to Service configuration.
- On the Outgoing calls tab, enable the Emergency service feature.
- Select Norway from the Emergency location list.
- Select the appropriate emergency unit from
the Emergency unit list.

- Click Save.


