



This chapter demonstrates how to efficiently manage a large number of phone numbers (DIDs) used for your SIP service. It will assist you in importing a set of DID numbers into PortaBilling, managing them, allocating them to your customers, distributors or resellers and finally, provisioning them on SIP phones.
Depending on your business model, you can introduce different pricing strategies:
- To define the revenue you want to receive for different types of DID numbers and charge customers for their provisioning or
- To charge customers the same price regardless of the type of DID provisioned to them.
The steps below describe the DID provisioning model in which customers are charged the same price for all DID numbers provisioned to them. To apply different methods of charging, please refer to the How to … section.
For more information about available fields, click /image005.png "Managing DIDs for customers manually (DID inventory) 1") at the top-right corner.
at the top-right corner.
Configuration overview
- Create a DID supplier vendor
- Create a DID batch for the vendor
- Upload DID numbers
- Release DID numbers to the DID pool
- Create a pricing DID batch
- Assign the pricing batch to customer
- Create an account
- Create a group of accounts
Create a DID supplier vendor
This entity is required in order to keep track of your incoming DID expenses, as well as to provide an adequate level of security on your network. If you have already created a vendor while setting up a PSTN-to-SIP service, please proceed to the next step.
- In the left upper corner click
/image008.png "Managing DIDs for customers manually (DID inventory) 2") to open the navigation menu.
to open the navigation menu. - On the navigation menu, select Infrastructure, then select Vendors.
- On the Create vendor panel, fill in the vendor details:
- Name – type a short name for the vendor object; this will be used on the web interface (for example, DID supplier).
- Currency – choose the currency in which this vendor charges you.
- Opening balance – this indicates a starting balance for the vendor; the default is zero.
- Billing period – split period for vendor statistics.
- Click Save.
/image009.png "Managing DIDs for customers manually (DID inventory) 3")
Create a DID batch for the vendor
A DID batch groups together a set of phone numbers (typically from the same city or area) provided by a particular vendor.
- On the navigation menu, select Infrastructure, select Inventory, then select DID/MSISDN inventory.
- On the DID/MSISDN inventory panel, select Vendor batches.
- On the Create a vendor batch panel, fill in the vendor batch details:
- Name – type a vendor batch name.
- Vendor – choose the vendor that this batch will belong to.
- Description – your comments about this vendor batch.
- Click Save.
/image010.png "Managing DIDs for customers manually (DID inventory) 4")
Upload DID numbers
Now you need to fill in the DID batch with actual numbers. This is done by uploading a .csv file containing the numbers into PortaBilling.
-
- Prepare a file in .csv, .xls or .xlsx format. The structure of the file should be as shown in the following table:
Field
Mandatory
Format
Description
Number
Yes
Number
Phone number.
DID vendor batch
Yes
Text
Name of the vendor batch this DID belongs to.
Description
Text
Description of a particular DID number.
Activation fee
Yes
Number
A one-time cost paid to a vendor for the DID number activation.
Periodic fee
Yes
Number
A monthly amount charged by a vendor for the provisioned DID number.
Released date
YYYY-MM-DD HH:MM:SS
Must be earlier than the upload date and time
The date that this number was released from the customer it was previously assigned to.
Free of charge
Y/N
Set “Y” (Yes) for completely free of charge DID numbers. When such a DID number is assigned to a customer or a reseller, no charges apply.
The DID numbers uploaded with the “Y” value will be marked as Free of charge
 in the DID inventory. Note that such numbers will always remain free even if these DID numbers are further assigned to a pricing batch with defined pricing parameters.
Country
Two-letter country code (ISO 3166-1 alpha-2);
“--“ for “Not Applicable”
The country that this number belongs to.
Area
Text
The area that this number belongs to.
The column headers are important! Make sure the field names and formatting in your upload file are correct.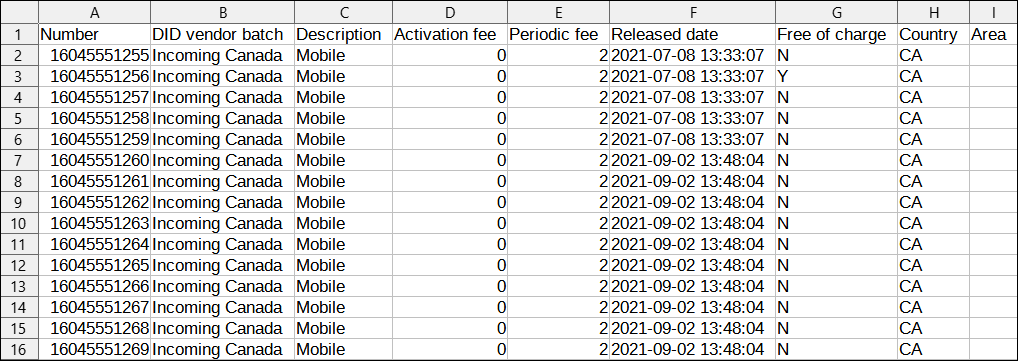
- On the navigation menu, select Infrastructure, then select Inventory and click DID/MSISDN inventory.
/image014.png "Managing DIDs for customers manually (DID inventory) 7")
- On the DID/MSISDN inventory page, click the Upload button on the toolbar.
/image016.png "Managing DIDs for customers manually (DID inventory) 8")
- In the Upload DID numbers dialog box, drop a file or browse for it by clicking the Brows
/image018.png "Managing DIDs for customers manually (DID inventory) 9") button.
button. - Click Upload.
/image020.jpg "Managing DIDs for customers manually (DID inventory) 10")
- When the DID number upload operation is scheduled, the notification pops up.
- When the DID numbers are uploaded you will see a new notification in the toolbar. Click the notification
/image022.png "Managing DIDs for customers manually (DID inventory) 11") icon to view it.
icon to view it.
/image024.jpg "Managing DIDs for customers manually (DID inventory) 12")
/image026.jpg "Managing DIDs for customers manually (DID inventory) 13")
- While on the DID/MSISDN inventory page, go to DID numbers list to view the uploaded DID numbers.
/image028.png "Managing DIDs for customers manually (DID inventory) 14")
- You will see the DID numbers list displaying the numbers you have just uploaded, similar to the one below.
/image030.png "Managing DIDs for customers manually (DID inventory) 15") You should create a DID batch for the vendor before uploading the DID numbers provided by this vendor into the DID/MSISDN Inventory.
You should create a DID batch for the vendor before uploading the DID numbers provided by this vendor into the DID/MSISDN Inventory.
- Prepare a file in .csv, .xls or .xlsx format. The structure of the file should be as shown in the following table:
Upon upload, the status of DIDs is Frozen. When they are frozen, they are stored in the DID/MSISDN inventory and are therefore unavailable for immediate usage.
Release DID numbers to the DID pool
To use the DID numbers, release them to the DID pool.
- On the DID/MSISDN inventory panel, select DID number list.
- On the DID number search panel, select the specific vendor batch from the Vendor batch list and click Apply filters.
- Select the appropriate DIDs and click Manage.
- In the Select operations to apply to the selected DIDs dialog, select Pool management, then select Release DIDs to the pool.
- Click Ok.
/image031.png "Managing DIDs for customers manually (DID inventory) 16")
Create a pricing DID batch
The pricing DID batch is a storage area for DID numbers that can be used for a particular purpose (e.g., to be provisioned to end users). Pricing batches allow you to apply additional charges for using DID numbers.
Depending on the type of a DID pricing batch, you can provide DID numbers either free of charge or for a price that is defined by the DID markup:
- DID numbers in free pricing batches are free of charge, i.e., no charges apply to a customer when they are provisioned with a DID number.
- Pricing batches with DID markup and prices defined for them allow you to apply additional charges to your customers or resellers for provisioning and using the DID numbers.
At this step it is required to create a pricing batch with a DID markup.
- On the DID/MSISDN inventory panel, select Pricing batches.
- On the Create a pricing batch panel, fill in the pricing batch details:
- Name – type a pricing batch name.
- Applied to – select Customer.
- Type of DIDs – select Inventoried as the batch contains DID numbers previously uploaded to the DID/MSISDN inventory.
- Pricing – select Fee-paying.
- Pricing parameters:
- Currency – choose the currency used to charge for DID usage.
- Additional activation fee – specify an amount you want to charge in addition to a DID provider’s activation fee.
- Additional recurring fee – specify an amount that is always included in the recurring (e.g., monthly) charge.
- Recurring fee markup – specify a markup that is included in the recurring amount. It is calculated as a percentage of the Recurring cost amount (charged by a DID vendor).
- Rounding precision – select the number of decimals to round the DID charges.
/image033.png "Managing DIDs for customers manually (DID inventory) 17")
- Click Save.
Assign the pricing batch to customer
To provision your customer with DID numbers, assign the pricing batch to them. The price defined within this pricing batch is what a customer pays when a DID number is provisioned to them.
 If you want to charge a different price for every DID provisioned to a customer, please refer to the How To… section.
- On the customer’s panel, go to General info > Additional info tab.
- Select a previously created pricing batch in the Auto-provision DIDs via batch list.

- Click Save.
Create an account
- On the customer’s panel, click Accounts/DIDs.
- On the Add account panel, specify the account’s details on the General tab:
- Type – select Credit for the postpaid services.
- Account role – select Phone line.
- ID – click DID
/image038.png "Managing DIDs for customers manually (DID inventory) 20") to select a DID number from the available DID numbers list.
to select a DID number from the available DID numbers list.

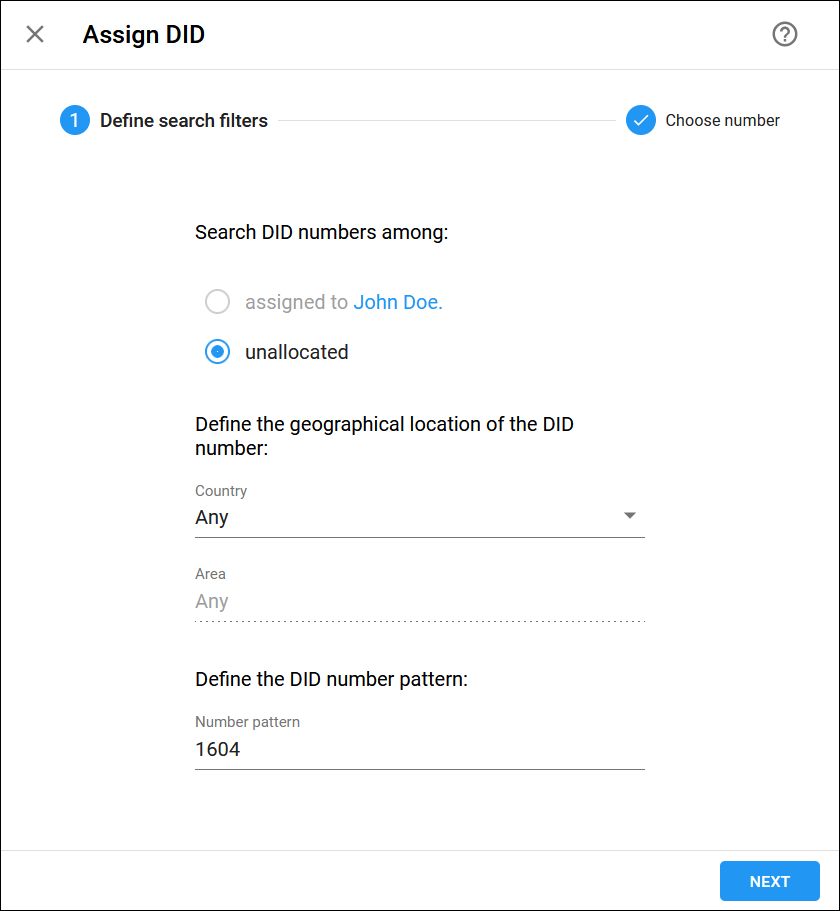
- On the Assign DID panel that opens, specify whether to search through unallocated DIDs or among the DIDs assigned to this customer. You can also specify the geographical location and DID number pattern (e.g., specify 1604 to search for DIDs with the prefix 1604). Click the Next button.
- On the Assign DIDs panel, you will see a list of available DID numbers that match your search query and the charges associated with them. The charges for DIDs from the DID pool are pre-populated from the customer’s pricing batch. Select a DID number and click Assign.

- Once a DID number has been assigned, continue filling in the details on the Add Account panel:
- Service password – together with the account ID, this password will be used to authenticate registrations and call attempts on the SIP server. It is very important to assign a secure (difficult to guess) password to prevent the account from being wrongfully entered and used to inject fraudulent calls to your network.
- Balance control – define the way the balance of the account is controlled. Select Subordinate in this field.
- Subordinate – the balance will directly depend on the customer’s balance (only the customer tops up the balance);
- Individual credit limit – this account may have its own balance and credit limit (the customer credit limit still applies).
- Activation date – choose the date from which the account is usable. By default, the account is activated immediately upon creation.
- Expiration date – this identifies the date when the account expires. Since we are setting up a postpaid service, which should function for a long time, set this option to Never.

- Contact info tab:
- Here you can fill in the account owner’s email address in the Email field. If the account owner ever forgets the password for the web self-care pages, they will be able to reset it, and a new password will be sent to this email address.
- Additional tab:
- Here you can enable Auto-provisioning and assign a device to the account. Leave this option disabled for now.
- Products tab:
- Select the main product in the Product field.

- Select the main product in the Product field.
-
Web self-care tab:
- Login – specify the account login for the self-care web interface. It can be the same as account ID.
- Password – generate a password for the self-care web interface.
- Role – select Account.
- Time zone – select a time zone for the account self-care web interface.
- Web interface language – select a language to be used on the account self-care web interface.
- Click Save.
- Open the account’s panel and navigate to Service configuration.
On this panel, you can activate/deactivate various features of the services provided to this account.
For now, you may leave these with their default values.
- Click Save.
Create a group of accounts
You can also create a group of accounts and allocate DID numbers to them using the Account Generator. But first you need to assign the DID numbers from the DID pool to the pricing batch.
- On the DID/MSISDN inventory panel, select DID number list.
- On the DID number search panel, select Not in use in the Status list and click Apply filters.
- Select the appropriate DIDs and click Manage.
/image047.png "Managing DIDs for customers manually (DID inventory) 26")
- In the Select operations to apply to the selected DIDs dialog, select the Assign the pricing batch option and select the required pricing batch from the list.
- Click Ok. On the refreshed page you will see that the DID numbers have now been assigned to the pricing batch mentioned in the previous step.
/image049.jpg "Managing DIDs for customers manually (DID inventory) 27")
Now you can create new accounts via the Account generator.
- On the Customer panel, click Accounts/DIDs.
- Click Account generator and specify accounts' details on the General tab:
- Type – select Credit for the postpaid services.
- Account role – select Phone line.
- Balance control – define the way the balance of the account is controlled. Select Subordinate in this field.
- Product – select the main product.
- Quantity – specify the number of accounts to generate.
- Batch – accounts are grouped into batches. If Add a new batch is selected, all accounts will be placed into a new batch. Otherwise, an existing batch should be selected from the drop-down list.
- New batch name – a suggested batch name. You can define your own batch name.
- Activation – choose the date from which accounts are usable. By default, accounts are activated immediately upon creation.

- Additional tab:
- Pricing batch – by default, accounts with the Phone line account role are generated from the DID/MSISDN inventory. Select the pricing batch to take DID numbers from.
Any pricing batch can be selected for the creation of credit accounts. Debit accounts can be created only from free pricing batches.
- Use DID numbers from – here you additionally define where PortaBilling retrieves DID numbers from when generating accounts. The DID/MSISDN inventory option means accounts are generated with available DIDs. If you have reserved DIDs for the customer by assigning them to this customer, select the Assigned to customers option.
- If you wish, you can select the starting DID from the Assign DIDs sequentially starting with menu. Use this feature e.g., if you want to make sure that the customer’s phone range starts with a “round” phone number such as 00, followed by 01, 02, etc.
- Specify other account parameters according to the instructions given in the previous chapters.

- Pricing batch – by default, accounts with the Phone line account role are generated from the DID/MSISDN inventory. Select the pricing batch to take DID numbers from.
- Summary tab: verify the account generation configuration and click Generate.



