



This panel displays the list of Customer Premises Equipment (CPE), such as IP phones, that match your search query.

You can check the total number of devices in the CPE inventory at the bottom of the tab. Here you can also see:
- In use – the number of devices with at least one line used, i.e., these are devices assigned to at least one account.
- Available – the number of devices that have all lines free.
Click the number to filter the devices by status.
Set default profiles
Click Set default profiles on the toolbar to configure the list of CPE profiles for enabling “bring your own device” (BYOD) support.
Phones/CPE search
Specify one or more search criteria and click Search. To stop the search, press “Esc” on the keyboard or click Stop
 .
.
To reset search criteria, click Default filters  .
.
MAC address
To find a device by its MAC address, type the MAC address fully or partially.
Device model
Filter devices by specific model. Select the needed model in the dropdown list.
Status
Filter devices by their status. Select one of the following options:
- Any – all devices in the CPE inventory.
- Available – devices that have all ports free.
- In use – devices with at least one port used, i.e., these are devices assigned to at least one account.
Assigned to
Filter devices that are assigned to a specific customer. Select a customer in the dropdown list.
To choose among the reseller’s customers, select this reseller in the Managed by field above first.
Managed by
Filter devices by the entity they are managed by. Select one of the following options:
- Any – all devices in the CPE inventory.
- Administrator only – devices managed by administrators.
- Reseller name – devices managed by a specific reseller.
More
To obtain more precise results, click More  to open advanced search criteria.
Device ID
To find a device by device ID, type the device ID fully or partially.
Inventory ID
To find a device by inventory ID, type the inventory ID fully or partially.
Owned by customer
Filter devices by ownership status – whether a device is marked as customer-owned or not.
Description
Filter devices by their description. Type a description fully or partially.
Phones/CPE list
Each entry in the phones/CPE list consists of:
Device ID
The device ID serves as a unique device name. This is also a link that redirects you to the device details.
Actions
This column shows the available actions you can perform with a specific device.
- Click Edit
 to view and edit the device details.
 - Click Delete
 to delete the device. This option is only available for devices that are not in use.
Description
This is a short description of the device. To add/remove this column, click Settings  on the title bar, click Customize columns, and select/clear the Description checkbox.
Device model
This is the hardware model of the device, e.g., Yealink SIP-T21P E2.
Owned by customer
This shows whether the device is marked as customer-owned.
CPE profile
This is the CPE profile assigned to the device. This is also a link that redirects you to the CPE profile details.
Managed by
This shows whether the device is managed by the administrator or a specific reseller.
MAC address
This is the device MAC address, e.g., 00:14:20:FF:3C:52.
Assigned to
This shows a specific customer the device is allocated to.
Total lines
This is the total number of device lines.
Free lines
This is the number of lines that are not assigned to any account.
Inventory ID
The inventory ID allows you to identify the device in the external system, e.g., your warehouse management application.
Download phones/CPE list
To download the list of devices available in the CPE inventory:
- Click Download
 , select the file type (.csv, .xls, or .xlsx), and click Download to confirm.
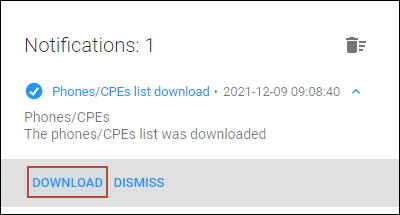
 When the file is available to download, a new notification appears on the toolbar.
- Open the notification and click Download.
Upload phones/CPE list
You can upload a batch of devices to the CPE inventory from a .csv, .xls, or .xlsx file.
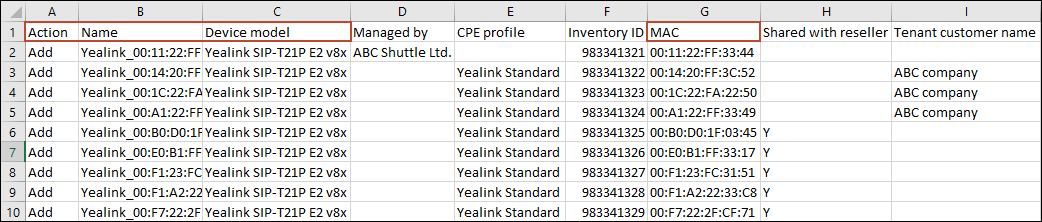
- Prepare a file to upload a batch of devices.
To get the file template (with all available columns in the required order), you can download the file as described above.
The file has mandatory columns:
- Action – contains the “Add” value (another option is “Remove”);
- Name – contains the device ID;
- Device model – contains the device model, e.g., Yealink SIP-T21P E2;
- MAC address – contains the device MAC address, e.g., 00:14:20:FF:3C:52.
Optionally, you can fill in the other columns, such as:
-
- Managed by – specify a reseller’s name to allow only a specific reseller to manage a device;
- CPE profile – fill in to assign a CPE profile to a device;
- Shared with reseller – specify “Y” (Yes) to make a device available not only to the administrator but also to all resellers;
-
- Tenant customer name – specify a customer’s name to allocate a device to a specific customer.
- Tenant customer name – specify a customer’s name to allocate a device to a specific customer.
- Click Upload
 , select the file to upload, and click Upload to confirm.

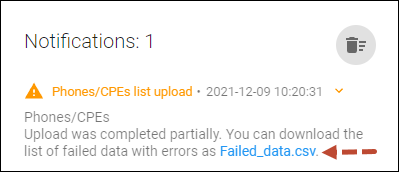
When the upload is completed, you receive a notification with the upload results. The notification is available on the toolbar.
If any errors occurred during the upload (e.g., MAC address is not unique), you can download the error list.
Customize the panel
- Change table settings – click Settings in the title bar to customize columns and change row style.
- Re-order the columns – drag-and-drop the column headers right or left to place the columns in the order you want.
- Re-order the rows – click the arrow
 (or
(or  ) next to the column header to re-sort the rows. For example, the Phones/CPE panel displays records in alphabetical order. You can re-sort them in reverse order.
 - Change the default number of results globally – use the Number of results drop-down list in the upper right corner to adjust the maximum number of rows that appear on the panel. By default, the panel displays 25 rows. Once the number is changed, it's automatically saved, so the same number of rows is shown for PortaBilling entities, e.g., customer, account, reseller, etc.


