An account identifies the end user who is using the service. For example, a prepaid calling card is an account identified by a PIN, while a customer’s VoIP gateway could be an account identified by its IP address, and a SIP phone is identified by its phone number. There are two main types of accounts (debit and credit) plus an auxiliary one (voucher).
Debit
Typically used for: prepaid calling cards.
- The balance shows the available funds on the account. Initially, the balance is equal to the “opening balance” (typically the prepaid amount), and decreases with every call made.
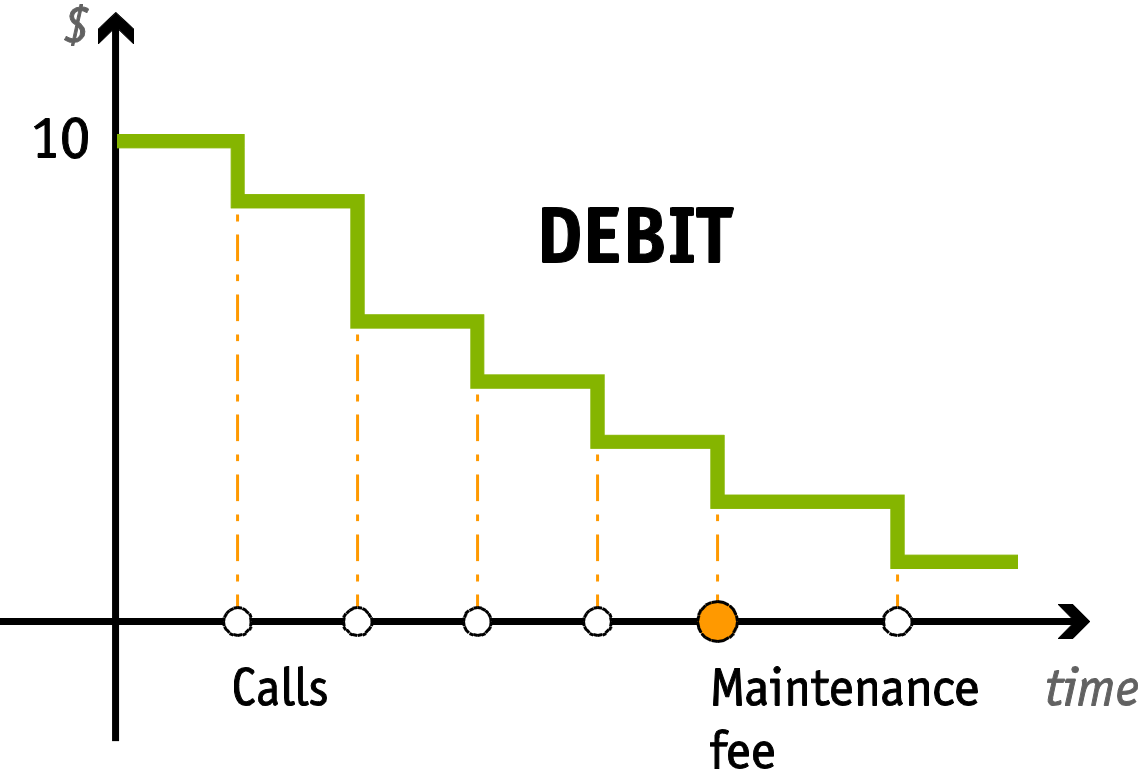
- The account is unusable when the balance hits zero.
Credit
Typically used for: postpaid services.
-
Unlimited number of simultaneous sessions.
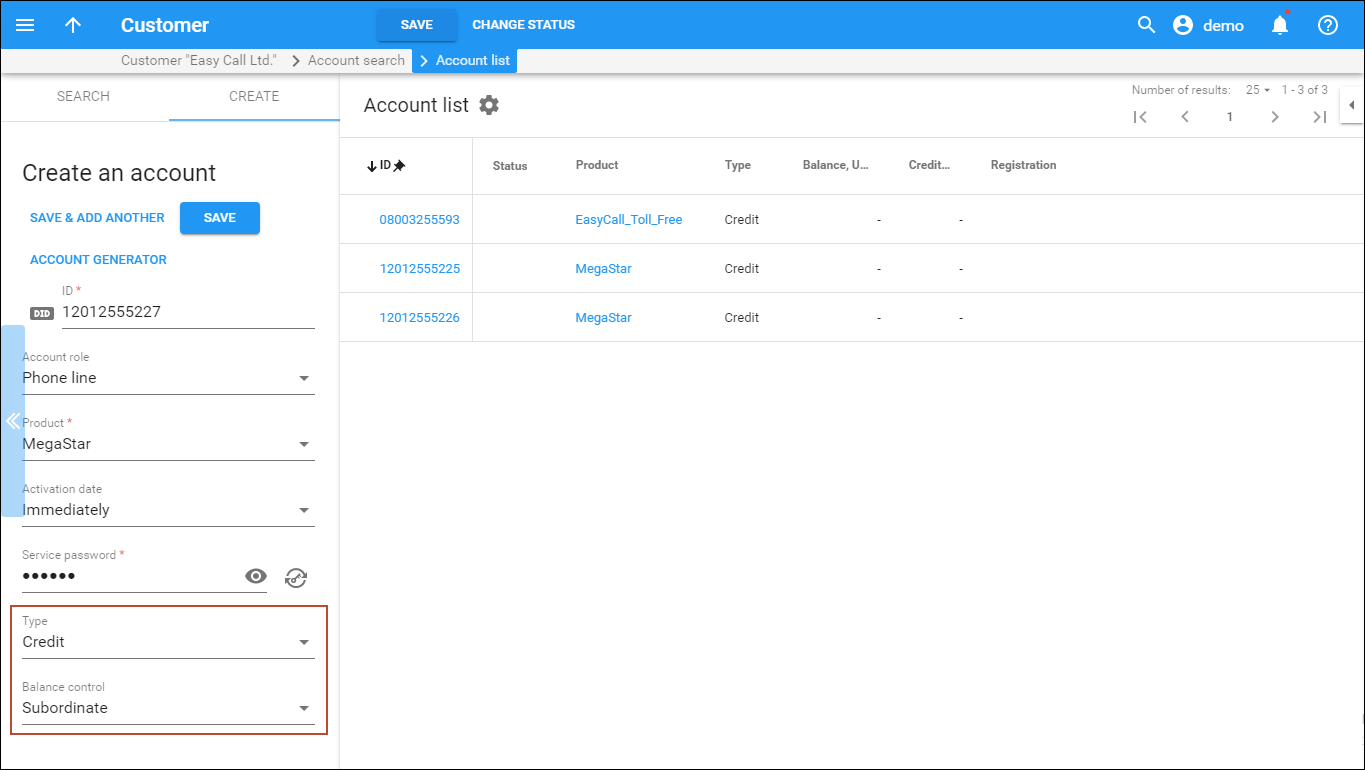
Subordinate credit accounts
In most cases, a customer makes a unified payment for all accounts and controls their own credit limit. Therefore, displaying the balance of individual accounts on the web interface is not necessary.
The administrator operates with the customer’s balance only.
Consider the following example: a company has several phone lines (accounts). The users make calls, and therefore, the balance for the whole company increases. At the end of the billing period the company receives a consolidated invoice showing activities from all the accounts and sends a single payment that covers and is then applied to all accounts. Therefore, the company’s balance decreases with one action.
Credit accounts with individual credit limit
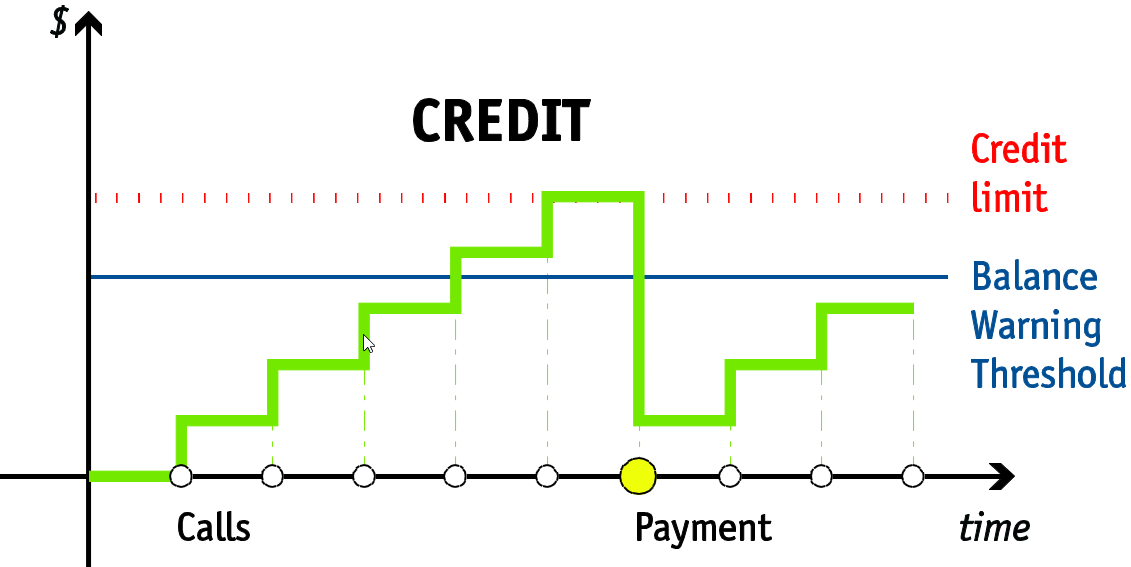
- The balance reflects how much the account owner owes you. It starts with zero and goes up every time a service is used (e.g., a call is made, or a message is sent), and decreases when a payment is received.
- The account is unusable when the balance reaches the “credit limit”.
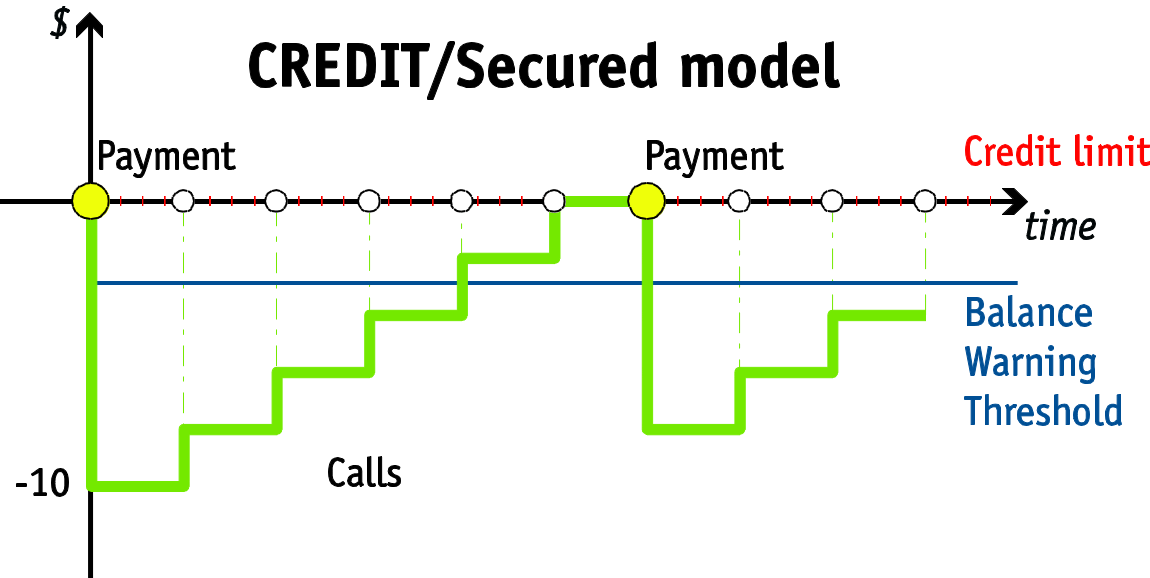
- The balance can also be negative – this means you owe money to the account owner (e.g., the account owner has made a deposit). By setting the credit limit to zero you can provide “secured” services (as shown on the diagram above), in which case an account owner can only use a service when there is a deposit remaining in his account.
Voucher
Typically used for: refill debit or credit accounts for a customer using the same account over a long time, e.g., ANI-based authentication.
A voucher can be used to “recharge” (increase the available amount of) a credit or debit account. In this case, the balance of the voucher account is transferred to the main account. An account of this type cannot be used for any services such as making calls. Recharging may be done on the account self-care pages or via a special IVR script.
Vouchers with encrypted PINs
Vouchers with encrypted PINs prevent theft, as you can restrict access to voucher passwords for some PortaBilling users. Vouchers with encrypted PINs are composites. That is, their PINs consist of voucher IDs and auto-generated passwords that are stored in encrypted form in the database.
Making balance top-ups using vouchers with encrypted PINs is done the same way as when using ordinary vouchers. To top up the balance with a voucher, an end user enters a compound PIN, e.g., printed on a scratch card. The compound PIN printed on the card is produced by combining the account ID and the non-encrypted service password. When a voucher PIN is entered (either via the web self-care interface or the IVR application), PortaBilling decrypts the stored password, validates the voucher PIN, and tops up the balance.
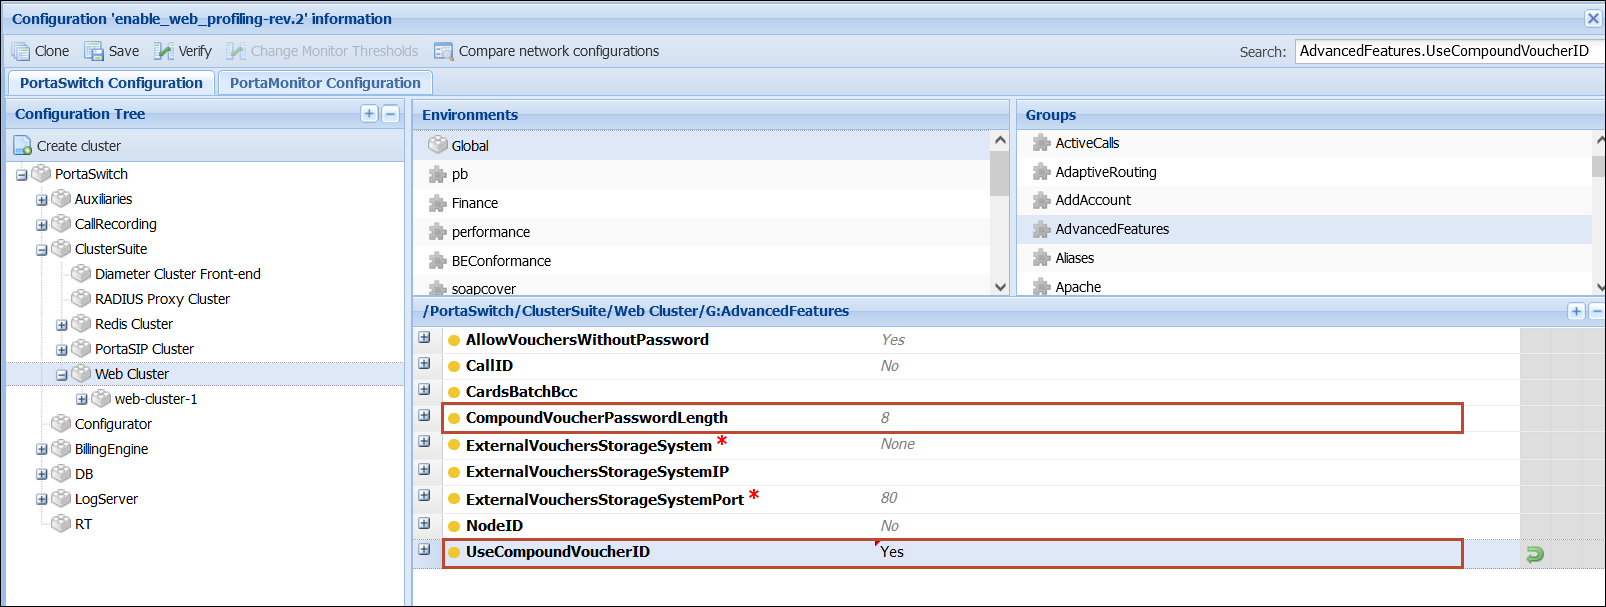
To enable generating vouchers with PIN encryption, set the following options on the Configuration server:
- Security.EncryptPasswords – set to Yes;
- AdvancedFeatures.UseCompoundVoucherID – set to Yes;
- AdvancedFeatures.CompoundVoucherPasswordLength – specify the password length.
When vouchers are generated, their passwords are visible on the web interface by default. If you need to restrict access to voucher passwords for some users, e.g., for helpdesk operators, configure permissions for these users’ role:
- open My company > Access control > Roles > open the needed role, e.g., Helpdesk > click Permissions tab;
- turn on the Advanced mode toggle > open the Customer section > Account > Personal info > Additional info > select Restrict for Service password.
You may need to retrieve IDs and passwords of numerous generated vouchers to print them on the scratch cards. You can retrieve "id" and "h323_password" for each voucher via the PortaBilling API using the get_account_list method. For example, you can see the following voucher data in the API response:
"id": "85275446188@pin",
"h323_password": "53552477".
When you combine "id" and "h323_password", you will have the voucher PIN, e.g., 8527544618853552477. Refer to the API reference guide for more information about API methods.
By generating vouchers with PIN encryption, you can prevent voucher data theft and protect your business.
Account top-up using external vouchers
For the most part, ITSPs use PortaSwitch as an all-in-one solution in which all services (service provisioning, account management, invoicing, etc.) are provided solely by PortaSwitch. However, ITSPs that partner with suppliers of top-up vouchers may prefer to retain the business processes they have established with those suppliers, in which case the suppliers need to be integrated so they are recognized as part of the ITSP network.
PortaBilling supports integration with external top-up voucher storage systems and retains all voucher management processes already established with those systems. This allows ITSPs to provide customers both with vouchers generated internally (i.e., by PortaBilling) and vouchers generated externally (i.e., by their voucher suppliers).
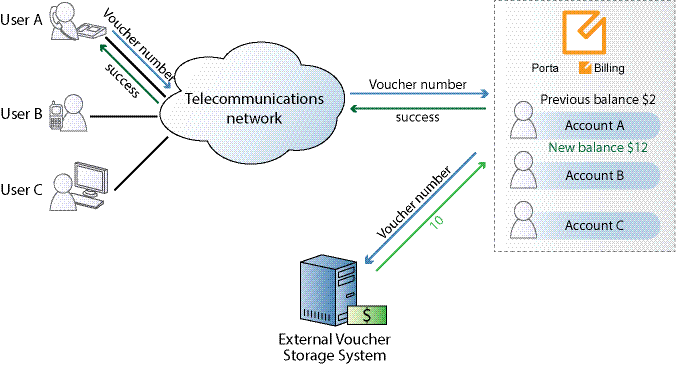
When an end user requests account top-up by voucher using the IVR application or the account self-care interface, the voucher is first checked against the PortaBilling accounts.
If the voucher is not found among the PortaBilling accounts, it is considered external and the voucher number is sent to the external voucher storage system. There the voucher is checked for validity and the corresponding response is returned to PortaBilling. The account balance is topped up based on the voucher face value and the voucher is marked as depleted on the external voucher storage system.
Thus, by integrating external voucher storage systems with PortaBilling, ITSPs are able to extend their partner relationships. Moreover, if their partners have large sales networks, integration may allow the ITSPs to leverage these networks to boost their own sales.
Account batches
Accounts can be grouped into batches. Each batch has its own descriptive name, giving you two ways to identify an account:
-
By account ID (this is usually some type of ID the customer uses to access the service, e.g., PIN number for calling cards or phone number for residential VoIP services);
-
By a combination of batch name and the account’s control number (a sequential number within the batch).
When creating new accounts, you can either create them in a new batch or add them to an existing batch. In addition to better account tracking, this also permits easy modification of a large number of accounts.
Note that a batch always belongs to a customer, so you cannot mix different customers’ accounts within the same batch, and you cannot have two batches of the same name under two different customers.
You can also create new accounts without assigning them to any batch (this is usually done if you expect to have just a few accounts under a customer). You can always assign a batch to these accounts later.
Batch account update
The Batch account update function allows you to apply new settings to a group of accounts at a time. For example, you can assign another product to all the accounts within a batch at once.
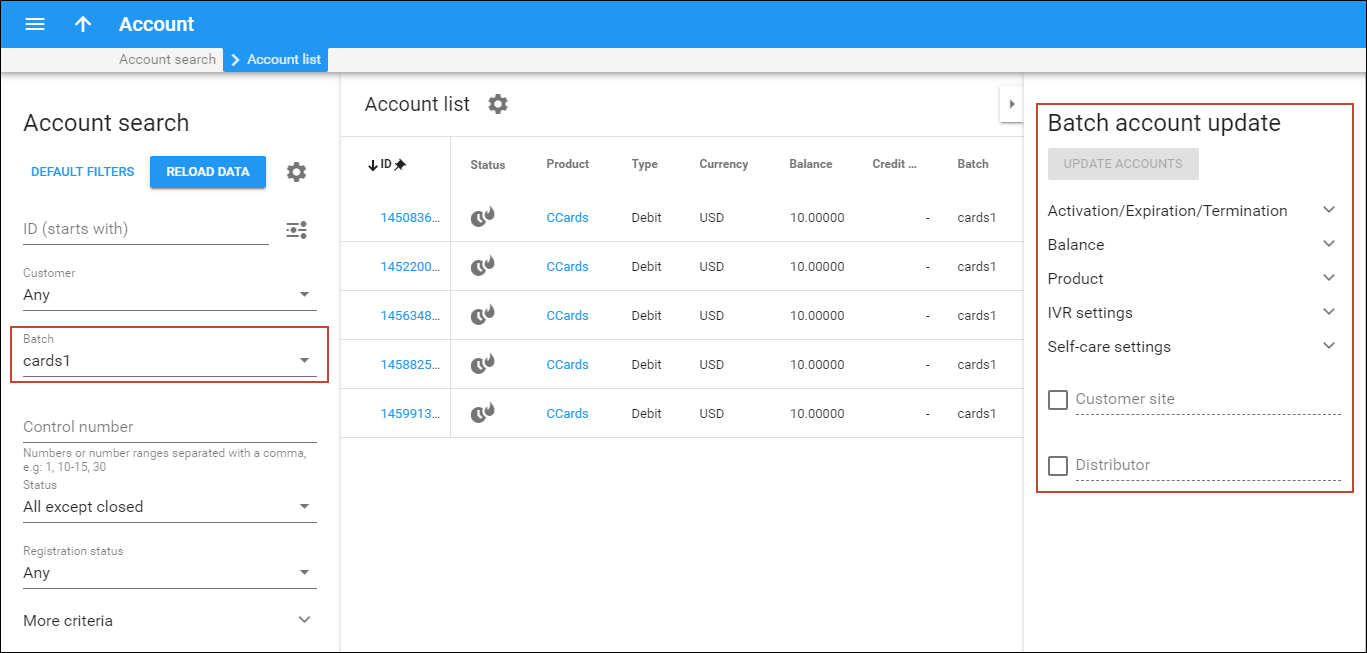
To update multiple accounts, filter the batch of accounts you want to modify and specify the settings to update on the Batch account update panel. You can activate or block accounts, change their balance, assign products or change other settings for either the whole batch or for specific accounts.
To update specific accounts in a batch, you can apply additional filtering options such as control number, registration status, etc. Note that filtering by custom fields is not supported for batch account update.
You can see the list of applied filtering criteria and settings to be changed in the confirmation dialog window once you click Update accounts.
Account life cycle
An account may be created in an inactive state. This enables you to fully provision the entire service configuration for this account, yet the service can only be used once the account is activated.
There are two parameters that define the life cycle of an account:
-
Every account has an activation date. This defines the date of the first usage of the account (e.g., you print Christmas promotion cards in November, but set the activation date for December 23rd so that it can’t be used earlier). Note that an account is activated on a specific day in the customer’s billing time zone – the time zone in which the customer’s billing periods close (e.g., if you are in Sydney and your customer is in New York, the Christmas promotion cards you have created will be activated on December 23rd New York time).
-
Expiration date defines the date after which the account can no longer be used. There are three options for setting it up:
-
Specific date – you can set a specific date. For instance, the administrator sets March 20th as the expiration day, so the end user can use the services until 23:59 on March 19th. After that, the account expires.
-
Account availability after the first usage – you can set the number of days that the services will be available after the first usage. For instance, the period for using the calling card service is defined as 25 days. An end user makes the first call on the 1st of March at 11:00 and uses the calling card daily. Therefore, the 26th of March 23:59 is the last time when the end user can use this calling card, and on the 27th of March, the card expires.
-
Account availability after the last usage – you can set the number of days from the last use that the services will be available. For instance, this period equals 25 days. The end user makes their first call on the 21st of February. They also make calls for the last time on the 1st of March at 11:00. Therefore, the 26th of March 23:59 is the last time when the end user can use this calling card, and on the 27th of March, the card expires.
-
When configuring an account expiration date, either select one or combine several expiration options. They have equal priority: an account expires according to which event occurs first. Additionally, setting the expiration date is optional, so you may create accounts that have no expiration date.
How to extend the life cycle of an account
To extend the life cycle for the account that has automatically expired, you can change the expiration date that was set earlier or extend the existing availability period. For example, the account expired 10 days after the last usage. If you need to activate it, set “20” value for the Account availability after the last usage option to prolong the account life cycle for 10 more days.
Another important point regarding expiration options is that a voucher recharge operation extends the life cycle of an account. Thus, if an account is adjusted to be available for 60 days after the first use, and the account’s owner recharges the account 57 days after the date of its first use, the service is extended for another 60 days. The account recharge works analogically for account expiration after the last usage.
Account aliases
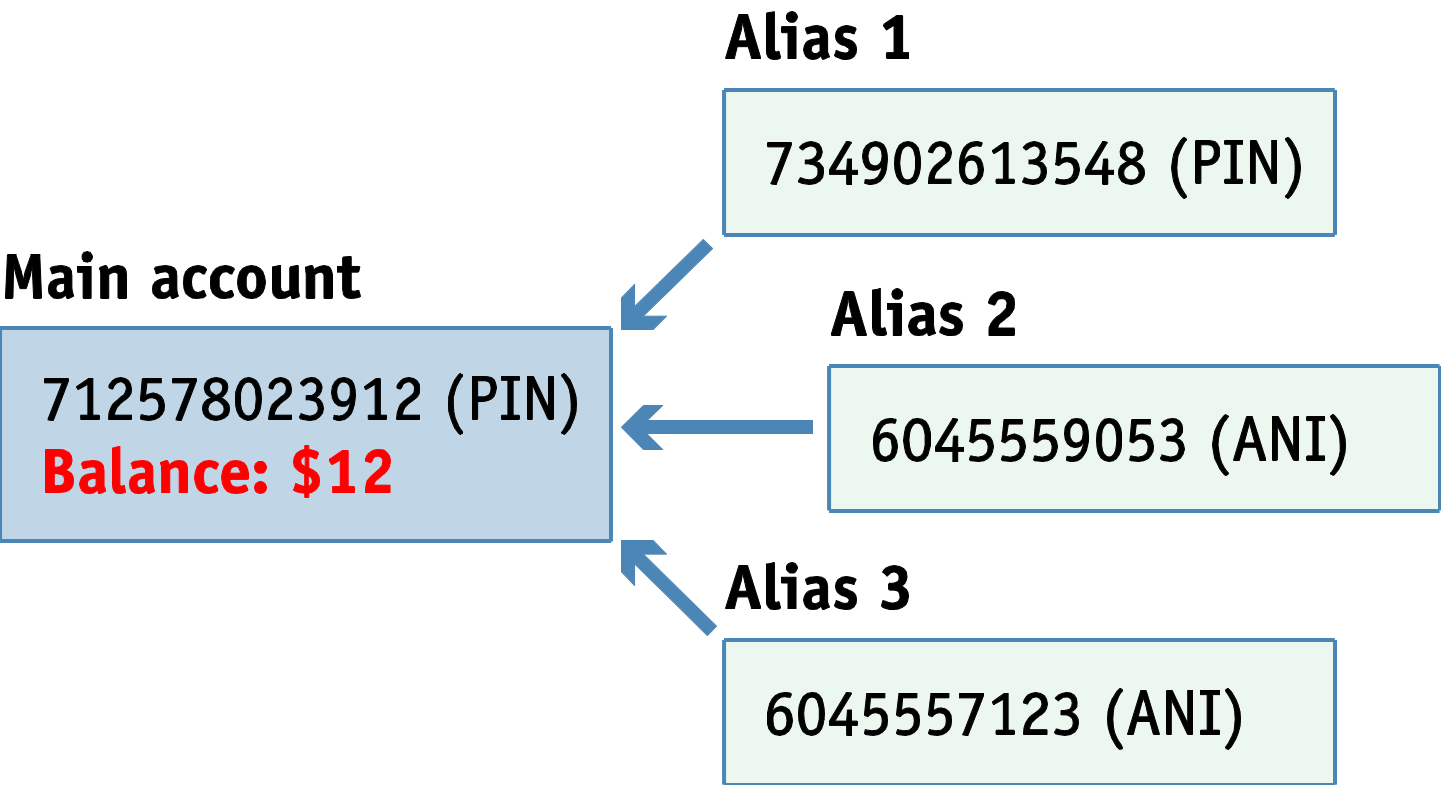
Sometimes it is desirable to provide multiple means of authentication for the same account, e.g., several phone numbers may be registered for PINless dialing to a single prepaid card. In this case, there will be a single account containing the actual balance and other billing information, and multiple account aliases associated with it. An alias serves as a link or pointer to the main account. When a customer uses an alias ID for authentication, PortaBilling retrieves information about the main account and uses its balance, product, and other parameters for all further operations. Note that if you create an alias that will be used independently for registration and authentication (the Allow authentication option is enabled for the alias), you must register this alias on an IP phone; if the alias is not registered the incoming calls to the corresponding phone number will be dropped.
As mentioned above, an alias gives you the ability to use the service via an additional identification, while still drawing on funds from the main account. In some cases, you may want to restrict this ability; one typical example is DID forwarding in the case of the SIP trunking service. Here independent registrations for each additional alias created under the main account will be prevented (this is done by disabling the Allow authentication toggle in the alias configuration at the account level or disabling the alias authentication/registration option at the customer level). In this case, incoming calls to the alias will be routed to the main account. Outgoing calls using the alias cannot be made.


