Re-branding services via a reseller
This section demonstrates how to configure a reseller who will be providing services under their own name. A prepaid service is used as an example, but the procedure is basically the same when setting up any other service (e.g., prepaid callback or postpaid residential VoIP), the only difference being the type of accounts used. Please consult the handbook for a given service regarding its specific configuration details.
The procedure is very similar to the general prepaid set-up described in the Prepaid services section. Only a few additional comments are necessary:
- Resellers are not allowed to create new tariffs or products. In addition to security considerations, this is because the rating list to a product must be configured in order to create it properly. The person doing this must be well acquainted with your VoIP network structure (gateways, access lines, etc). Your reseller will not have this knowledge; in fact, you will probably not even want to share such information with them. Therefore, your administrators will create an initial framework of tariffs and products for your reseller and configure the products’ rating list. If the reseller wants to sell a product under a different name later, they can simply clone the existing product.
- The correct sequence of actions is as follows:
- Create the tariff you will use to charge resellers (“applied to reseller”).
- Create a reseller, assigning this tariff to them.
- Create tariffs and products for resellers’ customers, making sure that you mark these tariffs and products as “managed by that reseller”.
- Unless assigned the “Advanced Reseller” access level, resellers are not able to view their own rates on the web interface, so that you are in control when informing them of rate changes. For example, at the beginning of the month, you may choose to enter a rate change effective the first day of the following month; however, you may notify the reseller of this only one week in advance.
Configuration overview
- Operations to be performed by the admin:
- Operations to be performed by the reseller:
1. Operations to be performed by the admin
1.1 Initial configuration of PortaBilling
If you have just installed the PortaBilling software or dedicated a new billing environment to configure the services described in this handbook, make sure to first perform the initial configuration of PortaBilling. To do this, use the Initial configuration of PortaBilling handbook.
1.2 Create a tariff for charging the reseller
This tariff will be used to charge the reseller, so it should contain your selling rates for the reseller.
- On the navigation menu on the left, select Service catalog > Tariffs and click + Tariff.

- On the Add tariff panel, fill in the tariff details:
- Name – type a short name for the tariff; this is the name you will see in the select menus (for example, Reseller).
- Currency – this indicates the currency in which you charge your resellers.
The currency for the tariff is chosen only once and cannot be changed later.
- Service – select Voice calls.
- Applied to – select Reseller.
- Define prices – select per individual rate code.
- Code group set – select None.

- Click Save.
Add rates to the tariff
You can upload rates from a .csv or .xls file. Please refer to the Rate import section.
To add a rate manually, perform the following steps:
- On the reseller’s tariff panel, navigate to Rates and click + Rate.
- On the Add rate panel, fill in the rate details.
- Rate code – select a rate code from the list or type it in directly (e.g., 47 for the Norway destination).
You should create an entry for certain phone prefixes in the Rate code register before creating a rate for them in the tariff.
- Rating mode – select Flat rate. If you want to enter different rates for the peak and off-peak periods, select the Separate peak/off-peak rate option.
- Effective from – if you want this rate to take effect sometime in the future, you can either type in a date manually, or use the calendar (click the DD-MM-YYYY link).
When using the calendar, you can specify that the date you are entering is in a different time zone than your current one. PortaBilling will then automatically adjust the time.
- Payback rate, Hidden, Forbidden, or Discontinued – these flags are optional.
- First interval – first billing unit in seconds.
- First price – per-minute price for the first interval.
- Next interval – Next billing unit in seconds.
- Next price – per-minute price for next interval.
- First off-peak interval – first billing unit in seconds for off-peak time.
- First off-peak price – per-minute price for the first interval of off-peak time.
- Next off-peak interval – next billing unit in seconds for off-peak time.
- Next off-peak price – per-minute price for the next interval of off-peak time.
Off-peak fields appear only if the Separate peak/off-peak rate rating mode is selected, or an off-peak period has already been assigned to this tariff on the General info panel.

- Rate code – select a rate code from the list or type it in directly (e.g., 47 for the Norway destination).
- Click Save.
- Repeat these steps if you need to enter more rates.
1.3 Create a customer class
Customer class provides the ability to define a business model as well as a group of other parameters in a centralized way, then apply those parameters to many customers at once. (If you have already created a customer class that you can use for prepaid card distributors, skip this step and go to the next one.)
If the invoicing and collection parameters for resellers are not relevant at this moment, skip this step and use the Default customer class for your resellers.
- In the navigation menu, select Sales > Customer classes and click Add.
- On the Create a customer class panel, fill in the customer class details:
- Name – provide a short name for this customer class.
- Business model – select which customers this customer class will apply to. Select Prepaid cards holder.
- Currency – specify the currency in which you want to set the collection threshold.
When specified, this customer class can only be assigned to resellers with the same currency. Once the currency selection is saved, it cannot be changed.

- Click Save.
- On your customer class panel, click Finances > General info.
- On the General info panel, fill in general information about the customer class:
- Close the billing period – leave the default option. Find more details here.
- Configure the Periodic xDR export parameters:
- Export xDRs to a .csv file – leave this option enabled to export xDRs to files for customers in this customer class.
- Send the generated .csv files via email – specify whether customers should receive the generated files by email.
- Configure the Status change parameters:
- Suspend customers – specify whether PortaBilling should check whether the reseller has sufficient funds for their subscription charges.
- Permanently terminate customers after provisional termination – enable this option to permanently terminate resellers and define the amount of days for termination delay.

- On your customer class panel, navigate to Finances > Invoicing > Regular invoices.
- On the Regular invoices panel, specify the invoicing parameters for the customer class:
- Invoice template – select the appropriate template which will be used to create a .pdf file with the invoice for your customers.
- Generate invoice pdf – leave the default option At the end of billing period selected.
- Send the invoice via email – select Automatically to automatically send an invoice to a customer at the end of a billing period.
- Configure Collection threshold, Payment terms, and Action upon non-payment parameters for customers. Please consult the PortaBilling help for a description of the parameters available here.

- On the Taxation panel, select the taxation method and specify the taxation parameters.
- Click Save.
For now, you may leave the rest of the configuration parameters with their default values. If you change them later, these changes will automatically affect all resellers that are already assigned to this customer class.
1.4 Create a reseller
The reseller entity you are about to create will define your relationship with a business partner who is reselling your services under their own name and allow them further independent service management (e.g., creating their own customers and accounts).
- On the navigation menu, select Sales, then Sales agents, and click Resellers.
- On the Create reseller panel, fill in the reseller details:
- Name – a short name for this reseller; this will be used on the web interface.
- Currency – the currency in which this reseller will be billed.
- Credit limit – assign a credit limit for the reseller.
- Customer class – customer class allows you to define a policy for automated payment collection. By choosing a specific class here, the customer will automatically inherit all of the class properties (grace period, invoice template, etc.). Select the customer class you have just created.
- Billing period – choose a billing period for the reseller. A billing period defines the frequency of invoicing for this reseller.
- The default tariff for voice calls – this is the tariff that will be applied by default to calls placed by the reseller’s subscribers. Select tariff A (e.g., Reseller) here.

- Click Save.
General info
Define the reseller’s personal information (such as name, email address, etc.).
- On your reseller’s panel, navigate to General info, Basic info.
- Fill in the reseller’s personal information and an email address for receiving invoices.
Web interface
Define credentials and preferred settings (such as language, time zone, date input and output formats) for this reseller.
- Switch to the Web interface tab.
- Define credentials for the reseller web interface and other preferred settings (such as time zone). The time zone you define for the reseller defines their billing period and when the reseller will see their xDRs. For example, if you choose America/Vancouver here and the billing period is Monthly, the billing period will start on the first day of the month at midnight (12 a.m.) New York time.

Credit limit
- On the reseller panel, navigate to Finances > Credit limit.
- On the Credit limit tab, define the Warning threshold parameter. The reseller can be notified by email when their balance is dangerously close to the credit limit, and service will soon be blocked. The threshold can be specified:
- As a percentage (e.g., 90%). The warning will be sent when the reseller’s balance exceeds that percentage of his credit limit. So, if the credit limit is USD 1000.00 and the threshold is 90%, a warning will be sent as soon as the balance exceeds USD 900.00. This is only applicable when the customer has a positive credit limit.
- As an absolute value. The warning will be sent as soon as the balance goes above the specified value.

- Click Save.
1.5 Create a tariff for reseller’s use
This tariff the reseller will use to charge their customers. The reseller will perform the actual tariff configuration on the self-care interface. You just need to provide them with a framework by pre-allocating a tariff.
- On the navigation menu on the left, select Service catalog > Tariffs and click + Tariff.
- On the Add tariff panel, fill in the tariff details:
- Name – type a short name for the tariff object; this is the name you will see in the select menus (for example, ABC Shuttle prepaid cards).
- Currency – this indicates the currency in which the reseller charges their customers.
The currency for the tariff is chosen only once and cannot be changed later.
- Service – select Voice calls here.
- Applied to – select Customer here.
- Managed by – select the name of the reseller you have created here.
- Define prices – select per individual rate code.
- Code group set – select None.

- Click Save.
Add rates to the tariff
Optionally, you can add rates to this tariff. The procedure is the same as described in the Add rates to the tariff step.
1.6 Create a product for reseller’s use
- On the navigation menu, select Service catalog and click Products.
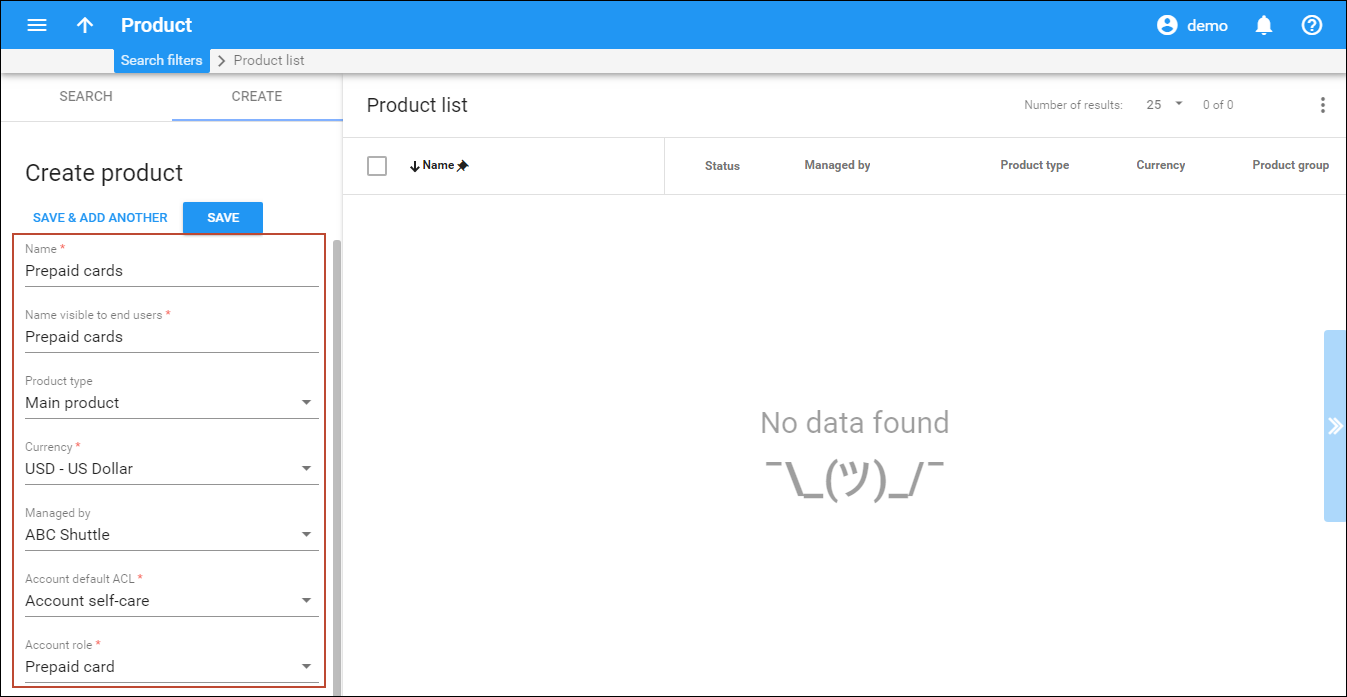
- On the Create product panel, fill in the product details:
- Name – type an internal product name that will be shown on the web interface.
- Name visible to end users – type a name of the product that will be shown to end users on their self-care interfaces.
- Product type – select Main product here.
- Currency – choose a currency the product will be priced in. Only tariffs that have the same currency will be permitted in the rating list.
- Managed by – select your reseller from the list.
- Account role – select Prepaid card since this product is intended for making calls.
- Click Save.
Services
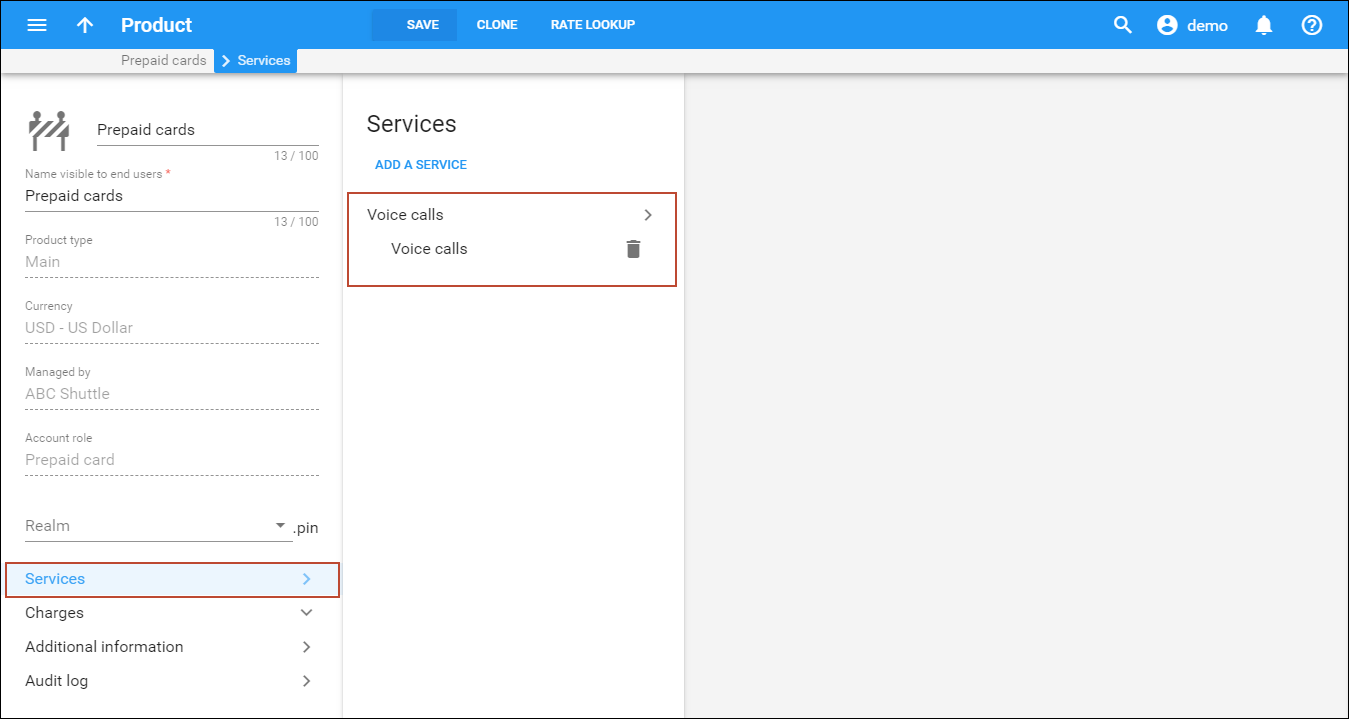
Define which service types are included in the product. A service type is a description of the physical service provided to end users.
To add a service type:
- On your product’s panel, click Services.
- On the Services panel, click Add a service.
- In the Select services to add dialog box, select Voice calls and click Add.
Usage charges
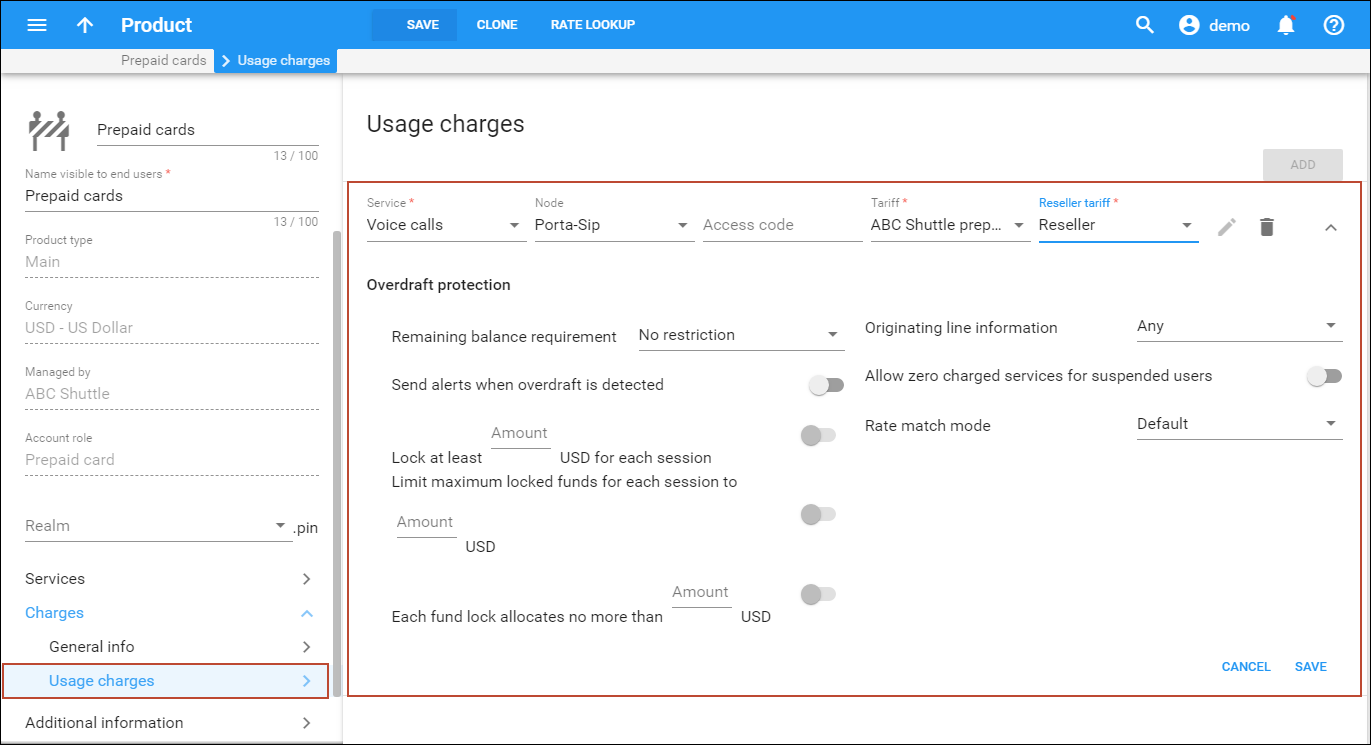
- On the product’s panel, click Charges, then click Usage charges. The reseller will not have access to information about your network, and therefore cannot view rating list information. You may define it for them as follows:
- On the Usage charges panel, click Add.
- Fill in the required information:
- Service – select Voice calls.
- Node – select the PortaSIP node.
- Access code – leave this field empty for the basic SIP service.
- Tariff – choose the tariff that will be used to calculate the charges for outgoing calls.
- Reseller tariff – select the tariff you have created in the Create a tariff for charging the reseller section. You can also select the Default tariff. This will be the same tariff as you have assigned as a default one when creating a reseller.
- Overdraft protection – to configure overdraft protection for this product, consult the Overdraft protection configuration handbook.
- Click Save.
- Repeat steps 3-4 if you want to define more rating entries.
For more information about the available product features, please refer to the System Concepts section of the PortaBilling Admin Guide.
1.7 Provide login credentials to the reseller
Provide the reseller with the credentials to access their portal (defined on the Reseller > General info > Web -interface tab):
- The reseller portal URL (by default https://<porta-billing-server-name>:8442).
- Login credentials.
2. Operations to be performed by the reseller
2.1 Log in to the reseller portal
Log in to the reseller portal using the provided URL and credentials.
2.2 Modify the tariff
The reseller can adjust various parameters of a tariff (e.g., off-peak period or rounding).


- On the Main Menu page of the reseller self-care interface, in the Service catalog > Tariffs.
- Click the needed tariff and, if necessary, modify the tariff parameters on the Edit tariff page:
- Default Off-Peak Period – if you do not differentiate between peak and off-peak rates, just select Not defined; otherwise, select one of the previously defined off-peak periods.
- Short Description – a short tariff description. This will be shown in the rate lookup on the admin interface and the self-care pages for your accounts and customers. For example, for a tariff named Cust-ABC-Easy Call-1800, the short description will provide better information for your reseller ABC, who will be using this tariff, such as: “EasyCall – via a toll-free number”.
- Description – an extended tariff description.
- Click Save.
Modify rates
Modify the rates of this tariff. The procedure is similar to the one described in the Add rates to the tariff subsection of the Create a tariff for charging the reseller section of this handbook.
Test rate configuration (optional)
- On the Tariff page, click Test on the toolbar.
- In the Test rate dialog, in the Telephone number or prefix field, type in the phone number for which you would like to test the rating, as well as the estimated call duration.

- Click Test. You will now see the estimated amount charged for this call, as well as a detailed explanation of the rating process.

2.3 Modify the product
If necessary, you may modify certain product parameters:
- On the Main Menu page of the reseller self-care interface, go to Service catalog > Products.
- Click the Prepaid cards product in the Product list.
- On the Edit Product page, change the required parameters. For more information about available options, please click Help at the top-right corner of the page.
- When all the required changes are done, click Save.


2.4 Create a customer
A customer is an owner of accounts. Therefore, although you will not issue invoices, etc., for the prepaid calling card service, you will still need at least one customer object to keep all of the prepaid card accounts organized in one location.
- On the navigation menu, select Sales > Customers and click + Customer.
- On the Add customer panel, fill in the customer details:
- General tab:
- Balance control – select Prepaid.
- Name – short name for the customer.
- Currency – choose the currency in which this customer will be billed.
- Available funds – the amount of funds available for the customer to spend on services. Type 0 here.
- Business model – a business model defines what type of service is to be provided to the customer. Select Mobile for this customer.
- Customer class – customer class allows you to define a policy for automated payment collection. By choosing a specific class here, the customer will automatically inherit all of the class properties (grace period, invoice template, etc.). Select the previously created customer class.
- Billing period – choose a billing period for the customer.
- Billing period time zone – choose a time zone in which the customer’s billing period will be closed.

- Basic info tab:
- Email – specify an email address for distribution of accounting information. After the billing period is over, a list of xDRs will be sent to this address.
- Self-care tab:
- Time zone – the time zone in which the customer will see their xDRs, and which will also define their billing period. For example, if you choose America/Vancouver here and the billing period is Monthly, the billing period will start on the first day of the month at midnight (12 a.m.) Vancouver time.
- Web interface language – the language to be used on the customer’s self-care web interface.
- General tab:
- Click Save.
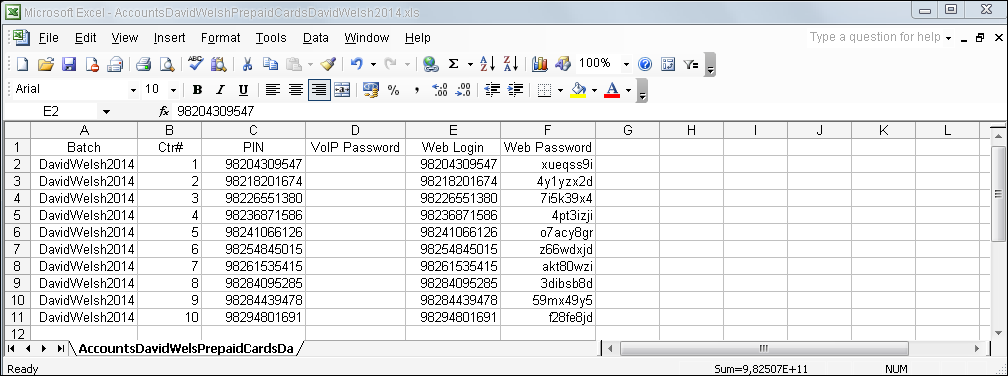
2.5 Generate accounts
- Go to Accounts and click Account generator
on the toolbar.

- In the Account generation dialog, fill in information about accounts.
- General tab:
- Type – select Debit.
- Account role – the defined usage for the account. Select Prepaid card from the list.
- Opening balance – specify the initial balance on a card.
- Product – select the product for prepaid cards you have modified in the Modify the product section.
- Quantity – number of accounts (prepaid cards) to be generated.
- Batch – accounts are grouped into batches. If Add a new batch is selected, all accounts will be placed into a new batch. Otherwise, an existing batch should be selected from the drop-down list.
- Requires manual activation – it is normal practice to generate all prepaid cards as inactive, so they cannot be misused before being sold to the dealer or end customer. You can always activate the whole batch of cards or an individual card later. If you plan to assign the cards to a distributor later on, the cards must be generated as inactive. Move the slider to the right to generate as inactive.
- Activation date – the date from which the account is usable.
- Expiration date – the date that the account expires.
- Availability period after first usage, days – defines the number of days the account remains active after its first use or recharge.
- Availability period after last usage, days – defines the number of days the account
remains active after its last use or recharge.

- Additional tab:
- Generation method – the Random method means that every account is assigned a unique, randomly-generated PIN.
- ID length – specify the total ID length (PINs). This is the number of digits, including the ID prefix (e.g., 10). In order to avoid problems with the prepaid card print-shop, PortaBilling doesn’t generate account numbers that lead with a zero. Also, PortaBilling only allows the generation of a batch with feasible parameters. For example, it is impossible to generate a batch of 1,000 accounts with an ID length of 4 and an ID that starts at 55.
- ID prefix – specify which digits lead to generate accounts that start with the same digit string. Note that an ID prefix is part of the ID length. If you enter 12 and an ID length of 10, account IDs (PINs) will look like this: 12NNNNNNNN, where N = random digits.
- Service password – to improve security, you can use an account password during authentication, in addition to a PIN. If you choose Empty, no password will be assigned to the account, and the password check will be switched off during authentication. Choosing Empty is recommended by default. If you decide to use passwords, then please use the Auto-generated digits only option, since then the password can be entered in the IVR via phone keys.
- Distributor – you can assign a specific distributor to this group of accounts.
- Web interface:
- Credentials – if you choose Auto-generated, your customer will use their account ID (PIN) to log in to the self-care pages; a random password for web access will be assigned for each account. If you choose Empty, the account owner will not be able to use the self-care pages at all until a login has been assigned for their account; no password will be assigned, so the account owners will be able to log in to the web interface simply by providing their account ID (PIN).
- Time zone – when an account owner accesses the web self-care pages to see a list of his calls, the time will be shown in the time zone most appropriate for him.
- Web interface language – the language to be used on the account self-care web interface.

- General tab:
- Click Generate.
Account generation tasks are executed every few minutes, and it may take a while to generate large numbers of accounts.