Intrado Inc. is the largest E911 service provider operating throughout the US and Canada.
Once an end user connects with Intrado, fills in their address information in PortaBilling (on the account self-care interface), and submits it to enable E911 services on their account, the information is sent to Intrado using the API. Then the user’s location information is checked and verified in Intrado’s database. Users must have valid US or Canadian numbers for this to function properly. Once that verification is successful, PortaBilling receives notification of it and the E911 services are enabled for the user’s account.
This connection is handled by the special Porta::E911:Intrado plug-in. The sections below demonstrate the steps required to set up and configure E911 service provisioning using Intrado.
Configuration overview
- Obtain the NENA ID
- Download a VUI digital certificate from Intrado
- Export the VUI certificate to the web server
- Enable the emergency module on the Configuration server web interface
- Create a rate code
- Create a vendor tariff
- Enter rates
- Create Intrado vendor
- Define connections
- Modify customer tariff
- Fill in address information for an account
- Enable E911 for an account
Obtain the NENA ID
Before setting up Intrado E911 services in PortaBilling, it is necessary to obtain a National Emergency Number Association Company Identifier (NENA ID). This is a three- to five-character code that allows 911 centers to quickly identify the telephone company or access infrastructure provider responsible for a particular telephone number.
The NENA ID is obtained by filling in an online Company Identifier Data Base Update Form and submitting it through the NENA website (http://www.nena.org).
Download a VUI digital certificate from Intrado
You will need to obtain a digital certificate from Intrado.
Intrado’s Validation and Update Interface (VUI) uses this certificate to verify that the user location information provided is real.
- Sign a contract with Intrado Inc. (http://www.intrado.com/). You will receive a VUI account ID, username, enrollment passphrase and confirmation number from Intrado’s Product Support. You will also be provided with a URL link to Intrado’s VUI interface. This link will be used to receive user information validation requests.
- Download
your digital certificate following Intrado’s guidelines.
The digital certificate has an activation date. It will not be activated prior to this date.
Export the VUI certificate to the web server
It is necessary to upload the VUI certificate to the PortaSwitch web server.
- Check that the certificate is decrypted. Otherwise, decrypt it.
- Log in to your web server using ssh.
- Copy
the certificate using the following command:
sudo scp user@remote.host:/full_path_to_certificate/ITSP_VUI.p12
/home/porta-admin/

user@remote.host password:

ITSP_VUI.p12 100% 0 0.0KB/s 00:00
Enable the emergency module on the Configuration server web interface
- Clone
the active configuration.
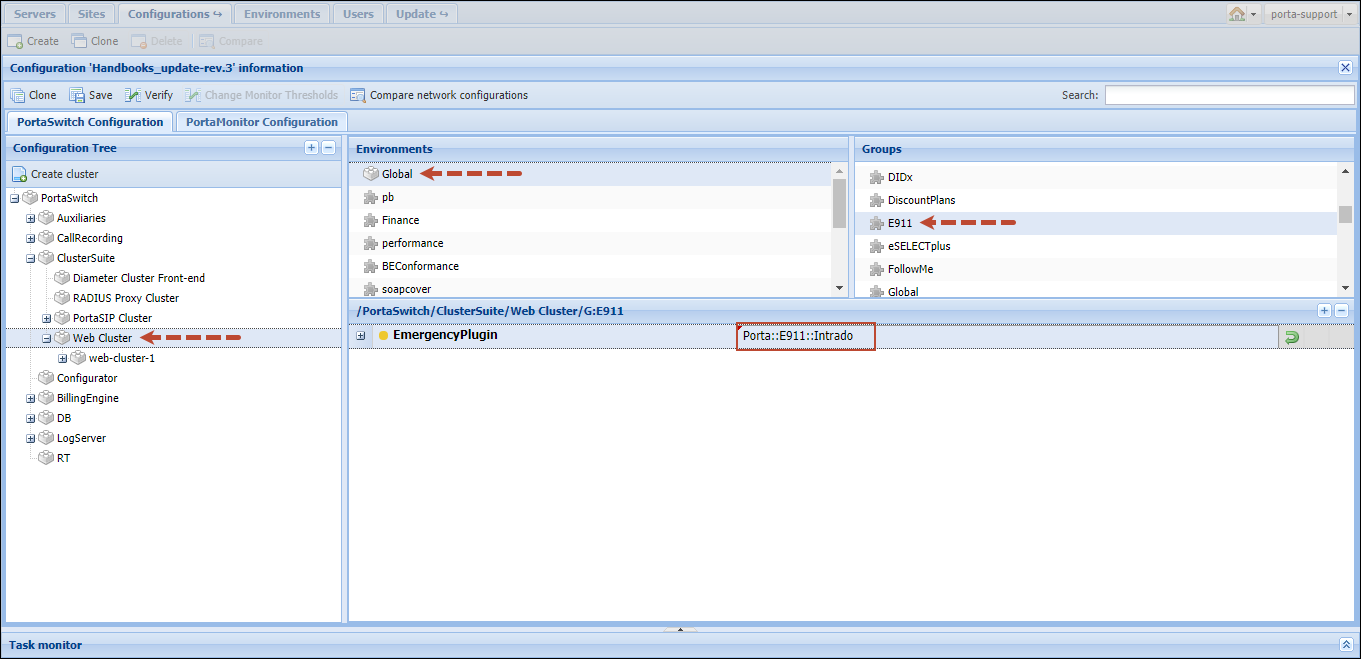
- Select
the E911 group and specify the following
information:
- EmergencyPlugin
– select Porta::E911::Intrado.
- EmergencyPlugin
– select Porta::E911::Intrado.
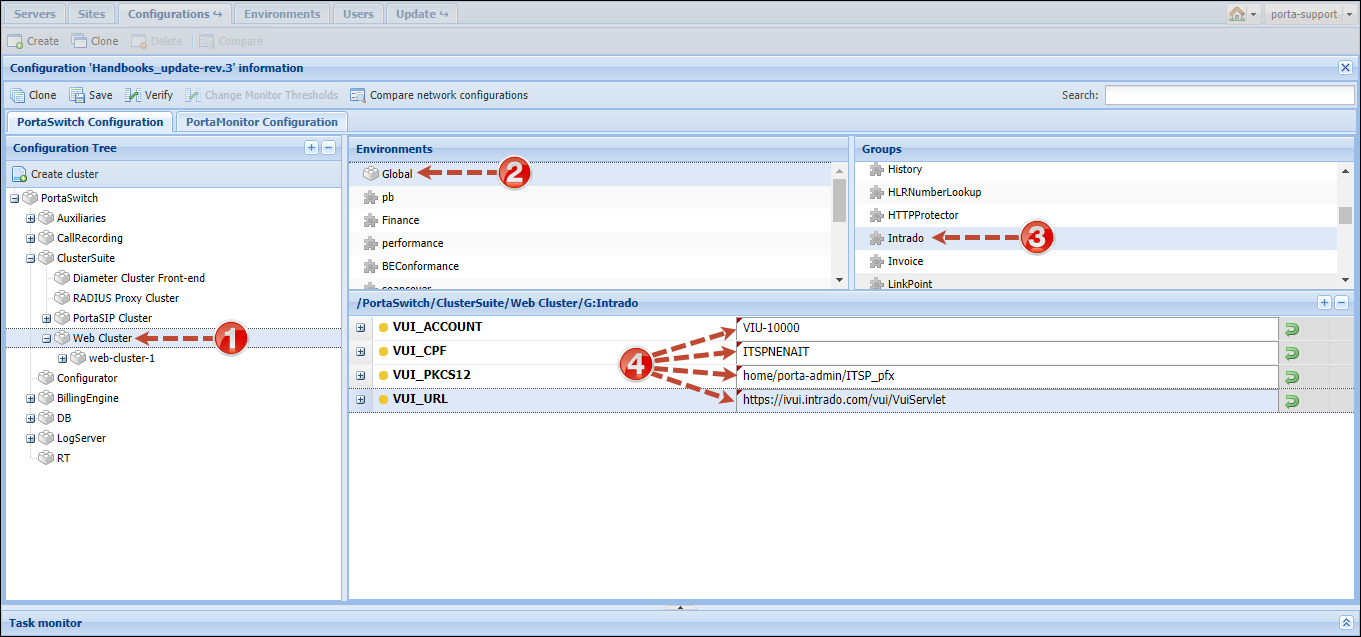
- Select
the Intrado group and specify the following information acquired
from Intrado:
- VUI_ACCOUNT – type the VUI account ID provided by Intrado.
- VUI_CPF – type your NENA ID here.
- VUI_PKCS12 – type the full local path to the digital certificate provided by Intrado.
- VUI_URL – type the URL provided by Intrado.
- Click
the Save button and then the
 Verify button.
 - Verify
the new configuration and click the Check/Apply
button. Note that the Apache service will need to be restarted, so consider
applying the configuration during off-peak time.
Create a rate code
Now it is necessary to create the rate code that will be used to charge for emergency services.
- On the Navigation menu, select Service catalog > Rate codes.
- Click + Add and fill in the required information.

- Click Save.
Create a vendor tariff
The tariff is a single price list for calling services or termination costs. A tariff combines:
- conditions that are applicable for each call, regardless of the destination called;
- per destination rates.
- On the navigation menu, select Service catalog > Tariffs.
- Click + Tariff and fill in the tariff details:
- Name – a short name for the tariff object; this is the name you will see in the select menus.
- Currency
– choose the currency in which the vendor charges you.
The currency for the tariff may be chosen only once, and cannot be changed later.
- Service – choose Voice calls here.
- Applied to – choose Vendor in the Applied to list.
- Routing – enable the Routing option for this tariff.
- Define prices – select per individual rate code.

- Click Save.
Enter rates
Now add the rate for the 911 rate code to the tariff.
- On the vendor tariff’s panel (Intrado emergency calls), click Rates.
- Click + Rate and fill in the rate details:
- Rate code
– select a rate code from the list or type it in directly.
Make sure you have created the entry for the 911 prefix in the Rate code register before creating a rate for it in the tariff.
- Rating mode – select Flat rate here.
- Price – specify the per-minute price for this rate code.
- Leave
default values in all other fields.

- Rate code
– select a rate code from the list or type it in directly.
- Click Save.
Create Intrado vendor
- On the navigation menu, select Infrastructure > Vendors.
- On the Vendor list panel, click + Add and fill in the vendor details:
- Name – type a short name for the vendor object.
- Currency – choose the currency in which this vendor charges you.
- Opening balance – this indicates a starting balance for the vendor; the default is zero.
- Billing
period – split period for vendor statistics.

- Click Save.
Define connections
This connection represents the point from which calls leave or enter your network and are directed to or from vendors where charges are incurred.
- On your vendor’s panel (Intrado), click Connections.
- On the Connection list panel, click + Add and fill in the connection details:
- Description – type a descriptive name for this connection. It will be displayed in the list of connections.
- Service type – select Voice calls.
- Type of connections – select SIP.
- Direction – select To vendor.
- Tariff – choose the tariff that defines your termination costs for this connection/vendor.
- Active – use the slider to set this connection as active.
- Identify
gateway by – choose how to identify the gateway: IP, gateway ID or
both. Specify the IP address and/or ID of the vendor’s gateway or switch.

- Click Save.
Modify customer tariff
- On the tariff’s panel, click Rates.
- Click + Rate and fill in the rate details:
- Rate code – select a rate code from the list or type it in directly.
- Rating mode – select Flat rate here.
- Price – specify 0 price for this rate code.
- Leave
default values in all other fields.

- Click Save.
Fill in address information for an account
- On the Customer panel, select Accounts.
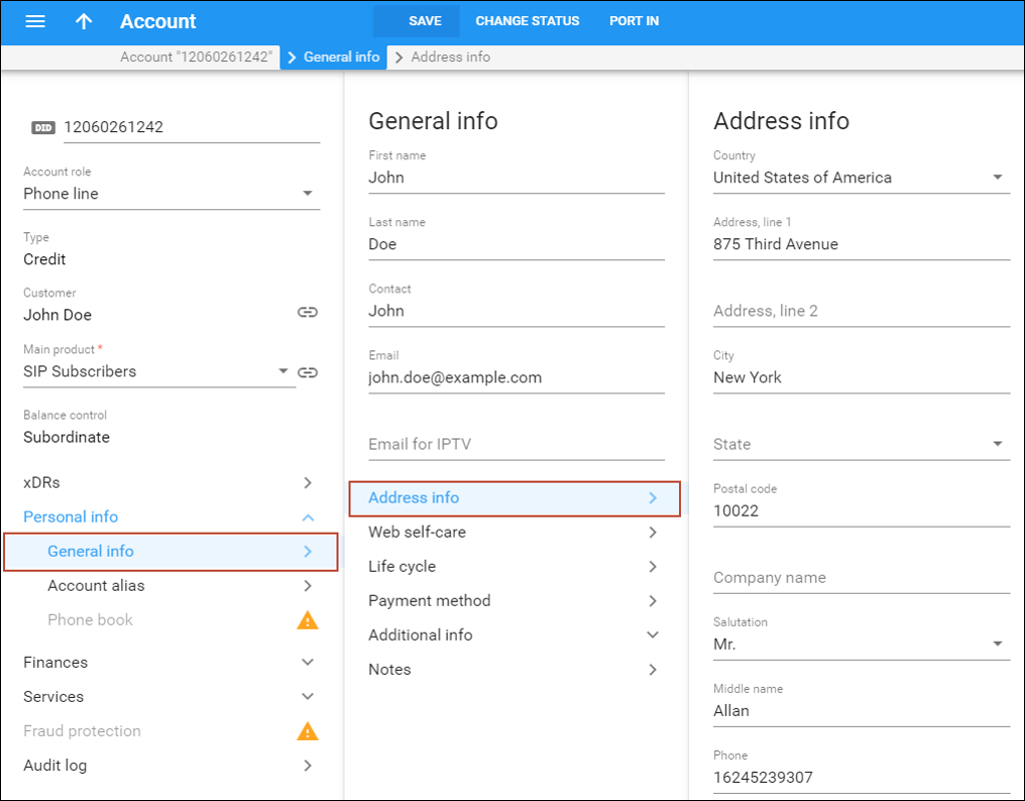
- Open the account and click Personal info, then select General info and fill in the account details.
- On
the Address info panel, specify the account’s location information.
- Click Save.
Enable E911 for an account
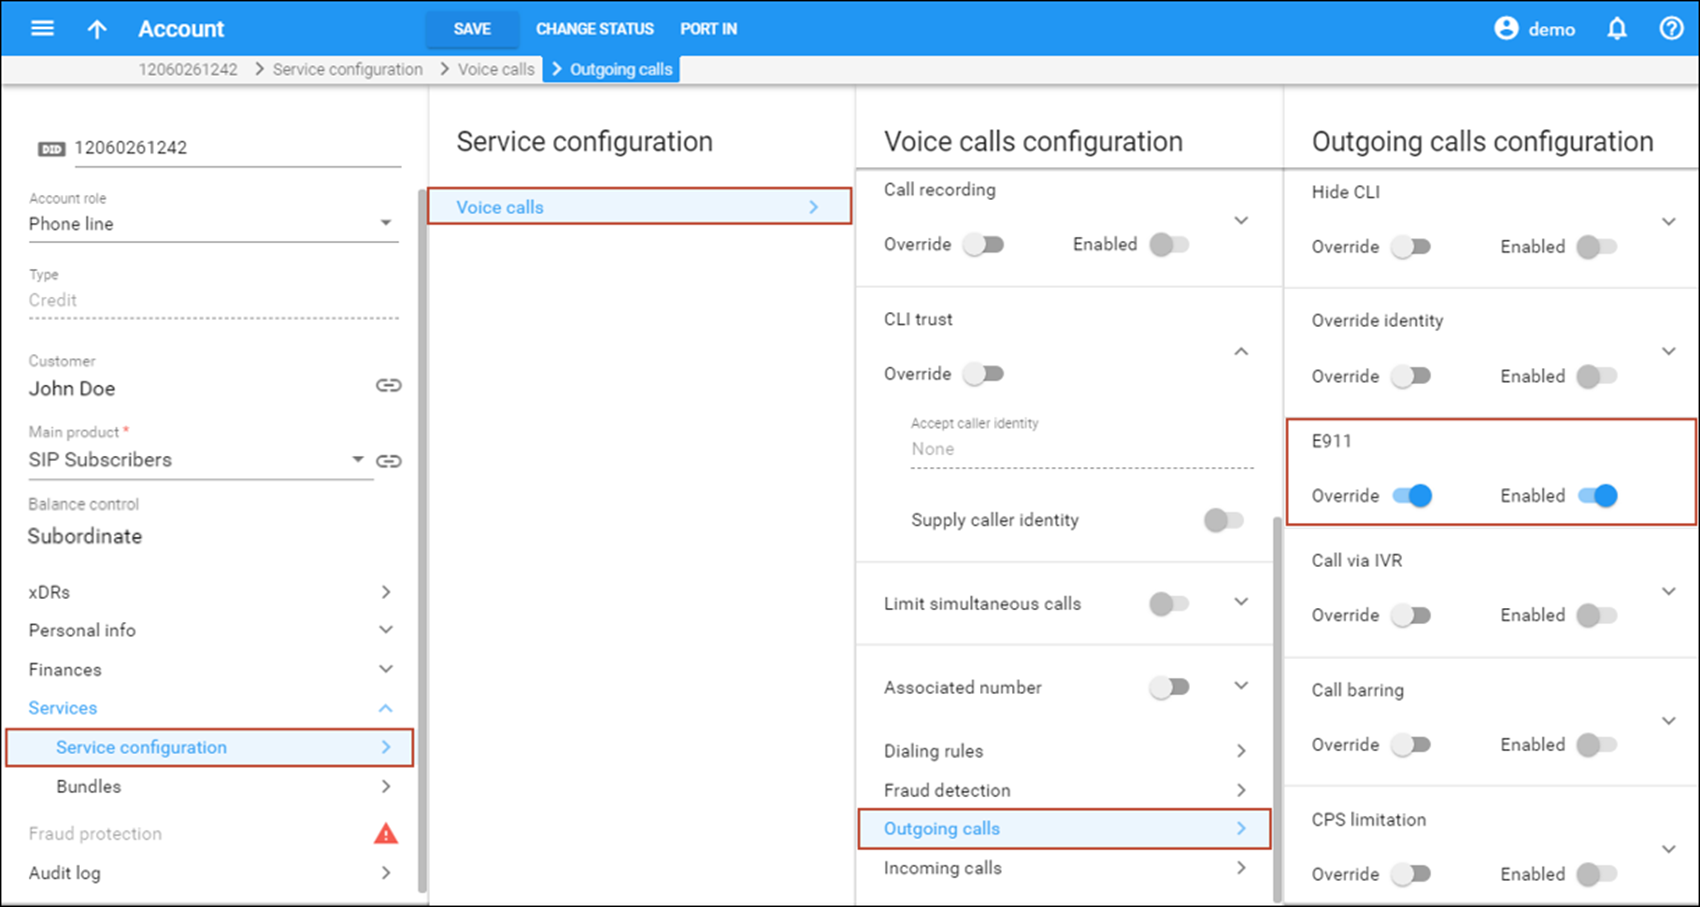
- On the Account panel, select Services, then Service configuration and click on Voice calls.
- On the Voice calls configuration panel, select the Outgoing calls section and enable the E911 option.
- Click
Save.