



… Configure call forwarding
Follow-me forwarding mode
Using follow-me, you can forward calls to multiple destinations. You can also configure it so that each of these destinations will be active in its own time period. For example, let’s suppose you want to redirect all your calls from 8 PM till 8 AM to your mobile phone (e.g., 12065550022) in case your IP phone is offline.
- On the navigation menu, select Toolbox, click Find account, and search for the desired account.
- On the Account page, go to the Voice calls Service configuration > Incoming calls tab and enable the Default answering mode option. Specify Forward Only in the dropdown list.

- Go to the Call forwarding tab and enable Call forwarding option.
- In the Call forwarding dropdown, select Follow-Me.

- In the Follow-me forwarding settings, specify the number on which you want to receive forwarded calls.
- Enter the following information:
- Order – select the order for redirecting a call:
- If you set As listed, then every active number will be called, from the first number to the last one.
- For random order, select Random.
- If you would like to call all numbers from the list simultaneously, use Simultaneous.
- If you want to call the destination numbers based on the percentage specified, use Percentage list.
- Name – type in a name for the follow-me number (the mobile phone number in the example).
- Forward to – enter a number for redirecting calls (e.g., 12065550022).
- Timeout – set the number of seconds to wait before a call is forwarded to the next number in the list if the call is not answered.
- Add time periods – define the period when the number is active and is allowed to receive a forwarded call. Click the
 Add icon to add a period. If you want the follow-me number to be active permanently, enable the Select whole day option while on the Add time periods wizard. See the ... Define a time period using the wizard? section for more details.
 - Calling party display – choose how to display the caller’s info during forwarding:
- Select Caller number and name to seethe phone number and the name of the original caller.
- If you choose Caller number and forwarder name, then the phone number of the caller and the forwarder’s name will be displayed.
- To see the phone number and the name of the forwarder, select Forwarder number and name.
Move a slider
 if you wish to temporarily disable forwarding to this follow-me number.
- Order – select the order for redirecting a call:
- Click Save on the toolbar. To add another follow-me number click
 .
. - Repeat steps 5-6 until all the desired follow-me numbers are added.
Advanced forwarding
This is similar to follow-me mode, but has a few extra options that allow you to route calls to SIP URI.
For example, suppose you want to redirect your calls to SIP URI from 1 PM till 3 PM. To do this, follow the steps below:
- On the navigation menu, select Toolbox, click Find account, and search for the desired account.
- On the Account page, go to the Voice calls Service configuration > Incoming calls tab and enable the Default answering mode option. Choose Forward only if you do not want the call to go to voicemail if not answered. Otherwise, choose Forward Then Voicemail here.
- Go to the Call forwarding tab and enable Call forwarding option.
- In the Call forwarding dropdown, select Advanced Forwarding.

- In the Advanced forwarding settings, add the number on which you want to receive forwarded calls.
- Enter the information needed. The fields are very similar to those for adding a follow-me number as described above.
- Below are additional fields that are not available when adding a follow-me number.
- SIP URI – specify a valid IP address here (four numbers separated by dots, e.g., 193.168.192.198).
- Protocol – enables you to choose the UDP or TCP transport protocol. You can use the TCP protocol instead of UDP for SIP communications for PBXs which do not support UDP.
- Keep original CLD – enable this option to ensure that the originally dialed number is present in the call information when forwarding a call to another account.

- Click Save.
Simple forwarding
The simplest type of forwarding is when you specify a single phone number to which all calls will be sent. For example, if you wish to redirect all your calls to 18185551219, use simple forwarding.
- On the navigation menu, select Toolbox, click Find account, and search for the desired account.
- On the Account page, go to the Voice calls Service configuration > Incoming calls tab and enable the Default answering mode option. Choose Forward only or Forward Then Voicemail if you want your calls to be forwarded to voicemail if not answered.
- Go to the Call forwarding tab and enable the Call forwarding option.
- In the Call forwarding dropdown, select Simple Forwarding.

- In the Simple forwarding settings, add the number on which you want to receive forwarded calls.
- Enter the following information:
- Forward to – the number you wish the calls to be forwarded to.
- Timeout – set how long the IP phone will ring before a call goes to voicemail (if Forward Then Voicemail is set in the Default answering mode field) or is disconnected.
- Limit simultaneous calls to – specify the allowed number of concurrent calls here. When an account tries to place a call beyond the allowed limit, it will be rejected.
- Calling party display – choose one of the ways to display the caller’s info during forwarding (a detailed description of each option is given above).
- Keep original CLD – when this option is enabled, the originally dialed number is preserved during forwarding.

- Click Save.
… Define a time period using the wizard
Using the period definition wizard, you can easily define the time period when a number (e.g., a follow-me number) will be active. If you want the number to be active permanently, enable the Select whole day option. Otherwise, define the desired period. The following example illustrates the process of creating a period that starts at 8 PM and lasts until 8 AM the next morning on workdays.
- In the forwarding settings, click Add period and fill in the details:
- Whole day – disable the toggle.
- Time – specify 20:00 in the From field and 08:00 in the To field.
- Days – select Monday-Friday.
- Months – enable the All months toggle.

- Click Save to save the period.
… Enable end users to manage the answering mode via IVR
This chapter demonstrates how to enable end users to choose a method for processing incoming calls and how to specify the number the incoming calls will be forwarded to using a special IVR.
Create an IVR Application and Associate an Access Number
Define which IVR application launches when an end user dials an access number to manage answering mode.
- On the navigation menu, select Voice calls processing and go to Voice applications.
- On the Voice application list panel, click + Add and fill in the following fields:
- Name – specify the IVR application’s name (e.g., Call forwarding).
- Application type – select Call forwarding management.
- Number – type in the number to be dialed by an end user or click the
 button to select a DID number from the available DID numbers list. Click Add
  to add more numbers.

- Click Save.
Modify a Product
To allow end users to define a method of processing incoming calls by themselves, modify the service configuration within the product assigned to them.
- On your product’s panel, click Services, then click Voice calls.
- On the Voice calls configuration panel, click Incoming calls and use a slider to enable Unified messaging service feature.
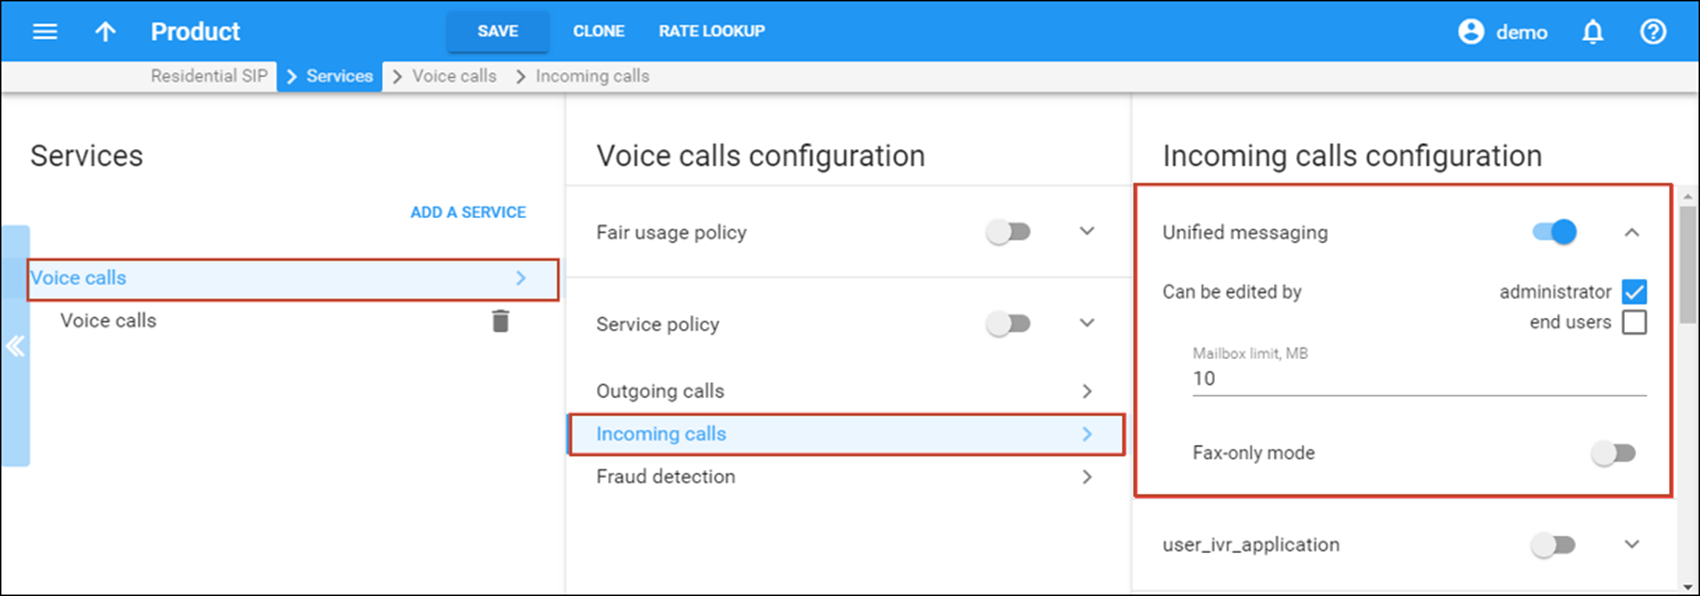
- Use a slider to enable the Call forwarding feature and select the End-users checkbox.
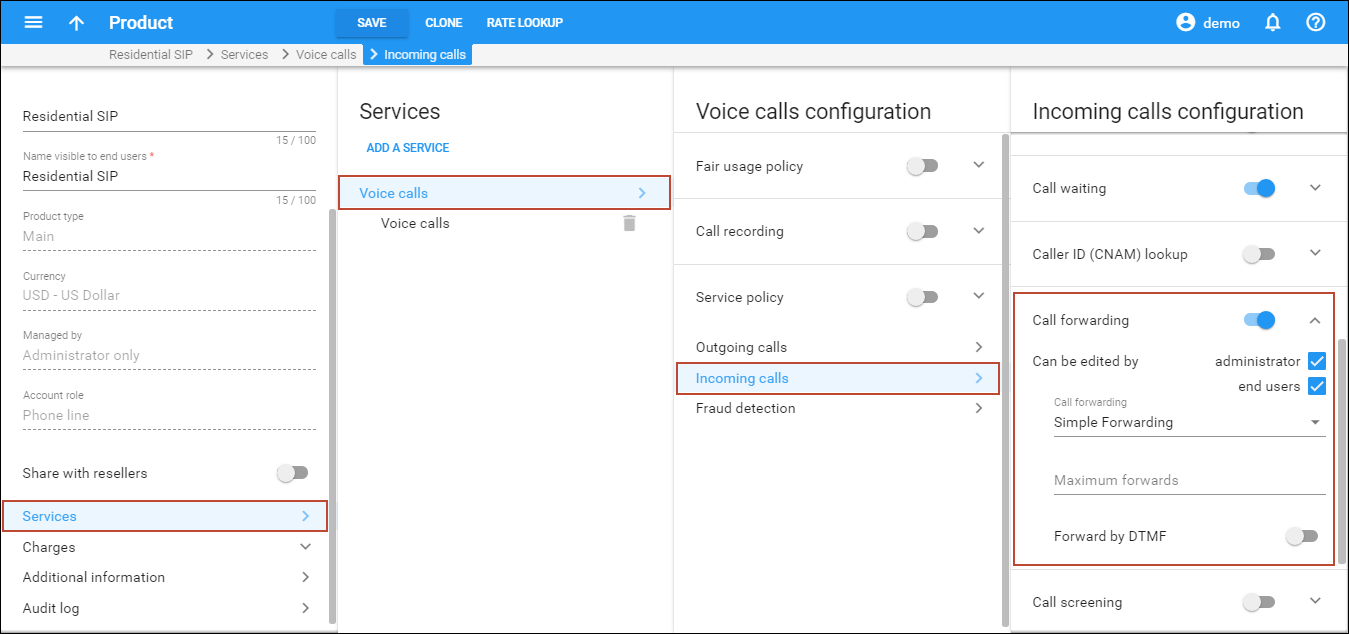 Enabling the End-users checkbox for Call forwarding is mandatory to permit end users to modify how to process incoming calls via an IVR and their account self-care interface. To permit end users to modify the method for processing incoming calls only via an IVR, restrict them to accessing only the account self-care interface.
 - To allow end users to define a phone number to forward calls to, select Simple forwarding in the Call forwarding field.
- Click Save.
… Configure call screening
On the Call Screening page of the Account Self-Care Portal, you can define and view a list of rules for handling incoming calls.
Let’s consider this example: during off-hours, the calls received to your extension from VIP partners need to be forwarded to your mobile phone. To configure this, perform the following steps:
- On the navigation menu, select Toolbox, click Find account, and search for the desired account.
- On the Account page, go to the Voice calls Service configuration panel > Incoming calls tab and enable the Call screening service feature.

- Click Save.
Log in with the account’s web access login and password. After that, you will be able to see the account’s dashboard interface.
- On the Cloud PBX tab of the Account self-care interface, go to Call Screening page and click the
 Add new rule button.
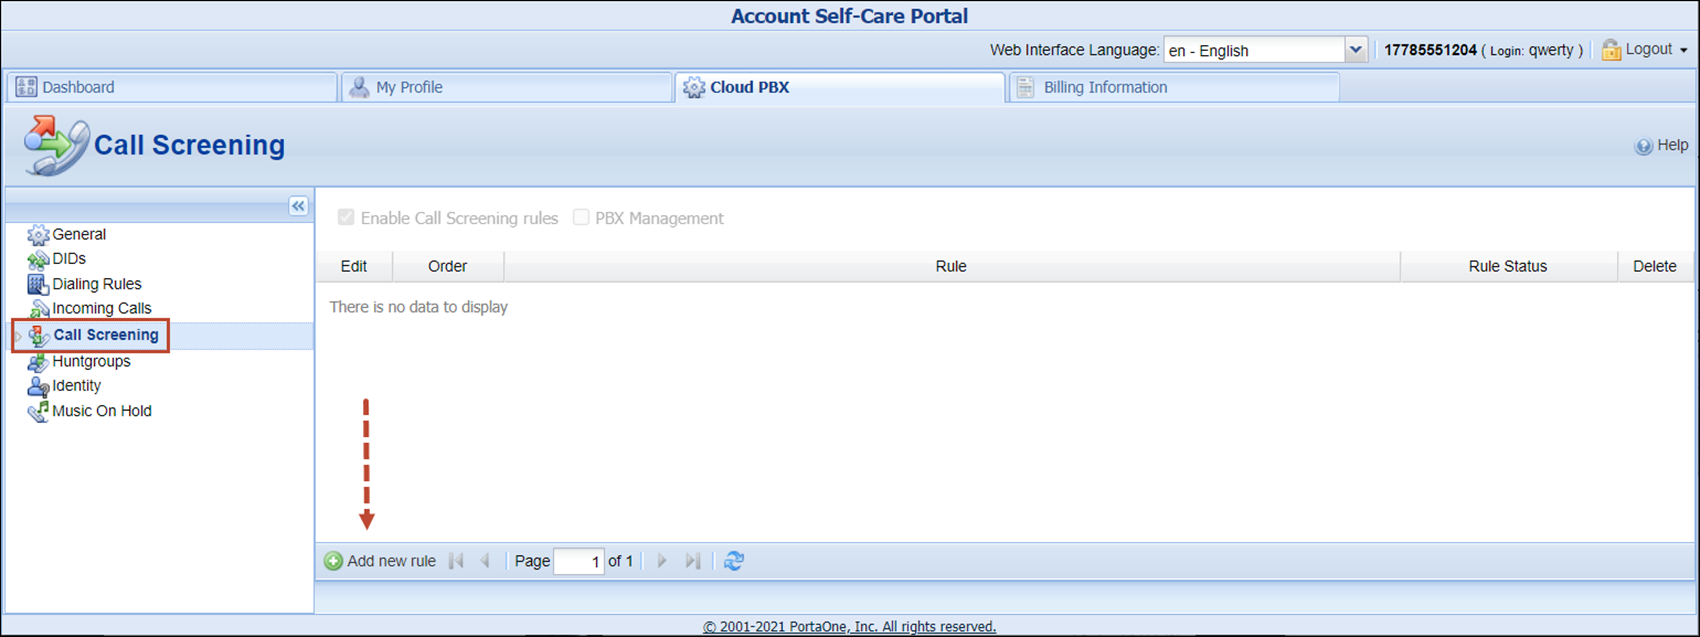
- In the Time Filter and Action section, configure the following parameters:
- Enable Rule – check this box to enable this rule.
- Action – choose Forward Only. Refer to the Simple Forwarding section of this document for instructions on how to configure forwarding to your mobile number.
- Time Filter – allows you to select a condition applicable to the time when a call is made. Select Create New Time Filter here.
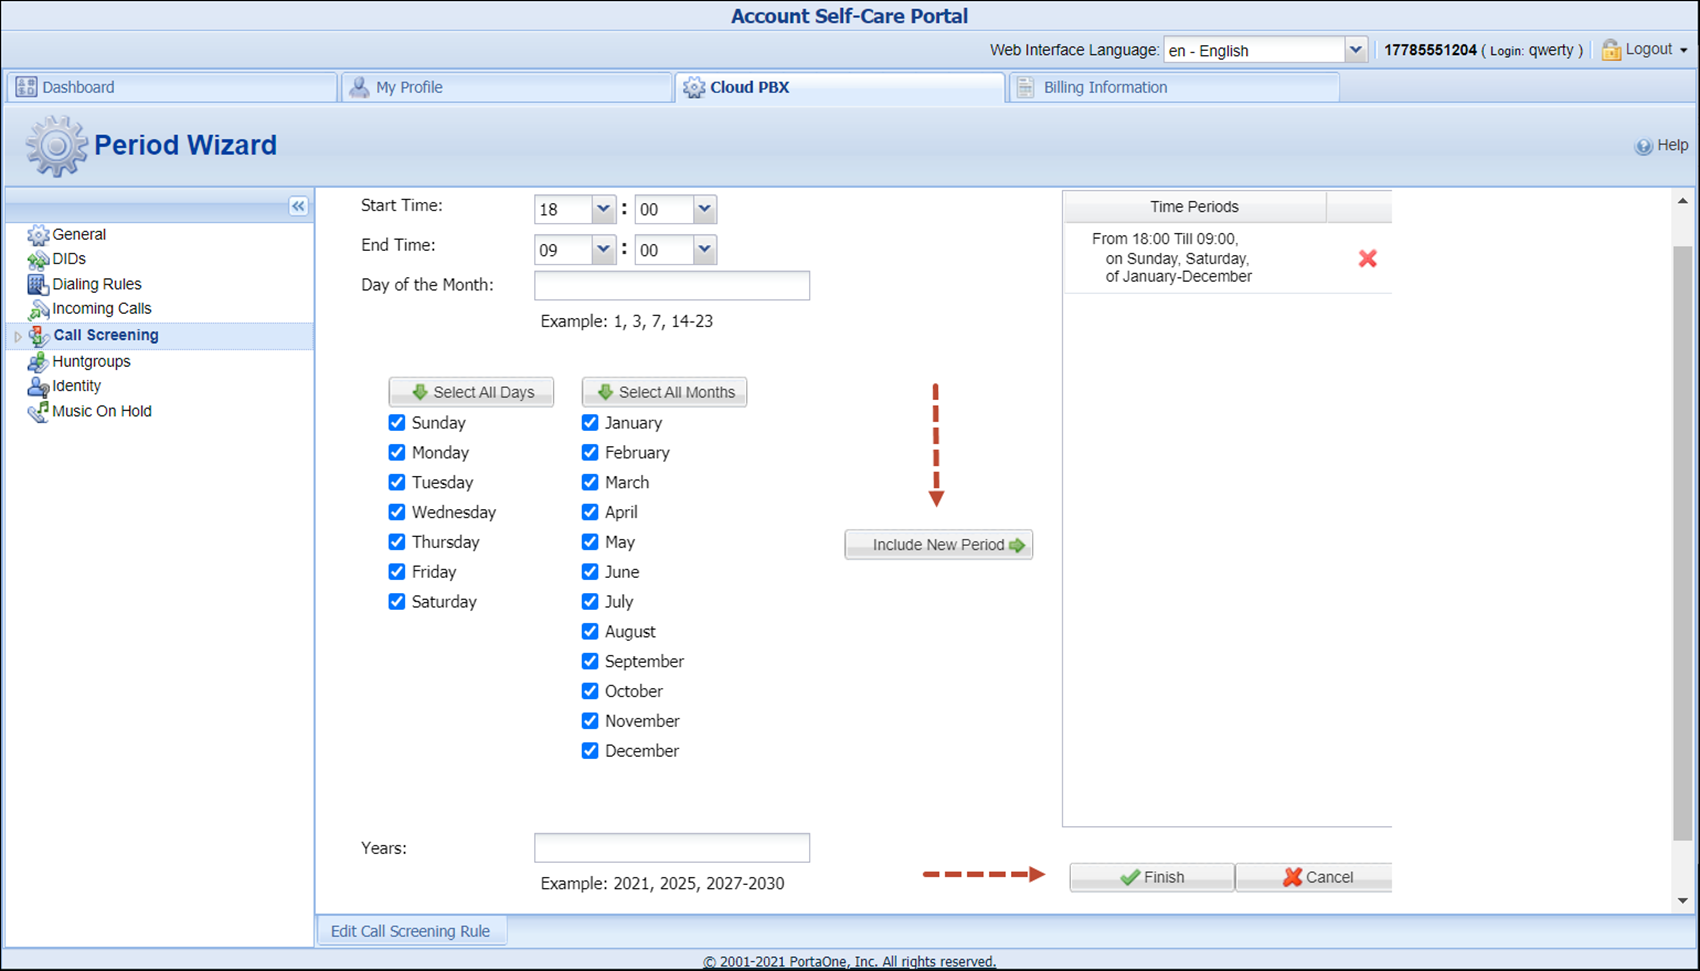
- Time Filter Name – enter the name for a new time window. To set specific parameters for your Time Filter, click the
 Time Interval icon to define the interval.
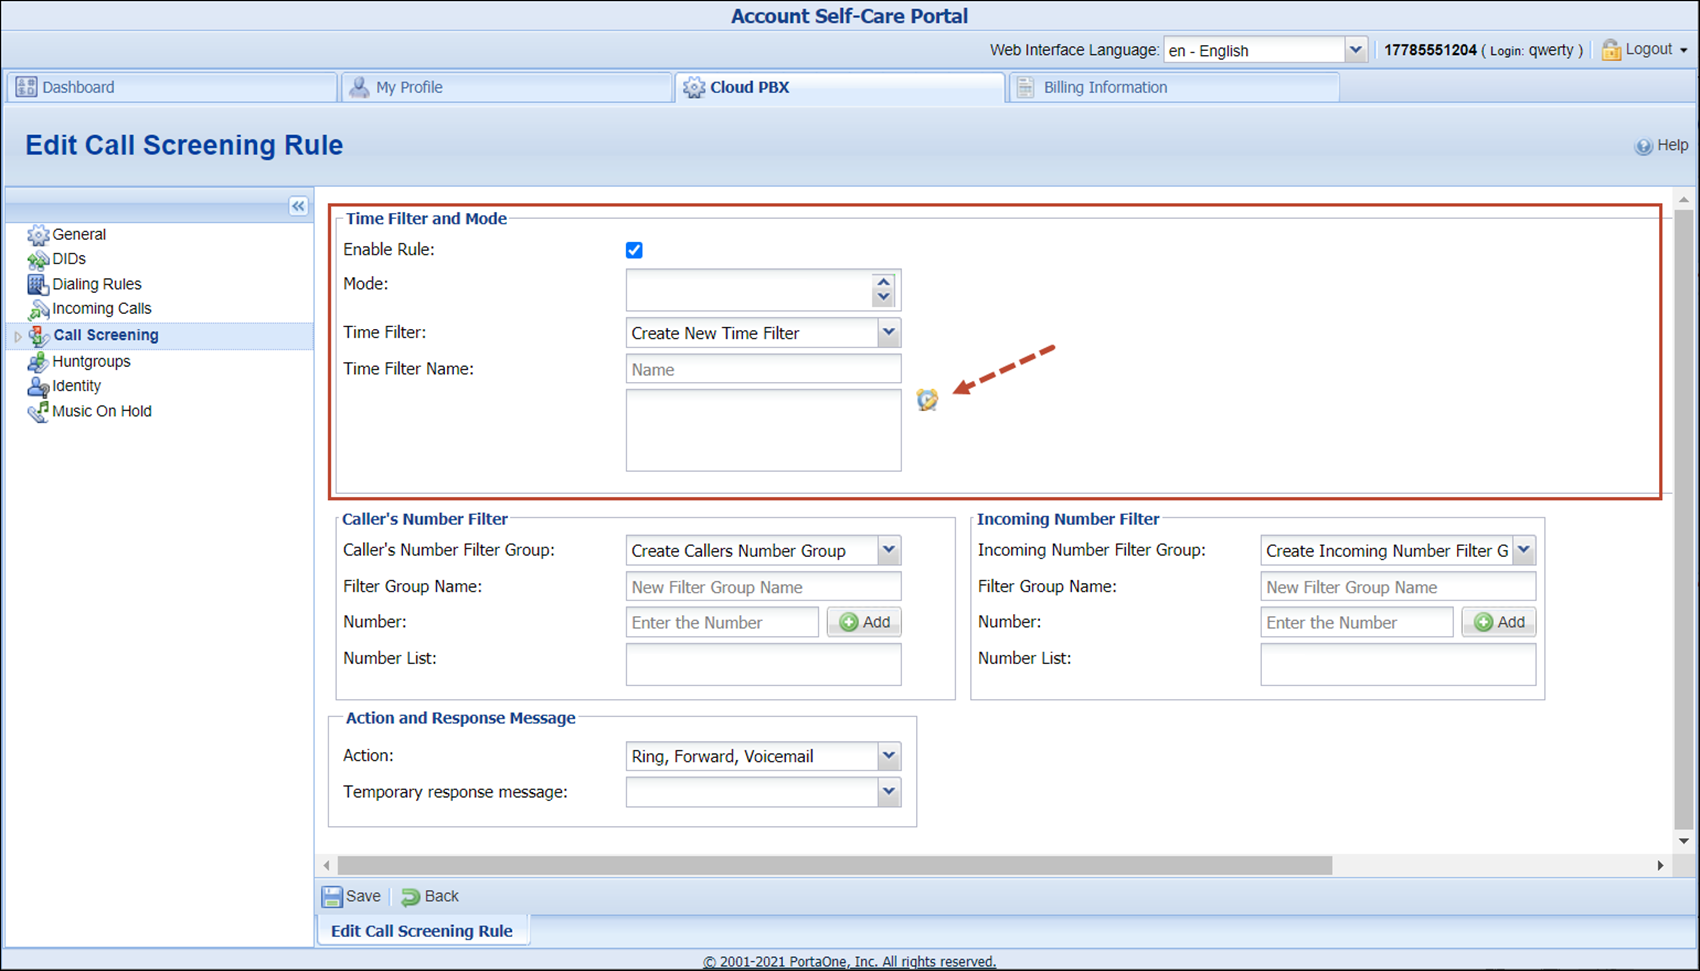
- In the Caller’s Number Filter section, configure the following parameters:
- Caller’s Number Filter Group – select a condition applicable to an incoming phone number (phone number of a person trying to contact you).
- Filter Group Name – type in the name of a Filter Group (e.g., VIP partners).
- Number – add the number(s) to your filter group. First enter the number and then click the
 Add button.
 - Number List – the numbers you have added to the group are displayed here.

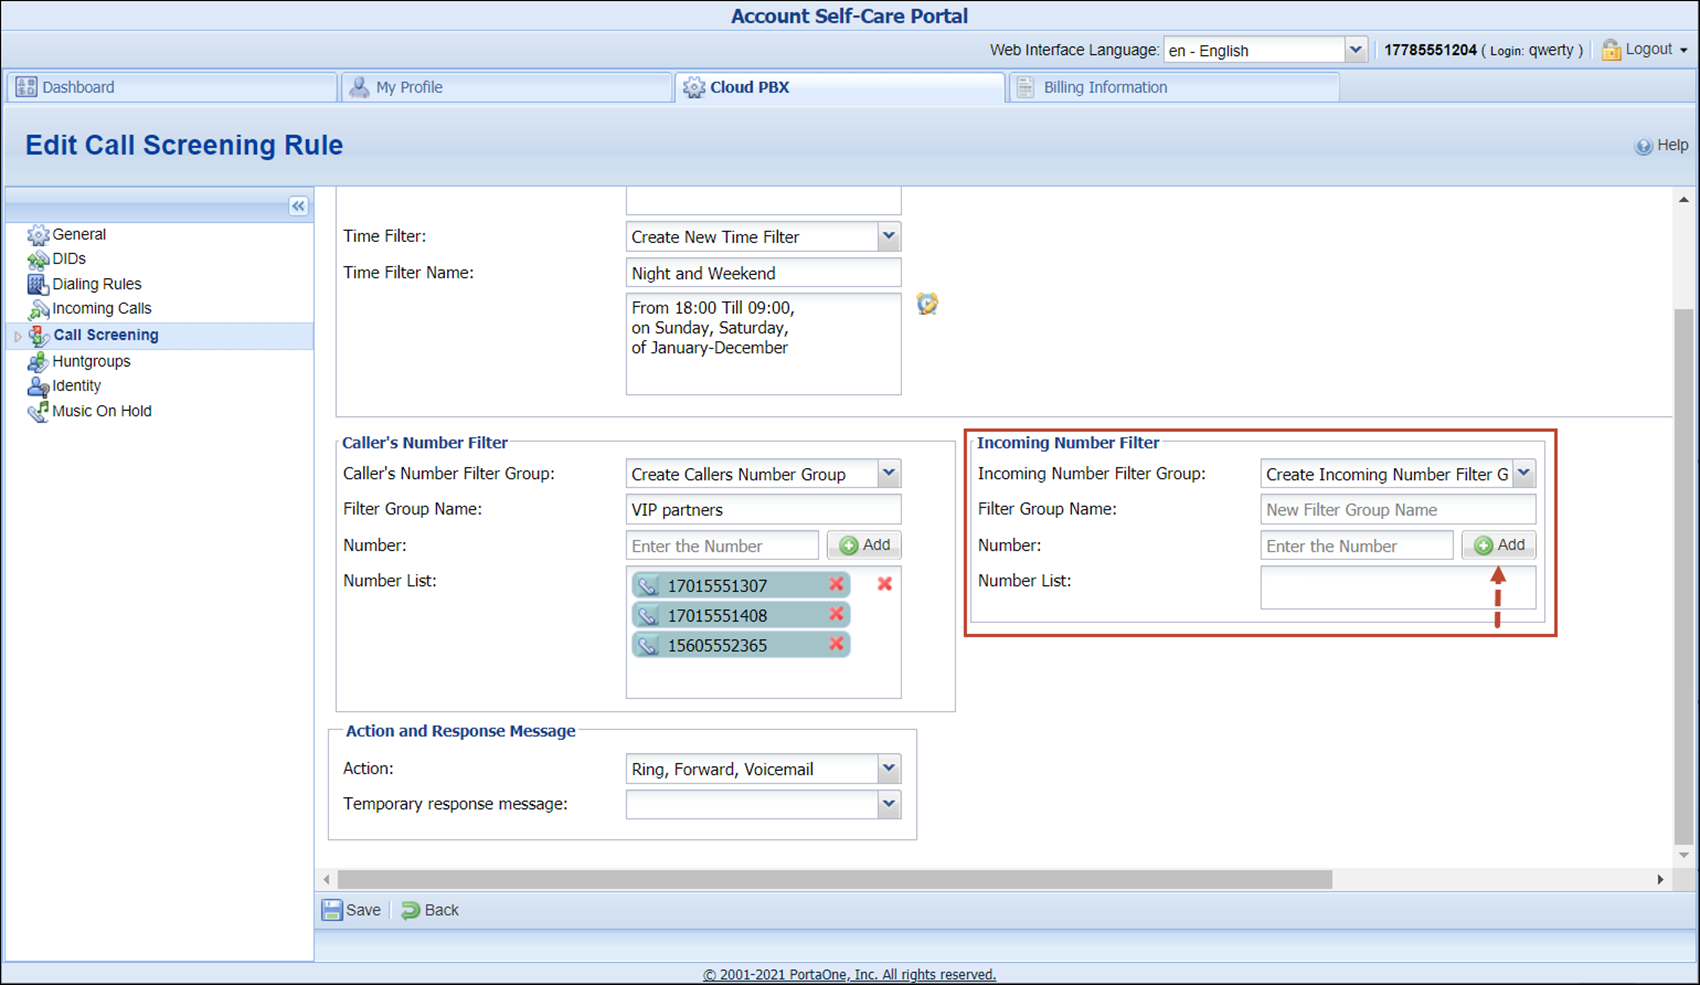
- In the Incoming Number Filter section, configure the following parameters:
- Incoming Number Filter Group – allows you to select a condition applicable to one of your phone numbers that a person tries to contact you.
- Filter Group Name – enter the name for the new filter group (e.g., Work phone).
- Number – add the number(s) to your filter group. First enter the number and then click the Add button.
- Number List – the numbers you have added to the group are displayed here.
- Click the
 Save button.
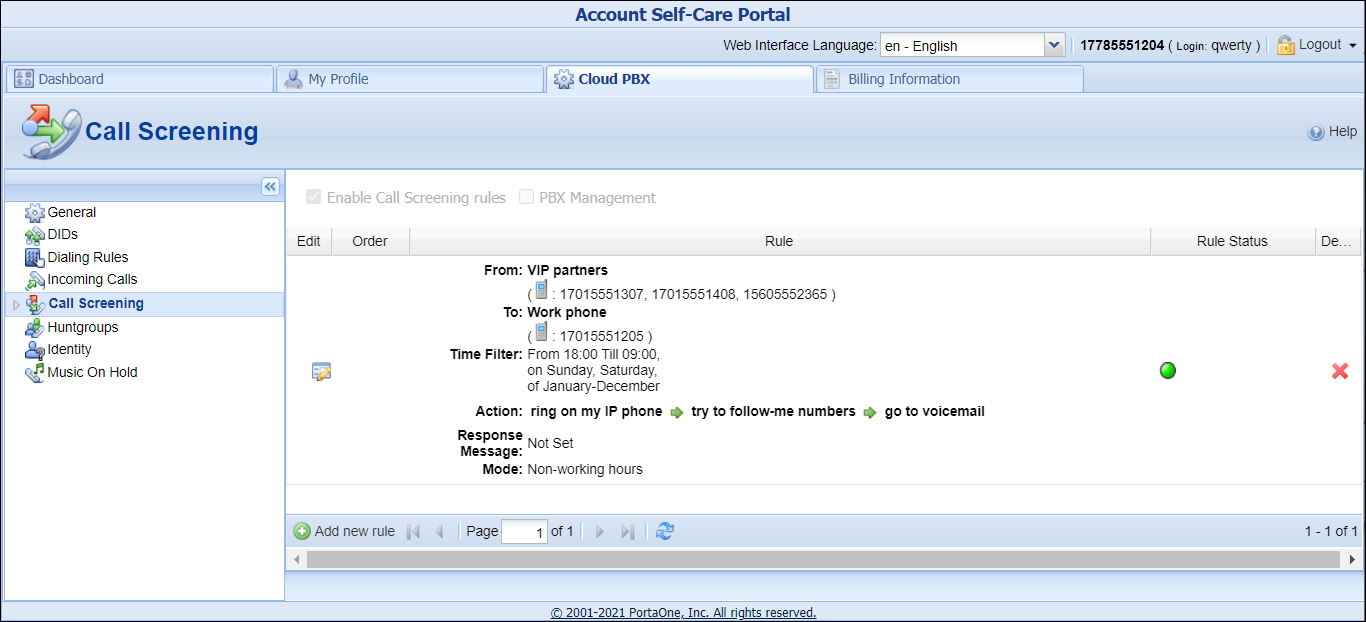
Repeat the previous steps to create more call screening rules if necessary.
… Create extra DIDs as aliases
You can use phone numbers (e.g., DIDs 44012555772, 17785551208 and 18701191444) to forward incoming calls to the main PBX account. To do that, add those numbers as aliases.
Create Aliases manually
- On the Account panel, go to General info > Account aliases tab.
- Click + Add and specify the alias details:
- Alias role – select Phone line here.
- Alias ID – specify the DID number in this field or click the
 button to add a DID number as an alias:
- When the Define the search filters sidesheet opens, specify whether to search through the DIDs assigned to this customer or among unallocated DIDs. Also, you can specify the geographical location and DID number pattern (e.g., specify 44 to search for DIDs with the prefix 44). Click Next.
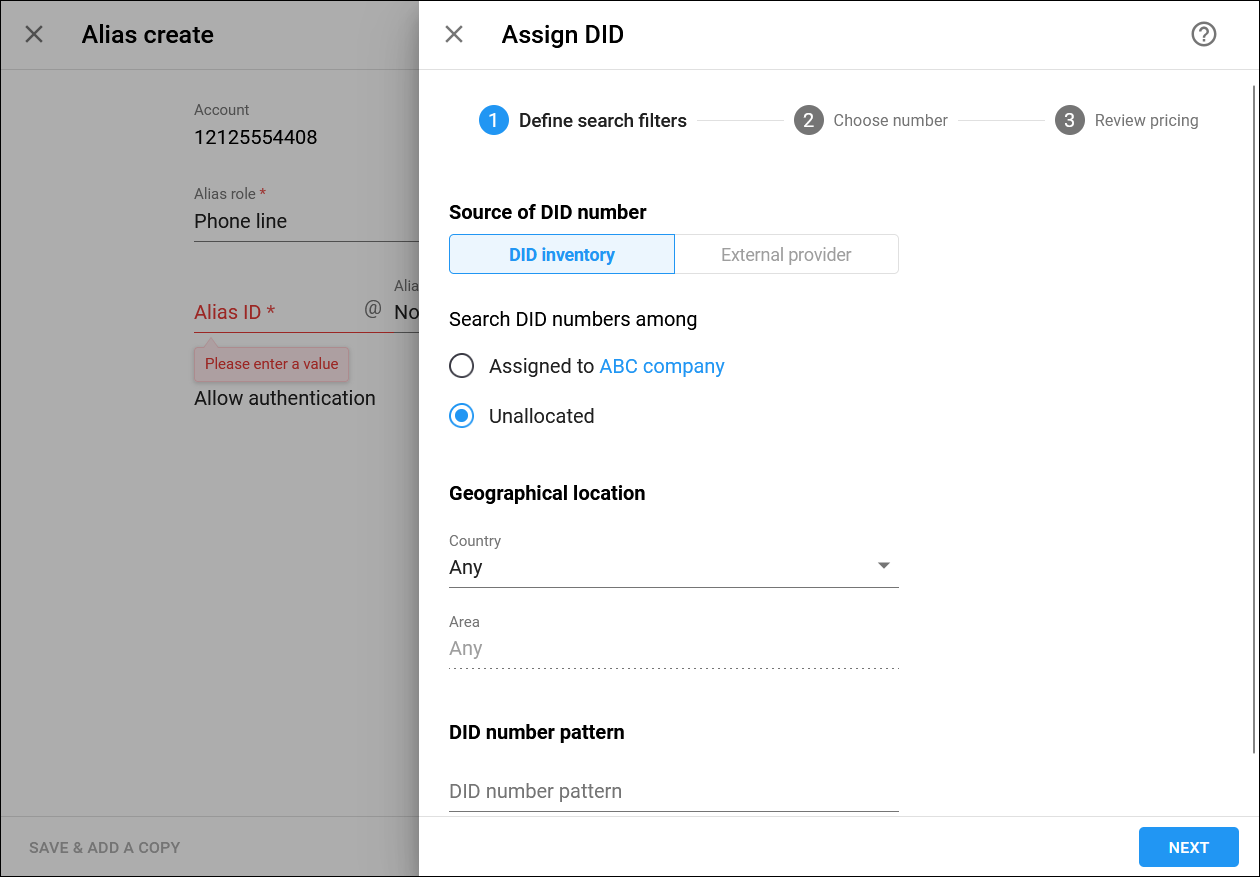
- On the Choose number panel, you will see a list of available DID numbers that matches your search query and the charges associated with them. The charges for DIDs from the DID pool are pre-populated from the customer’s pricing batch. Select a DID number and click Next.

- On the Review the pricing panel, review the charges for the DID number and click Assign.

- When the Define the search filters sidesheet opens, specify whether to search through the DIDs assigned to this customer or among unallocated DIDs. Also, you can specify the geographical location and DID number pattern (e.g., specify 44 to search for DIDs with the prefix 44). Click Next.
- Allow authentication – disable this option.

- Click Save.
- Repeat step 1-4 to add additional aliases.
 TIP: You can associate the above-mentioned phone numbers to a single account (e.g., 17785551204) and then register those numbers on separate IP phones. This allows your users to make and receive outgoing and incoming calls. To do that, add those numbers as aliases and enable the Allow authentication parameter.
Generate multiple aliases
To create multiple aliases, use the Alias Generator tool.
- Open the account's General Info > Account aliases tab and click Alias generator.
- Specify the generation parameters in the Alias generator sidesheet:
- Number of aliases – number of aliases to be generated.
- Allow authentication – disable this option.
- DID pricing batch – select a corresponding pricing batch from the list.
- Starting DID pattern – if you wish, you can manually enter the starting DID, e.g., if you want to make sure that the customer’s phone range starts with a “round” phone number such as 00, followed by 01, 02, etc.

- Click Generate to initiate the alias generation process.
… Limit the number of concurrent calls for a specific customer
- On the navigation menu, go to Sales, select Customers, and open the needed customer.
- On the Customer panel, go to Accounts / DIDs > Sites tab.
- Click + Site, and fill in the site details:
- Site name – type the short site name.
- In the Simultaneous calls tab, use a slider to enable the Limit simultaneous calls option and specify the following parameters:
- Type of calls – select All calls.
- Simultaneous calls – define the number of concurrent calls for the accounts of this customer.

- Click Save.
By using the Bypass Menu Prompt to Dial Extension functionality, you can allow callers to dial a known extension once they hear the menu prompt. To do this, follow the steps below:
- Go to the Account Self-Care Portal.
- On the Auto Attendant page of the Cloud PBX tab open the ROOT menu.
- On the General tab specify when the ROOT menu is active.
- Enable the Allow callers to dial a known extension directly option.
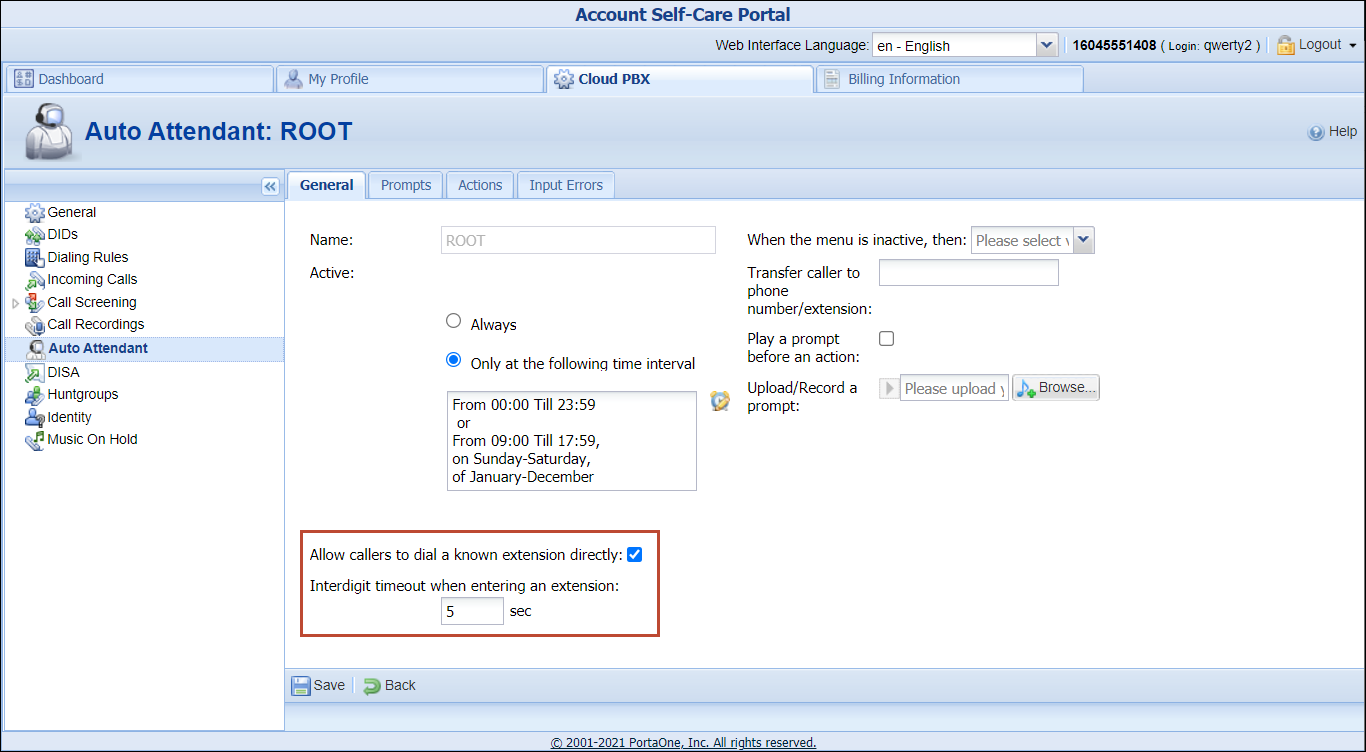
- Adjusts the Interdigit timeout when entering an extension option value. This is the maximum number of seconds the system waits till a user dials the second and following digits of an extension.
- Click
 Save.
Save.
Note that the enabled Allow callers to dial a known extension directly option disables the Dial Extension Directly menu action.
… Configure immediate redirect to call queues
This allows you to automatically place callers on the predefined call queue once a call to an auto attendant has been connected. To do this, follow the steps below:
- Go to the Account Self-Care Portal.
- On the Auto Attendant page of the Cloud PBX tab open the ROOT menu.
- On the Actions tab select:
- User Input – no input
- Timeout – 0
- Action – queue “Name”
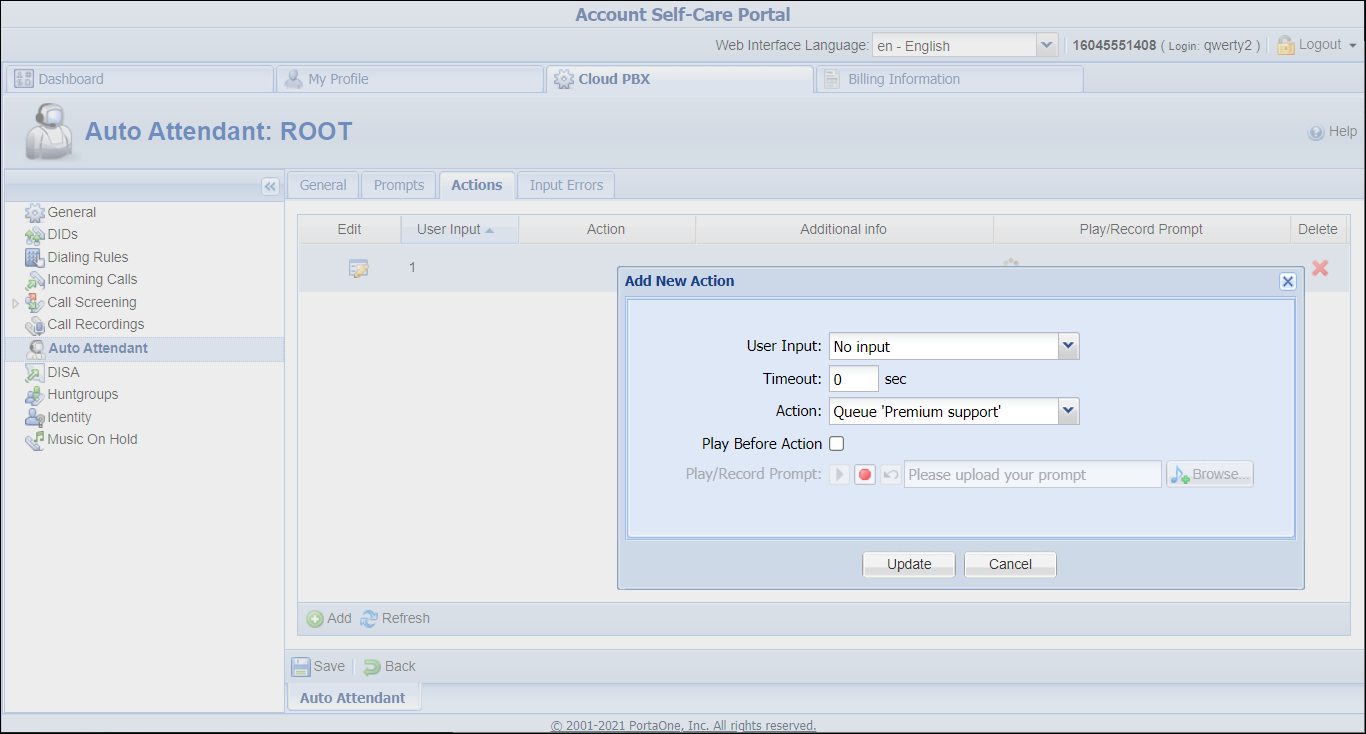
- Click Save.
…Configure the customer hierarchy
The Customer hierarchy feature is used when you need to set up the distributed infrastructure of a company with several functional departments. To configure the customer hierarchy:
- Create customer records for the Main and Branch offices. Note, that billing period for both offices must be the same, e.g., monthly.
- Open the customer record of the “main office” customer, e.g., ABC company.
- On the customer page, go to General info > Additional info tab and turn on the Use the hierarchy of offices toggle. In the Office field, select the role “Main (HQ).”

- After configuring the main office, you also need to configure a branch office:
On the Customer page, click General info > Additional info tab and:
- Turn on the Use the hierarchy of offices toggle.
- Select Branch (Site) from the Office dropdown list.
- Select the main office, e.g., ABC company, in the Main office field.

A hierarchy has been created and configured for the customer.
… Configure multiple pickup groups
The multiple pickup groups functionality allows phone lines in the same PBX environment to be grouped so that phone line owners within the group may answer each other's calls by merely dialing a group pickup prefix on their phones.
Let's assume that there are two offices working with shared secretarial services. First you must enable the Group Pickup feature, then configure two hunt groups and lastly configure the pickup groups within them.
- On the Cloud PBX tab, select Incoming Calls.
- To enable the group pickup feature, select Yes from the Group Pickup list.
- Select Dialing Rules. For your current dialing rule, in the Other prefixes and codes area, in the Group Pickup Prefix box, type 77. Click Save.
- Select Hunt groups, and add two hunt groups.
- To the first hunt group 88 (e.g., Sales Department), add the required extensions: 222, 333, and the secretary's 999 extension. Define hunt group 88 as primary for extensions 222 and 333. Make sure the Call Pickup Allowed is enabled for the hunt group.
- To the second hunt group 99 (e.g., Support Department) add extensions 444, 555, and the secretary's 999 extension. Define hunt group 99 as primary for all these extensions – 444, 555, and 999. Make sure the Call Pickup Allowed is enabled for the hunt group.
With these settings the following scenario is possible:
There is an incoming call to the extension 444. The secretary (extension 999) dials *77 to pick up this call because extension 444 is in their primary group.
To pick up an incoming call to hunt group 88 (the Sales department), the secretary dials *7788 (because 999 belongs to this hunt group. However, since 999 has a different primary group, they have to dial the group pickup prefix and the hunt group number).
If the incoming call rings only on extension 222, the secretary dials *77222 to pick it up. (because 999 and 222 belong to the same hunt group Sales Department.)


