Overview
This chapter provides instructions on how to configure the ESPF (External system provisioning framework) to capture changes in customer/account configuration in PortaBilling and send provisioning events to the external system via the HTTP protocol.
ESPF sends HTTP POST requests with provisioning events using the EventSender handler. Service providers develop the web application that receives these requests, processes them, and updates the data in the external system. They can develop their web application in a programming language they prefer and can run it on any of their web servers or in a cloud.
In this document, we demonstrate how to configure the EventSender handler for ESPF to provision events to a custom web application.
To provision any of the supported external systems, it is necessary to choose an essential handler (e.g., Yate HSS) and configure this handler instead of the EventSender.
Let’s say that you operate as an MVNO and you now have an HSS of your own. You want to provision your subscriber details there when a mobile user is added to or modified in PortaBilling.
For example, provisioning events are sent when an administrator changes a phone number/SIM card or product for a user when the user has depleted their available funds or topped up their balance, or when an administrator temporarily blocks a user (e.g., for non-payment).
Preparation
Before you proceed with the ESPF configuration, configure the OpenSearch instance and apply the configuration. Add the ESPF instance only afterward. Contact PortaOne Support for assistance if needed.
Configuration overview
- Enable provisioning on the Configuration server
- Create a handler on the PortaBilling web interface
- Configure a handler
- Subscribe the handler to the provisioning events
- Enable notifications upon failure (optional)
- Test the system
1. Enable provisioning on the Configuration server
To enable provisioning to external systems, create a new ESPF instance as follows:
- On the Configuration server web interface, go to the Configurations tab.
- Clone the current configuration.
- In the node tree select Auxiliaries → ESPF and click Create instance.
- Select
the server and service IP for the instance.
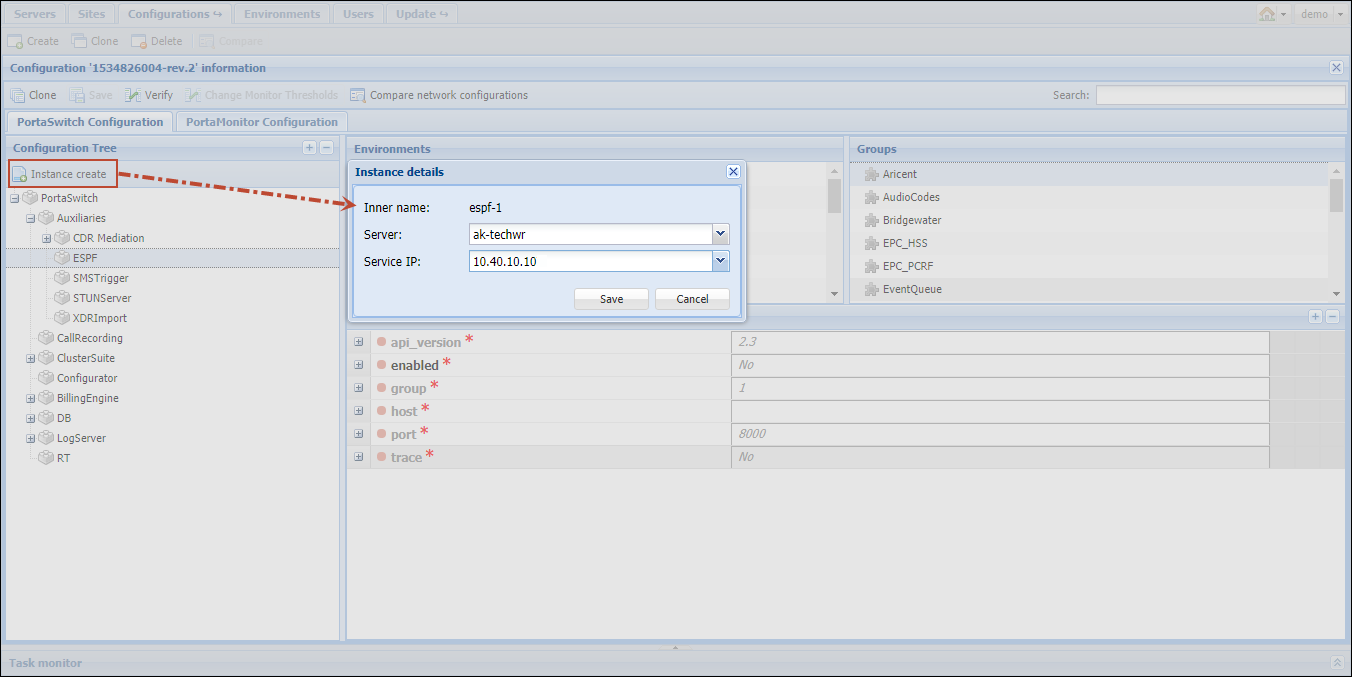
- Click Save.
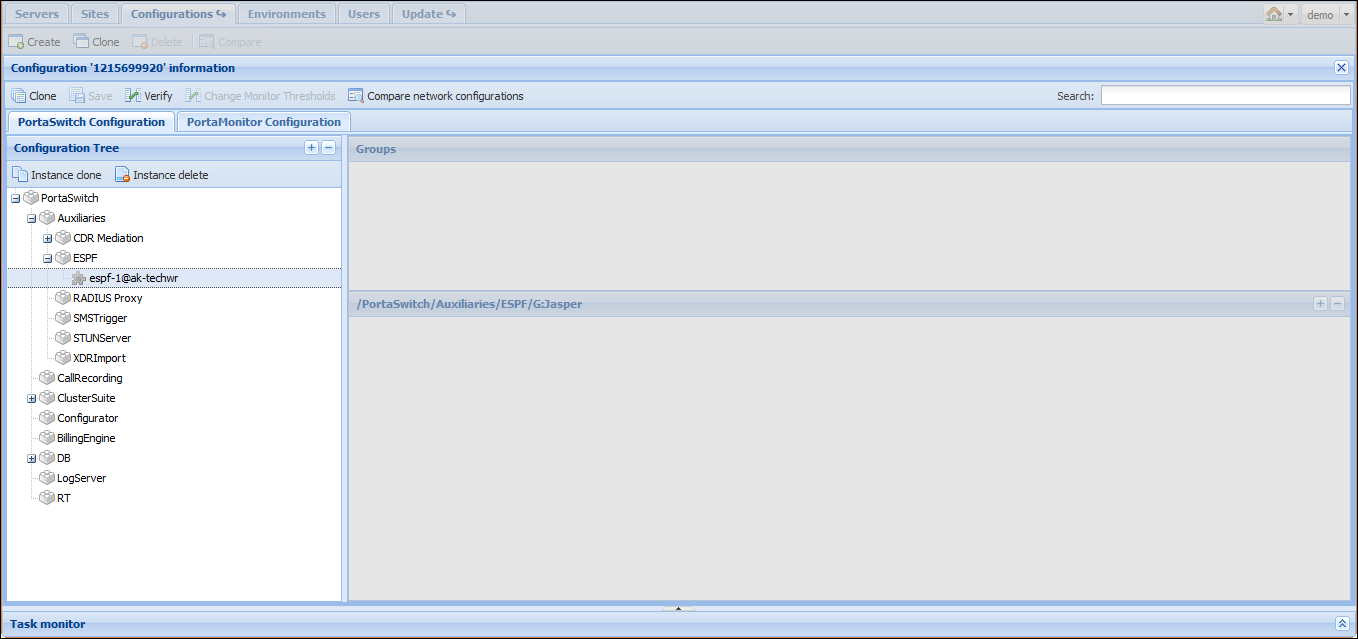
You can configure multiple ESPF instances. Thus, repeat steps 1-5, in case you need to configure another ESPF instance.
2. Create a handler on the PortaBilling web interface
To provision data to your external web application, configure the EventSender handler.
- On the PortaBilling web interface, go to Infrastructure and select Event handlers.
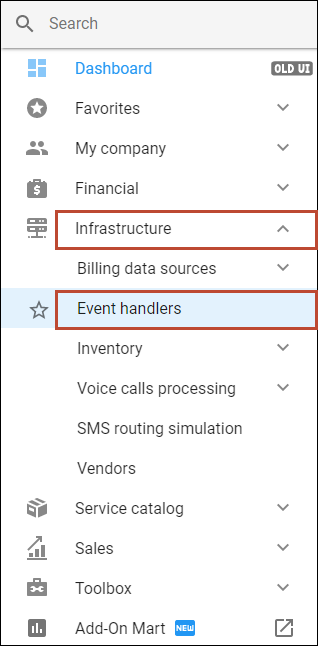
- Click + Event handler on the Event handlers list and fill in the details:
- Name – type the event handler name, e.g., “EventSender”.
- Type – select EventSender.
- Leave the Enabled checkbox selected to enable the handler once it’s created.

- Click Save&Edit details.
3. Configure the handler
To provision data to your external web application, configure the created EventSender handler.
- Open the created event handler > Configuration and fill in the following information:
- Events version – define the version of the provisioning events used by the handler:
- Events v.1 – for standard provisioning events;
- Events v.2 (default value) – for simplified provisioning events (a limited set of events and variables).
- Concurrency – the number of concurrent task processing. The default value is “1”.
- AsyncMode – leave this toggle on to send requests asynchronously (a handler sends a request as soon as it is processed, without waiting for a reply from a server). If you turn off the toggle, the requests will be sent synchronously (one by one once a server reply is received).
- AuthHeader – this is the name for the header that holds authentication details (e.g., authentication key/user/type/key ID) based on the authentication method. Leave the default Authorization header here.
- AuthMethod – select the method used to authenticate HTTP requests. The possible options are:
- Basic (default value) – authenticate by user ID and password.
- BasicAuth.Key – specify the user password mandatory for the Basic HTTP authentication.
- BasicAuth.User – specify the user ID mandatory for the Basic HTTP authentication.
- Custom – authenticate by custom type and credentials.
- CustomAuth.Credentials – specify the credentials mandatory for the Custom HTTP authentication.
- CustomAuth.Type – specify the authentication type mandatory for the Custom HTTP authentication.
- Signature – authenticate by key and key ID.
- SignatureAuth.Key – the key associated with the key ID that is used to create a signature. This field is mandatory for the Signature HTTP authentication.
- SignatureAuth.KeyId – the string that the server can use to look up the component required to validate a signature. This field is mandatory for the Signature HTTP authentication.
- None – when the external system requires another way for authorization, select this option to disable authorization header.
- Basic (default value) – authenticate by user ID and password.
- MaxWaitTime – this defines how long the handler waits for a response from a server in asynchronous mode. The timer starts once the last request from an iteration was sent (600 seconds by default).
- RequestTimeout – the number of seconds that the handler waits for the response from the server once a request is sent (300 seconds by default).
- TokenBurstiness – this value defines the maximum number of requests that can be sent per second in asynchronous mode (100 by default).
- TokenRate – this value defines the average number of requests that are sent per second in asynchronous mode (10 by default).
- URL – the IP address or host name of the server to which requests are sent (e.g., http://127.X.X.X:5000 or http://test.domain.com:5000).
- WithUniqueID – leave the toggle on to add a unique identifier to the event data so that the remote side can detect request retries.

- Events version – define the version of the provisioning events used by the handler:
- Click Save.
4. Subscribe the handler to the events
When a handler is subscribed for specific events, the handler receives notifications only about events of that type and processes them. To subscribe EventSender to the required event types, perform the following steps:
- Open the handler and go to Event subscriptions.
- Turn on the toggle for specific events to subscribe to these events.
- Click Save.

In our example, the following event types must be enabled:
- Account/New
- Account/SIMCardAssignment
- Account/ServicePassword/Changed
- Account/Password/Changed
- Account/ID/Changed
- Account/ZeroAvailableFunds
- Account/AvailableFundsAppear
- Account/Product/Changed
- Account/Blocked
- Account/Unblocked
- Customer/ZeroAvailableFunds
- Customer/AvailableFundsAppear
- Customer/Blocked
- Customer/Unblocked
5. Enable notifications upon failure (optional)
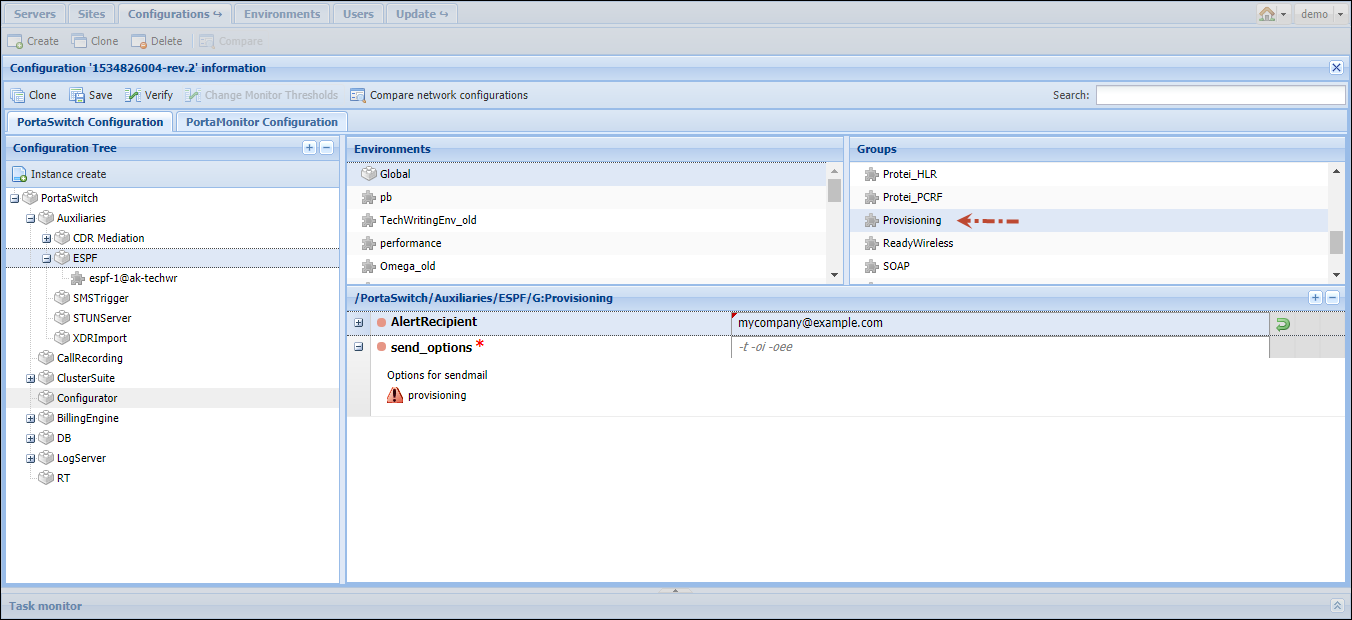
It may happen that the web application becomes unreachable due to network connectivity issues and therefore, that provisioning fails. To be informed about unsuccessful provisioning, configure the ESPF to notify you via email.
- From Groups, select Provisioning.
- Fill
in the fields:
- AlertRecepient – type in your email address to receive notifications.
- send_options
– specify the options passed to the command-line sendmail utility.
This utility is used to send notifications about provisioning errors (if
there are any).
- Click Save.
When you are done, click Verify to view the changes, and then click Check/Apply to apply the configuration.
6. Run tests
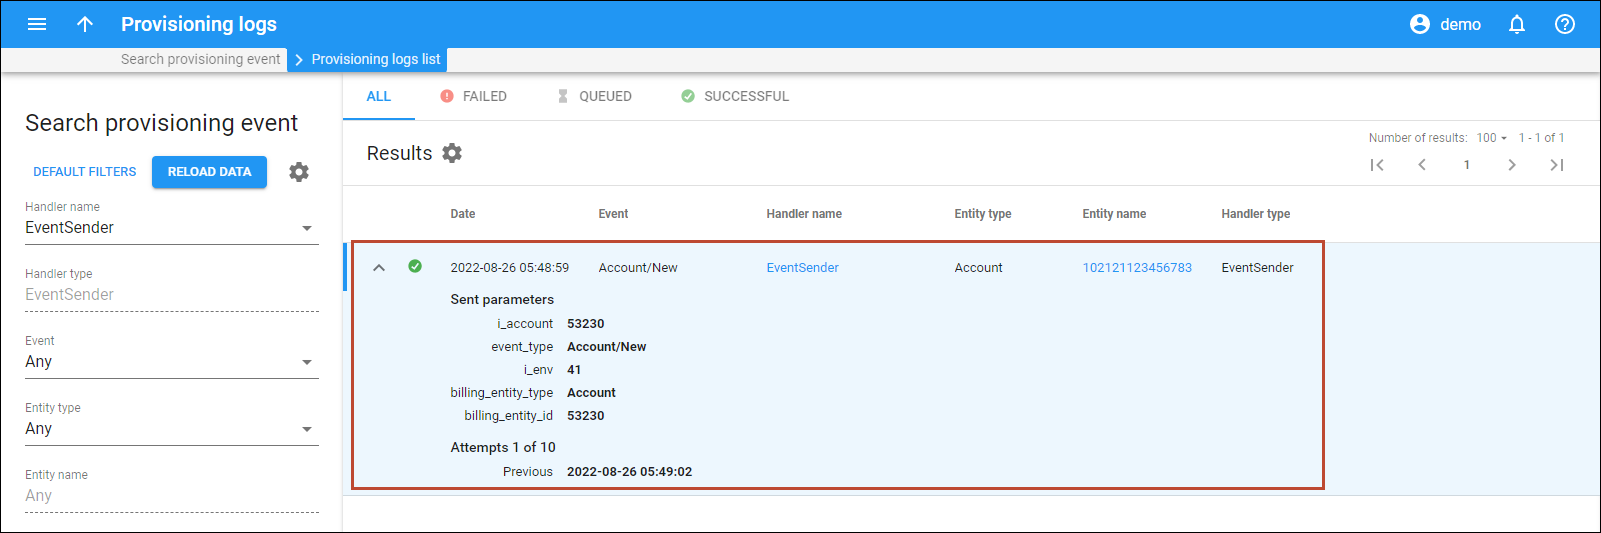
Create a new mobile account via the administrator web interface and see whether the request has been sent.
- On your customer’s panel, click Accounts.
- On
the Create an account panel, specify the account’s details:
- ID – type in the user’s mobile number.
- Account role – select Mobile.
- IMSI
– click IMSI
 and
select one of the available SIM cards from the SIM Card Inventory dialog.
and
select one of the available SIM cards from the SIM Card Inventory dialog. - Product – select the LTE Product here.
- Activation date – the date from which the account is usable.
- Type – select Credit for your postpaid Internet users.
- Balance
control – select Subordinate from the list.
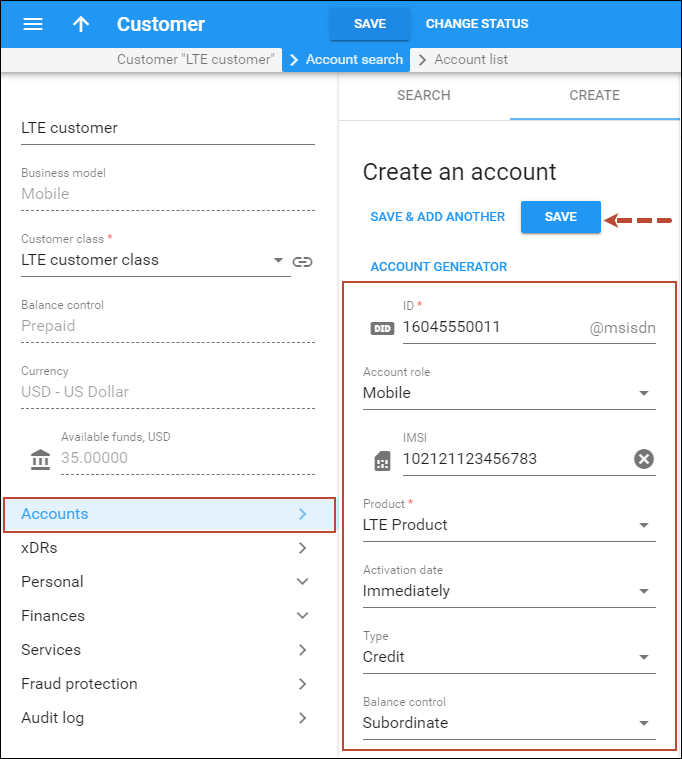
- Click Save to create an account.
- Check the log.
When an account has been added, you can check this event in the event log file:
- Go to Toolbox > Provisioning events.
- On the Search provisioning event panel, select the handler name from the dropdown list.
- Click Apply filters to see a specific event log.
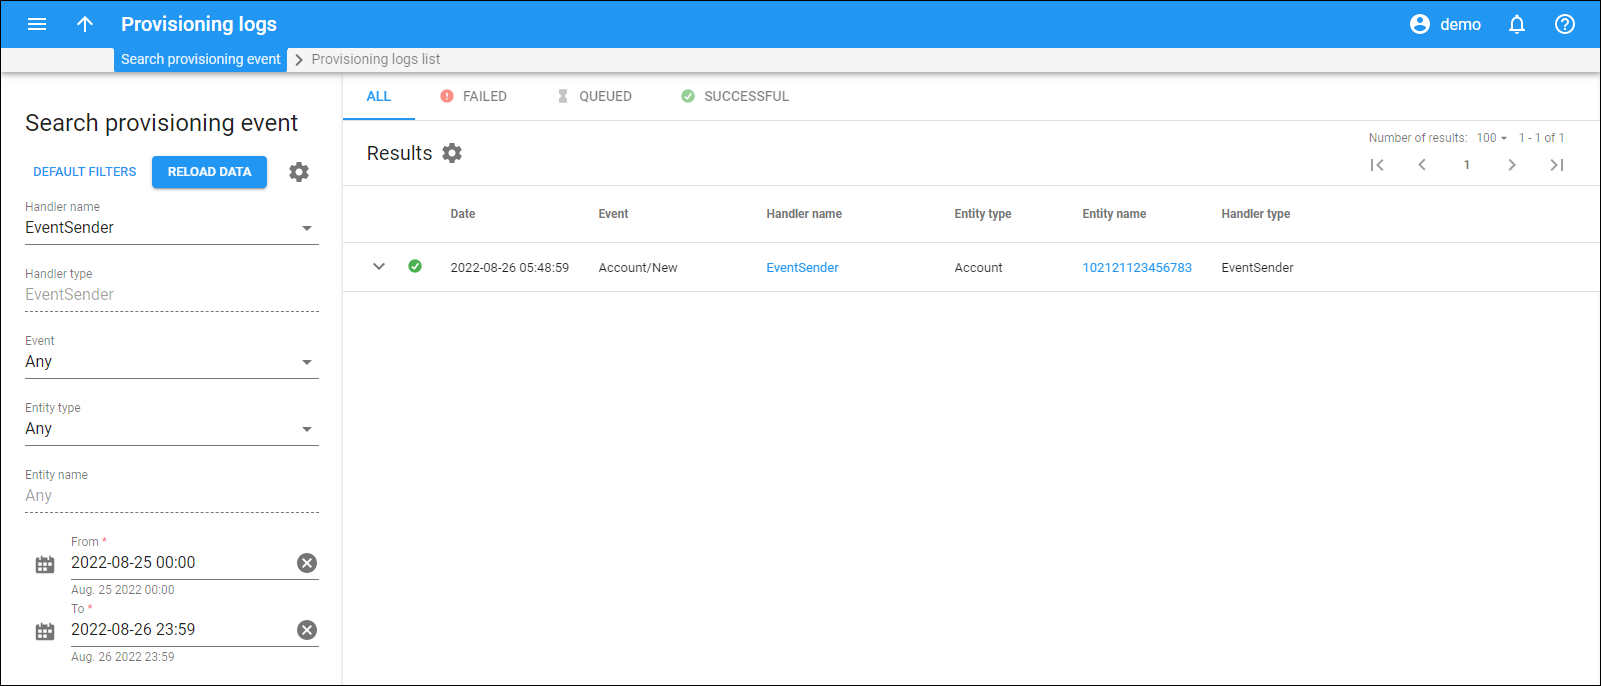
- To obtain the details of the event log, hover over a specific event log, and click Arrow
 .
.