This handbook describes how you can use PortaBilling to provision and define rates for broadband internet access services (such as FTTH, FTTx, cable, etc.)
The most typical broadband package types that you can offer your clients include:
- Fixed bandwidth (download and/or upload) and unlimited data transfer, for a fixed monthly fee.
- Fixed bandwidth (download and/or upload) and a limited total data transfer amount, for a fixed monthly fee.
- A pay-as-you-go plan, where the customer is charged based on the amount of data transferred (per kilobyte, megabyte or gigabyte).
In this handbook we will show you how to:
- charge data transfers using tariffs;
- implement packages with a fixed monthly fee using subscriptions assigned to products;
- limit bandwidth for a product and /or an account;
- limit data transfers using bundles.
You will also learn how to assign a static IP to an account and restrict the number of simultaneous internet sessions with the same Account ID.
Examples of broadband packages
As an example, we will create three packages with the following specifications:
- Start: 128 kbps upload and 512 kbps download bandwidth for $15.00 monthly. To provide all of your customers with adequate internet usage you can design a service usage policy that eliminates service abuse or illegal service usage. You can do this by limiting the quota of internet traffic per day. For example, a customer will be unable to download more than 1 GB of data in a single day; after that, the internet will be blocked until the following day.
- Pro: 256 kbps upload, 1 Mbps download bandwidth and 20 GB of data transferred during peak hours and 30 GB of data transferred during nighttime hours for $30.00 monthly. You can limit upload / download bandwidth to 64 kbps after customer consumes his quota.
- Premium: 512 kbps upload, 2 Mbps download bandwidth and, data transfer up to 40 GB for $40.00 monthly. Data transfer above these thresholds is charged at $2.00 per gigabyte. Premium provides the rollover of unused traffic to the following month.
Please refer to the PortaBilling Help for detailed instructions on how to navigate and operate the web interface, along with detailed explanations of particular fields.
Configuration overview
- Initial configuration of PortaBilling
- Enable the NetAccess service type on the Configuration server
- Create a rate code
- Create services
- Create nodes
- Set up vendor:
- Define an off-peak period
- Set up customer product:
- Set up customer:
Initial configuration of PortaBilling
If you have just installed the PortaBilling software or dedicated a new billing environment to configure the services described in this handbook, make sure to first perform the initial configuration of PortaBilling. To do this, use the PortaBilling Initial Configuration handbook.
Enable the NetAccess service type on the Configuration server
- On the Configuration server web interface, go to the Configurations tab.
- Clone
the current configuration.
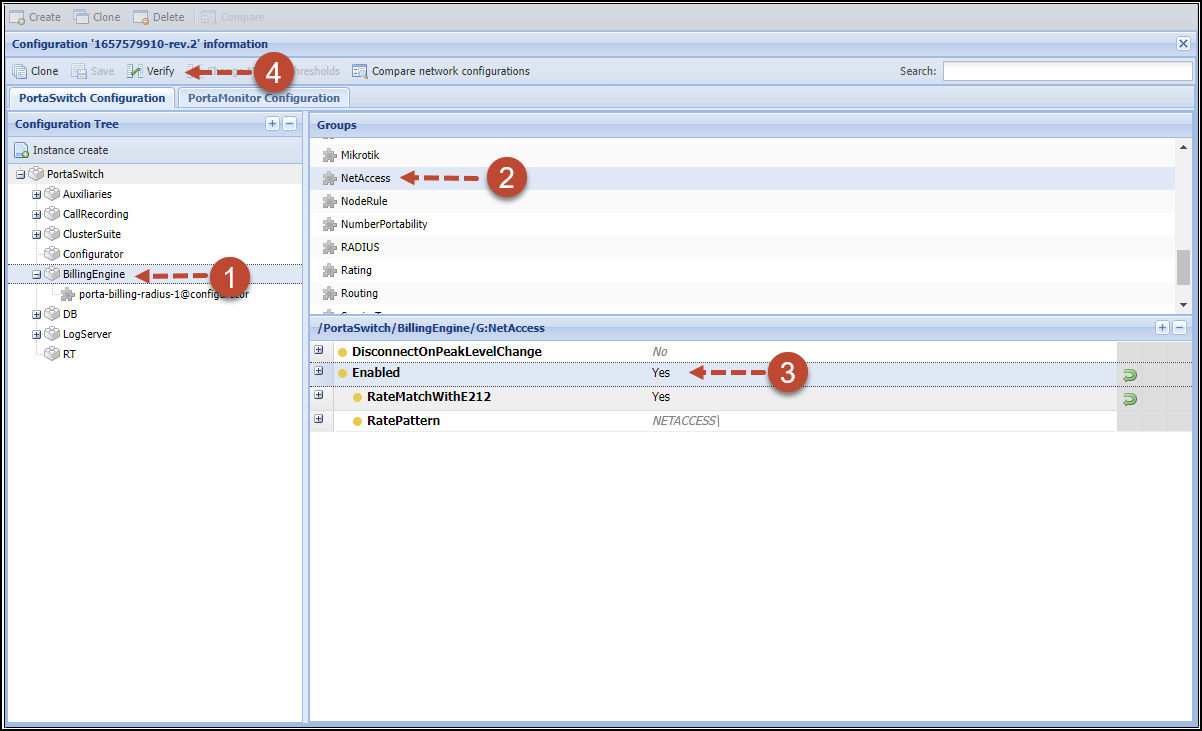
- In the Configuration Tree, click on the BillingEngine node.
- On the Groups panel, select the NetAccess group.
- For the Enabled option, select Yes.
- Click Save and then Verify.
- Verify the new configuration and click the Check/Apply button.
Create a rate code
This step is only required if you have not defined the necessary rate code previously. If not, you will need to create a symbolic NETACCESS rate code.
- Go to Service catalog > Rate codes.
- Click Add and fill in the rate code information:
- Format – select Custom from the list.
- Prefix – type in NETACCESS.
- Description
– enter useful information about the service being provided (e.g., Internet
access), since this is what your clients will see on their xDR Summary
pages.

- Click Save.
Create services
Services provide a way to define how charges are calculated (e.g., whether customers are charged based on the time they stay online, or the amount of data transferred) and how these are then presented on their invoices.
- In the navigation menu, select Services, then click + Service.
- Open the Create service panel.
- Fill
in the required information:
- Name – a short descriptive name for this service, it will be used in select menus and shown on customer self-care pages (e.g., Internet access)
- Type – select Internet access.
- Rating base – select upload+download (megabytes).
- Base unit – select megabyte.
- Billing unit – select gigabyte. This will be shown on statistics pages and on invoices.
- Base ratio – 1024.
- Usage
charge – select Yes here.

- Click Save.
Create nodes
This step is only required if you have not previously entered your NAS into the system. In this case, you must enter your NAS as a node. PortaBilling requires some key information about your network equipment such as IP address, Node ID, Radius shared secret, etc.
- In the navigation menu, select Infrastructure > Nodes and click Add.
- On
the Create node panel, fill in the node details:
- Name – a short descriptive name for this node (e.g., Cisco NAS)
- Node ID – cisco NAS host name (recommended hostname.domainname).
- IP – the IP address of the node.
- Manufacturer – select Cisco.
- Type
– select NAS.

- Click Save.
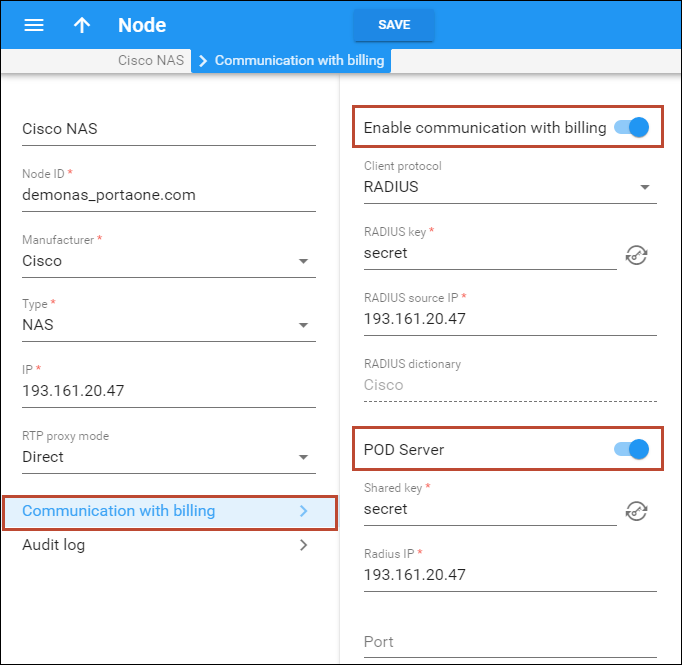
- On
the Communication with billing section use
the slider to enable Communication with billing option and
fill in the node details:
- Client protocol – select RADIUS to enable the NAS (node) to communicate with PortaBilling via RADIUS.
- RADIUS key – enter the RADIUS secret key you specified in the configuration of the NAS.
- RADIUS source IP – see the Node ID, IP and Radius source IP section of the PortaBilling Administrator Guide. Unless your NAS has multiple network interfaces, the value here will be the same as the IP.
- POD
Server – use the slider to enable
interaction with this server on NAS. The system will send a special command
to this server if an account runs out of balance, exceeds its data transfer
limit, or expires. The POD server will then terminate the internet session(s)
opened by this account.
- Click Save.
- Repeat steps 2–5 until all of your nodes are entered.
Create a vendor tariff
This step is only required if you have not entered vendor information into the system before.
The tariff is a single price list for the use of internet access services. To successfully provide internet access services, a tariff with corresponding data costs should be created; this tariff is created as “Applied to: Vendor.”
To create the required tariff, follow the next steps:
- In the navigation menu on the left, select Service catalog > Tariffs and click + Tariff.
- On the Add tariff panel, fill in the tariff details:
- Name – a short name for the tariff object (e.g., Internet access); this is the name you will see in select menus.
- Currency
– choose the currency in which the vendor charges you.
The currency for the tariff may be chosen only once, and cannot be changed later.
- Service – select the services you created earlier (in our example Network access).
- Applied to – choose Vendor in the Applied to list.
- Define prices – set per individual rate code.
- Code group set – select None.

- Click Save.
Enter rates
- Open the vendor tariff "Internet Access," navigate to Rates, and click + Rate.
- On the Add rate panel, fill in the rate details:
- Rate code – type in the ‘|’ (pipe) rate code.
- Rating mode – select Flat rate.
- Rounding – leave the default “1” value for this example. See more info on the Rounding option in the UI help.
- Unit price – price per billing unit (in this example, per gigabyte). If you don’t intend to calculate costs, specify zero “0” rate for this vendor tariff.

- Click Save.
Create a vendor
This step is only required if you have not entered information about your vendors into the system before.
- In the navigation menu, select Infrastructure > Vendors and click Add.
- On
the Create vendor panel, fill in the vendor details:
- Name – type a short name for the vendor object (for example, Internet Access).
- Currency – leave the base currency.
- For Opening balance and Billing
period fields, leave the default values since this symbolic vendor
is created only so that the system functions properly.

- Click Save.
Define a connection
- On your vendor’s panel (Internet Access), click Connections.
- On
the Create connection panel, fill in the connection details:
- Description – type in a short description for this connection.
- Service type – select Internet access.
- Tariff – select the vendor tariff you created earlier.
- Node – select the Cisco NAS which you previously added as a node.
- Capacity
– in the Capacity field specify the maximum number of sessions
you anticipate handling on this NAS in the near future. This parameter
is only used for correctly scaling the load graph for the connection.

- Click Save.
Define an off-peak period
You need to define an off-peak period for the Pro package. Please refer to the Creating a Service with Multiple Off-Peak Periods handbook for detailed instructions on how to define peak and off-peak periods.
Create customer tariffs
In our example, we need to create two customer tariffs:
- a joint tariff for the Start and Pro packages with a zero price per GB;
- a tariff for the Premium package with a $2 price per GB.
To create the required tariffs, follow the next steps:
- In the navigation menu, select Service catalog > Tariffs and click + Tariff.
- On the Add tariff panel, fill in the tariff details:
- Name – type in a short name for the tariff object; this is the name you will see in the select menus.
- Currency – select the currency in which you will charge your customers.
The currency for the tariff is chosen only once, and cannot be changed later.
- Service – select the service you created earlier (in our example, Internet access).
- Applied to – select Customer as this tariff will be used to charge your customers.
- Managed by – select Administrator only here.
- Define prices – set per individual rate code.
- Code group set – select None.

- Click Save.
- Open the tariff and navigate to General configuration > General info.
- Select the Default off-peak period
that you created within the previous step. This off-peak period will be applied to Pro subscribers.

- Click Save.
Repeat steps 1–3 for the Premium tariff.
Enter rates
- Open the customer tariff > Rates and click + Rate.
- On the Add rate panel, fill in the rate details:
- Rate code – type in the NETACCESS rate code directly or select it from the list.
The NETACCESS rate code you are creating a rate for must already exist in Rate code registry.
- Rating mode – select Flat rate.
- Rounding – leave the default “1” value for this example. See more info on the Rounding option in the UI help.
- Unit price – the price per billing unit (in our example, per gigabyte). Leave a zero price for the Start + Pro tariff. Charge your internet users who subscribe to the Premium package $2.00 per gigabyte for data transfer above the thresholds.


- Rate code – type in the NETACCESS rate code directly or select it from the list.
- Click Save.
Create subscriptions
Subscriptions allow you to charge a certain periodic fee to accounts that belong to a certain product. Below we will show you how to create a monthly $15.00 subscription and apply it to a product. You will also need to create $30.00 and $40.00 monthly subscriptions and apply them to their corresponding products.
To create a subscription plan, follow these steps:
- In the navigation menu, select Service catalog > Subscriptions and click + Subscription plan.
- On the Add subscription plan panel, fill in the required information:
- General tab:
- Name – name of the subscription plan that will be used on the Admin interface.
- Name visible to end users – provide the name of the subscription plan that your customers will see on their self-care interfaces and invoices.
- Currency – indicates which currency is used for pricing information. A subscription
plan can only be applied to a product, account or customer using this
same currency.
The currency for the subscription plan may only be chosen once and cannot be changed later.
- Managed by – if you want this subscription plan to be used for your reseller’s accounts so the reseller himself can change the parameters of the plan and apply it to his accounts, choose a customer name from the menu. Otherwise, choose Administrator only here.
- Activation mode – defines when the subscription will be considered active (and charges begin to apply): either from the date it is entered into the system or it can be postponed until the actual date of the customer’s first usage of the account.
- Subscription charges applied – the default method is At the end of the billing period, so that subscription charges are applied to the account/customer balance when the billing period closes. Another option is Progressively, wherein a small portion of the total subscription fee is applied daily, so that the balance grows gradually. You can also choose to apply charges In advance.
- Can be applied more than
once –
select this checkbox to assign the same subscription multiple times to
one account. You can only use this option when you are adding a new subscription
plan. For new subscriptions, the Can
be applied more than once option is off by default (so that
subscription charges are not applied multiple times for the same account).

- The Fee tab:
- Activation fee – enter the value charged for every new subscription upon startup.
- Activation tax transaction code – specify the internal tax transaction code from the list. PortaBilling will use this code to extract taxation codes for Avalara, GST or SureTax taxation plug-ins and send them for tax processing for services covered by a subscription activation fee.
- Monthly fee – specify the fee value that will be applied to your customers every month.
- Prorate
fee for the partial billing period – when a customer signs up for/cancels
a subscription in the middle of a billing period, you can charge either
a prorated or full periodic fee. By default, customers are charged a prorated
fee based on the number of days the subscription is active during the
first/last partial billing period.
- First billing period – select the checkbox to charge a prorated fee for the first billing period. Clear the checkbox to charge customers a full periodic fee, no matter when they activate their subscription.
- Last
billing period – select the checkbox to charge a prorated fee for
the last billing period. Clear the checkbox to charge customers a full
periodic fee, no matter when they cancel their subscription.
If you set up the non-prorated (full) fee, credits may still be issued for the days when a customer cannot use the service due to service suspension, block, having exceeded credit limit, etc. (credits are issued according to the Issue credits for the days when and Skip credits, charge in full options configuration).
- Usage tax transaction code – specify the internal tax transaction code from the list. PortaBilling will use this code to extract taxation codes for Avalara, GST or SureTax taxation plug-ins and send them for tax processing for services covered by the periodic subscription fees.
- Minimum subscription period – time (in months) during which the customer must keep the subscription plan active in order to avoid penalties. Leave this field empty to create a subscription plan that can be closed at any time.
- Early
cancellation penalty – if the subscription
is cancelled earlier than the minimum subscription period, a one-time
fee is applied. The following options are available:
- Fixed – a fixed charge is applied without taking account of when the subscription was cancelled.
- Remaining subscription charges – the charge will depend on when the subscription was cancelled.
- Cancellation
tax transaction code – specify the internal tax transaction code from
the list. PortaBilling will use this code to extract taxation codes for
Avalara, GST or SureTax taxation plug-ins and send them for tax
processing for services covered by the subscription cancellation fee (e.g.,
administrative costs).

- General tab:
- Click Save.
- Open the created Subscription plan > Configuration.
- On the General configuration tab, you can additionally configure the following options:
- Issue credits for the days when – here you can choose under which conditions to issue credits for a subscription fee. Customers may not have access to the service due to suspension, block, account expiration, or lack of funds. To exclude charges for the days when no service was provided, a subscription fee is charged in full and then credits are issued for the days when no service was available. By default, credits for a subscription fee are issued under all conditions: the account was expired, the account or customer was blocked, the customer was suspended, or no funds were available (the balance of a customer or an individual account reached the credit limit or ran out of available funds). Clear the checkboxes if you want to charge the subscription fee for these days.
- Skip credits, charge in full – when one or several conditions are set to issue credits for a subscription fee, you can skip credits for the first, last, or/and regular billing periods by selecting the corresponding checkbox.
- Description
– you can specify an extended description of this subscription plan.

- Click Save.
- Repeat the above procedure for all your subscriptions.
Create a code group set
To set up a bundle for your internet service, you need to create a code group set.
- In the navigation menu on the left, select Service catalog > Code group sets.
- Click Add and fill in the required information:
- Name – type in a descriptive name for the code group set (e.g., Internet Access);
- Type – leave the default type Regular.

- Click Save.
Define a code group
Now you need to create one code group.
- Open the created Code group set and click Add
- Type in the code group name and, optionally, provide a short description.

- Click Save.
Assign a prefix to code group
- On the Code group page, click All rate codes.
- On the Rate code search panel, specify the parameters (e.g., format, prefix) to find the required rate code in the list and click Apply filters.

- Select the prefix you want to include (e.g., NETACCESS) in the code group and click Assign to group.
- Select the code group (Internet Access) and click Assign. The selected prefixes will be added automatically to the code group.

Create bundles
We need to create three Renewable by calendar bundles to provide a certain service volume for each package.
- In the navigation menu on the left, select Service catalog > Bundles.
- Click Add and fill in the bundle details:
- Name – a short descriptive name for this bundle (e.g., Start Bundle, Pro Bundle, Premium Bundle).
- Currency
– select the currency in which you charge your customers.
The currency for the bundle may be chosen only once (at creation) and cannot be changed later
- Code group set – choose the code group set you created in the previous steps, Internet access.
- Bundle type – select Renewable by calendar.
- Managed by – leave Administrator only here.
- Apply bundle if a rate code is found that – leave the default option Matches the rate exactly.
- Description
– specify an extended bundle description.

- Click Save&Add copy.
- Repeat steps 1–3 to create bundles for Pro and Premium packages.
Define service volumes within a bundle
Start package
- Open the “Start Bundle” bundle and go to Bundle items panel.
- Click Add and fill in the bundle item details:
- Service – select Internet access here.
- Code group – select the configured code group, Internet Access.
- Measured as – select Service used, gigabyte.
- Service volume – specify 1.

- Click Save&Edit details.
- Go to the Configuration panel and set the If the volume is used up option to Block the service. When the allocated service volume is depleted, the Internet service becomes unavailable until the following day:

- Click Save.
Pro package
- Open the “Pro Bundle” bundle and go to the Bundle items panel.
- Click Add and fill in the bundle item details:
- Service – select Internet access.
- Code group – select the configured code group Internet Access.
- Measured as – select Service used, gigabyte.
- Service volume – specify 20.

- Click Save&Edit details.
- Go to the Configuration panel and set the If the volume is used up option to Limited. This makes it possible to reduce the speed of Internet traffic once the service volume is used up.

- Go to
the Service volume panel and mark Use separate thresholds for the first off-peak period checkbox. Specify the 30 GB threshold value for the first off-peak period.

- Open the Notifications panel and specify the following:
- Remaining peak period volume drops below – specify 2, to send a notification when a customer uses 18 out of 20 GB of their service volume.
- Turn on the Peak period volume is depleted toggle to notify a customer when the service volume is depleted.
- Remaining off-peak period volume drops below – specify 2, to send a notification when a customer uses 28 out of 30 GB of their service volume.

- Click Save.
- Open the “Premium Bundle” bundle and go to Bundle items panel.
- Click Add and fill in the bundle item details:
- Service – select Internet access.
- Code group – select the configured code group Internet Access.
- Measured as – select Service used, gigabyte.
- Service volume – specify 40.

- Click Save&Edit details.
- Go to the Configuration panel, configure
the following:
- Allowed number of rollovers – select 1. This means that if there is unused traffic at the end of the month, it will be rolled over to the second usage period. The remaining service volume not fully used by the end of the second month will be lost.
- If the volume is used up – select Provide the service as usual. When the service volume is depleted, the Internet speed remains the same, and the user is charged according to the pay-as-you-go rate.
- Prorate
thresholds for first usage period – select Common prorating to prorate service volume thresholds according to the number of days remaining in the first usage period after bundle assignment.

- Click Save.
Create a service policy
An internet access policy allows you to restrict the amount of available bandwidth or prohibit Internet access based on a specific time of day or day of the week. For example, you may allow Internet access only at night and for 24hrs during the weekend and/or restrict the bandwidth for data transfer to 1 Mbps.
- In the navigation menu, select Service catalog > Service policies and click + Policy.
- On the Add policy panel, fill in the details:
- General tab:
- Service – select Internet access.
- Name – a short descriptive name for this Service policy. Type in Pro here.
- Managed by – select Administrator only.
- Hotlining – select when users will be redirected to a hotline portal: if account is out of funds or/and if account is suspended or blocked. Specify the hotline portal address in the Captive
portal (Hotline URL) field.

- Attributes tab:
- Adjust your service provisioning based on the specifics of your gateway (Cisco-NAS in our example) and specify the default
values for the Radius response attribute:
enable RADIUS response on Cisco NAS panel and click Set default.
If you use different network equipment to provide Internet service which supports authorization via the RADIUS protocol, be sure to configure the default radius response values for it.

- Adjust your service provisioning based on the specifics of your gateway (Cisco-NAS in our example) and specify the default
values for the Radius response attribute:
enable RADIUS response on Cisco NAS panel and click Set default.
- Access policy tab:
- Fill in the download and upload rates for all access types:
- Regular – a regular bandwidth rate that is used most of the time. In our example, the Download Rate for the Pro package is 256 kbps, the Upload Rate is 1 Mbps.
- Turbo – this defines a bandwidth rate for off-peak times. In our example, the values for this row are the same as for the Regular access type.
- Limited – this usually restricts the bandwidth to an extremely low value, so that the customer can only access the Internet for checking his bill, making a payment, etc. Let’s specify 64 kbps here for the Download Rate and 64 kbps for the Upload Rate.
- Blocked – this access type prohibits Internet access (this rate cannot be changed).
Configure the access type of usage on the grid that shows all of the week’s hours. Simply click several times on a cell within the grid to set a certain access type for that particular hour.

- Fill in the download and upload rates for all access types:
- General tab:
- Click Save.
- Repeat steps 1–8 for the Start and Premium packages.
Create a product
Accounts for accessing your services will be issued for a specific product. Products are a powerful tool that defines different ways to bill an account. Product definition is always realized through these steps: product definition, service definition and configuration and creation of a rating list.
In this case, you need to create three products:
- Start
- Pro, and
- Premium.
- In the navigation menu, select Service catalog and click Products.
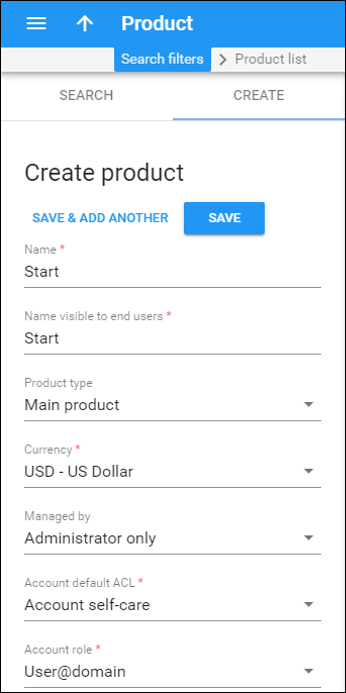
- On the Create product panel,
fill in the product details:
- Name – type in a short name for the product object; this is the name you will then see in the select menus.
- Name visible to end users – specify the name of this product that your customers will see on their self-care interface.
- Product type – select Main product here.
- Currency – choose a currency the product will be priced in.
- Managed by – select Administrator only here, since we are setting up a service without the involvement of resellers.
- Account default ACL – choose an Access Control List (ACL) for accounts with this product assigned. ACLs control which objects end users can access to and which actions they can perform.
- Account role – select User@domain from the list since this product is intended for accessing the Internet.
- Click Save.
Services
Define which service types are included in the product. A service type is a description of the physical service provided to end users.
To add a service type:
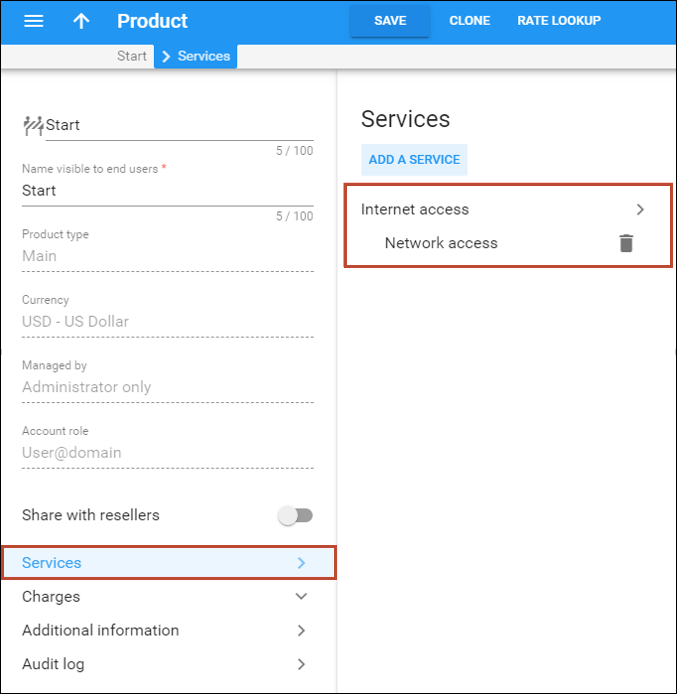
- On your product’s panel, click Services.
- On the Services panel, click Add a service.
- In
the Select services to add dialog box, select Network access
and click Add.
Service configuration
Define the default values of the service attributes for all the accounts that this product will be assigned to.
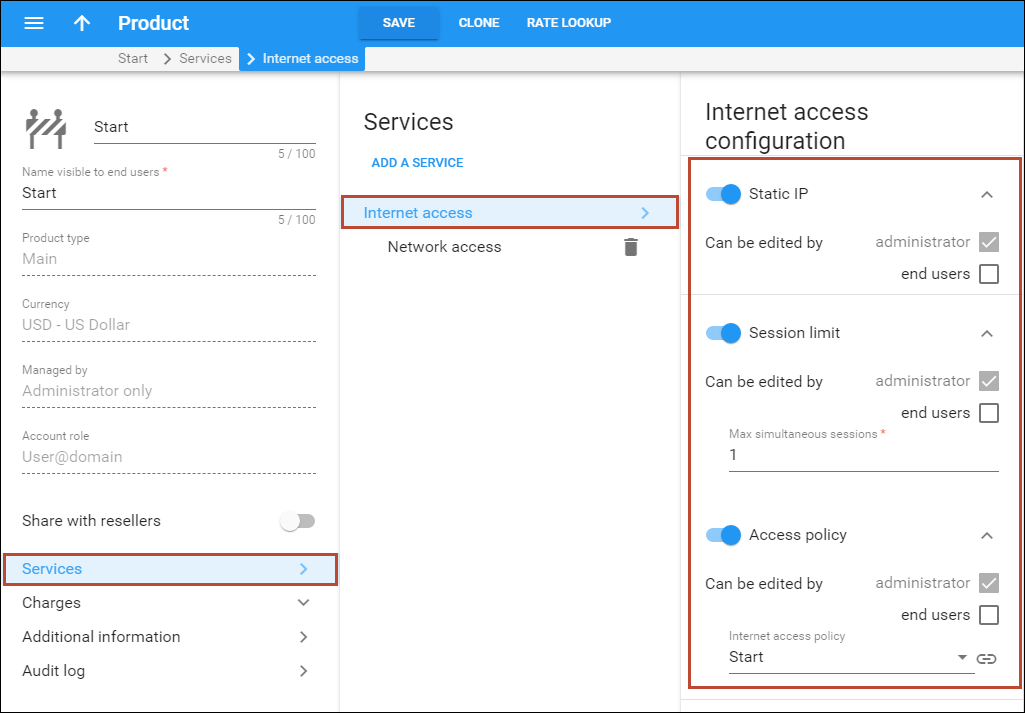
- Go
to the Internet access configuration page and configure the following:
- Static IP – use a slider to enable the option to assign a static IP to the account.
- Session limit – use a slider to enable the option to define a specific number of simultaneous sessions.
- Access policy – use a slider to enable the option to define an Internet access policy and set different bandwidths for different times of day.
- Internet access policy –
select the access policy you created earlier(e.g.,
Start).
Usage charges
The rating list has two functions: it defines permitted access points (nodes and access numbers) and specifies which tariff should be used for billing in each of these points.
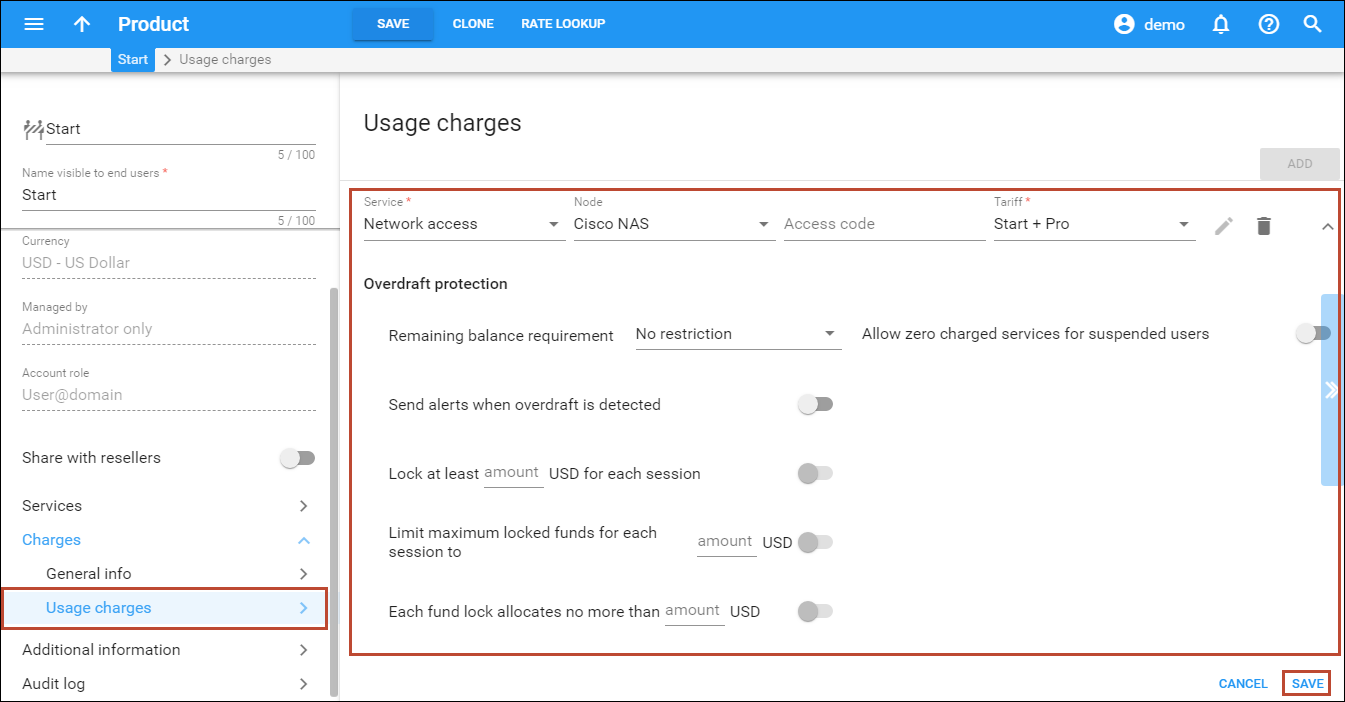
- On your product’s panel, click Charges, then click Usage charges.
- On the Usage charges panel, click Add.
- Fill
in the required information:
- Service – select Network access.
- Node – select the Cisco NAS node.
- Access code – leave this field empty.
- Tariff – select the tariff that applies to your customers when they use the Internet service.
- Overdraft protection – to configure overdraft protection for this product, consult the Configure Overdraft Protection Section within the Product section in the Overdraft Protection Configuration handbook.
- Click
Save.
Charges
On the General info panel, you can define special pricing such as bundles, regular payments such as subscriptions and also set up overdraft protection.
- To
access this panel, click Charges on your product’s panel, then
click General info.
Overdraft protection
Link copied to clipboard- Use the slider to turn on/off overdraft protection. For obvious reasons, turning off overdraft protection is not recommended for general use.
Default bundle
Link copied to clipboard- Default bundle – select the bundle to be associated with the Start package (Start Quota in our example). For the other two packages, select the corresponding bundles.
Subscription
Link copied to clipboard- Subscriptions
– this panel allows you to choose a subscription plan for the product.
This subscription plan is then automatically applied to every account
with this product assigned. Select the corresponding subscription plan
from the list of subscription plans (Internet Access Start in our
example).

- Click Save.
Create a customer class
A customer class provides the ability to define the business model and a group of parameters centrally, and then apply those parameters to many customers simultaneously.
- In the navigation menu, select Sales > Customer classes and click Add.
- On
the Create a customer class panel, fill in the customer class details:
- Name – type a short name for this customer class.
- Business model – select which customers this customer class will apply. Select Internet access from the list.
- Currency – specify in which currency you charge the customers of this customer class. When specified, this customer class can only be assigned to customers with the same currency. Note that you can define the currency only when you create the customer class and can't change it later.
- Managed
by – select Administrator only.

- Click Save.
- Open the created customer class and navigate to Finances > General info.
- Fill in general information about the customer class:
- Close the billing period – select the globally defined delay (e.g., 6 hours) or specify a custom delay.
- Configure the Periodic xDR export parameters.
- Configure the Status change parameters.
Click
 Help for a description of the parameters available here.
- Navigate to Finances > Invoicing > Regular invoices.
- On the Regular invoices panel, specify the invoicing parameters for the customer class:
- Invoice template – select the appropriate template which will be used to create invoice .pdf files for your customers (e.g., Internet Access invoice template).
- Generate invoice pdf – leave the default option At the end of billing period.
- Send invoices via email – select Automatically to automatically send an invoice to a customer at the end of a billing period.
Click
Help for a description of the parameters available here.
- On the Invoicing panel, click Out-of-turn invoices and specify the invoicing parameters for the customer class as described in the previous step.
- On the customer class panel, navigate to Finances > Taxation.
- On the Taxation panel, select one of the available taxation methods and specify the taxation parameters for it. Click
 Help for a description of the parameters available here.

- Click Save.
Create a customer
A customer is an owner of accounts. The customer’s contact information is used to distribute account usage information, internet access statistics, invoices, and so on. You will usually need to create one customer for each postpaid broadband user.
- In the navigation menu, select Sales > Customers and click + Customer.
- On the Add customer panel, fill in the customer details:
- Balance control – specify the way the customer will pay for the service: Postpaid – after consuming the services; Prepaid – prior to consuming the services. Select Postpaid.
- Name – type a short name for the customer object; this will be used on the web interface.
- Currency – choose the currency in which this customer will be billed.
- Credit limit – assign a credit limit for the customer.
- Business model – a business model defines what type of service is to be provided to the customer. Select Internet access for this customer.
- Customer class – customer class allows you to define a policy for automated payment collection. By choosing a specific class here the customer will automatically inherit all of the class properties (grace period, invoice template, etc.). Select the previously created customer class.
- Billing period – choose a billing period for the customer. A billing period defines the frequency of invoicing for this customer.
- Billing
period time zone – choose a time zone in which customer’s billing
period will be closed and invoices will be generated.

- Click Save.
Create accounts
- On your customer’s panel, navigate to Accounts / DIDs and click + Account.
- On the Add account panel, specify the account details:
- General tab:
- Type – select Credit for your postpaid internet users.
- Account role – select User@domain.
- ID – this is the ID that will be used to authorize a user for Internet access. Specify the user’s email address (e.g., johndoe@gmail.com)
- Service password – the account ID and this password are used to authenticate Internet users. Make sure you choose a password that is difficult to guess or crack. Use the Auto button next to the Service password field to generate a secure password.
- Balance
control – select Subordinate from the list.
 TIP:
You may use the MAC address of the user’s device as an account ID (e.g.,
when provisioning Internet access via MAC bridges). To do this, make sure
to select Universal from the Account role list both during
product configuration and during account creation.
TIP:
You may use the MAC address of the user’s device as an account ID (e.g.,
when provisioning Internet access via MAC bridges). To do this, make sure
to select Universal from the Account role list both during
product configuration and during account creation. - Activation
date
– the date from which the account is usable.

- Products tab:
- Product – select the main product that you want this account to have (e.g., Start).

- Product – select the main product that you want this account to have (e.g., Start).
- General tab:
- Click Save.
- On the Account page, navigate to Internet access.
- On
the General tab, configure the following parameters:
- Static IP – turn on the toggle to enable the parameter if you want to assign a static IP to this account (the default setting is Disabled).
- Static IP – if you have Enabled for the previous field, type in an IP.
- Static IP netmask – type in a netmask (e.g., 255.255.255.0).
- Routed networks – leave the field empty or type in the route for your IPv4
network in the CIDR notation format – X.X.X.X/Y Z.Z.Z.Z where:
- X.X.X.X is the IPv4 address that defines the network prefix;
- Y is the decimal length of the network prefix mask;
- Z.Z.Z.Z
is the gateway IP address; it must belong to the network range.
Any incorrect adjustment of the last parameter may affect the entire ISP network so please be sure that your settings are correct.

- Click Save.
- Repeat steps 1–3 to create more accounts for the customer. For instance, a company to which you supply broadband services may have several internet users.
Check current bundle statistics for account
- On your customer’s panel, click Accounts.
- Perform an account search and, when the required account is displayed, click on the account ID.
- On
the Account page, click Services and select Bundles.

Verify broadband event history for account
You can view transaction records (xDRs) for your account subscribers on their respective xDR History pages. To check how much time they have spent on the Internet or how much data they have uploaded/downloaded, go to their Service Usage Details pages. Account subscribers can do the same by visiting their self-care interfaces.
Viewing xDR history
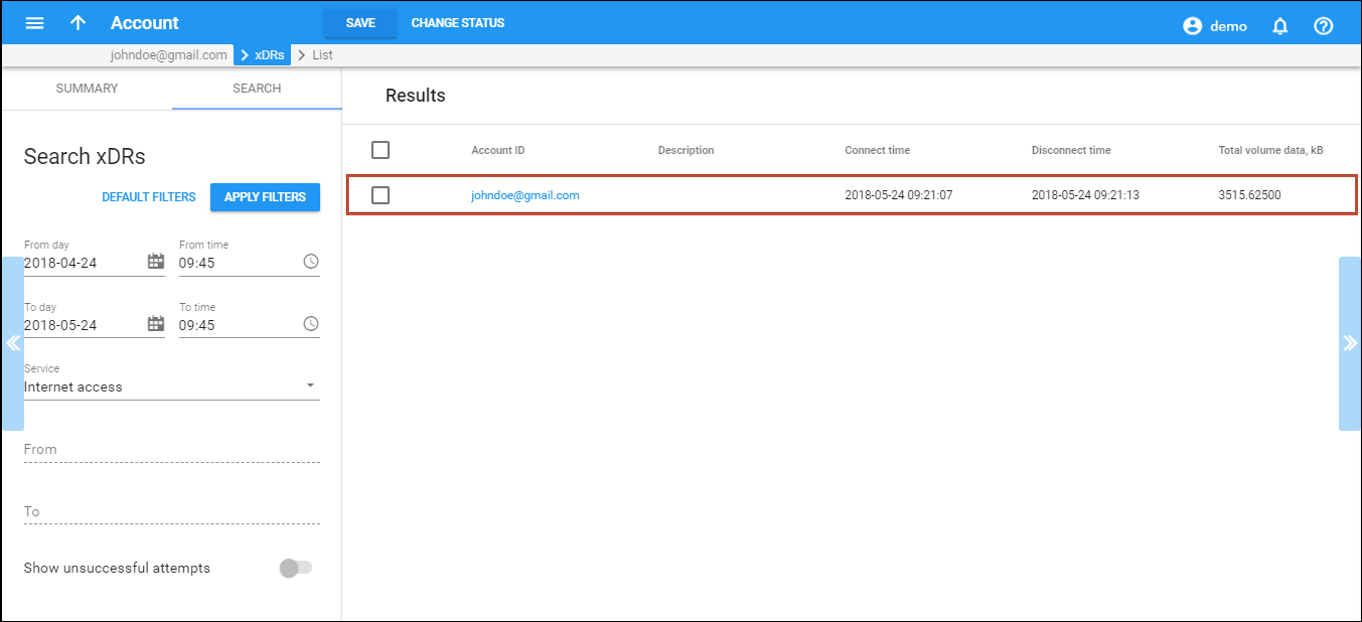
To view an account’s xDRs, go to the Account page and click the xDRs button. On the Search panel choose the date range, select the service (Network access) and click Apply filters.
 You can also
go to the account self-care page (accessible via the Accounts menu item
in the Home popup menu).
You can also
go to the account self-care page (accessible via the Accounts menu item
in the Home popup menu).
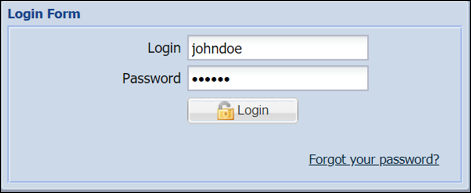
Log in with the account’s web access login and password. After that, you will be able to see the account’s dashboard interface.
In the Billing Information tab, click Transactions. Choose the date range that you want to see a list of access to the internet instances and click Show Records.
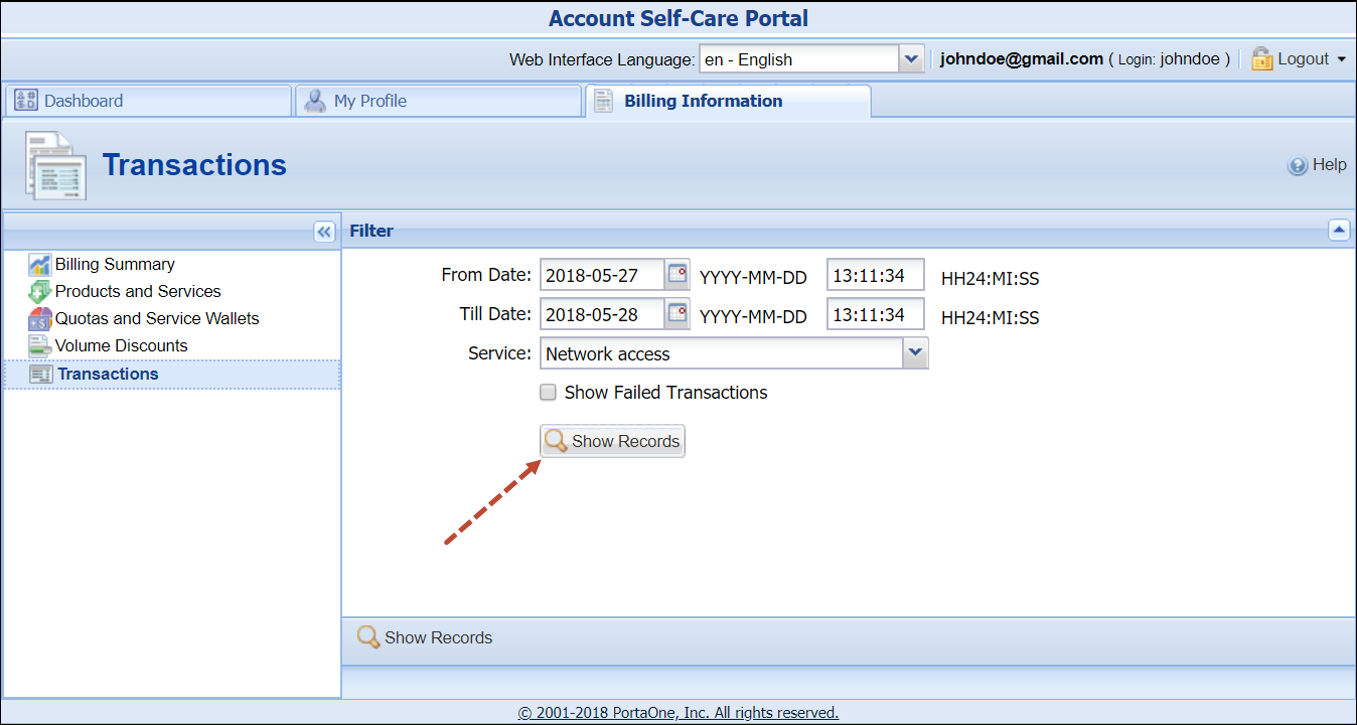
In the results table you will see charges and other fees, such as maintenance fees or refunds (if any). The report can be downloaded by clicking the Download button.
Viewing service usage
While on Search panel choose the date range,
select the service (Network access) and click Apply filters.
Go to the Results panel, select the xDR and click the  Details icon.
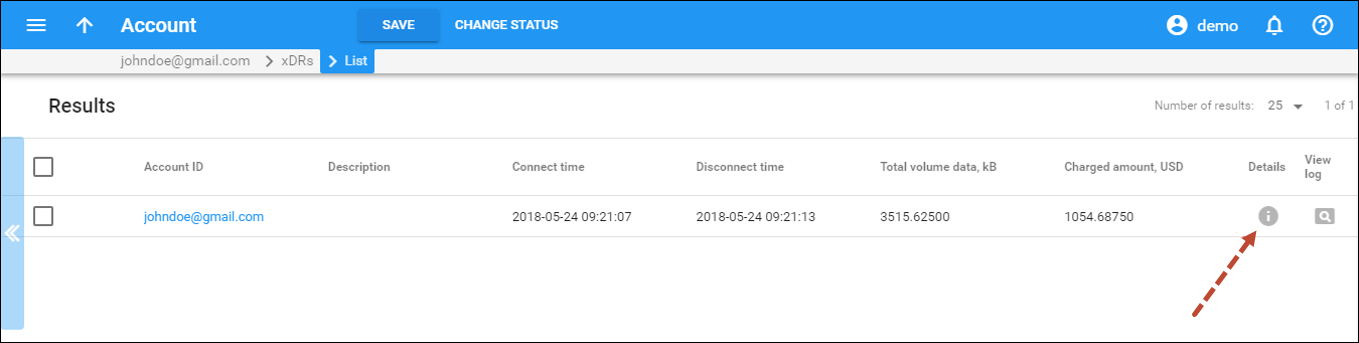
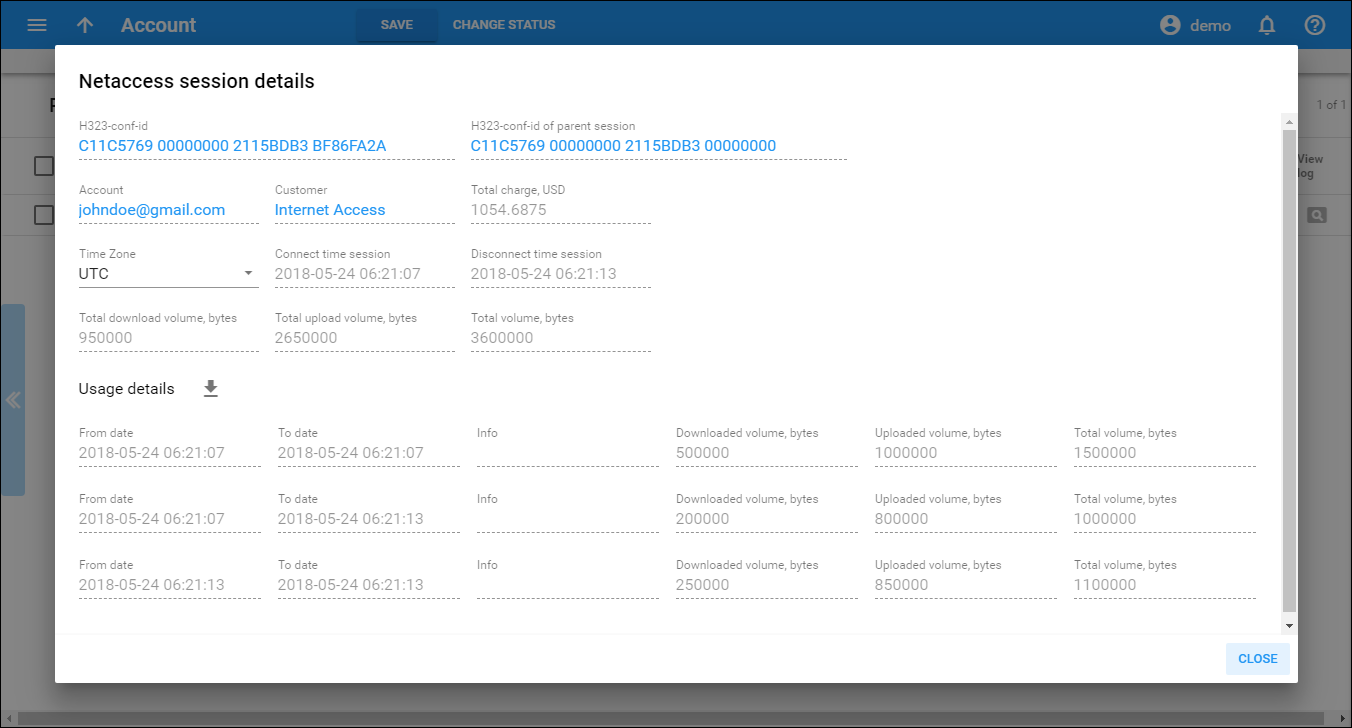
On the Netaccess session details page that opens, you can view the account’s statistics for chosen service type: