



This chapter demonstrates how to set up SIP trunking for PBX capable of digest authentication so that:
- A call to one of the DIDs that the customer has purchased is processed by PortaSwitch and routed to the customer’s external PBX.
- Outgoing calls from the customer’s PBX are processed and routed by PortaSwitch to carriers.
Please refer to the Cloud PBX (hosted PBX) solution section for information on how to activate and use the PBX / hosted PBX features available in PortaSwitch.
Checklist
Use this checklist to check off the operations you have completed while performing the system setup according to the instructions in this chapter. Please be sure to perform all of the operations in the order designated (all of the boxes should be checked), otherwise, the service will not work.
|
Operation |
Done |
|
Rating configuration (Vendor) |
|
|
Confirm that the DID supplier vendor and its “Calls from Vendor via SIP” connection has been configured according to the instructions in the Incoming calls from DID provider (manual configuration) section |
|
|
Confirm that the internal vendor and its “Calls to vendor via SIP” connection has been configured according to the instructions in the PortaBilling initial configuration section. Check if the Internal connection use for field contains the “SIP-to-External SIP proxy (SIP-URI)” string for this vendor. Check if the tariff assigned has a zero cost rate for the wildcard rate code (|). If you need to configure the internal vendor rating perform the following steps: Create a tariff (referred to as tariff A later on) that describes your termination costs for calls forwarded to SIP-URI (make sure it is NOT a Routing type!) |
|
|
Enter a zero cost rate for the wildcard rate code (|) in tariff A |
|
|
Create an internal (virtual) vendor for keeping track of calls forwarded to SIP-URI |
|
|
Create a “Calls to vendor via SIP” connection with the Internal connection use for field contains the “SIP-to-External SIP proxy (SIP-URI)” for this vendor using tariff A |
|
|
Rating configuration (Customer) |
|
|
Create a tariff (referred to as tariff B later on) that will be used to calculate the charges for outgoing calls from customer’s PBX |
|
|
Enter rates in tariff B that cover the destinations where your customers can call |
|
|
Create a tariff (referred to as tariff C later on) that will be used to calculate the charges for incoming calls to DIDs |
|
|
Enter rates in tariff C that cover the DIDs you offer to your customers |
|
|
Create your SIP trunking product |
|
|
Create a rating entry for this product that associates the service Voice сalls and tariff B with the PortaSIP Node and OUTGOING Access code |
|
|
Create a rating entry for this product that associates the service Voice сalls and tariff C with PortaSIP Node and INCOMING Access code |
|
|
Account provisioning |
|
|
Create a retail customer who will represent the PBX owner |
|
|
Create an account that will be used to authorize outgoing calls from PBX |
|
|
Create accounts for incoming DIDs (depending on PBX capabilities) |
|
|
Testing |
|
|
Provision the PBX to place outgoing calls via PortaSwitch |
|
|
Provision the PBX to receive incoming calls via PortaSwitch |
|
|
Check the parameters (SIP proxy address and port and optionally, account ID and password) in the BPX and then make a test call |
Initial configuration of PortaBilling
If you have just installed the PortaBilling software or dedicated a new billing environment to configure the services described in this handbook, make sure to first perform the initial configuration of PortaBilling and configure incoming calls from PSTN. To do this, use the PortaBilling initial configuration and Incoming calls from DID provider (manual configuration) handbooks.
Create customer tariffs
You should create two separate tariffs for your PBX customer. These tariffs will be used for charging outgoing and incoming calls.
Follow these steps to create customer tariffs:
- On the navigation menu, select Service catalog and click Tariffs.
- Click + Tariff and fill in the tariff details:
- Name – type a short name for the tariff object; this is the name you will see in the select menus.
- Currency – this indicates the currency in which you charge your customers.
The currency for the tariff is chosen only once, and cannot be changed later.
- Service – select Voice calls.
- Applied to – select Customer as this tariff will be used to charge your customers.
- Managed by – select Administrator only here, since we are setting up a service without the involvement of resellers.
- Define prices – select Per individual rate code.

- Click Save.
Enter rates
You should specify the rates for the two separate tariffs created in the previous section:
- Rates for the first tariff (referred to as tariff B in the checklist) should cover the destinations that your customers can call. They are used to calculate the charges for outgoing calls from the customer’s PBX.
- Rates for the second tariff (referred to as tariff C in the checklist) should cover the DIDs that the customer has purchased.
If you charge the same rate for forwarded calls as you do for outgoing calls and do not charge for calls made on your own network (a very typical case), you may use tariff B for both outgoing and forwarded calls.
 Rates can be
managed online and offline. Use the section below to add rates to all
tariffs.
Rates can be
managed online and offline. Use the section below to add rates to all
tariffs.
Managing rates online
- On the navigation menu, select Service catalog and click Tariffs.
- Click the customer tariff name, which is also a link that redirects you to the edit tariff panel.
- On the customer tariff’s panel, click Rates.
- Click + Rate and fill in the rate details:
- Rate code – select a rate code from the list or type it directly, e.g., 420 for Czech Republic destination.
You must create an entry for certain phone prefixes in the Rate code register before creating a rate for them in the tariff.
- Rating mode – select the Flat rate option here. If you want to enter different rates for the peak and off-peak periods, select the Separate peak/off-peak rate option.
- Effective from – if you want this rate to take effect sometime in the future, you can either type in a date manually, or use the calendar (click on the DD-MM-YYYY link).
When using the calendar, you can specify that the date you are entering is in a different time zone than your present one. PortaBilling will then automatically adjust the time.
- First interval, seconds – type a first billing unit in seconds.
- Next interval, seconds – type the next billing unit in seconds.
- First price – type a per minute price for the first interval.
- Next price – type a per minute price for the next interval.

- Rate code – select a rate code from the list or type it directly, e.g., 420 for Czech Republic destination.
- Click Save.
- Repeat these steps to enter more rates.
Managing rates offline
You also can upload rates from a file in .csv, .xls or .xlsx format – please consult the Rate import handbook for more details.
Repeat the Create tariff and Enter rates steps to create tariffs that can be used for charging customers for incoming calls.
Create a product
Create a SIP trunking product.
- On the navigation menu, select Service catalog and click Products.
- On the Product list panel, click + Add and fill in the product details:
- Name – type an internal product name that will be shown on the administrator interface.
- Name visible to end users – type a name of the product that will be shown to end users on their self-care interfaces.
- Product type – select Main product here.
- Currency – choose a currency the product will be priced in.
- Managed by – select Administrator only here, since we are setting up a service without the involvement of resellers.
- Account default ACL – choose an Access Control List (ACL) for accounts with this product assigned. ACLs control which objects end users can access to and which actions they can perform.
- Account role – select Phone line since this product is intended for making and receiving calls.

- Click Save.
Included services
Define which service types are included in the product. A service type is a description of the physical service provided to end users.
To add a service type:
- On your product’s panel, click Services.
- On the Services panel, click Add a service.
- In the Select services to add dialog box, select Voice calls and click Add.
Please refer to the Basic residential VoIP service handbook for a detailed description of the product creation process.
Create rating entries for the SIP trunking product
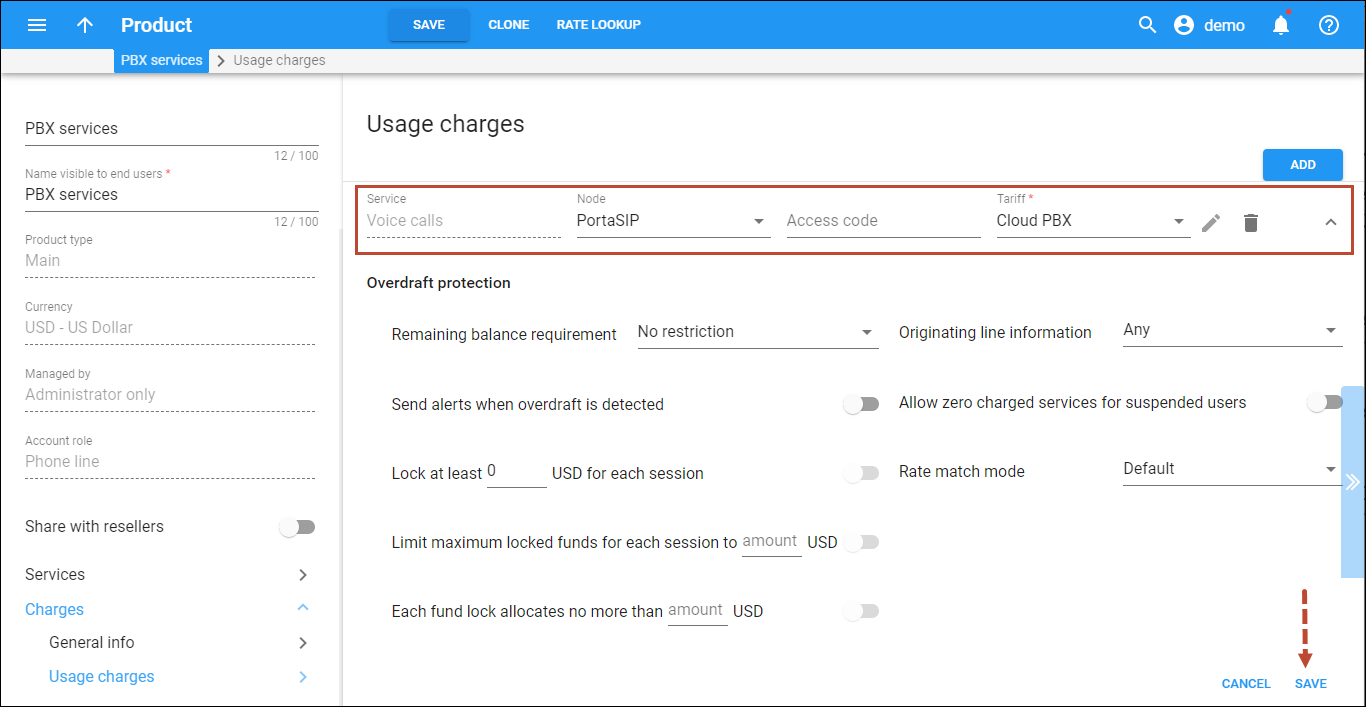
- On your product’s panel, click Charges, then click Usage charges.
- On the Usage charges panel, click Add.
- Fill in the required information:
- Service – select Voice calls.
- Node – select the PortaSIP node.
- Access code – leave this field empty for the basic SIP service.
- Tariff – choose the tariff that will be used to calculate the charges for outgoing calls.
- Overdraft protection – to configure overdraft protection for this product, consult the Configure overdraft protection section within the product section in the Overdraft protection configuration handbook.
- Click Save.
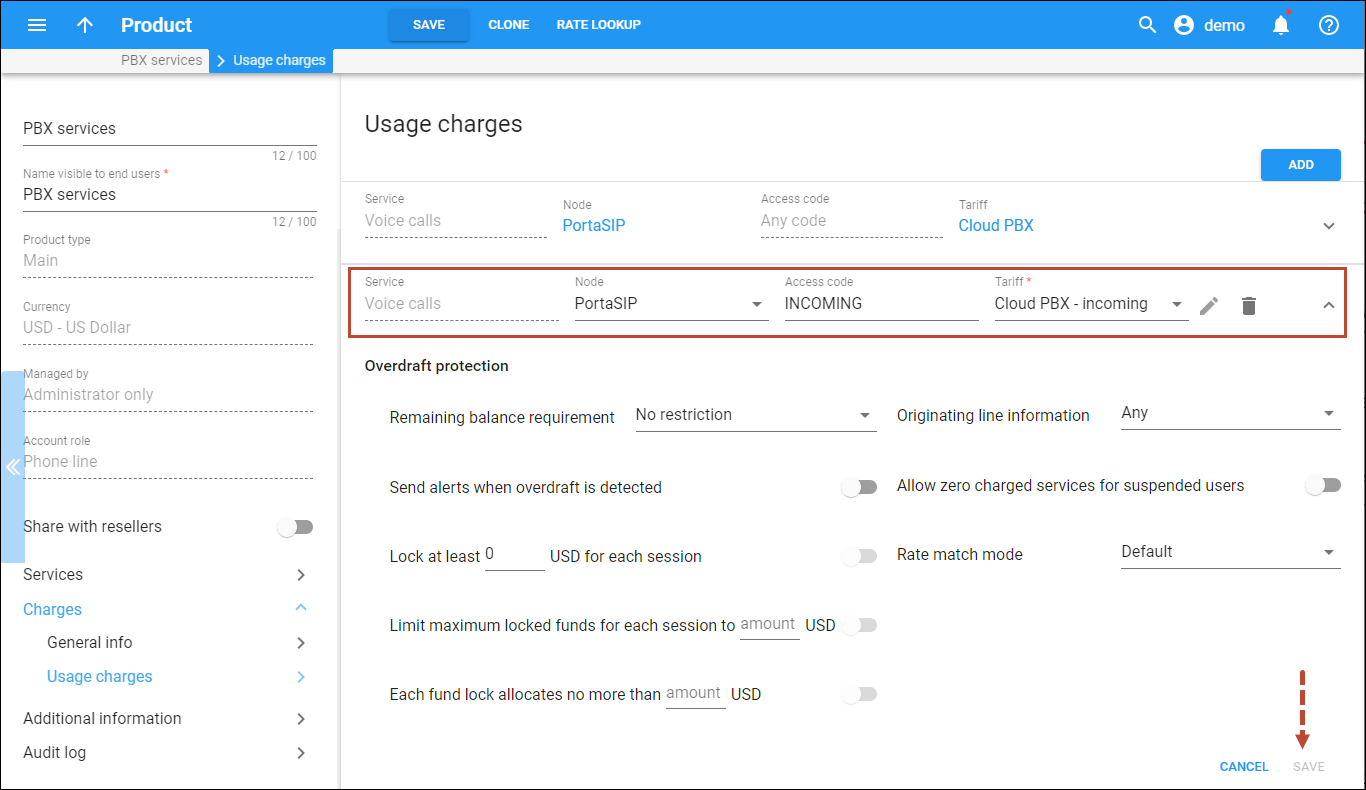
- On the Usage charges panel, click Add to add the second rating entry.
- Fill in the required information:
- Service – select Voice calls.
- Node – select the PortaSIP node.
- Access code – type INCOMING in this field.
- Tariff – choose the tariff that will be used to calculate the charges for incoming calls.
- Overdraft protection – to configure overdraft protection for this product, consult
the Configure overdraft protection section within the product section
in the Overdraft
protection configuration handbook.
- Click Save.
Create a customer class
Customer class provides the ability to define a business model and a group of parameters in a centralized way, and then apply those parameters to many customers at once.
- On the navigation menu, select Sales, then select Customer classes.
- On the Customer class list panel, click + Add and fill in the customer class details:
- Name – type a short name for this customer class.
- Business model – select which customers this customer class will apply. Select SIP trunking from the list.
- Currency – specify in which currency you charge the customers of this customer class. When specified, this customer class can only be assigned to customers with the same currency. Note that you can define the currency only when you create the customer class and can't change it later.
- Managed by – select Administrator only.

- Click Save.
Refer to the Create a customer class section of the Basic residential VoIP service handbook and complete the customer class creation.
Create a customer
- On the navigation menu, select Sales, then select Customers.
- Click + Customer and fill in the customer details in the General tab:
- Balance control – specify the way the customer will pay for the service: Postpaid – after consuming the services; Prepaid – prior to consuming the services. Select Postpaid in this field.
- Name – type a short name for the customer object; this will be used on the web interface.
- Currency – choose the currency in which this customer will be billed.
- Credit limit – assign a credit limit for the customer.
- Business model – a business model defines what type of service is to be provided to the customer. Select SIP trunking for this customer.
- Customer class – customer class allows you to define a policy for automated payment collection. By choosing a specific class here the customer will automatically inherit all of the class properties (grace period, invoice template, etc.). Select the previously created customer class.
- Billing period – choose a billing period for the customer. A billing period defines the frequency of invoicing for this customer.
- Billing period time zone – choose a time zone in which customer’s billing period will be closed and invoices will be generated.

- Click Save.
Personal info
Define the customer’s personal information (such as name, email address, and etc.).
On your customer’s panel, go to General info. In the Basic info tab, fill in the customer’s personal information and an email address for the receipt of accounting information. After the billing period is over, a list of xDRs and other statistics will be sent to this address.
Web self-care
Define credentials and preferred settings (such as language, time zone, date input and output formats) for this customer’s self-care interface.
On your customer’s panel, go to General info. In the Web self-care tab, define credentials for the customer self-care interface (such as login, password, time zone) and other preferred settings.
Credit limit
On your customer’s panel, go to Finances. In the Credit limit tab, define the Warning threshold parameter. The customer can be notified by email when his balance is dangerously close to the credit limit and service will soon be blocked. The threshold can be specified:
- As a percentage (e.g., 90%). The warning will be sent when the customer’s balance exceeds that percentage of his credit limit. So, if the credit limit is USD 1000.00 and the threshold is 90%, a warning will be sent as soon as the balance exceeds USD 900.00. This is only applicable when the customer has a positive credit limit.
- As an absolute value. The warning will be sent as soon as the balance goes above the specified value.
Invoices and taxation
Define whether to send this customer their statistics and invoices by email.
On your customer’s panel, go to Finances. In the Financial info tab, set the Send the generated .csv files via email option to Summary only. This delivers a call summary only and do not attach a details file; this could be useful in the case of a large number of calls. Other options are Full Statistics (attach a complete list of xDRs) or Do not send (this option prevents the delivery of event statistics to this customer via email).
Services
On your customer’s panel, go to Service configuration in Voice calls section.
The Service configuration panel provides an access to a group of tabs where you can activate/deactivate various features of the voice calls service provided to the customer.
This is a convenient way for managing parameters which are the same for a whole set of accounts. Instead of trying to configure them for each individual account, you can define them once at the customer level, then specify in the account configuration that the value in the customer’s configuration be used. Should you wish to change this value later, you need only modify it once for the change to be automatically propagated to all accounts.
Please consult the PortaBilling help for a description of parameters available here. For now, you may leave these with their default values. If you change them later, these changes will automatically affect all accounts created under this customer.
Create accounts
Please refer to the Create accounts section of the Basic residential VoIP service handbook for the general steps of account creation. The steps below help you configure accounts depending on the PBX features and preferences.
Accounts for outgoing calls from PBX
If the PBX is capable of digest authentication, create its main phone line as an account with the following options:
- On your customer’s panel, click Accounts / DIDs.
- Click + Account and fill in the account information.
- General tab:
- Type – select Credit in this field.
- Account role – select Phone line.
- ID – Click the
 button to select a DID
number from the available DID numbers list:
button to select a DID
number from the available DID numbers list:
- When the Define the search filters sidesheet opens, specify whether to search through DIDs available in DID pool or among the DIDs assigned to this customer. Also, you can specify the geographical location and DID number pattern
(e.g., specify 120 to search for DIDs with the prefix 120). Click the Next button.

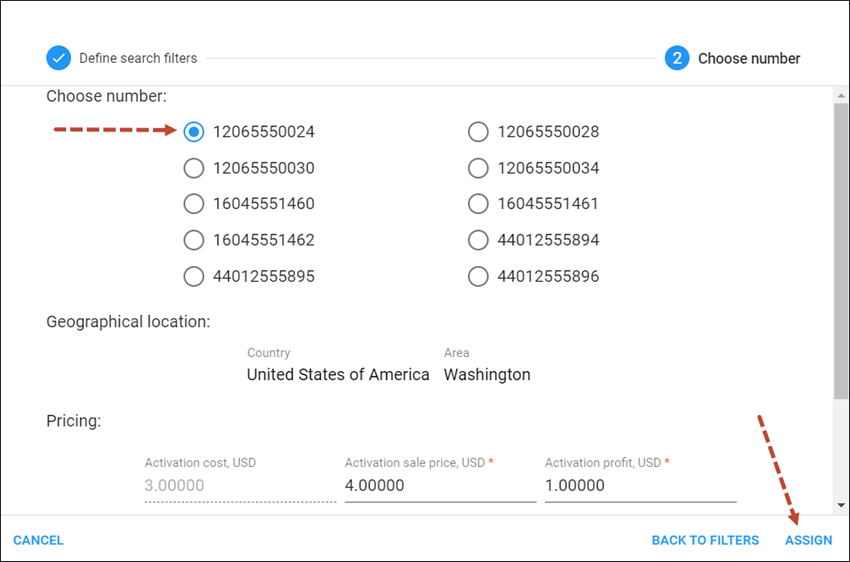
- On the Choose number panel that opens, you will see a list of available DID numbers that match your search query and the charges associated with them. The charges for DIDs from the DID pool are pre-populated from the customer’s pricing batch. Select a DID number and click the Assign button.
- When the Define the search filters sidesheet opens, specify whether to search through DIDs available in DID pool or among the DIDs assigned to this customer. Also, you can specify the geographical location and DID number pattern
(e.g., specify 120 to search for DIDs with the prefix 120). Click the Next button.
- Service password – specify a service password for this account.
- Balance control – define the way the balance of the account is controlled. Subordinate – the balance will directly depend on the customer’s balance (only the customer tops up the balance); Individual credit limit – this account may have its own balance and credit limit (the customer credit limit still applies.) Select Subordinate in this field.
- Activation date – set the date from which the account becomes active. The default value is Immediately.
- Expiration date – set the date when the account expires. The default value is Never.

- Products tab:
- Product – choose the main product, which you would like your account to have (make sure it has the Phone line account role defined within).

- Product – choose the main product, which you would like your account to have (make sure it has the Phone line account role defined within).
- General tab:
- Click Save.
Account info
On the account’s panel, go to General info. In the Basic info tab, fill in the account owner’s email address in the Email field. If the account owner ever forgets the password for the web self-care pages, they will be able to reset it, and a new password will be sent to this email address.
Web self-care
On the account’s panel, go to General info. In the Web self-care tab, define credentials for the account self-care interface (such as login, password, time zone, etc.).
Additional info
On the account’s panel, go to General info. In the Auto-provisioning tab, you can assign a device to an account for automatic provisioning. Leave this option disabled for now.
Life cycle
On the account’s panel, go to General info > Additional info tab. In the Life cycle section, you can fill in the account life cycle information :
- Expiration date – this identifies the date when the account expires. Since a postpaid service is set up, which should function for a long time, leave this option disabled.
- Availability period after first usage, days – this defines the number of days the account remains active after its first use or recharge. Leave this field blank.
- Availability period after last usage, days – this defines the number of days the account remains active after its last use or recharge. Leave this field blank.
Service configuration
Using this tab, you can activate/deactivate various features of the services provided to this account. Note that features are defined per service type (the physical service provided to the user such as Conferencing, Data Service, Voice Calls, Messaging etc.)
Click  Help to find
the description of parameters available here. For now, you may leave these
with their default values.
Help to find
the description of parameters available here. For now, you may leave these
with their default values.
Note that you can limit the number of simultaneous calls for a specified customer (for more details, see the …limit the number of concurrent calls for a specific customer? chapter in the How To… section).
Accounts for incoming calls to PBX
The configuration of incoming calls depends on whether the PBX can register with its phone lines on a SIP server.
If the PBX is capable of registering on a SIP server, you may want to use the same account that you already created for outgoing calls.
To create a new account, define the following options:
- Type – select Credit in this field.
- Account role – select Phone line.
- ID – SIP ID, i.e., the DID number to be used for receiving incoming calls.
- Service password – specify a service password for this account.
- Balance control – define the way the balance of the account is controlled. Subordinate – the balance will directly depend on the customer’s balance (only the customer tops up the balance); Individual credit limit – this account may have its own balance and credit limit (the customer credit limit still applies.) Select Subordinate in this field.
- Activation date – set the date from which the account becomes active. The default value is Immediately.
- Expiration date – set the date when the account expires. The default value is Never.
- Product – choose the main product, which you would like your account to have (make sure it has the Phone line account role defined within).
- Click Save.
If your PBX supports multiple registrations, repeat steps 1-4 and create accounts for every PBX extension.
If you want to dedicate several DIDs to forward incoming calls to the PBX, use one of the ways described below to achieve this.
Creating extra DIDs as accounts
Create extra accounts (e.g., 12035556218, 18001111112 and 44201224505) and configure forwarding for these accounts so that incoming calls always go to the main PBX account.
- On your customer’s panel, click Accounts / DIDs.
- Click + Account and fill in the account information:
- Type – select Credit in this field.
- Account role – select Phone line.
- ID – SIP ID, i.e., the DID number to be used to register with the SIP server and receive calls.
- Service password – specify a service password for this account.
- Balance control – define the way the balance of the account is controlled. Subordinate – the balance will directly depend on the customer’s balance (only the customer tops up the balance); Individual credit limit – this account may have its own balance and credit limit (the customer credit limit still applies.) Select Subordinate in this field.
- Activation date – set the date from which the account becomes active. The default value is Immediately.
- Expiration date – set the date when the account expires. The default value is Never.
- Product – choose the main product, which you would like your account to have (make sure it has the Phone line account role defined within).
- Go to Voice calls > Service configuration > Call forwarding tab and enable forwarding:
- Call forwarding – select Simple Forwarding.
- Maximum forwards – specify the number of concurrently active forwarding destinations allowed.
- Forward by DTMF – leave the option disabled.
- Call forwarding – select Simple Forwarding.
- In the Simple forwarding settings section, specify the ID of the main PBX account in the Forward to field. Activate the Keep original CLD option to store the called DID. The
PBX can then correctly route the calls made to individual phone numbers to their appropriate extensions. (Please consult the Forwarding with
the original DNIS (CLD) section in the PortaSIP
Administrator guide for a detailed description.)

- Click Save.
- Repeat these steps if you need to create more accounts for forwarding calls to the main PBX account.
Create extra DIDs as aliases
Please see the …create extra DIDs as aliases? chapter in the How to… section.
IP PBX with dynamic IP address
Routing incoming calls via the registration account is used for PBXs that can perform registration on the SIP server using their main account (i.e., the registration account), yet use dynamic IP addresses for registration.
To set this up, perform the following steps:
- Create a customer who represents the owner of the PBX.
- Create a main account for this customer as described in the Create phone lines section of the Cloud PBX services handbook (the Account ID is the phone number that will be used for registering on the SIP server).
- On your customer’s panel, go to Voice calls > Service configuration > Incoming calls tab and enable the SIP contact option.
- Deliver incoming calls to – select Account.
- Account ID – select the account you created at step 2.

- Click Save.
How to override incoming calls delivery settings for an account (optional)
Let’s consider the example of when it is necessary to use one of the PBX phone lines on a separate SIP phone. To do this, perform the actions as described below:
- On
your account’s page, go to Voice calls > Service configuration > Incoming calls tab and disable the SIP contact
service feature.

- Click Save.
For more information about incoming call delivery to a PBX with dynamic IP address please refer to the PortaSIP administrator guide.


