Skip to the content
Release
mr131
mr130
mr129
mr128
mr127
mr126
mr125
mr124
mr123
mr122
mr121
mr120
mr119
mr118
mr117
mr116
mr115
mr114
mr113
mr112
mr111
mr110
mr109
mr108
mr107
mr106
mr105
mr104
mr103
mr102
mr101
mr100
mr99
mr98
mr97
mr96
mr95
mr90
mr85
mr80
mr75
mr70
mr65
mr60
mr55
mr127
mr131
(latest)
mr130
mr129
mr128
mr127
mr126
mr125
mr124
mr123
mr122
mr121
mr120
mr119
mr118
mr117
mr116
mr115
mr114
mr113
mr112
mr111
mr110
mr109
mr108
mr107
mr106
mr105
mr104
mr103
mr102
mr101
mr100
mr99
mr98
mr97
mr96
mr95
mr90
mr85
mr80
mr75
mr70
mr65
mr60
mr55
mr131
(latest)
mr130
mr129
mr128
mr127
mr126
mr125
mr124
mr123
mr122
mr121
mr120
mr119
mr118
mr117
mr116
mr115
mr114
mr113
mr112
mr111
mr110
mr109
mr108
mr107
mr106
mr105
mr104
mr103
mr102
mr101
mr100
mr99
mr98
mr97
mr96
mr95
mr90
mr85
mr80
mr75
mr70
mr65
mr60
mr55
Search
Search
Search
Documentation
portaone.com
Documentation
portaone.com
What's new in MR127
What’s new in MR127
Admin manuals
Architecture & concepts
Billing administration & invoicing
Carrier management & routing
Connection to / interoperability with external systems
Installation, maintenance & security
MNO / MVNE / MVNO
IoT/M2M
Other telco services (FTTH, IPTV, etc.)
Product catalog / rating configuration
Voice service configuration on PortaSIP (cloud PBX, SIP trunking, etc.)
Handbooks
Distributors
Initial Configuration
Callback Services
Advanced Configuration
DID Provisioning
Emergency Services
Cloud PBX and SIP Trunking Services
External System Provisioning
General Configuration Tools
Internet, WiFi, IPTV Provisioning
Management and Monitoring
Messaging Services
Invoicing and Payments
MVNO
Online Signup
Prepaid Services
Resellers
Residential VoIP Services
Routing Configuration
Troubleshooting
Unified Communications
xDR import
Wholesale Services
UI help
Admin interface
Account self-care interface
Customer self-care interface
Reseller interface
Distributor self-care interface
Representative self-care interface
Developers documentation
PortaBilling API
PortaSIP API
Call Control API
ESPF API
PortaBilling API 2.0
Provisioning Application Reference Guide
Installation, maintenance & security
Hardware and software requirements
Disk space requirements
PortaSwitch hardware and software requirements
PortaBilling hardware and software requirements
PortaBilling with Oracle Real Application Cluster hardware and software requirements
PortaSIP hardware and software requirements
Installation
How to...
What is the recommended setup for the PortaSwitch behind a firewall?
… Install PortaSwitch using USB DVD ROM?
… Create a bootable USB flash drive from a PortaSwitch ISO file?
… Create bootable USB flash drives from PortaSwitch ISO files ? (obsolete method)
… Perform basic troubleshooting?
… Activate the configuration server?
Installation
Oracularius installation
Deploying PortaSwitch on an Extended Distance Oracle RAC
Servers installation and interconnection
Maximizing DB availability using Oracle Data Guard
PortaSwitch installation
Installation process
Overview
Step 1: Power-up, boot order setup
Step 2: Insert the installation medium into the computer
Step 3: Starting installation
Step 4: Installation summary page
Step 5: Installation source
Step 6: Software selection
Step 7: Installation destination
Step 8: Network & host name
Step 9: Root password
Step 10: Begin installation
Step 11: Change installation medium (applicable only for local installation from two ISO files)
Step 12: Reboot
Step 13: Hardware check
Step 14: Check if system can reboot to normal state
Step 15: Prepare the system for transportation (optional)
Step 16: Perform initial configuration of PortaSwitch (when all servers have been installed)
Network configuration
Network configuration
Security and system access
Overview
Third-party software in PortaBilling/PortaSwitch
How PortaOne Support accesses PortaBilling/PortaSwitch and installed software
Password protection
Restrict system access to trusted IP addresses only
Protection against brute-force attacks via SSH
Operations
Reduced database load by batch update of balances
PortaBilling server health monitoring
User notifications
Web interface administration
Branding web interfaces
Multi-language support
Role-based access control
Two-factor user authentication
Allow customers to control self-care access with individual credentials and roles
Control what custom portal functionality is visible according to user permissions
Limits management for administrative users
Custom fields
Personal data protection. GDPR compliance
White labeling
Troubleshooting
Trace session
Log viewer
Troubleshooting tools
Troubleshooting common problems
FAQ
Statistics and reporting
Custom reports
Date and time information
VoIP network performance statistics
xDR summary
PortaSwitch Configuration server web reference
Introduction
Login to the Configuration server interface
Initial configuration of PortaSwitch
Initial configuration of PortaSwitch
System management
Servers
Sites
Docker Swarm
Configurations
Environments
Users
Update
Custom
Deposit
UI plug-ins
Task monitor
How to …
... Prevent service downtime when applying a new configuration
… Add an alias to the PortaSIP cluster’s IP address
… Change configuration options
… Configure a MySQL database white list
… Configure a backup procedure
… Configure an adaptec RAID health monitoring
… Configure dispatching SBC?
… Configure several PortaSIP clusters in PortaSwitch
… Configure site-to-site VPN tunnels for PortaSwitch
… Create new billing environments
… Define new default ACLs
… Delete an active billing environment
… Display provisioning event status for ESPF on the PortaBilling web interface
… Enable additional validation of dialing rule emergency numbers
… Migrate an IP address
… Migrate an instance
… Promote the secondary site to the main site
… Сonfigure PortaBilling to interact with the Microsoft Active Directory
…Configure DNS server addresses
…Control billing environment deletion
Installation, maintenance & security
Installation
Installation process
Step 6: Software selection
Step 6: Software selection
Link copied to clipboard
February 4, 2026
1 minute to read
This page for the latest version (MR131)
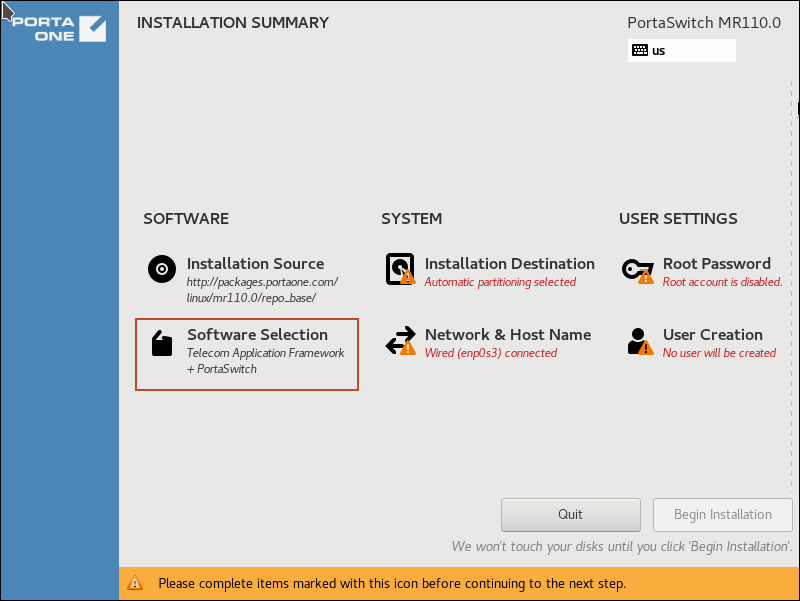
On the
Installation summary
page, choose
Software selection
.
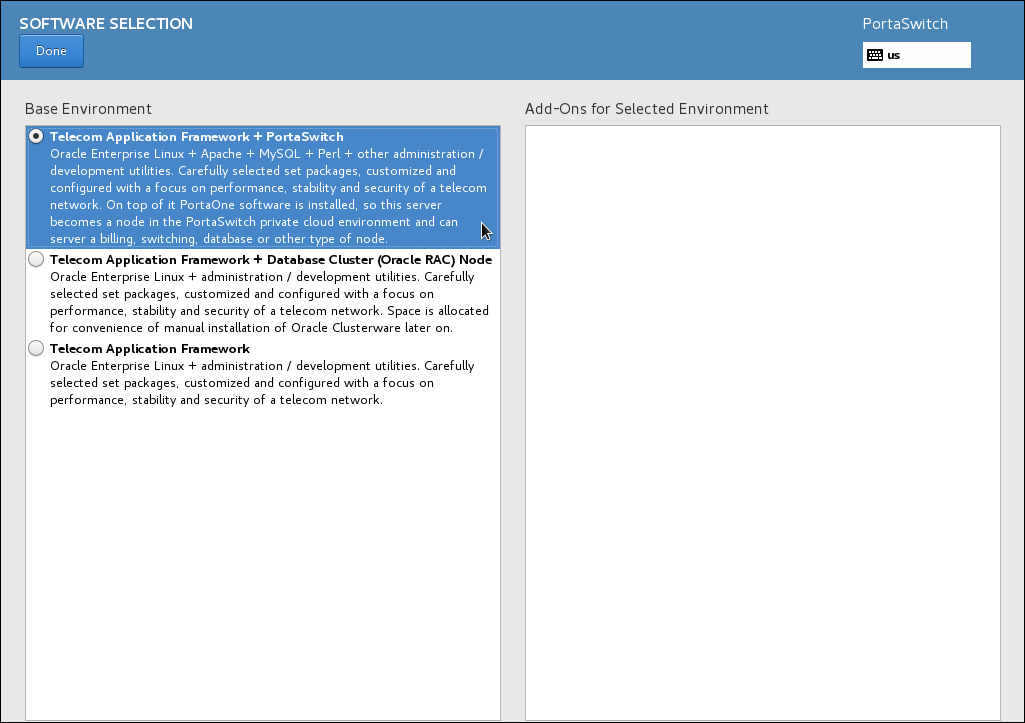
In the
Base Environment
section, choose
Telecom Application Framework + PortaSwitch
.
Click
Done
.
See Also
How to perform basic troubleshooting?
top
On this page
Search Documentation
Search
Enter a search string that is at least
1 symbol long
Docs for
Any
Any
mr131 (latest)
mr130
mr129
mr128
mr127
mr126
mr125
mr124
mr123
mr122
mr121
mr120
mr119
mr118
mr117
mr116
mr115
mr114
mr113
mr112
mr111
mr110
mr109
mr108
mr107
mr106
mr105
mr104
mr103
mr102
mr101
mr100
mr99
mr98
mr97
mr96
What's new
Admin manuals
Handbooks
UI help
Developers documentation
Search
Search
Menu
Main page
The Connector
PortaOne Blog
PortaOne.com
This website uses cookies. By continuing to use our website, you are agreeing to our
cookie policy
.
Accept and close
Decline