



Before you start, make sure that:
- You have two working USB flash drives at your disposal.
- The servers (physical or virtual) meet the minimum hardware requirements.
Create a bootable USB drive in the Linux command-line interface
To make PortaSwitch installation USB flash drives using the Linux command-line interface complete the following steps:
- Plug the first USB flash drive into the USB port of your computer.
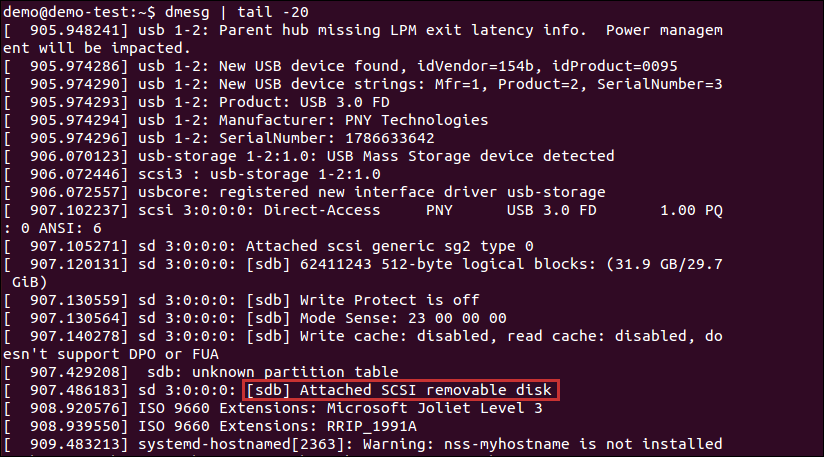
Check the name Linux has assigned to your USB flash drive. To do this execute the following command:
dmesg | tail -20and look for strings that contain titles like "sdX," where X can be any letter, e.g., sdb, sdc. This is your USB flash drive name, you should remember as you will need it for the next step. For example, in the screenshot below, the USB flash drive name is sdb.
- Write the first PortaSwitch installation ISO file to the USB flash drive. To do this, execute the following command (replace Dir1/PortaSwitch_installation_file1.iso
with the path to the first PortaSwitch installation ISO file and sdX with your USB flash drive name):
sudo dd if=/Dir1/PortaSwitch_installation_file1.iso of=/dev/sdX bs=8M

- Once the writing process has finished, unplug the first USB flash drive and plug in the second one.
- Write the second PortaSwitch installation ISO file on this USB flash drive. To do this repeat steps 2 and 3, but in step 3, specify the name of the second PortaSwitch installation ISO file.
Create a bootable USB drive in Windows
There are many utilities available for Windows, Linux, and macOS that help create bootable USB flash drives, such as balenaEtcher or Rufus. You can use the one you prefer.
For example, to create a bootable USB drive on Windows using balenaEtcher:
- Download and install Etcher
- Go to https://etcher.balena.io/#download-etcher and download the installer for your OS.
- Install and launch Etcher.
- Insert the USB Flash Drive
- Plug the USB drive into your computer.
- Back up any important data as this process will erase everything on the drive.
- Select the ISO File
- Click Flash from file and browse for the ISO file you want to use.

- Click Flash from file and browse for the ISO file you want to use.
- Choose the USB Drive
- Click Select target and pick your USB flash drive from the list.
- Start Flashing
- Click Flash! to begin.
- Wait for the process to complete. It may take a few minutes.
- Eject the USB Drive
- Once flashing is done, safely remove the USB drive before unplugging it.
Write the second PortaSwitch installation ISO file on the second USB flash drive. To do this, repeat steps 2–5, but in step 3 select the second PortaSwitch installation ISO file.


