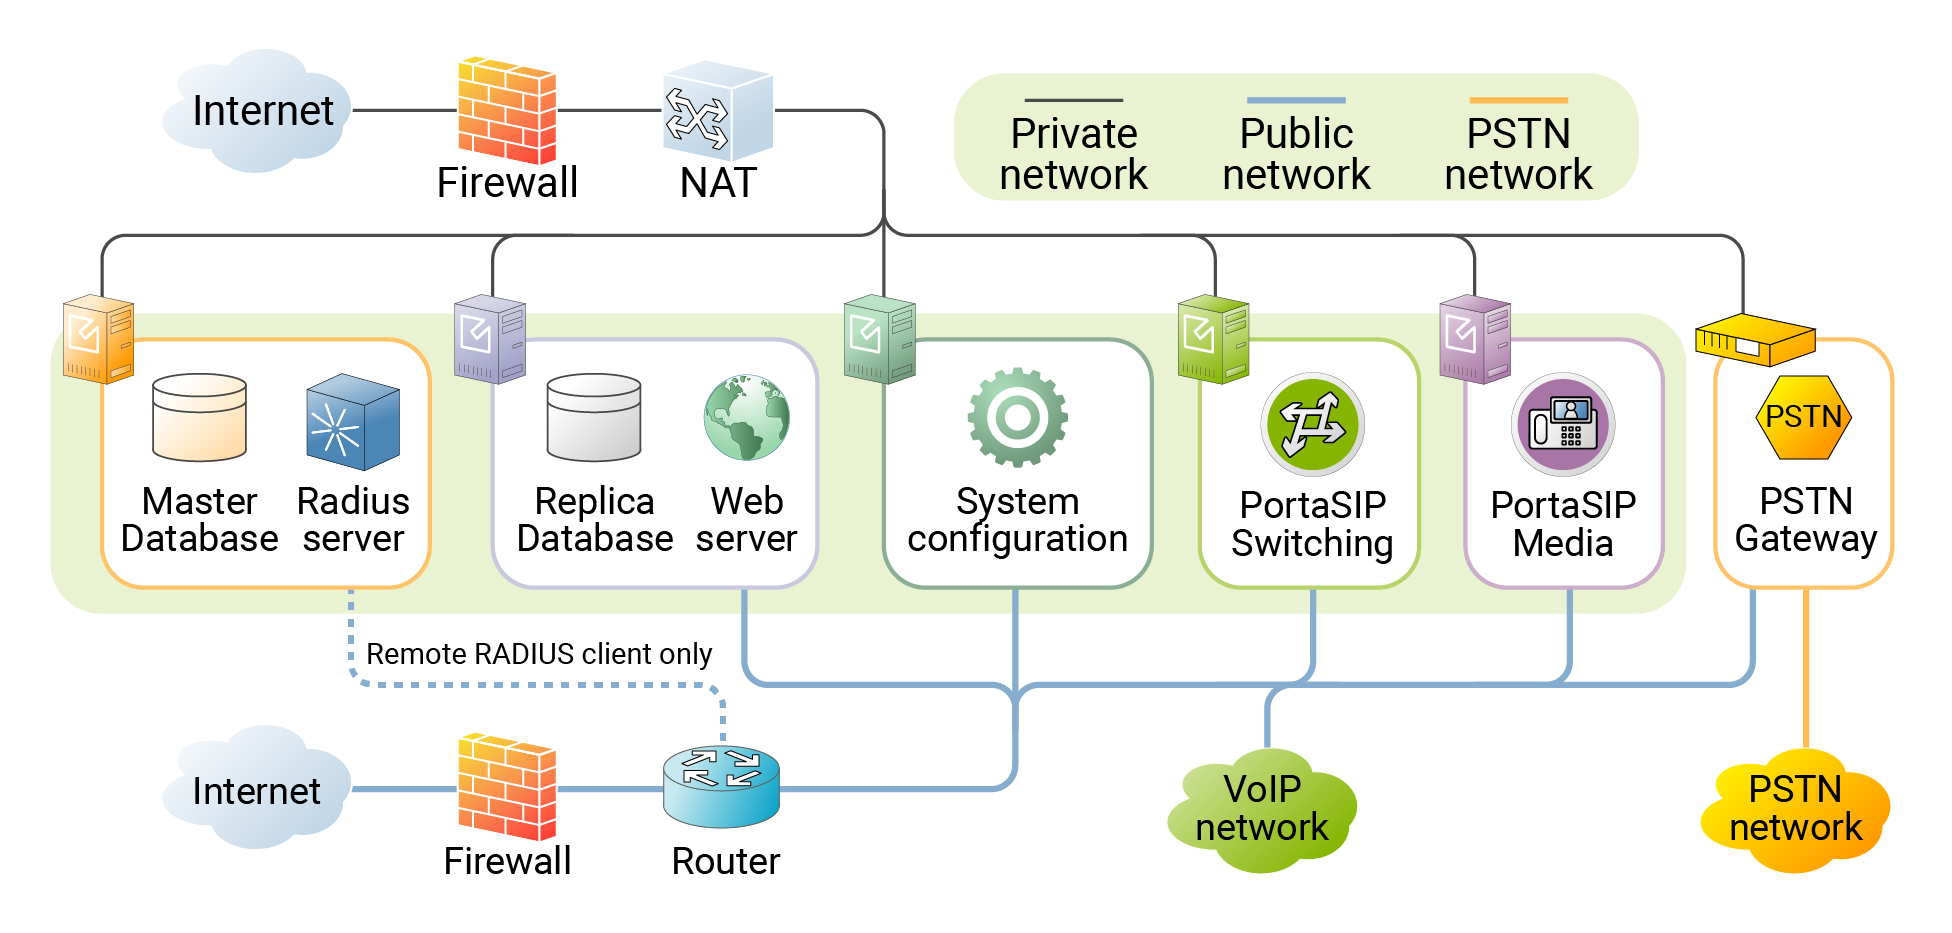
The figure below shows a common network configuration for PortaSwitch.
PortaSwitch server requires two physical network interfaces:
- The first network interface is connected to a private LAN segment for internal communication between servers (the black lines on the diagram). Private LAN must allow servers to initialize outgoing connections to the Internet (using NAT) for the purposes of monitoring, performing maintenance, and updating the servers.
- The other network interface is connected to the public Internet segment. This interface is used to provide “public” services (such as VoIP calls or access to the self-care portal) to your customers. This public Internet connection is marked by the
blue lines on the diagram.
If all servers can initialize outgoing connections to the Internet via the public Internet segment, there is no need to configure an outgoing connection for a private LAN.
Two physical network interfaces are required for the following purposes:
- Improved network security, since all data (such as access to the database or the transfer of sensitive customer information) is transported via a dedicated interface.
- Ability to quickly and easily relocate services (including public IPs allocated to each service) from one physical server to another, or to change the roles of the servers.
- In case public IPs are not accessible anymore (e.g., the servers have been physically moved to a different hosting facility, or the administrator supplied incorrect information regarding a public IP), it is still possible to access the server via the internal interface and fix the configuration.
- Intensive data transfer on one interface (e.g., database copy for a daily backup) does not affect services provided on the other interface (e.g., media transport for voice calls).
Consider the following when planning your network:
- Private IP addresses must be in the same LAN (or VPN).
- The 10.19.0.0/16 and 10.11.0.0/16 private IP address subnetworks are reserved for configuring the Docker infrastructure. Thus, don’t use the 10.19.0.0-10.19.255.255 and 10.11.0.0-10.11.255.255 address pools while configuring the network interfaces on the servers.
- RADIUS servers do not normally require a connection to the public Internet segment, so it is recommended that you not assign public IP addresses to them. The only exception is when you have remote RADIUS clients which cannot interconnect with RADIUS servers via private IP addresses. Below you will find the parameters that must be configured when you only assign private IP addresses to RADIUS servers. This is usually done by the PortaOne support team once the system has been installed:
If you only assign private IP addresses to RADIUS servers then you must specify a RADIUS server’s private IP address in the RadiusClient.Source_Address option on the Configuration server web interface.
If you are installing a RADIUS cluster, then the RADIUS.Forward_Mode option on the Configuration server web interface must also be enabled. This allows the RADIUS requests to be relayed to all of the RADIUS servers when you specify the private IP address for only one of them in the above options.
- Additional processes (e.g., geo-IP database auto-update or real-time lookup in a central LNP database) may run on the RADIUS servers if respective features are enabled (even if they do not relate to the RADIUS protocol.) These processes may require outgoing connections to specific IP addresses or to the whole public Internet: direct, via NAT, or via different sorts of custom proxying.
- Dedicated database servers do not require a connection to the public Internet segment, so it is recommended to not assign them public IP addresses.
- If you are planning to pass PCI DSS compliance, you should have dedicated databases with only private IP addresses. These IP addresses must be on a separate subnet.
Although not all servers need to be assigned IP addresses from the public Internet segment, we recommend that a physical connection be established for all servers (then you can easily swap roles between the servers using PortaSwitch configuration tools).
You can find our recommendations regarding the firewall in the What is the Recommended Setup for the PortaSwitch Behind a Firewall? section of the "Frequently Asked Questions" chapter.
You may configure virtual interfaces (VLANs for trunking) and/or network bonding (link aggregation) for servers using the Configuration server. For more details see the PortaSwitch Configuration Server Web Reference Guide.


