PortaBilling allows you to automate the process for controlling the call quality which becomes increasingly important today. That is, if you want to evaluate acceptable vendors for terminating VoIP calls, there is no need to hire numerous human operators or network engineers, who will track and analyze the specific route. All you need is to implement adaptive routing model.
Setting up adaptive routing
The main idea of adaptive routing is to dynamically measure a vendor’s quality parameters, and adjust the routing priority accordingly. These quality requirements are predefined in the form of threshold parameters on the Adaptive routing criteria page, and are then automatically applied to specific vendors. Any vendor who fails to satisfy your quality requirements will go to the “penalty box” – the very bottom of the routing list. This means that the system will try first to terminate calls using other carriers (with a good quality evaluation). However, if all of them fail or are unavailable, the “penalized” carrier will have a chance to terminate the call. It is still better to send a call via an inferior vendor than to have it fail completely.
Thus, if the quality requirements are applied, a carrier’s place on the routing list is determined not only by the route category, the assigned preference value, and the cost parameters (LCR model), but additionally by quality criteria.
Add routing criteria
- On the navigation menu on the left, select Infrastructure, then Voice calls processing, select Routing and open Adaptive routing.
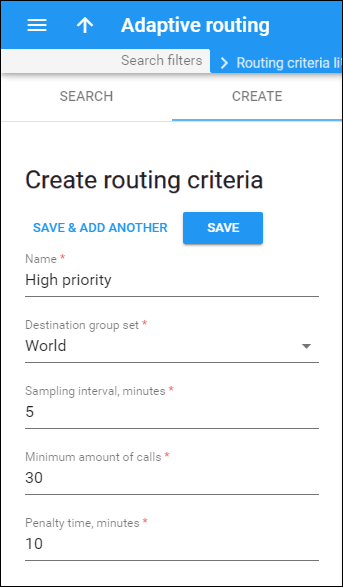
- On the Create routing criteria panel, fill in the required information:
- Name – the logical name of the routing criterion for use within PortaBilling.
- Destination group set – a set of destination groups you would like to use for more convenient quality criteria entry; later you can define the parameters for individual groups of this set. For how to create a destination group set please refer to the Create a destination group set step in the Creating a service with discount plans handbook.
- Sampling interval, minutes – the time interval for which statistics are computed. Smaller intervals will make the system “quicker” to notice any change in a vendor’s quality, but there is also a higher chance that a short-term problem on the vendor’s side (which can be fixed in a matter of minutes) will penalize his route for a relatively long period of time.
- Minimum amount of calls – the minimal required amount of calls via a given connection for the statistics to be considered representative. If the number of calls is below the specified value, the quality parameters will not be matched against the threshold, and no routing adjustments will be made.
- Penalty time, minutes – the time interval for which a connection will be “penalized” (at the very bottom of the routing list) if a given vendor does not meet the quality parameters.
- Click Save.
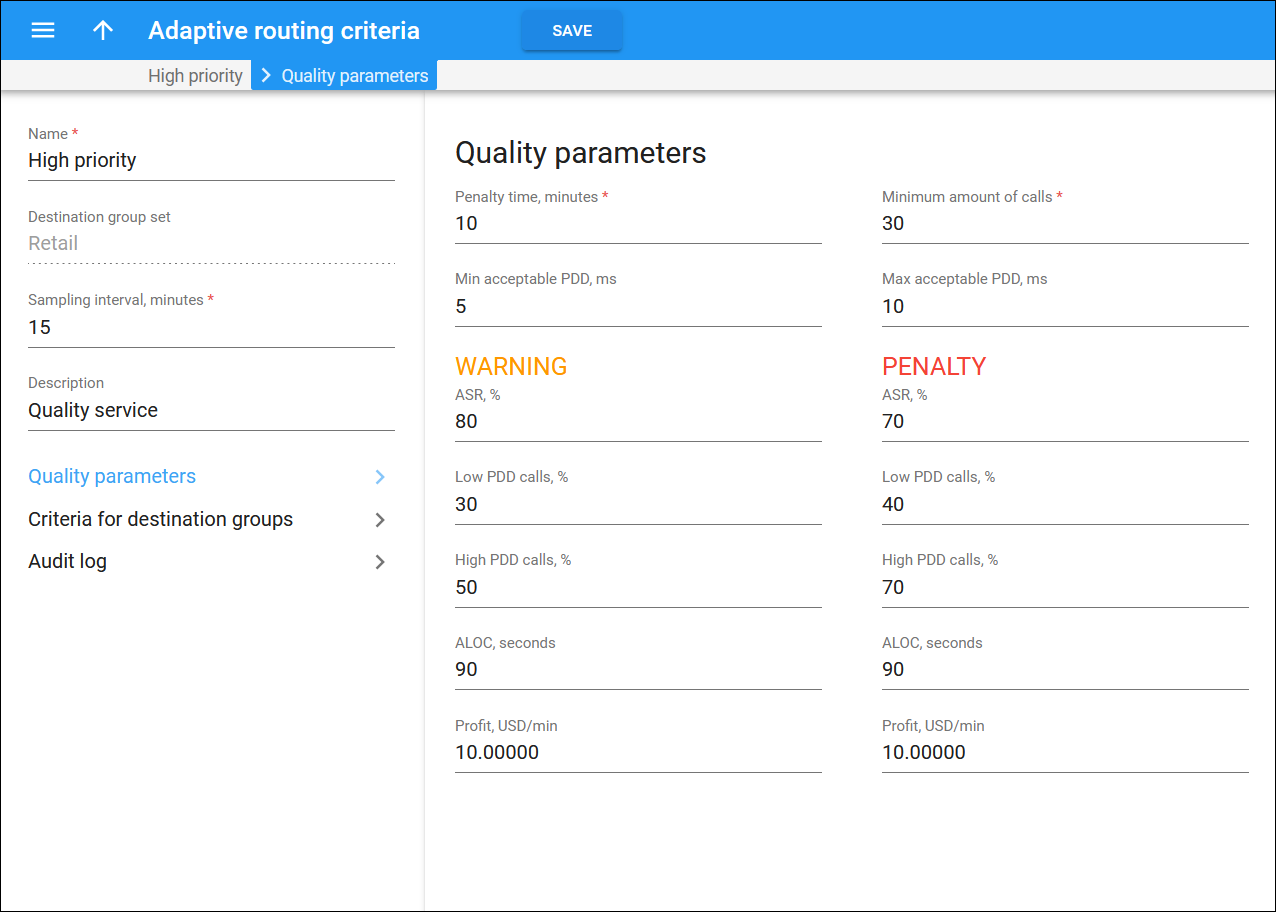
- On the Edit Adaptive routing criteria panel that opens, go to Quality parameters panel and specify the initial default values to be applied for all routing criteria you will create next:
- Min acceptable PDD (Post dial delay) – defines the minimum acceptable PDD (Post-dial delay), i.e. the time interval between the moment a connection request is sent to the vendor and the moment ring-back is received. Too low a PDD is suspicious, and in this case the vendor is probably doing “false ringing” to hide the long time it actually takes him to route the call.
- Max acceptable PDD – defines the maximum acceptable PDD. Too high a PDD has a strong negative impact on your business, since during the delay time the end user hears only silence, and generally assumes that there is a problem with the service.
- The following parameters require two values that define the Warning and Penalty thresholds, respectively:
- ASR (Answer seizure ratio) – the number of successfully connected calls divided by the total number of call attempts.
- Low PDD calls, % – maximum acceptable percentage of calls with a PDD below the specified value.
- High PDD calls, % – maximum acceptable percentage of calls with a PDD above the specified value.
- ALOC – an average length of call in seconds.
- Profit per minute – the aggregated profit, i.e. the difference between the actual charged amounts in your customers’ and vendors’ xDRs.
Add a routing criterion for a destination group
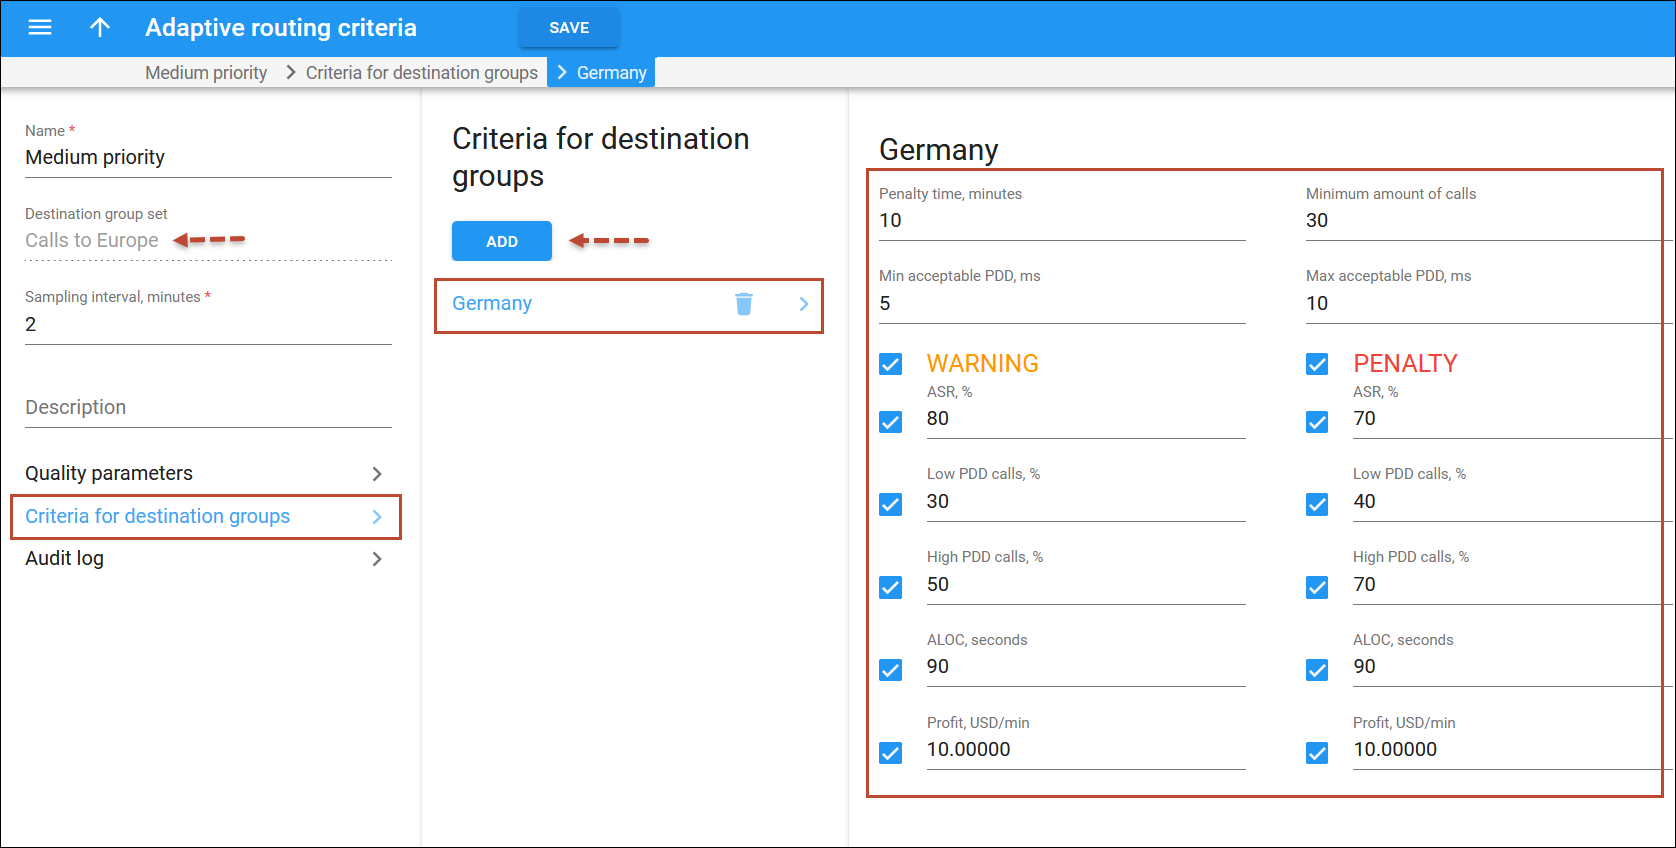
- Open the Criteria for destination groups panel and click Add.
- Choose a destination group from a searchable list inside the pop-up window that opens. You can access only groups that belong to the Destinations groups set you’ve used to create an Adaptive routing criterion.
- Select the quality parameters to be applied to your vendors. You need to provide two values for each parameter: warning and penalty thresholds.
- ASR (Answer seizure ratio) – the number of successfully connected calls divided by the total number of call attempts.
- Low PDD calls, % – maximum acceptable percentage of calls with a PDD below the specified value.
- High PDD calls, % – maximum acceptable percentage of calls with a PDD above the specified value.
- ALOC – an average length of call in seconds
- High PDD Calls, % – maximum acceptable percentage of calls with a PDD above the specified value.
- Profit per minute – the aggregated profit, i.e. the difference between the actual charged amounts in your customers’ and vendors’ xDRs.
- Click Save.
Define routing criteria for specific connection
After you create a routing criterion, you can apply your quality requirements to a specific vendor connection. Thus, when such a routing model is associated with a connection, PortaBilling will automatically arrange routes according to your quality preferences.
- On the navigation menu, select Infrastructure, then select Vendors.
- On your vendor’s panel (GlobalNet), click Connections.
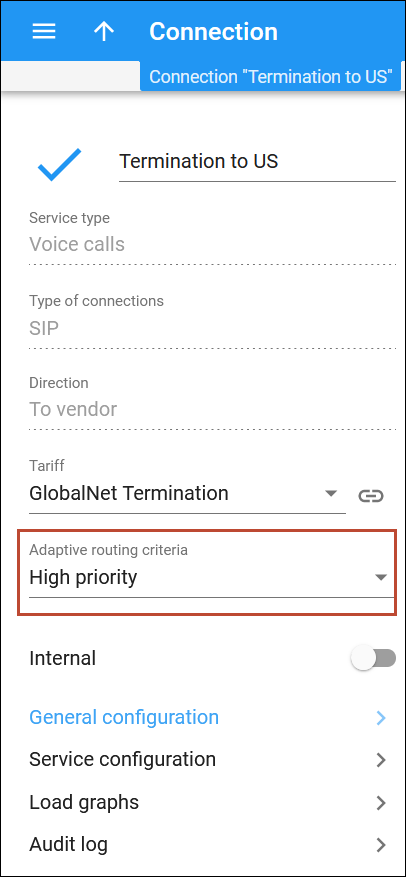
- Open the connection you want to assign the routing criteria to.
- Select the routing criteria you have created (e.g., High Priority) from the Adaptive routing criteria list.
- Click Save.
After that, the additional Tracking panel will appear.
Tracking connection status
When the value of a parameter reaches the predetermined threshold, the administrator receives an email alert about the latest connection threats. The administrator can track the current connection status on the Tracking panel of the Edit Connection page. This status is represented by different colors, as follows:
Active (grey color) – the number of calls is not enough to apply filtering differentiation.
Active (green color) – the route meets the quality requirements.
Active (yellow color) – the route is active, but some of its quality parameters are outside the warning thresholds.
Penalized – this route is currently being penalized.
When the penalty time is up, the connection is automatically unblocked. Alternatively, you can click the Restore button to manually unblock the penalized route.Restored – the route was manually unblocked; this status will remain unchanged till the next time interval for which the statistics will be computed.


