



Using this handbook, you can configure the tax calculation via SureTax. Follow the steps below to enable the SureTax taxation plug-in and set up taxation parameters for you as a service provider and your customers.
Let’s consider the following scenario: you are a US service provider and want to use the SureTax taxation company to assess taxes. You have a cloud PBX customer “SpaceNet” that is located in New York. Most of SpaceNet’s employees work in the New York office, and two employees work remotely in Los Angeles.
Configuration overview
- Configure the SureTax taxation plug-in
- Define taxation parameters for your company
- Create a customer class and configure the SureTax taxation parameters
- Override taxation parameters for a customer (optional)
Configure the SureTax taxation plug-in
Note that at this step, you will need the credentials provided by SureTax to configure the SureTax taxation plug-in in PortaBilling.
- Go to Financial > Taxation.
- Go to Taxation plug-ins and select SureTax (US, Canada).
- On the panel that opens, turn on the Use SureTax taxation plug-in toggle and specify the plug-in credentials to access the SureTax API:
- URL – specify URL for the SureTax environment to perform the initial setup and tax calculation configuration, e.g., https://testapi.sureaddress.net/sureaddress.asmx?wsdl.
The URL depends on the required API specified in the SureTax documentation.
- Login – specify the login provided by SureTax.
- Key – specify the password provided by SureTax.
- Description (optional) – you can type the description for this plug-in.

- URL – specify URL for the SureTax environment to perform the initial setup and tax calculation configuration, e.g., https://testapi.sureaddress.net/sureaddress.asmx?wsdl.
- Click Save to save the plug-in configuration.
Define taxation parameters for your company
Configure the taxation parameters that apply to you as a service provider.
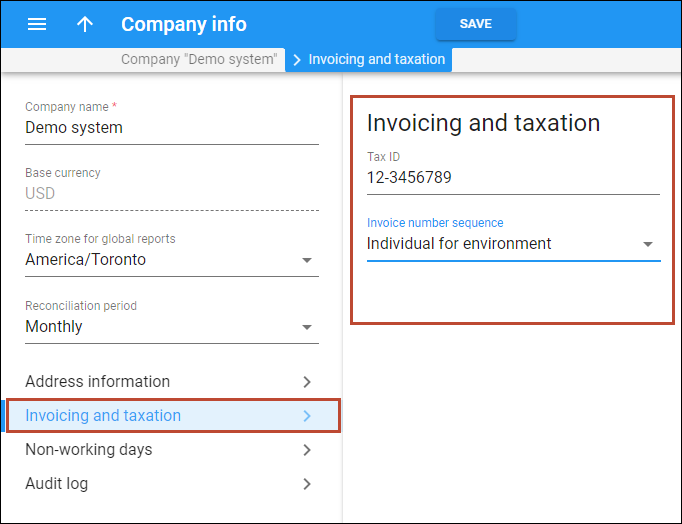
- Go to My сompany > Company info and click Invoicing and taxation.
- Specify your company’s tax ID in the Tax ID field.
- Click Save.
Create a customer class and configure the SureTax taxation parameters
- Go to Sales > Customer classes.
- In the Create a customer class sidesheet, fill in the customer class details:
- Name – a short name for this customer class, e.g., “Cloud PBX customers”.
- Business model – select which type of service is provided to the customers of this customer class, e.g., Cloud PBX, SIP trunking, etc. Select Cloud PBX for our example.
- Currency – the currency you charge the customers of this customer class, e.g., USD. When the currency is specified, this customer class can only be assigned to customers with the same currency. Note that you can define the currency only when you create the customer class and can’t change it later.
- Managed by – select Administrator only.

- Click Save.
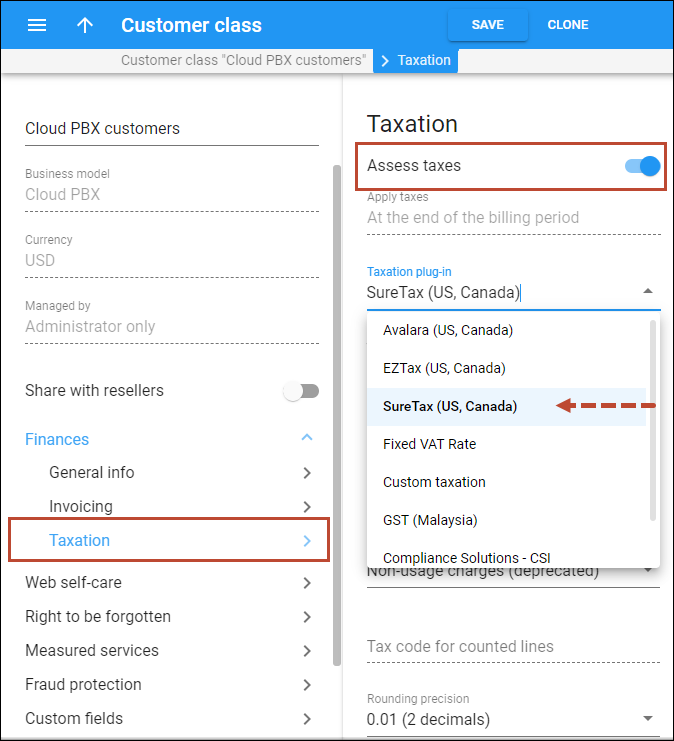
- On the customer class panel, click Finances > Taxation.
- Turn on the Assess taxes toggle and select SureTax (US, Canada) in the Taxation plug-in dropdown.
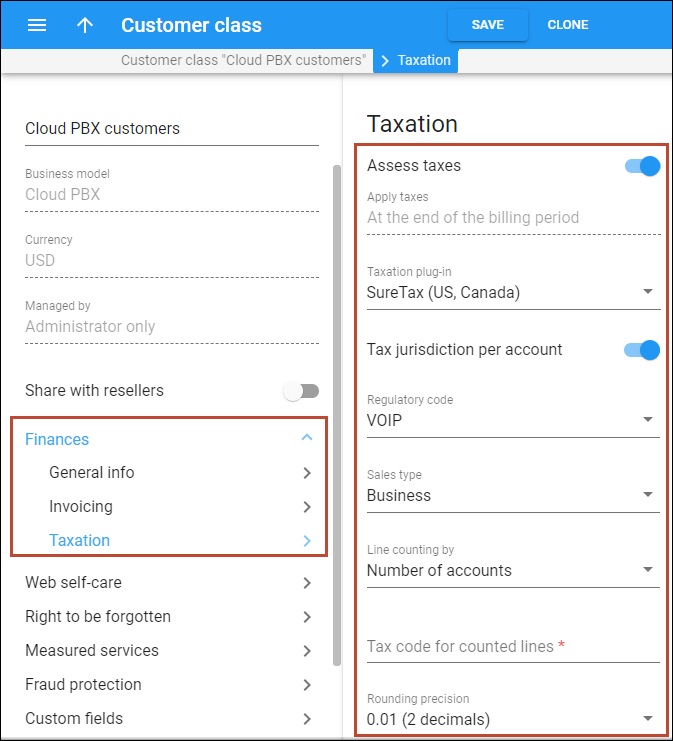
- Specify the taxation parameters that will apply to each customer with this customer class assigned:
- Apply taxes – taxes can only be applied at the end of the billing period.
- Tax jurisdiction per account – this option is disabled by default. The toggle can be turned off if the customer class is assigned to customers with users in a single location. Since the customer “SpaceNet” has users in different locations (New York and Los Angeles), turn on the toggle to assess taxes based on each user’s location.
To specify the location, ZIP codes must be populated for a customer and each customer’s account. Go to Personal > General info > Address info > Postal code and make sure that the correct ZIP codes are set on.
If the customer’s accounts have no ZIP code specified, the customer ZIP code is used instead to assess the taxes, and the administrator receives the corresponding notification on email. If a ZIP code is missing for the customer, the taxes won’t be calculated and the customer’s invoice won’t be generated. The administrator receives the corresponding notification. After the administrator adds the missing ZIP code, the taxes are calculated with the next periodic statistics run (within 24 hours). - Regulatory code – select the code that identifies the kind of services you provide. In our example, leave the default VOIP option here (VoIP telephony service provider).
- Sales type – select Business.
- Line counting by – this option allows configuring the per-line taxation based on the number of customer service lines. Depending on the selected option, PortaBilling automatically calculates the number of lines to send to SureTax.
For our example, select the Number of accounts option, so the number of lines is calculated as the number of customer accounts, e.g., 30 customer accounts equal to 30 lines. This mode is recommended for cloud PBX customers. The other possible options:
- Max number of outgoing calls – the number of lines corresponds to the number of simultaneous outgoing calls (allowed on the customer/product level), e.g., 25 simultaneous outgoing calls equal to 25 lines. This mode is recommended for SIP trunking customers.
- Non-usage charges – this is a deprecated mode. The number of lines equals the number of units in xDRs, e.g., for a subscription, it is one unit.
- Tax code for counted lines – specify the tax code provided by SureTax to assess per-line taxes.
- Rounding precision – select the number of decimal digits to round the tax amount. SureTax uses mathematical rounding on tax amounts. If you leave the default option here 0.01 (2 decimals), the charged amount will be rounded to two decimal digits, e.g., 1.204 rounds up to 1.20, 1.205, and 1.206 all round up to 1.21.
- Summary type – select how to display taxes in customer invoice. You can leave the default option No summary to display the taxes separately. The other option is Summary by federal, state and local taxes, see the details in the UI help.
- Exemptions – optionally, you can select which taxes the customers of this customer class are exempt from.
Complete the customer class configuration as described in the Basic residential VoIP service handbook.
- Click Save.
Override taxation parameters for a customer (optional)
You can define different taxation parameters for a specific customer.
For example, your customer “SpaceNet” (with a “Cloud PBX customers” customer class) is exempt from both federal and state taxes. Also, since they have a complex configuration of the hosted PBX environment, it is not possible to correctly calculate the number of lines automatically. So the administrator has to manually assign the number of lines for this customer to properly assess the taxes via SureTax. To override the taxation settings of the customer class:
- Open the “SpaceNet” customer record > Finances > Financial info tab > Taxation section.
- Change SureTax (US, Canada) (As defined by the customer class) taxation plug-in to SureTax (US, Canada).
- Change Line counting by to the Manual entry option and manually assign the required value.
- ZIP code – set ZIP code to determine the correct tax jurisdiction.
- Lines – specify the corresponding number of lines.
- For Exemptions, click Add exempts and mark the Federal Excise Tax and State Taxes Exempt checkbox.

- Click Save.


