



In PortaBilling, several devices (for example, laptops, 3G/4G modems) associated with the same account can share a single Internet quota. Sharing can be done among multiple devices with static and/or dynamic IP addresses.
Let’s configure the following scenario. Prime Ltd. company owns three shops in different districts of a city. To provide accurate provisioning for their devices in all three shops, static IP addresses are required. Moreover, Prime Ltd. wants to share a single Internet quota among all three shops because they have a premium offer from their ISP (PortaBilling owner). Therefore, static IP addresses must be configured for three servers with the following MAC addresses:
- 07333777F1F1
- 07333777F2F2
- 07333777F3F3
It is possible for three more devices to have dynamic IP addresses and to share the same Internet quota as the servers. So their MAC addresses are the following:
- 07555111C900
- 07555111C901
- 07555111C902
Preliminary configuration
In this handbook we assume that you already have an operating system to provide Internet access service. Please refer to the Broadband Internet Access Services handbook for detailed information about how to configure rate codes, nodes, vendors, connections, tariffs and products, if required. The steps below describe how to supplement the operating configuration for your customers to assign static and/or dynamic IP addresses to multiple devices sharing the same Internet quota.
Enable the NetAccessVerifyMAC module on the Configuration server
- Go to the Configurations tab on the Configuration server.
- Clone the existing configuration.
- Select BillingEngine from the Configuration tree, then select the Custom group in the Groups section. Type in the following row in the LoadModules field:
verifymac=Porta::Extra::NetAccessVerifyMACThe NetAccessVerifyMAC module checks whether the device’s MAC address is authorized to use the Internet service. The module matches a static IP address with its corresponding device to enable quota sharing.
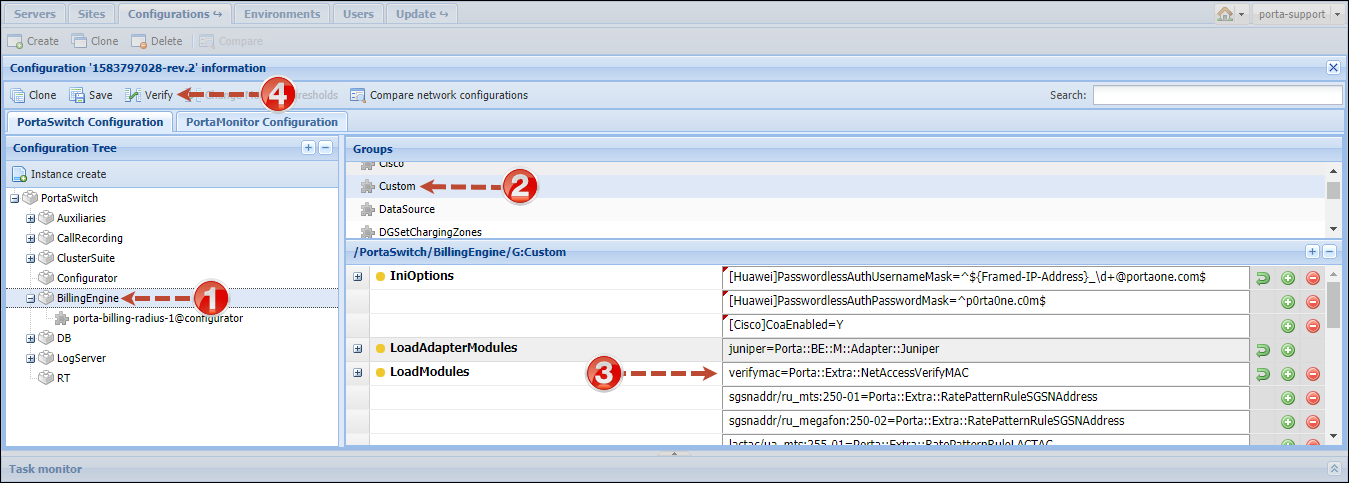
- Click the Save button and then the Check button.
- Verify the new configuration and click the Check/Apply button.
Create a service policy
Configuring an Internet access policy allows PortaBilling to identify the customer by using the device MAC address. Using the verify_mac module, the billing engine searches for the customer via the MAC address received in the authorization request.
Here are directions for what to do when an Internet access policy has not been previously created. However, if the Internet access policy was previously created and assigned to your product, go directly to the step 3.
- On the navigation menu, select Service catalog and click Service policies.
- Create + Policy and fill in the Service policy details:
- Service – select Internet access.
- Name – a short descriptive name for this Service policy. Type in Shared Quota here.
- Managed by – choose Administrator Only here.
- Description – specify verify_mac=customer to activate the verify_mac module.
It means that the billing engine searches for the customer via the MAC address used by the customer’s accounts and all their aliases. The other option is (verify_mac=alias), which is used to search for the customer via the MAC address used by the account’s aliases only.
- Match policy based on – select Diameter.
Refer to Internet access policy parameters section to see the parameters that can be specified here.

- Click Save.
- Open the created service policy.
- On the Access policy tab, use the slider to disable unlimited option and fill in the download and upload rates for all access types:
- Regular – a regular bandwidth rate that is used most of the time. In our example, the Download Rate is 1 mbps, the Upload Rate is 1 Mbps.
- Turbo – this defines a bandwidth rate for off-peak times. In our example, the Download Rate is 10 mbps, the Upload Rate is 10 Mbps.
- Limited – this usually restricts the bandwidth to an extremely low value, so that the customer can only access the Internet for checking his bill, making a payment, etc. Let’s specify 512 kbps here for the Download Rate and 120 kbps for the Upload Rate.
- Blocked – this access type prohibits Internet access (this rate cannot be changed).
- Configure the access type of usage on the grid that shows all of the week’s hours. Simply click on a cell within the grid to set a certain access type for that particular hour.

- Go to Attributes tab, in the Vendor-specific attributes section, select Cisco NAS for the Vendor option.
- Turn the Radius response slider and click Set default to autocomplete the Radius response values:
Service-Type= Framed-User
Idle-Timeout= 86400
Framed-IP-Address= 255.255.255.254
Framed-IP-Netmask= 255.255.255.255
Framed-MTU= 1500
This step is required only when your NAS communicates with PortaBilling via RADIUS.
- Click Save.
- Assign the Shared Quota Internet access policy to the product associated with the Internet service on the Internet access configuration panel.
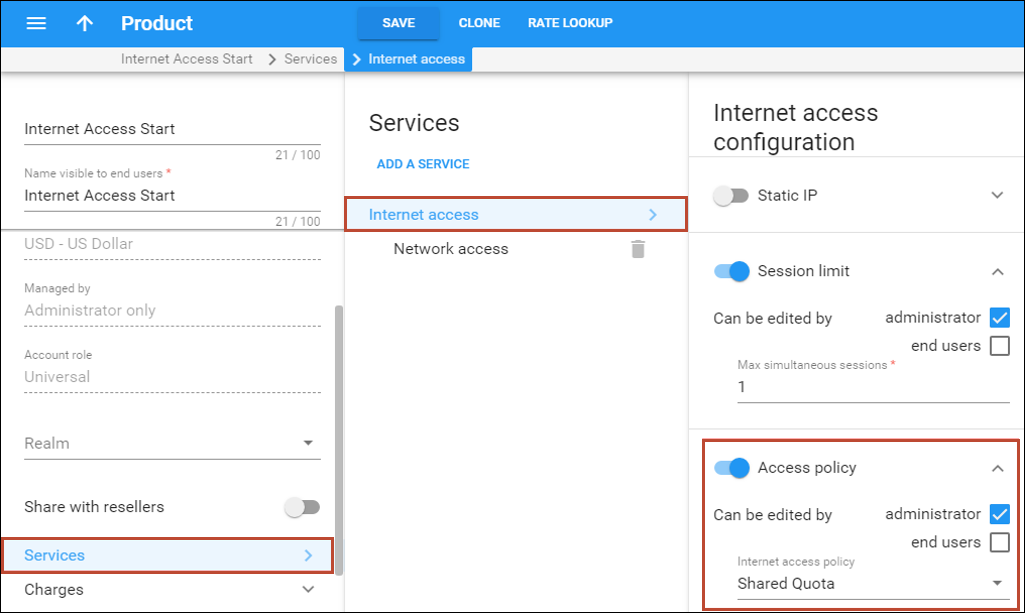
- Click Save.
Create a customer
A customer is an account owner of accounts. The customer’s contact information is used to distribute account usage information, internet access statistics, invoices, etc. In real life, this customer is an entity (company, retail customer, etc.) that owns multiple devices.
- On the navigation menu, select Sales, then select Customers.
- Click + Customer and fill in the customer details in the General tab:
- Balance control – specify the way the customer will pay for the service: Postpaid – after consuming the services; Prepaid – prior to consuming the services. Select Postpaid in this field.
- Name – type a short name for the customer object; this will be used on the web interface.
- Currency – choose the currency in which this customer will be billed.
- Credit limit – assign a credit limit for the customer.
- Business model – a business model defines what type of service is to be provided to the customer. Select Internet access for this customer.
- Customer class – customer class allows you to define a policy for automated payment collection. By choosing a specific class here, the customer will automatically inherit all of the class properties (grace period, invoice template, etc.).
- Billing period – choose a billing period for the customer. A billing period defines the frequency of invoicing for this customer.
- Billing period time zone – choose a time zone in which the customer’s billing period will be closed and invoices will be generated.

- Click Save.
Create a main account
Product assignment, quota tracking, and usage charges will be applied to the main account.
- On the customer’s panel, click Accounts / DIDs.
- Click + Account and specify the account’s details:
- General tab:
- Type – select Credit for your postpaid Internet users.
- Account role – select Universal.
- ID – the ID that will be used to authorize Internet access. In this example, it is prime.
- Service password – the account ID and this password are used to authenticate Internet users. Make sure you choose a password that is difficult to guess or crack. Use the Auto button next to the Service password field to generate a secure password.
- Balance control – select Subordinate from the list.
 TIP: You may use the MAC address of the user’s device as an account ID (e.g., when provisioning Internet access via MAC bridges). To do this, make sure to select Universal from the Account role list both during product configuration and during account creation.
 - Activation – leave the default value or select the date from which the account is usable.
- Expiration date – leave the default value or define when the account expires.

- Products tab:
- Product – select the main product that you want this account to have (e.g., Internet Access Start).
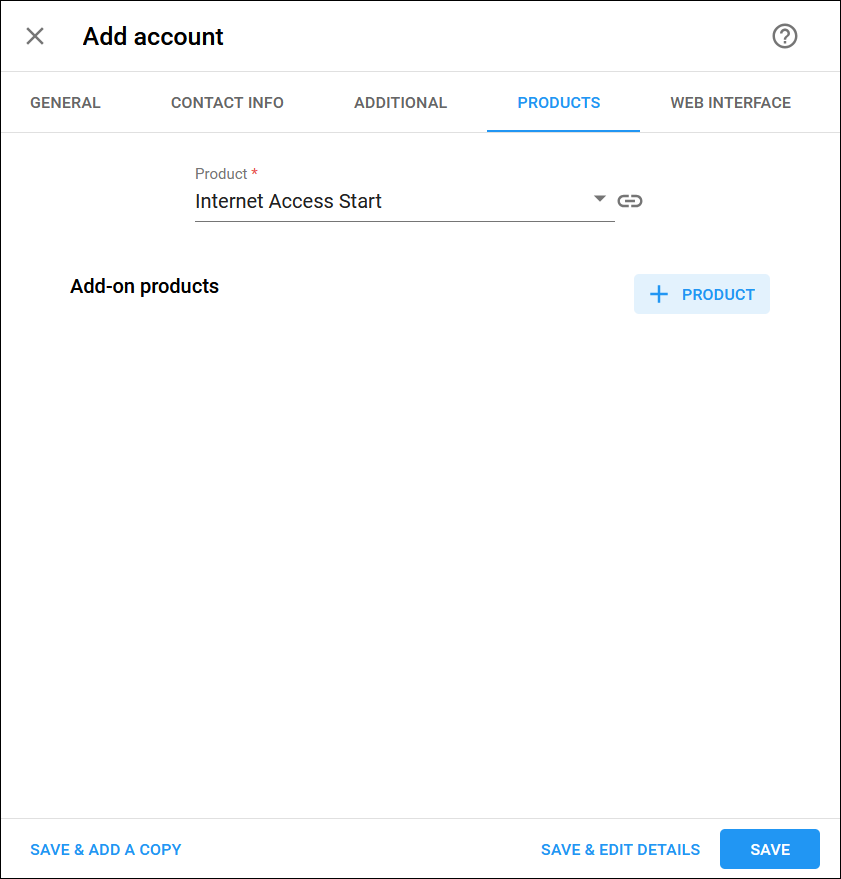
- Product – select the main product that you want this account to have (e.g., Internet Access Start).
- General tab:
- Click Save.
You may configure multiple main accounts if needed. Each main account will share an assigned Internet quota among the devices that work in conjunction with it. This makes it possible to use several shared Internet quotas under the same Customer.
- Go to the Internet access > General tab:
- Session limit – use a slider to enable the option to define a specific number of simultaneous sessions. Specify 3 to enable three devices with dynamic IP addresses using the Internet simultaneously.

- Session limit – use a slider to enable the option to define a specific number of simultaneous sessions. Specify 3 to enable three devices with dynamic IP addresses using the Internet simultaneously.
- Click Save.
Assign dynamic IP addresses to multiple devices
To add devices that have dynamic IP addresses, create aliases on the main account page for each such device in the Account_ID@MAC_Address format (e.g., prime@ 07555111C900).
- To create an alias, go to General info > Account aliases tab, click + Add, and fill in the details:
- Alias role – select Universal here.
- Alias ID – specify the alias in the Account_ID@MAC_Address format. In this example, prime@ 07555111C900.
- Allow authentication – disable this option.

- Click Save.
- Repeat steps 1-3 to assign aliases for all devices with dynamic IP addresses.

When any of these devices starts a session, PortaBilling locates its alias and authorizes NAS to assign a dynamic IP address to this device.
Assign static IP addresses to multiple devices
For devices that require a static IP address, create separate ad hoc accounts under the same customer in the Account_ID@MAC_Address format (e.g., prime@07333777F1F1) and configure the static IP address for each ad hoc account.
- On your customer’s panel, click Accounts / DIDs.
- Click + Account and specify the account’s details in General tab:
- Type – select Credit for your postpaid Internet users.
- Account role – select Universal.
- ID – the ID that will be used to authorize Internet access. Follow the compulsory template for account IDs – AccountID@MAC_address, where:
- AccountID equals the main account ID under the same customer (in this example, prime)
- MAC_address is the MAC address of the device with the static IP address.
- Service password – the account ID and this password are used to authenticate Internet users. Make sure you choose a password that is difficult to guess or crack. Use the Auto button next to the Service password field to generate a secure password.
- Balance control – select Subordinate from the list.
- Activation – leave the default value or select the date from which the account is usable.
- Expiration date – leave the default value or define when the account expires.
An administrator can assign any product to this account – all existing settings will be ignored by PortaBilling (and bypassed). These are auxiliary accounts with a single purpose – to supply the main account’s devices with static IP addresses.

- Click Save.
- Go to Internet access > General tab. Configure the static IP address:
- Static IP – select Enabled to enable this functionality.
- Static IP – specify the device’s static IP.
- Static IP Netmask – type in a netmask, or leave the default value: 255.255.255.255.

- Click Save.
- Repeat steps 1–5 for all devices that require the static IP address.
When one such device starts a session, it assumes the static IP address from the ad hoc account. When the session ends, PortaBilling charges the main account.


