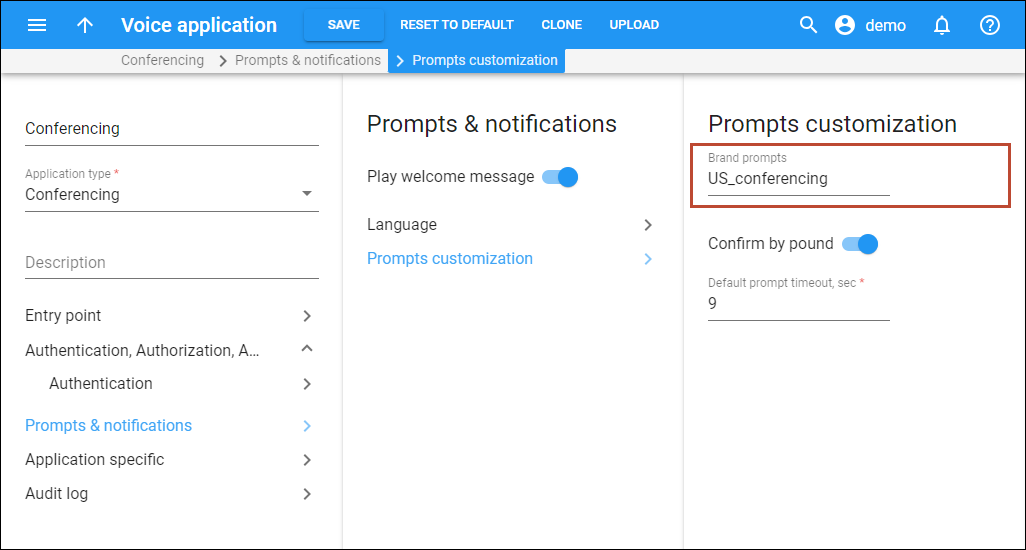
Brand prompts for the Conferencing voice application
Say you want the Conference voice application to play your custom prompts to users.
- Record a voice prompt, e.g., “Welcome to Armadillo Telecom” greeting, in the .wav, .mp3, or .mp4 format.
Give the prompt a proper name that corresponds to the prompt type, e.g., "conf_welcome.mp3" for a welcome message. If you need to configure other brand prompts, please contact the PortaOne support team for the proper name for other prompts.
- Copy the prompt file to your PortaSwitch server, e.g., to the /porta_var/tmp folder.
- Log in to a processing node via SSH.
- Convert the prompt into the .au and .g729 formats using the PortaOne converter – prompt_converter.pl.
For this, run the following command:
/home/porta-um/scripts/prompt_converter.pl --timeout 14 --config /etc/porta-one/psmsc/periodic–tasks–<SIP_IP>.conf --debug <file_name>
where file_name is the name of the file, and SIP_IP is the IP of the corresponding sip mu-bundle on your PortaSwitch server.
ExampleThe file name: conf_welcome.mp3
The SIP IP: 111.111.11.112
The command:
/home/porta-um/scripts/prompt_converter.pl --timeout 14 --config /etc/porta-one/psmsc/periodic-tasks-111.111.11.112.conf --debug conf_welcome.mp3
You can also convert all files on the server of the .mp3 format at once. Specify “*” as the file name, e.g., *.mp3 will convert all files in the .mp3 format.
- After the conversion, you need to change the prompt names using the following command:
rename 'new_' '' *.au *.g729
ExampleThe file names after the conversion: new_conf_welcome.au and new_conf_welcome.g729
The command:
rename 'new_' '' *.au *.g729
The file names after applying the command: conf_welcome.au and conf_welcome.g729
- Create new folders to place the brand prompts there. For this, run the following commands:
mkdir /porta_var/psmsc/custom-files/prompts/brands/<your_custom_name>
mkdir /porta_var/psmsc/custom-files/prompts/brands/<your_custom_name><language>
mkdir /porta_var/psmsc/custom-files/prompts/brands/<your_custom_name><language>/conferencing
where <your_custom_name> is the name of the folder for your custom prompts. The same folder name should be specified in the Brand prompts field of a voice application settings in step 9.
Instead of the <language> for the second folder, use the two-letter code of the language the prompts are recorded in.
ExampleIf the folder name is US_conferencing and the prompt language is English, then the command will be:
mkdir /porta_var/psmsc/custom-files/prompts/brands/us_conferencing
mkdir /porta_var/psmsc/custom-files/prompts/brands/us_conferencing/en
mkdir /porta_var/psmsc/custom-files/prompts/brands/us_conferencing/en/conferencing
- Place the brand prompts in the newly created <your_custom_name>/<language>/conferencing folder by using the following commands:
mv conf_welcome.au /porta_var/psmsc/custom-files/prompts/brands/<your_custom_name>/<language>/conferencing
mv conf_welcome.g729 /porta_var/psmsc/custom-files/prompts/brands/<your_custom_name>/<language>/conferencing
ExampleFor example, if the folder name is US_conferencing and the preferred language name is English, then the command will be:
mv conf_welcome.au /porta_var/psmsc/custom-files/prompts/brands/us_conferencing/en/conferencing
mv conf_welcome.g729 /porta_var/psmsc/custom-files/prompts/brands/us_conferencing/en/conferencing
If you want to move all the files of a specific format at once to a needed folder, then use *.au and *.g279 instead of the file names. So the commands will be:
mv *.au /porta_var/psmsc/custom-files/prompts/brands/us_conferencing/en/conferencing
mv *.g729 /porta_var/psmsc/custom-files/prompts/brands/us_conferencing/en/conferencing


