



A hotspot is a physical location where people may connect their phones, laptops and other devices over WiFi to access the Internet either for free or for a fee. Before they access the service, users land at the captive portal where they subscribe and/or login, accept the terms of use and can then select their service access options.
PortaBilling contains a captive portal for WiFi hotspot services. This enables you to configure WiFi access points in public places like cafes, libraries, airports, etc. plus generate revenue by selling WiFi vouchers to prepaid users.
The supplied captive portal interoperates only with Huawei BNG (Broadband Network Gateway) and is a sample model. It consists of a front-end web application and a back-end signup module that are both customizable. Your in-house or outsource developers can extend it to interoperate with other WiFi routers and access points that you use. Or, they can use it as the base when building your customized captive portal.
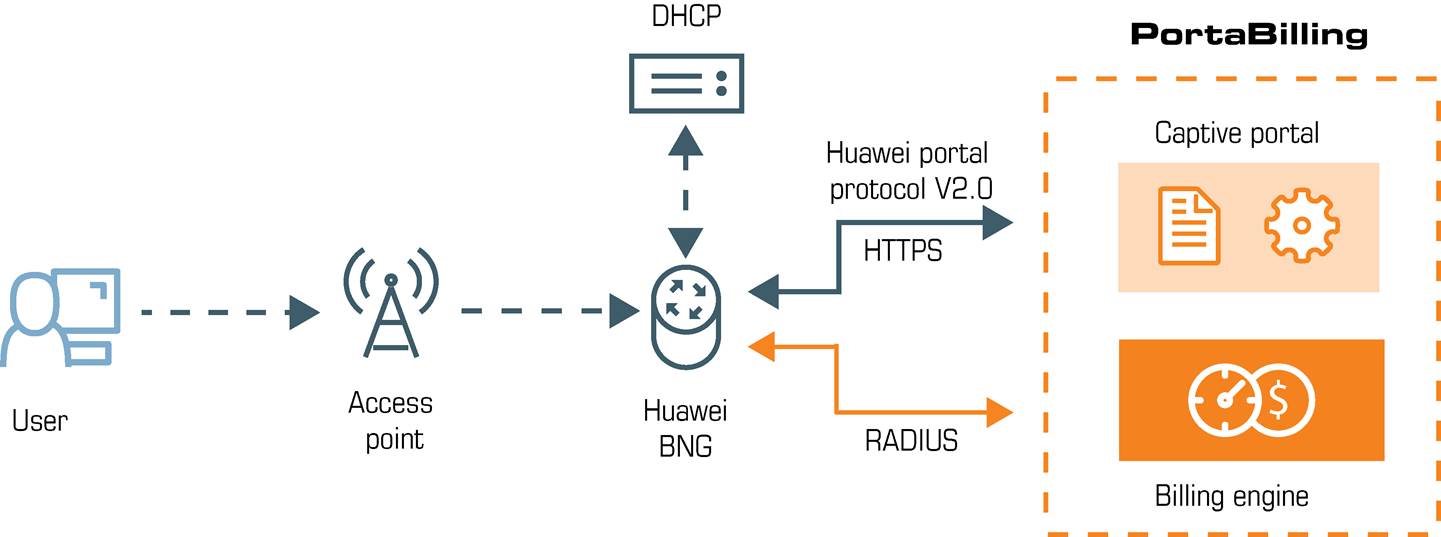
This chapter demonstrates how to configure PortaBilling to provide WiFi hotspot services to prepaid users via WiFi vouchers.
Preparation
The BNG configuration is outside the scope of the present document, so please follow the Huawei configuration guidelines to configure BNG and provision the following information about the billing server to it:
- The server’s IP address;
- The authentication key for RADIUS communication;
- The authentication key for communication with the signup module via the Huawei portal protocol V2.0;
- The port for sending authorization requests (1812 by default);
- The port for sending accounting requests (1813 by default);
- The URL of the captive portal (by default, accessible at https://<your_web_server_IP>:443/captive_portal).
Your WiFi access options include the following:
- 30 minutes free per day;
- $10 vouchers for 1 hr. and
- $15 vouchers for 2 hrs.
Once the user is authorized for the service, they see their session status and their remaining time.
Configuration overview
- Setup on the Configuration web server interface
- Add a rate code
- Add a node
- Create a WiFi vendor
- Set up the service package
- Set up a mobile subscriber
- Set up the captive portal
- Testing
1. Setup on the Configuration web server interface
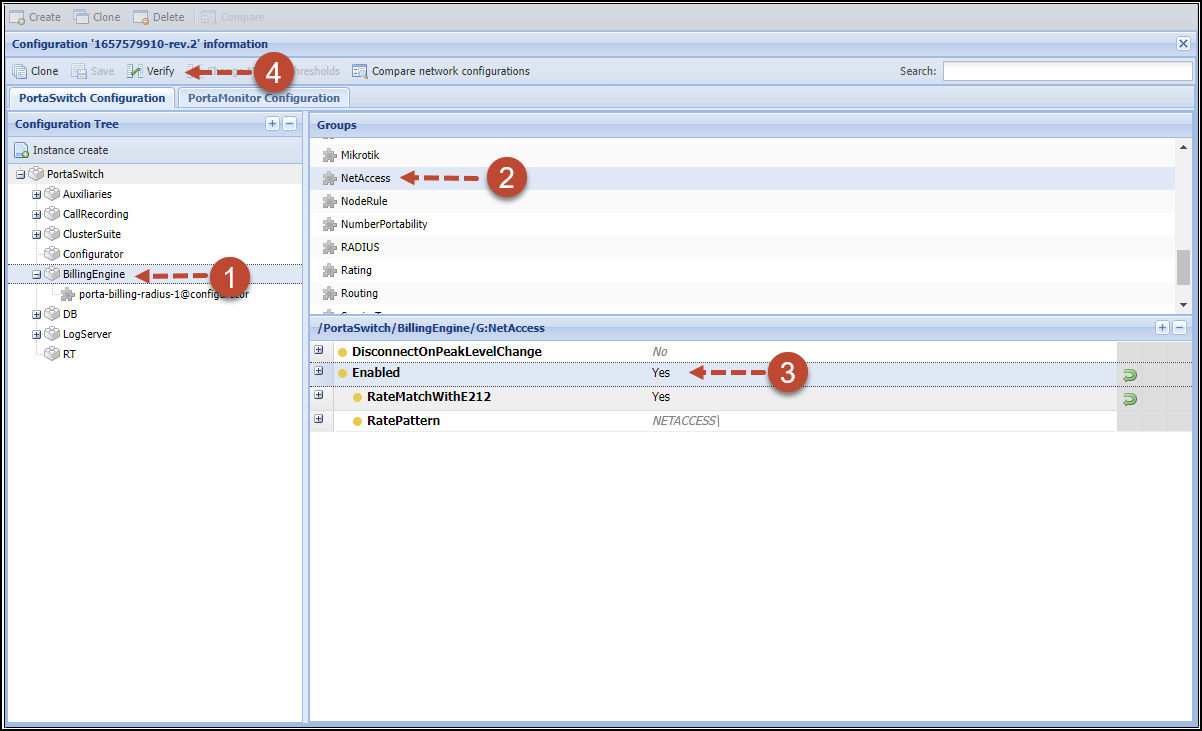
Enable the NetAccess service on the Configuration server web interface:
-
- In the Configuration Tree, click on the BillingEngine node.
- On the Groups panel, select the NetAccess group.
- For the Enabled option, select Yes.
- Click Save and then click Verify.
- Verify the new configuration and click Check/Apply.
2. Add a rate code
- Go to Service catalog > Rate codes.
- Click Add and fill in the new rate code details:
- Format – select Custom.
- Prefix – type in WiFi.
- Description
– provide some descriptive information about this rate code.

- Click Save.
3. Add a node
This step is only required if you have not entered your BNG into the system before.
A BNG is a trusted gateway and must therefore be entered as a node in PortaBilling. PortaBilling requires some key information about your network equipment such as an IP address, Node ID, RADIUS shared secret, etc.
- On the navigation menu, select Infrastructure > Nodes.
- Click + Add and fill in the node details:
- Name – a short descriptive name for this node (e.g., Huawei BNG).
- Node ID – the BNG host name (recommended hostname.domainname).
- IP – the IP address of the node.
- Manufacturer – select Huawei.
- Type – select BRAS.
- Click
Save&Edit.

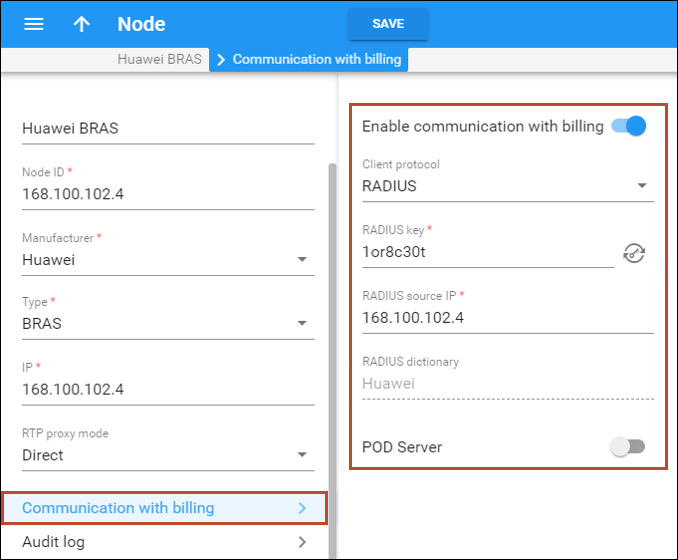
- On
the Communication with billing section, use
the slider to enable the Communication with billing
option and fill in the node details:
- Client protocol – select RADIUS to enable the BRAS (node) to communicate with PortaBilling via RADIUS.
- RADIUS key – enter the RADIUS secret key you specified in the BNG configuration.
- RADIUS
source IP – see the Node ID, IP and Radius source IP
section of the PortaBilling Administrator
Guide. Unless your node has multiple network interfaces,
the value here will be the same as for the IP.
- Click Save.
4. Create a WiFi vendor
Follow the Create a vendor tariff, Enter rates, Create a vendor and Define connections steps from the Prepaid WiFi services handbook to add a vendor for WiFi services in PortaBilling.
5. Set up the service package
5.1 Create a customer tariff
To provide WiFi access services to customers, create a tariff, which will be applied to WiFi users. Follow these steps:
- On the navigation menu, select Service catalog and click Tariffs.
- Click + Tariff and fill in the tariff details:
- Name – type in a short name for the tariff object; this is the name you’ll see in the select menus.
- Currency
– select the currency in which you will charge your customers.
The currency for the tariff is only chosen once and cannot be changed later.
- Service – select the Wi-Fi service.
- Applied to – select Customer.
- Managed
by – select Administrator only here.

- Click Save&Edit.
- On
the Rates page, click + Rate and fill in rate details:
- Rate code – type the WiFi rate code directly or select it from the list.
- Rating mode – select Flat rate here.
- Effective
from – if you want this
rate to take effect sometime in the future, you can either type in a date
manually, or use the calendar (click on the DD-MM-YYYY link).
When using the calendar, you can specify that the date you are entering is in a different time zone than your present one. PortaBilling will then automatically adjust the time.
- Interval – type in 1 here.
- Price – type
in zero here as your internet provider doesn’t charge you based on session
time.

5.2 Create a code group set and a code group
At this stage, you must create a code group set to use for your bundle configuration.
- On the navigation menu on the left, select Service catalog, Rate codes and click Code group sets.
- Click + Add, fill in the required information:
- Name – type in a descriptive name for the code group set (e.g., WiFi access);
- Type
– leave the default type Regular.

- Click Save&Edit.
- Click + Add, type in the code
group name, and provide a short description.

- To add the WiFi code to the created code group.
- On the Code group page, click the default All rate codes.
- On the Rate code search panel, select Custom from the Format list, type in WiFi to find the desired destination and click Apply filters.
- On
the Rate code list panel, select the WiFi prefix and click
Move to group.

- Select
the code group (WiFi in our example) and click Assign.

5.3 Create bundles
At this stage, you need to create two bundles: one to provide free service volume (Renewable by calendar bundle) and another to provide prepaid access options (One-off with top-ups bundle).
Configure the “Renewable by calendar” bundle
- On the navigation menu on the left, select Service catalog > Bundles.
- Click + Add, fill in the bundle details.
- Name – a short descriptive name for this bundle, e.g., Free WiFi access.
- Currency
– select the currency you use to charge your customers.
The currency for the bundle may only be chosen once (at creation) and cannot be changed later.
- Code group set – choose the code group set you created in the previous steps, WiFi access.
- Bundle type – select “Renewable by calendar”.
- Managed by – leave the default Administrator only value here.
- Apply bundle if a rate code is found that – leave the default option “Matches the rate exactly”.
- Description
– specify an extended bundle description.

- Click Save.
- Open the created Bundle and go to Bundle items.
- Click Add and fill in the bundle item details:
- Service – select Wi-Fi here.
- Code group – select WiFi.
- Measured as – select Service used, minute.
- Service volume – specify 30.

- Click Save&Edit details.
- Go to the Notifications panel and specify when a user receives a notification that the service volume is depleted. Set 5 in the Remaining peak period volume drops below option and when a customer uses 95 out of 100 minutes of their service volume, they receive a notification.

- Click Save to save your changes.
Configure “One-off with topups” bundle
- Go to Bundles, click Add, and fill in the bundle details:
- Name – a short descriptive name for this bundle, e.g., Paid options.
- Currency
– select the currency you use to charge your customers.
The currency for the bundle may only be chosen once (at creation) and cannot be changed later.
- Code group set – choose the code group set you created in the previous steps, WiFi access.
- Bundle type – select “One-off with top-ups”.
- Managed by – leave the default Administrator only value here.
- Apply bundle if a rate code is found that – leave the default option “Matches the rate exactly”.
- Description
– specify an extended bundle description.

- Click Save.
- Open the created Bundle and go to Bundle items.
- Click Add and fill in the bundle item details:
- Service – select Wi-Fi here.
- Code group – select WiFi.
- Measured as – select Service used, minute.
- Initial balance – specify 0.

- Click Save (you will be redirected to the Bundle item panel).
- Go to Bundle item > Top-up configuration and define top-up options (in our example, for 60 and 120 minutes).

- Click Save.
5.4 Create a main product
To access your services, accounts will be created for your users and assigned specific products. Products are a powerful tool to define different ways to bill an account. Product definition is always realized through these steps: product definition, service definition and configuration and then the rating list is created.
- On the navigation menu, select Service catalog and click Products.
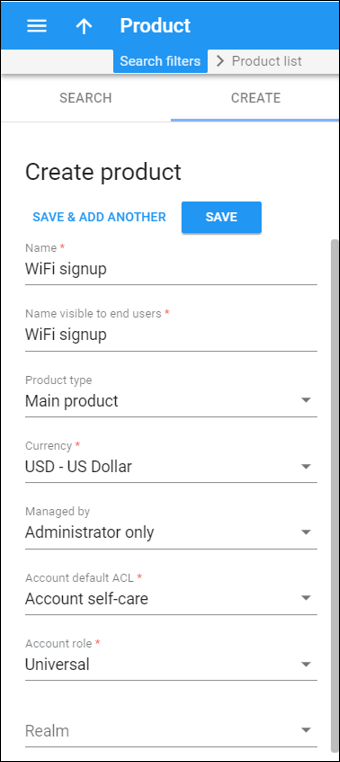
- On the Create product panel,
fill in the product details:
- Name – type in a short name for the product object; this is the name you will then see in the select menus.
- Name visible to end users – Specify the name of this product that your customers will see on their self-care interface.
- Product type – select Main product here.
- Currency – choose a currency the product will be priced in.
- Managed by – select Administrator only here, since we are setting up a service without the involvement of resellers.
- Account default ACL – choose an Access Control List (ACL) for accounts with this product assigned. ACLs control which objects end users can gain access to and which actions they can perform.
- Account role – select Vouchers from the list.
- Click Save.
Included services
Define which service types are included in the product. A service type is a description of the physical service provided to end users.
To add a service type:
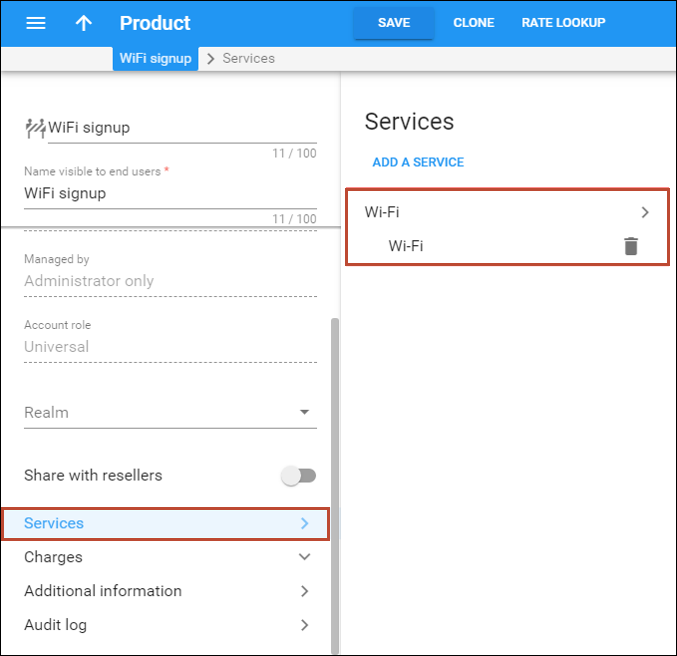
- On your product’s panel, click Services.
- On the Services panel, click Add a service.
- In
the Select services to add dialog box, select WiFi access
and click Add.
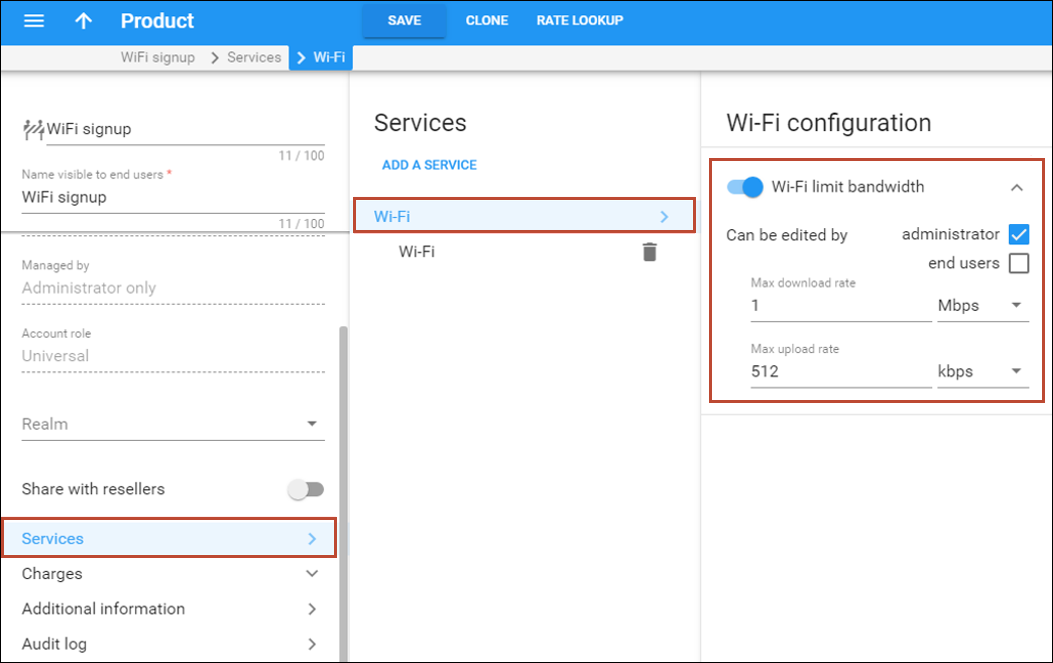
- Click
the WiFi link to limit WiFi bandwidth. Specify maximum upload/download
speed.
Usage charges
The rating list has two functions: it defines the access points permitted (nodes and access numbers) and specifies which tariff must be used for billing in each of these points.
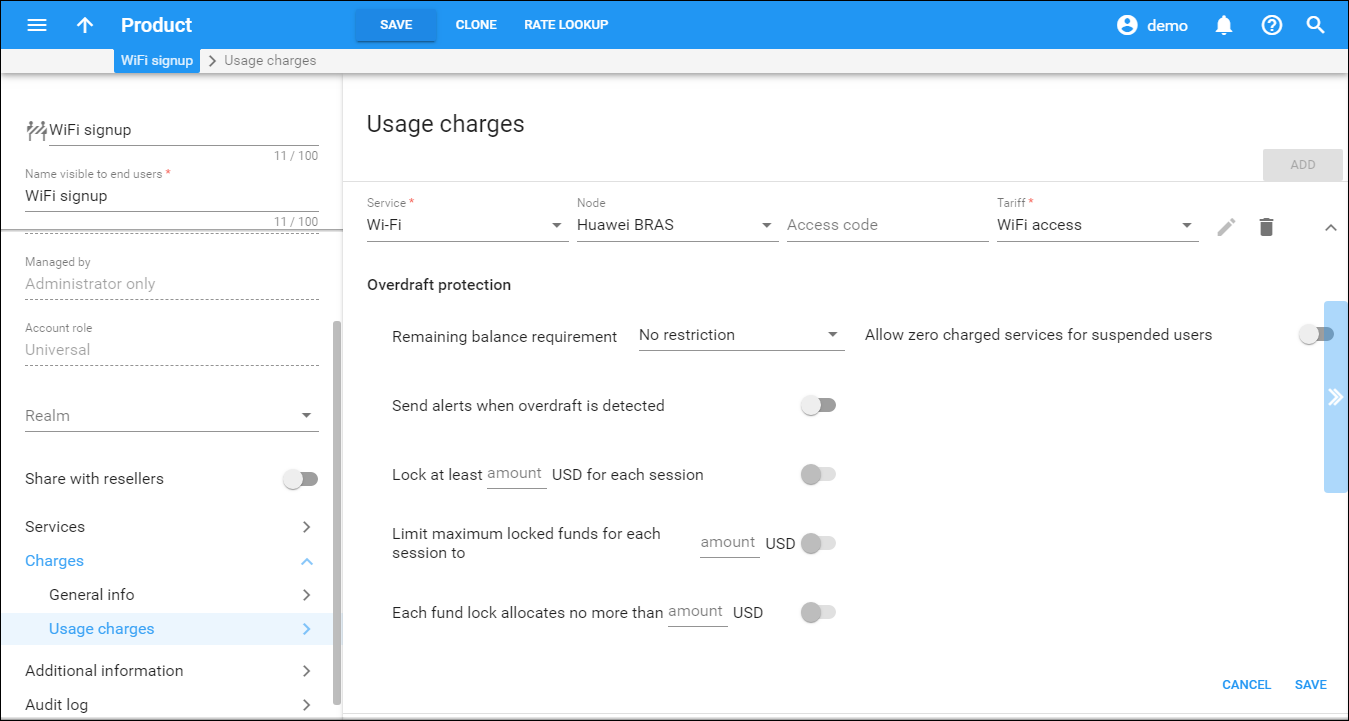
- On your product’s panel, click Charges, then click Usage charges.
- On the Usage charges panel, click Add.
- Fill
in the required information:
- Service – select WiFi.
- Node – select the Huawei BRAS node.
- Access code – leave this field empty for the basic SIP service.
- Tariff – select the WiFi tariff you created before.
- Click
Save.
- Click
General info and associate the bundle with the free
service volume with this product.

- Click Save to save the changes.
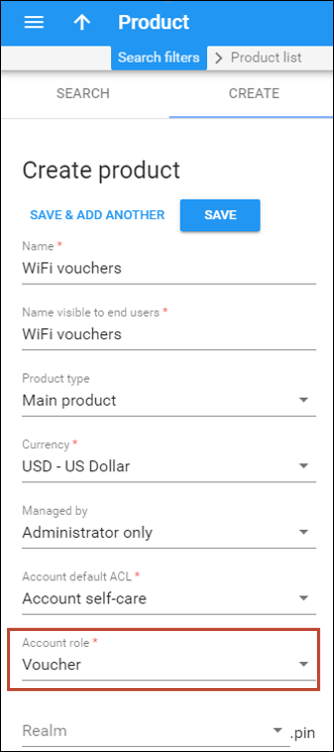
- Repeat
steps 1-4 and create another main product with the Voucher account
role. This product is only required to generate vouchers. Therefore, you
can use the same tariff you created in previous steps for definitions
of usage charges.
5.5 Create an add-on product
- Click
the
 arrow
icon to return to the Products panel.
arrow
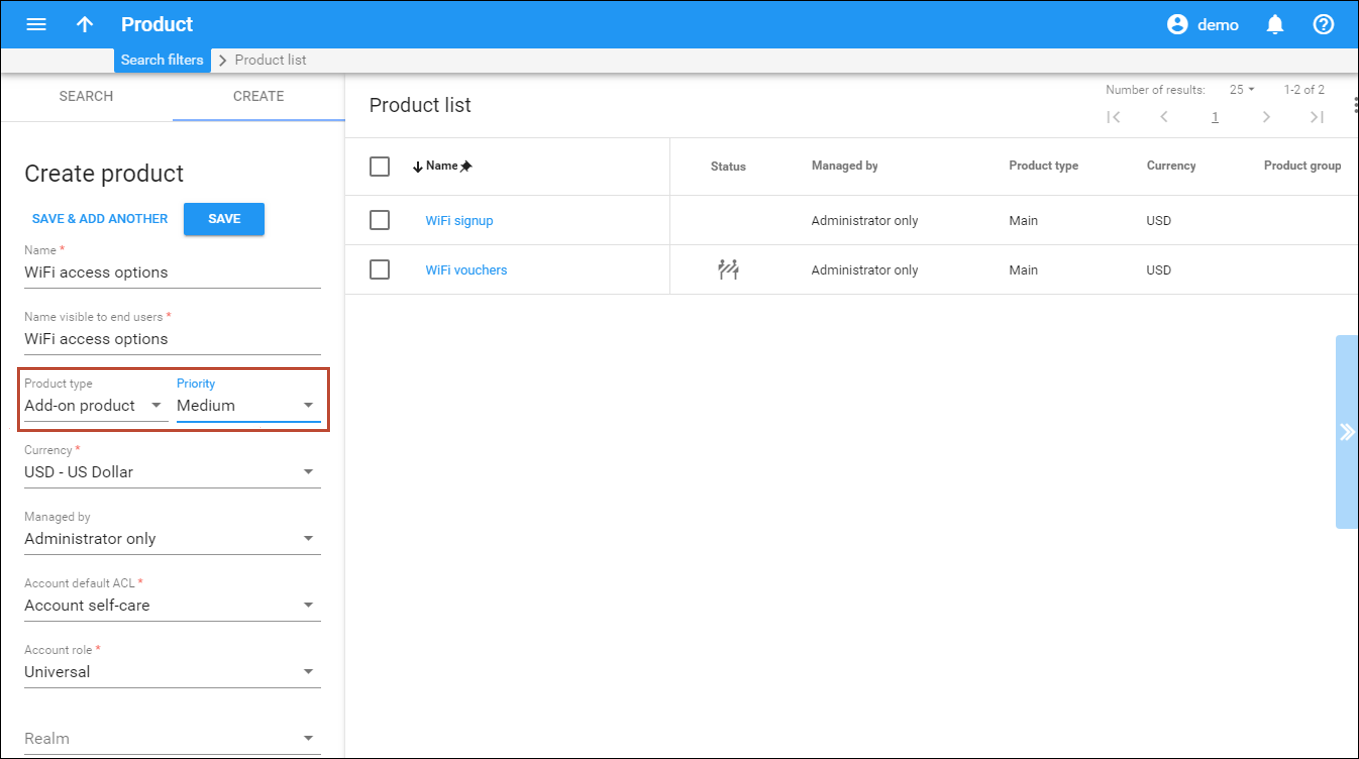
icon to return to the Products panel. - On the Create product panel,
fill in the product details:
- Name – type in a short name for the product object; this is the name you will then see in the select menus.
- Name visible to end users – specify the name of this product that your customers will see on their self-care interface.
- Product type – select Add-on product here.
- Priority – specify the product’s priority.
- Currency – choose the currency the product will be priced in.
- Managed by – select Administrator only here, since we are setting up a service without the involvement of resellers.
- Account default ACL – choose an Access Control List (ACL) for accounts with this product assigned. ACLs control which objects end users can gain access to and which actions they can perform.
- Account role –
select Universal from the list.
- Click Save.
- On
the product panel that opens, click Charges, then General info
and the bundle with the topup options from the Default
bundle list.

- Switch to the Additional information panel.
- Click
the Add product button in the Add-on product is allowed with
section and select the main product you just created.
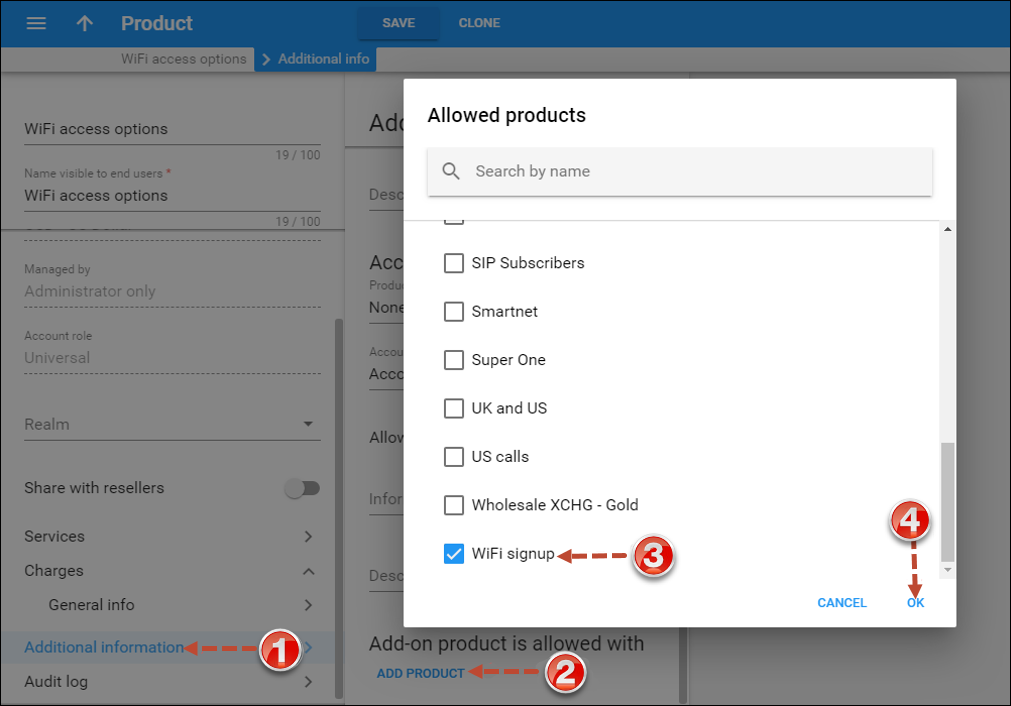
- Click OK.
- Click Save to save the changes.
6. Set up a mobile subscriber
6.1 Create a customer
In this case, the customer record is used to store vouchers and accounts to be created for your WiFi users.
- On the navigation menu, select Sales, then select Customers.
- Click + Customer and fill in the customer details:
- Balance control – specify the way the customer will pay for the service. Select Prepaid in this field.
- Name – type a short name for the customer object; this will be used on the web interface.
- Currency – choose the currency in which this customer will be billed.
- Available funds – since this customer is used as a placeholder for storing accounts, the number amount of available funds is insignificant. Type zero here.
- Business model – a business model defines what type of service is to be provided to the customer. Select Universal for this customer.
- Customer class – customer class allows you to define a policy for automated payment collection. Since you will not issue invoices nor collect payments for this customer, leave the Default customer class here.
- Billing period – choose a billing period for the customer. A billing period defines the frequency of invoicing for this customer. Leave the default monthly value here.
- Billing
period time zone – choose a time zone where customer’s billing period
will be closed and invoices will be generated.

- Click Save.
6.2 Generate vouchers
Vouchers grant users access to your paid access options. To differentiate between WiFi access options, generate vouchers in separate batches according to the top-up options you defined for your bundle. Give descriptive names to these batches to keep your vouchers well organized (Examples of batch names: “$10 for 60 minutes”). The voucher opening balance must be the same as the fee value you defined within the bundle item top-up options.
For more information about batch management, please read the Provisioning Prepaid Accounts section.
In our example, we will generate two batches for vouchers, one for 60-minute access and another for 120-minute access. The voucher opening balances are $15 and $20, respectively.
- On the customer panel that opens, click Accounts / DIDs.
- On the Accounts tab, click Account generator.
- Specify
the account generation parameters in the General tab:
- Account role – select Voucher.
- Opening balance – value (e.g., 10).
- Product – select the main product you created for voucher generation.
- Quantity – define the number of vouchers to generate.
- Batch – specify the batch name.
- Requires manual activation – make this option disabled to generate vouchers with the active status.
- Life
cycle – specify the activation/expiration dates for the vouchers using
the calendar. By default, vouchers are active for 90 days after their
activation date.
 Account generation tasks are executed every few minutes, so it may take a while to generate large numbers of accounts.
- Go to the Additional tab:
- ID length – leave the default 11 characters.
- Service
password – select Empty from the list.

- Click Generate. Repeat step 3 and generate another batch of vouchers for 120 minutes of WiFi access. Specify $15 as the opening balance.
6.3 Create a root user
When a user registers for the service, the signup module creates an account for the user in PortaBilling via the API. To make this happen, you must provide the API access to the PortaBilling web server by creating the user with root permissions.
- From the navigation tree, select My company > Users.
- Click + Add and fill in the new user details:
- Login – specify the login for this user.
- Password – specify the password for this user.
- Email – type in your email to receive the user credentials upon creation.
- Role
– define the access role for this user. Select Root from the list.

- Click Save&Edit.
- Select
Web interface panel and enable the API token access option.
The API token is now generated.

- Click Save.
7. Set up the captive portal
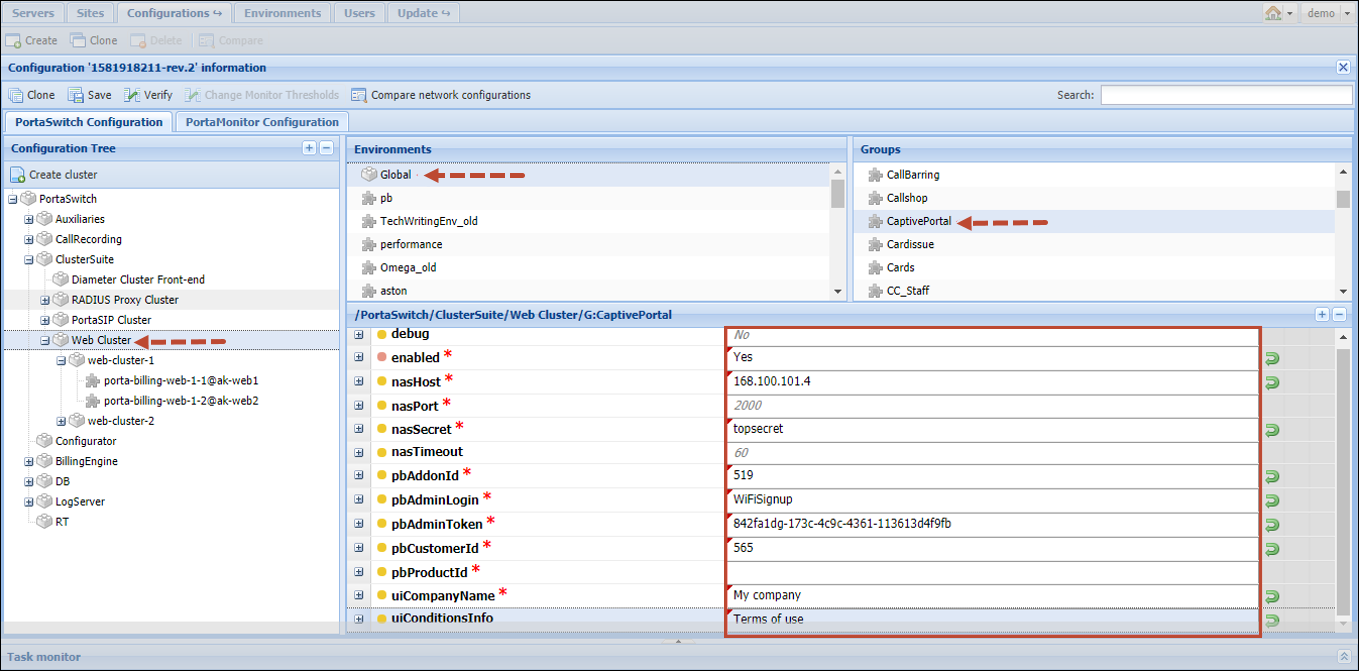
- On the Configuration server web interface, clone the currently active configuration to modify it.
- From the Configuration tree, select ClusterSuite > WebCluster.
- Select
the CaptivePortal group and configure these options:
- enabled – set Yes.
- nasHost – specify the IP address of your BNG.
- nasPort – specify the port on your BNG (the default one is 2000).
- nasSecret – specify the authentication key for communication with PortaBilling via Huawei portal protocol V2.0. It must be the same as the one you defined during the BNG configuration.
- pbAdminLogin – specify the login of the user you created for the API access to PortaBilling.
- pbAdminToken – specify the API token generated for the user.
- pbProductId – specify the internal ID of the main product (i_product) you created for WiFi access (WiFi signup in this example).
- pbAddonId – specify the internal ID of the add-on product (i_product) you created in the previous step (Paid options in this example).
- pbCustomerId – specify the internal ID of the WiFi card owner (i_customer).
- uiCompanyName – define your company name. Users will see it on the captive portal page.
- uiConditionsInfo
– specify your terms of use here.
TIP: To find the internal ID of the customer and products, connect to PortaBilling via the API and call these API methods:
To find the ID of the main product:
-curl https://<your_web_server>/rest/Product/get_product_list

-d auth_info='{"session_id":"session_ID"}'

-d params='{"name":"WiFi signup"}'
To find the ID of the add-on product:
-curl https://<your_web_server>/rest/Product/get_product_list

-d auth_info='{"session_id":"session_ID"}'

-d params='{"name":"WiFi access options""}'
To find the ID of the customer:
curl https:// <your_web_server>/rest/Product/get_product_list

-d auth_info='{"session_id":"<session_ID>"}'

-d params='{"name":"WiFi access options"}'
Alternatively, you can find the internal ID number via the web interface: they are the last digits in the URL when you open a record.
- Click Verify to verify the configuration.
- Click
Check/Apply to apply the configuration.
Note that the Apache service will need to be restarted, therefore apply the configuration during off-peak times.
8. Testing
- Connect to WiFi from your device.
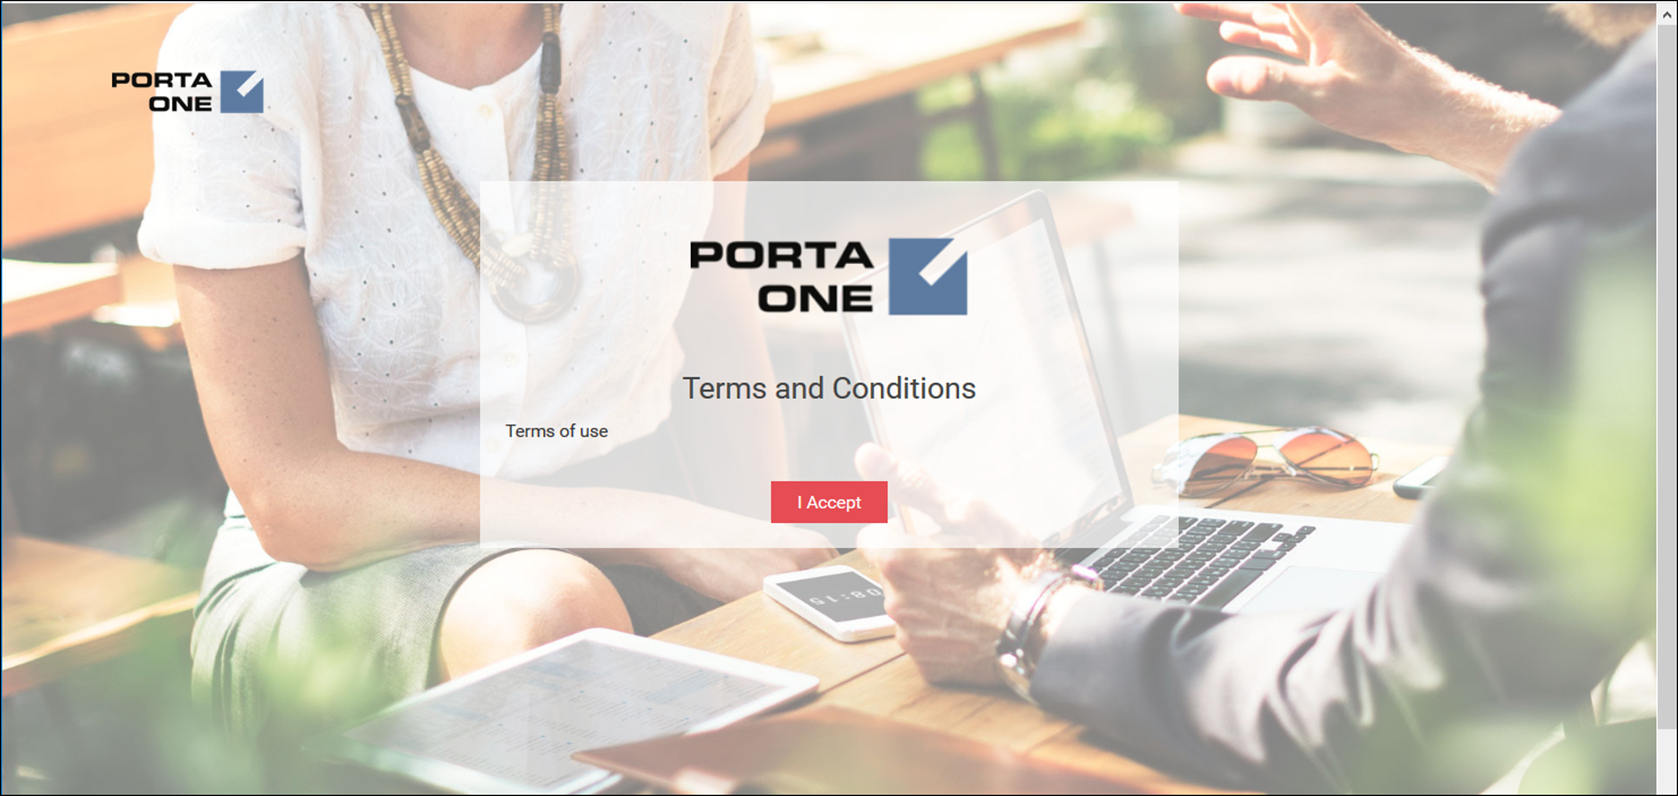
- You are redirected to the captive portal page.
- Accept
the terms of use.
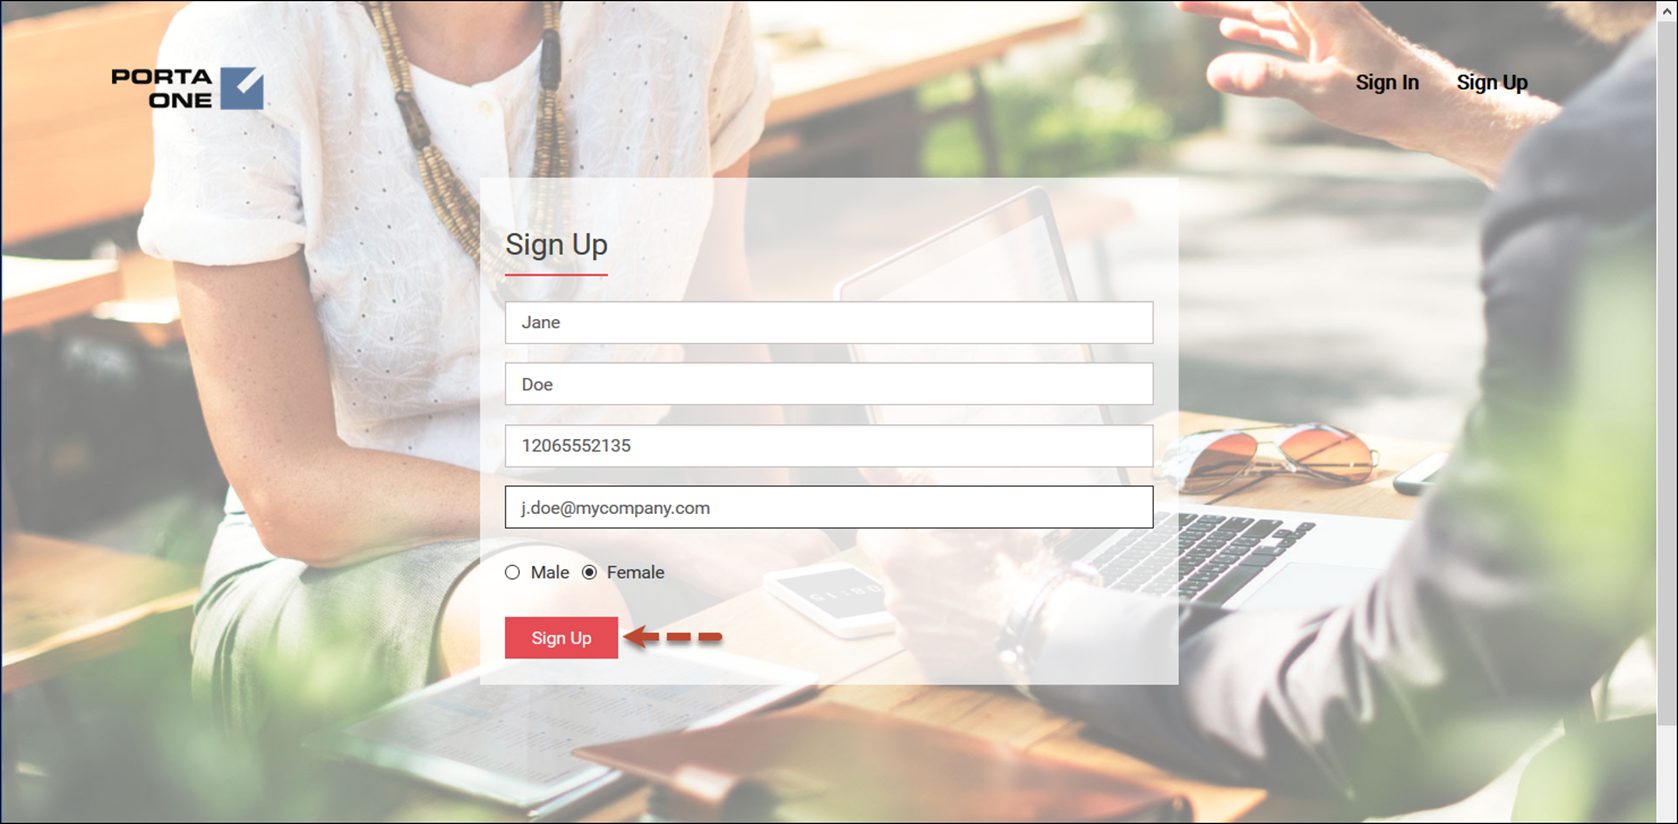
- Enter
your information for signup and click Sign Up.
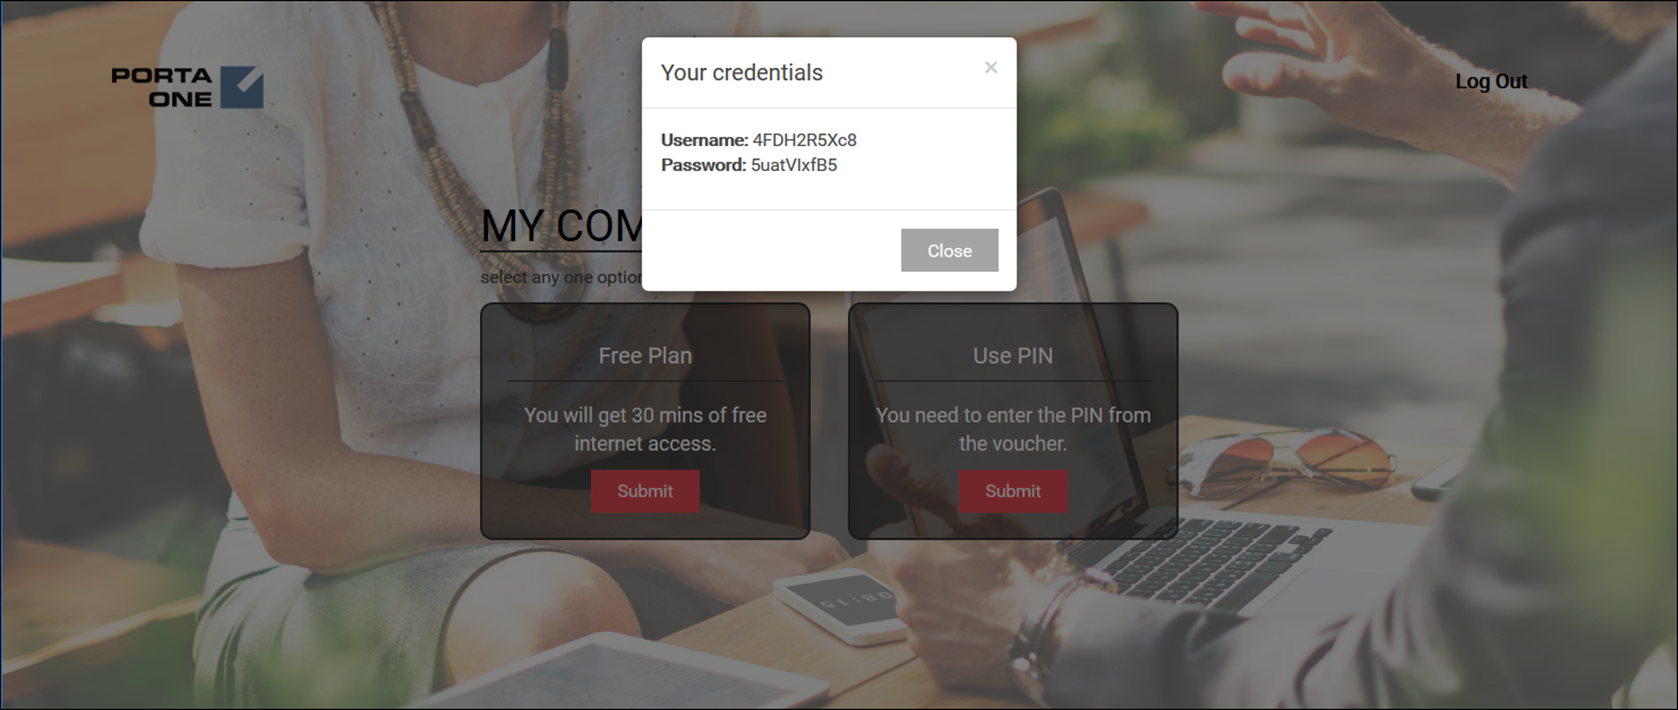
- Your
WiFi access credentials are returned. Store them somewhere so you can
log in later and then click Close.
- Select
the Use PIN option and enter a voucher PIN.
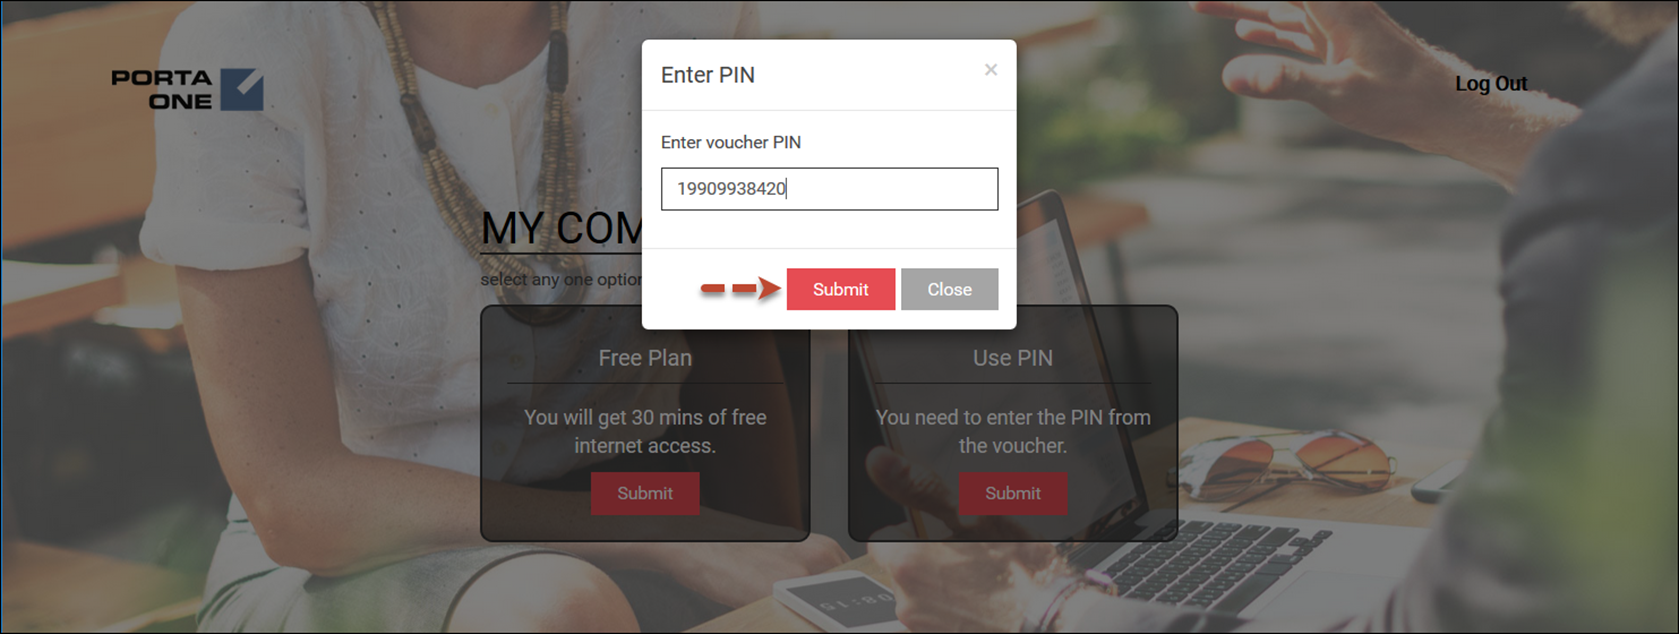
- Click Submit.
- You
are now connected to WiFi and can see your remaining time.



