



On this tab, you can define how to process incoming user calls.

Call forwarding
Select a forwarding mode to process incoming calls:
-
Follow-me allows users to define multiple destinations for call forwarding, each of which is active in its own time period. Users can also specify that multiple numbers be tried one after another, or that they all ring at the same time, or that they are tried, percentage-wise, depending on the total number of incoming calls.
-
Advanced forwarding provides extra options for the follow-me mode. Users can select the SIP proxy to which PortaSIP routes their calls.
-
Forward to SIP URI allows end user to enter a forwarding destination as a phone number and an IP address in the format CLD@IP or CLD@domain. PortaSIP round-robins through DNS SRV records if they are configured for the specific domain. This mode is useful when calls are forwarded to an external SIP proxy. To use SIP URI forwarding, it is required to configure a dedicated connection to route calls directly to the external SIP proxy.
-
Simple forwarding forwards all calls, unconditionally, to a single phone number pre-defined by the user.
Maximum forwards
This specifies how many forwarding destinations are concurrently active at any given moment. It doesn’t limit the total number of phone numbers entered into the forwarding list by the user. For example, a user may have a list of 20 numbers, each active in its own time period, some temporarily turned off, etc. When call forwarding is done, PortaBilling computes a list of numbers which may be used at that moment, and chooses only the first N in the list, where N is the number specified in Maximum forwards.
This option is active only when call forwarding is enabled.
Forward by DTMF
Select the checkbox to allow users to transfer incoming calls forwarded to their mobile phones from their PBX extensions by dialing DTMF tones on their mobile phone. Users stay on the line until the other party picks up.
For example, if a user receives a call to his mobile phone and needs to transfer it to his colleague at extension 1002, he dials *661002#, and when his colleague confirms that she is free to take the call, he hangs up.
Forwarding settings
Order
Specify the order for redirecting a call:
- As listed – try every active forwarding number from the first (topmost) number to the last, until the call is answered.
To change the number order in the list, select a specific forwarding number using Reorder
 and drag it up or down.
 - Random – try numbers in random order.
- Simultaneous – call all active forwarding numbers from the list at the same time until the call is answered.
- Percentage split – try numbers based on the percentage specified.
Percentage %
This field is only available when a Percentage list order is selected.
It shows the percentage of calls that PortaSwitch sends to a specific number. Note that the total percentage for all numbers in the forwarding list should be 100%. When you add the new forwarding number, it has 0% set by default.
Note that when the Percentage list order is selected, you can delete a forwarding number only when the percentage value of the remaining numbers on the list equals 100. For example, if you have 3 forwarding numbers with the following percentages: 50% to 18005558901, 15% to 18005558902, and 35% to 18005558903, and need to delete 18005558902, do the following:
- delete the 18005558902 number;
- change the percentage values for the remaining numbers so that their total percentage equals 100 (e.g., 60% to 18005558901, 40% to 18005558903); and
- save the changes.
Name
The name of the forwarding number, e.g., “mobile phone”.
Forward to
Specify a phone number to forward calls to. It will be translated according to the customer’s dialing rules.
SIP URI
An end user can enter a forwarding destination as a CLD@IP or CLD@domain. PortaSIP will round-robin through the DNS SRV records if they are configured for a specific domain.
Timeout
Specify how much time to wait, in seconds, until a call is answered. After the timeout, the call is either redirected to the next forwarding number or disconnected.
Add time periods
Define the period when it’s allowed to send calls to a specified number. By default, the calls are forwarded to this number 24/7.
To set a specific period, click Add period and specify the period details in the dialog that opens:
- Time – define the time for the period:
- Start time – define the exact time when the period starts.
- End time – define the exact time when the period ends.
If you want the period to take the whole day, turn on the Select whole day toggle. Click Continue to proceed.
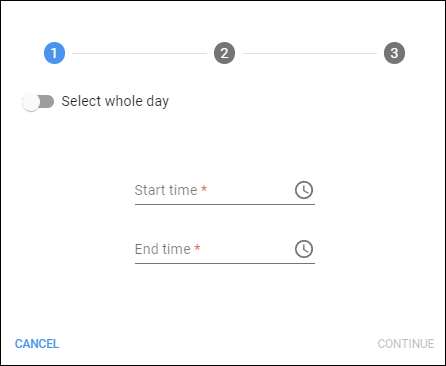
- Days – define the days of the week and/or of the month for the period:
- Days of the week – click on the specific days of the week to add them to the period.
- Days of the month – specify days of the month as comma-separated values, e.g., 1, 4, 5. To add a day's period, specify the values separated by dashes, e.g., 15-30.
If you want the period to cover the whole month (all days), turn on the Select all days toggle.
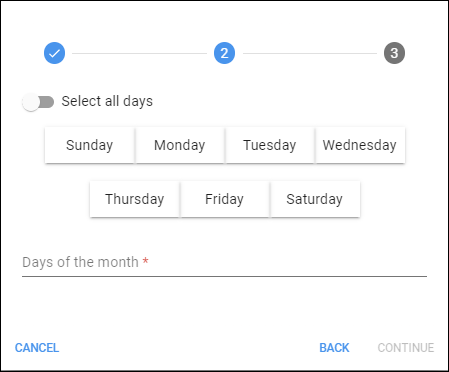
- Months – click the names of the months you want to add to the period. If you want the period to cover all months of the year, turn on the Select all months toggle.

- Click Finish to save the period configuration.
To delete the period, click Delete  . To change the period, click Edit
  .
.
To add more periods, click Add  and specify the details in the dialog that opens.
Calling party display
Choose how to display a caller's info during forwarding:
- Caller number and name – the call is forwarded with the phone number and the name of the original caller (e.g., if A calls B, but the call is forwarded to C, C will see that it is A who is calling).
- Caller number and forwarder name – the phone number of the caller and the forwarder name are put into the CLI of the forwarded call (e.g. if A calls B, but the call is forwarded to C, C will see A’s phone number and B’s name).
- Forwarder number and name – the call is forwarded with the phone number and the name of the forwarder (if A calls B, but the call is forwarded to C, C will see that it is B who is calling).
Limit simultaneous calls to
When the specified number of concurrent calls has already been established (calls are in a "connected" state) and the account tries to place another call, that call will be rejected.
Add a new forwarding number
To add a new forwarding number, click Add  .
.

Disable forwarding to a specific number
To temporarily disable forwarding to a specific number, turn off the toggle near a specific number.

Delete a forwarding number
To delete a forwarding number, click Delete to delete the forwarding number. Note that at least one number should be left.
Protocol
Choose the UDP, TCP, or TLS protocol.
To use SIP over TLS, enable the corresponding option in the Configuration server web interface and upload the TLS certificates.
Keep original CLD
With this option, preserve the original dialed number during forwarding. This is useful for forwarding a call to a remote PBX.


