Customer search
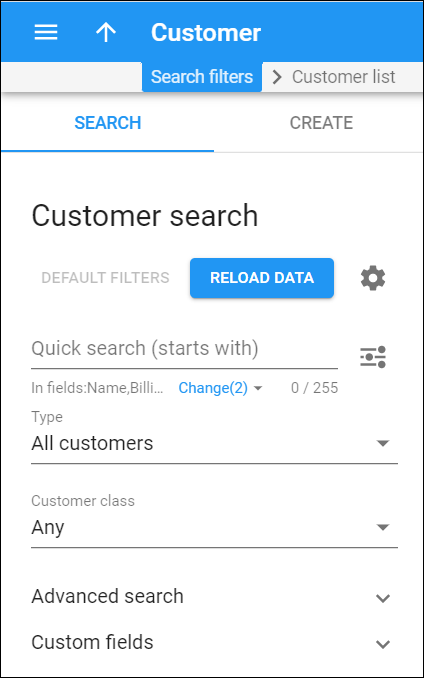
Use the Customer search panel to find a specific customer. Specify one or more of the search criteria listed below and click Apply filters. Click Default filters to reset search criteria.
PortaBilling loads the customer list automatically, once you open the page. To disable data autoload, click Settings .
To refresh the search results, click Reload data.
Quick search
Filter customers by name and other fields, e.g., billing address, login, phone, etc. By default, the quick search is performed only by name.
To set the search through other fields, click Change right under the Quick search field and select the corresponding checkboxes. Once the options are selected, the changes are automatically saved and applied to the next searches.
By default, PortaBilling searches for customers by their data that starts with your input. To change the search filter, click Search filter and select another option:
- Exactly matches – PortaBilling filters customer data that exactly match your input.
- Starts with – PortaBilling filters customer data that start with your input.
- Contains – PortaBilling filters customer data that contain your input anywhere in the content.
- Ends with – PortaBilling filters customer data that end with your input.
Type
Filter customers by type.
- Select Direct customers to display customers who deal directly with your company. Direct customers can be resellers, distributors or retail customers.
- Select All customers to search among your customers and customers of your resellers.
- Select Subcustomers of resellers to search among customers of your resellers.
Customer class
Filter customers by customer class.
- Select Any to search among customers with any customer class assigned.
- Select a particular customer class to display customers with this customer class assigned.
Advanced search
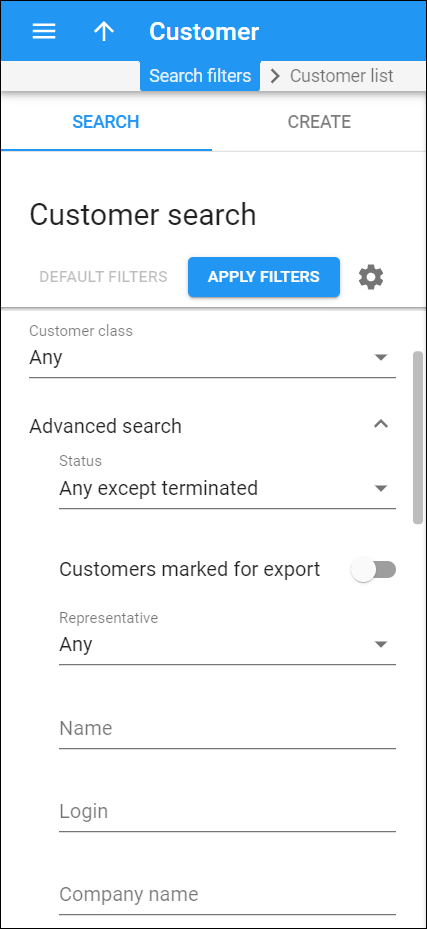
To obtain more precise results, click to open advanced search criteria.
Status
Filter customers by status:
- Select Any to search among customers with any customer status.
- Select Any except terminated to display all customers except those having the Permanently terminated status.
- Select Open to display customers who can use their services without any restrictions.
- Select Provisionally terminated to display customers who became provisionally terminated after the grace period expired for paying overdue invoices. When provisionally terminated, all of a customer’s services stop, although their data remains in the database so an invoice for the last billing period before the day of termination can be issued. You can reactivate the customer’s services if the customer changes their mind later on. The default period for reactivation is 30 days. You can change this in the customer class. If not reactivated, a customer’s status automatically changes to Closed.
- Select Permanently terminated to display customers who ultimately decide to discontinue their services and therefore, are terminated permanently in the system by an administrator. All services for such customers are permanently closed and cannot be restored.
- Select Suspended to display customers suspended because of an overdue invoice. Once the customer makes a payment in full to cover the overdue invoice, the suspension is automatically lifted.
- Select Exported to display customers whose data has been transferred to a new PortaSwitch installation. For such customers, both service provisioning and billing are stopped on the source and target systems.
- Select Service limited to display customers who now receive a limited amount/volume of services (e.g., lower Internet speed) due to an overdue invoice(s). The customer can still dial emergency numbers and receive incoming calls, though regular recurring charges apply. Once payment is received (via online payment, periodical payment, or an administrator inputs/sends a cash/check payment manually), the limit is automatically lifted.
- Select Spending limit reached to display customers whose daily expenses reach the defined limit. The spending limit is renewed at 00:00:00 each day. Once the limit is renewed, the Spending limit reached status is lifted from the customer.
- Select Credit limit exceeded to display customers whose current balance is higher than the credit limit value. The customer can’t use paid services though complementary services (e.g., calls to toll-free numbers) remain available.
- Select Export in progress (billing paused) to display customers who are currently in the process of migration to the target system with Dual Version PortaSwitch. The billing processes for these customers are paused: PortaBilling can’t close the billing period, calculate taxes, and generate invoices. Subscription charges won’t apply. The administrator can’t void, recalculate and re-issue invoices. However, they can change the customer information such as contact details, credit limit, payment method, etc. The customer can use their services and access the self-care interface (as it was on the source system before the migration). Once the migration is finished, the status is automatically changed to the customer’s pre-migration status, e.g., Active or Suspended.
Customers marked for export
Turn on the toggle switch to see customers marked for further export. These are customers who are included in the nearest porting run.
Representative
Filter customers by their representative. Representatives work on behalf of the company, selling services for a commission that is paid by the service provider.
Other search criteria in this section relate to the customer contact information and are self-explanatory. You can also search customers by the information defined in custom fields. Fill in the respective search criteria fields.
Custom fields
Search customers by the custom data you specified for them in custom fields.
Create customer
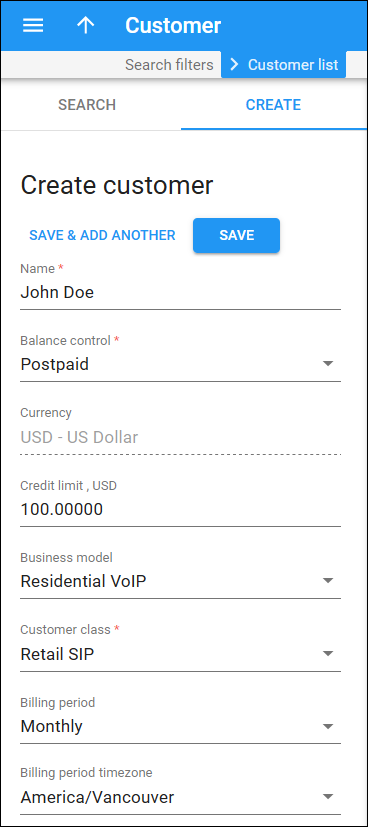
A customer is your client (an individual or a company) to whom you provide the services. To create a new customer, fill in the customer details and click Save.
Customer name
Type a unique name for the customer.
Balance control
Choose customer’s balance model: either prepaid (a customer who pays for services in advance) or postpaid.
Currency
Choose a currency to charge the customer in.
Credit limit
Set up a credit limit for the customer (only for postpaid customers). To prevent misuse of services and fraud traffic, it is highly recommended that you set up a credit limit for postpaid customers. When the customer’s balance reaches that credit limit, this customer is no longer allowed to use the services.
Available funds
This is an initial customer payment (only for prepaid customers). Customers who have a prepaid balance model first pay for the services and then use them (e.g., customers will not be able to make outgoing calls or surf the Internet without topping-up the balance first).
The balance for prepaid customers is shown as a positive value and indicates how much of the services can be used with the funds currently available.
Business model
Choose a business model for the customer. A business model defines what type of service is provided to the customer (for example, hosted IP PBX, Internet access, etc.).
Customer class
Choose a customer class for the customer. A customer class defines a set of parameters shared among a certain category of customers. For example, you can create two separate classes – one for retail customers and the other for business customers, plus define the relevant parameters for each class. After that, you only need to assign the required customer class to all customers of a given category to ensure that all of them have the same parameters (such as grace period, invoice template, taxation, notification list, etc.).
Billing period time zone
Choose a billing period for the customer. A billing period defines the frequency of invoicing for this customer.
Custom data
Additional fields appear here if you have assigned a mandatory custom field via a customer class. Here you enter customer’s additional information to the system (e.g., driver’s license ID or tax code, etc.).


