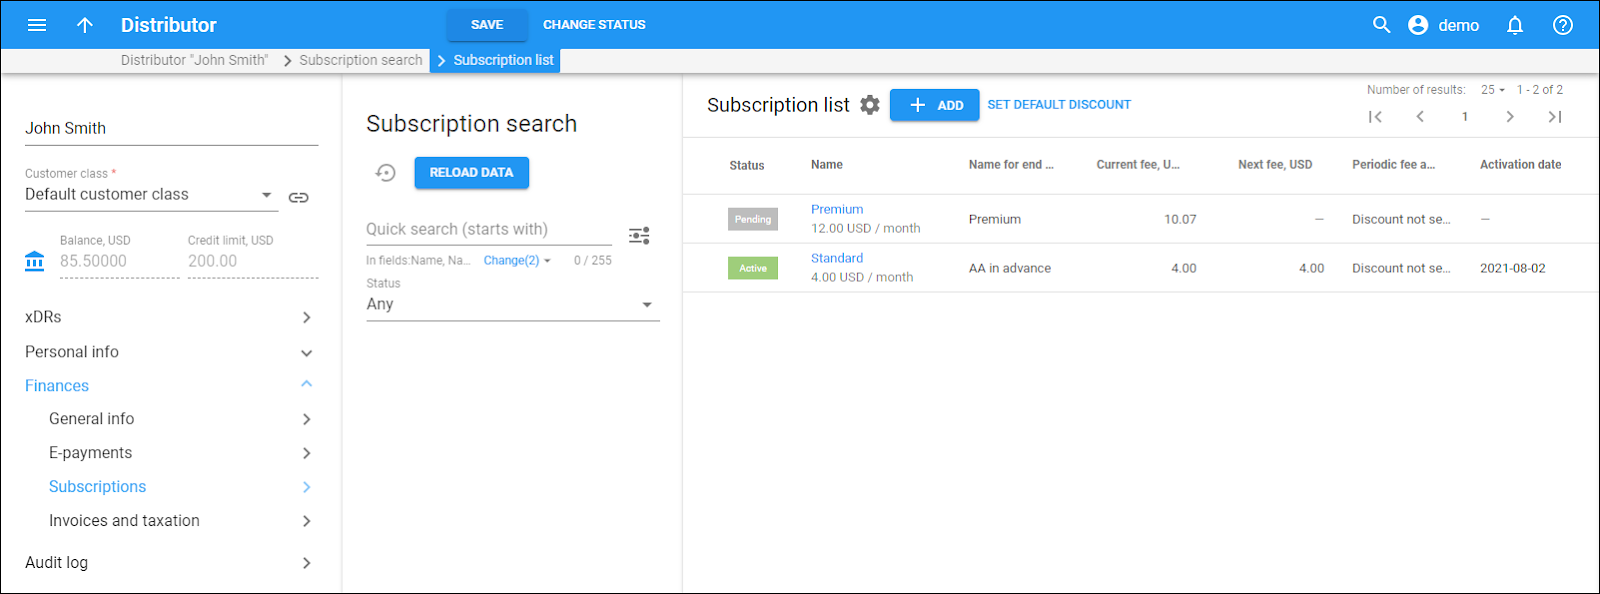
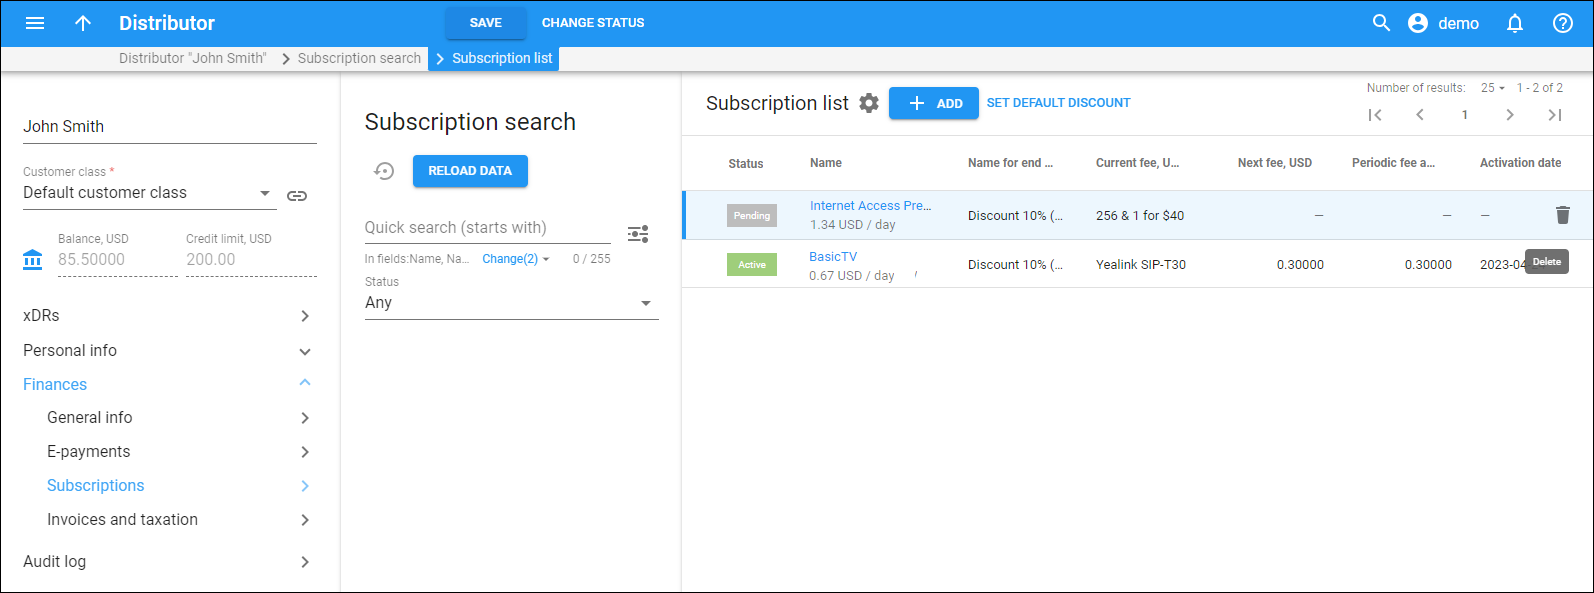
This panel displays the list of subscriptions assigned to this distributor that match your search query.
You can manage these subscriptions, assign more subscriptions to the distributor, and set the default discount.
Each subscription record, the following information is shown:
Status
The status of the assigned subscription:
- Pending – subscriptions that are not yet active and will be activated in the future.
- Active – currently active subscriptions (the distributor is billed for these subscriptions).
- Closed – subscriptions that have already been closed.
Name
The subscription name which is also the link that leads you to the Edit subscription dialog. Under the name, you can see the standard subscription fee per distributor’s billing period.
Name for end users
The subscription name that end users will see on their self-care web interface.
Current fee
The amount of money that is charged for the current billing period.
Next fee
The amount of money that will be charged for the next billing period.
Periodic fee adjustment
This shows whether you increase or reduce a recurring fee for this distributor.
- No adjustment – the standard subscription fee is applied. Even if the default discount is set for the distributor, this discount will not apply to this specific subscription.
- Default customer discount – the default discount that is set for the distributor will be applied to the subscription, e.g., “Discount 10% (default)”. With this option, even if the default discount is not currently set, it will be applied to this subscription once set for the distributor in the future.
- Discount – a fixed discount amount or a discount rate is applied to this specific subscription, e.g., “Discount 15%”.
- Upcharge – a fixed amount or an upcharge rate is applied to this specific subscription to increase the subscription fee, e.g., “Upcharge 8 USD”.
Activation date
This shows the date when the subscription is activated. Note that if an activation fee is defined for a subscription, it’s applied on the activation date.
Billed to
The end date of the billing period to which the subscription applies.
Start date
The date when the subscription should be activated. This date is set when assigning the subscription to the distributor.
Finish date
The closing date of the subscription.
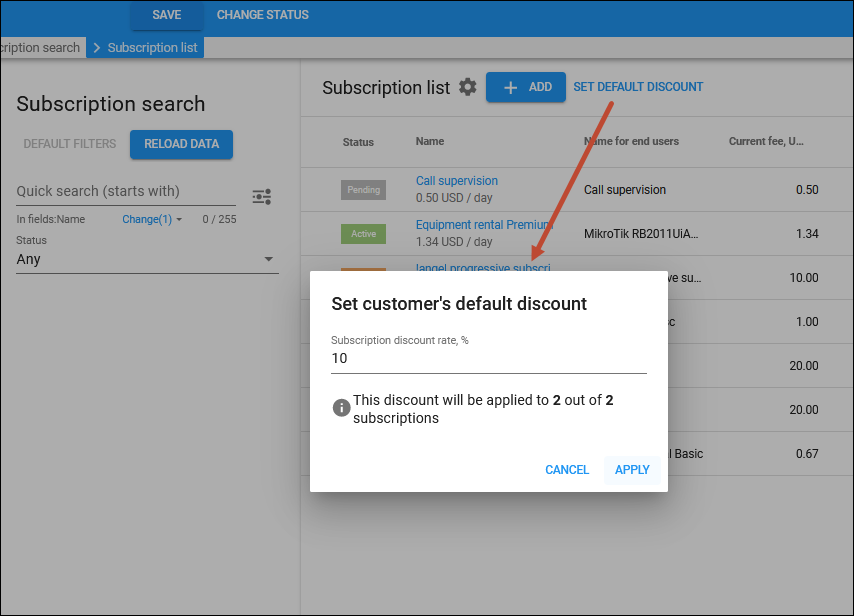
How to set a default discount for all subscriptions used by the distributor
You can reduce the subscription periodic fees for a specific distributor by providing them a discount that by default will apply to all subscriptions assigned to the distributor. You can manually change/remove this default discount for a specific subscription when you assign a new subscription to the distributor (or by editing an already assigned subscription).
Note that the 100% discount rate means “free service”.
To set a default discount for the distributor:
- Click Set default discount on the toolbar.
- In the Set customer’s default discount dialog, specify the default discount rate for the distributor’s subscriptions, e.g., 10.
When you change the default discount for the distributor, e.g., from 10 to 15%, the new rate will automatically apply to all subscriptions with the Default customer discount option selected in the Periodic fee adjustment field.
- Click Apply.
How to add a subscription
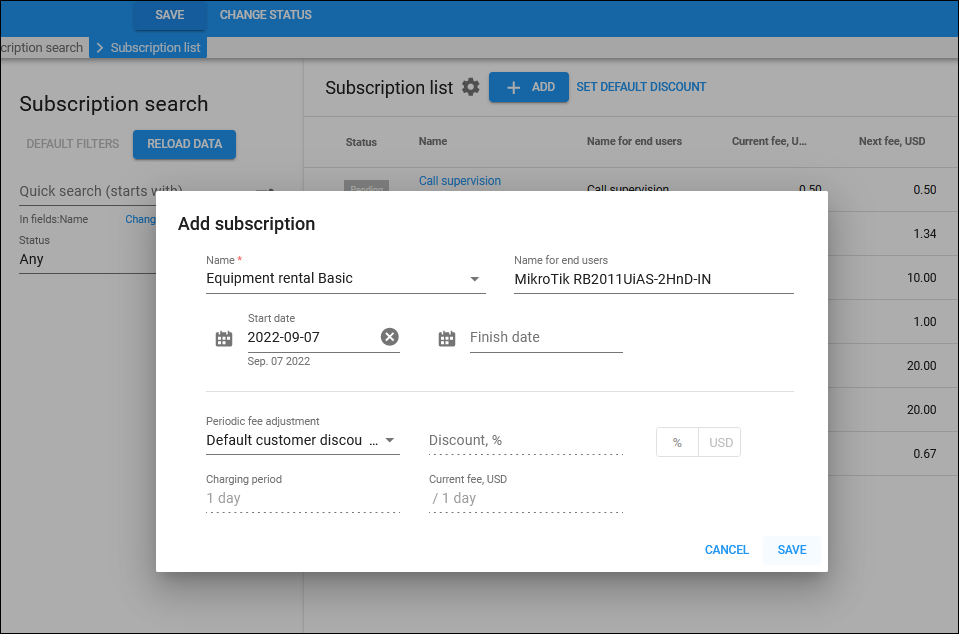
To assign a subscription directly to the distributor:
- Click Add on the toolbar.
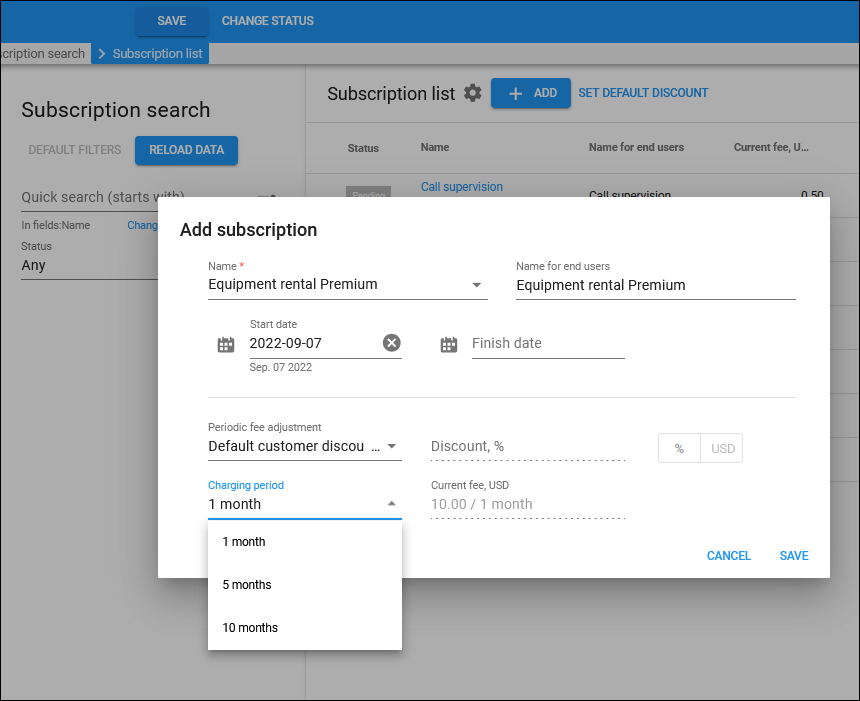
- Fill in the information in the Add subscription dialog:
- Name – select the subscription from the dropdown list.
- Name visible to end users – type a clear subscription name that end users will see on their self-care interface.
- Start date – choose a desired subscription activation date (by default, the current date is set). Click Calendar
 and set the date, or type it in the “yyyy-mm-dd” format (2022-09-07).
 - Finish date – optionally, choose a subscription closing date (the finish date is not set by default). Click Calendar
 and set the date, or type it in the “yyyy-mm-dd” format (2022-09-10).
- Periodic fee adjustment – you can choose whether to apply the default customer discount (if it’s set for the distributor), a specific discount/upcharge, or to not adjust the periodic fee at all. You can choose one of the following options:
- No adjustment – the standard subscription fee will be applied (even if the default customer discount is set for the distributor).
- Default customer discount (default) – a discount defined in the Set default discount dialog will be applied to the subscription fee, e.g., 10%.
- Discount – select this option if you want to set a specific discount for this subscription. Specify the fixed discount amount or discount rate in the corresponding field, e.g., “Discount 15%”. A 100% discount means “free service”.
- Upcharge – select this option if you want to apply an upcharge that increases the standard subscription fee. Specify a fixed amount or an upcharge rate in the corresponding field, e.g., “Upcharge 8 USD”.
- Charging period – select the charging period if the multi-month prepaid plan is configured for the subscription charged in advance, e.g., 5 months.
- Current fee – this is a read-only field that shows the subscription periodic fee that is charged each billing period.
- Click Save.
How to remove a subscription
You can remove only subscriptions assigned directly and that haven’t been activated yet (that have been assigned but are pending activation).
Click Delete ![]() next to the subscription in the list and click Delete in the confirmation dialog.
next to the subscription in the list and click Delete in the confirmation dialog.
How to review and edit subscription details
You can edit only pending and active subscriptions.
To edit a subscription, select a specific subscription from the list and click its name.
The Edit subscription dialog opens with the details of the subscription. You can change:
- The subscription plan name that is visible to end users (Name for end users field).
- Set the subscription closing date (Finish date field) to cancel the subscription.
- The Periodic fee adjustment option.
- The charging period for the subscription that is charged in advance with configured multi-month prepaid plans.
Customize the panel
- Change table settings – click Settings
in the title bar to customize columns and change row style.
- Re-order the columns – drag-and-drop the column headers right or left to place the columns in the order you want.
- Re-order the rows – click click Arrow
(or
) next to the column header to re-sort the rows. For example, the Subscription list panel displays subscriptions in alphabetical order. You can re-sort them in the reverse order.
- Change the default number of results globally – use the Number of results dropdown list in the upper right corner to adjust the maximum number of rows that appear on the panel. By default, the panel displays 25 rows. Once the number is changed, it’s automatically saved, so the same number of rows is shown for PortaBilling entities, e.g., customer, account, reseller, etc.


