For your convenience, we will use the PortaSwitch naming alongside the corresponding TeamMate naming. You can check the mapping between the terms in PortaSwitch and TeamMate here.
Prerequisites
Link copied to clipboard
Before adding customers on the Reseller portal, make sure you have:
- Your customers’ names, e.g., “ABC company”.
- Email addresses of your customers’ Microsoft Global Admins.
How to add Enterprises
Link copied to clipboard
The configuration steps “How to add Enterprises” described below are also available as a video instruction prepared by PortaOne.
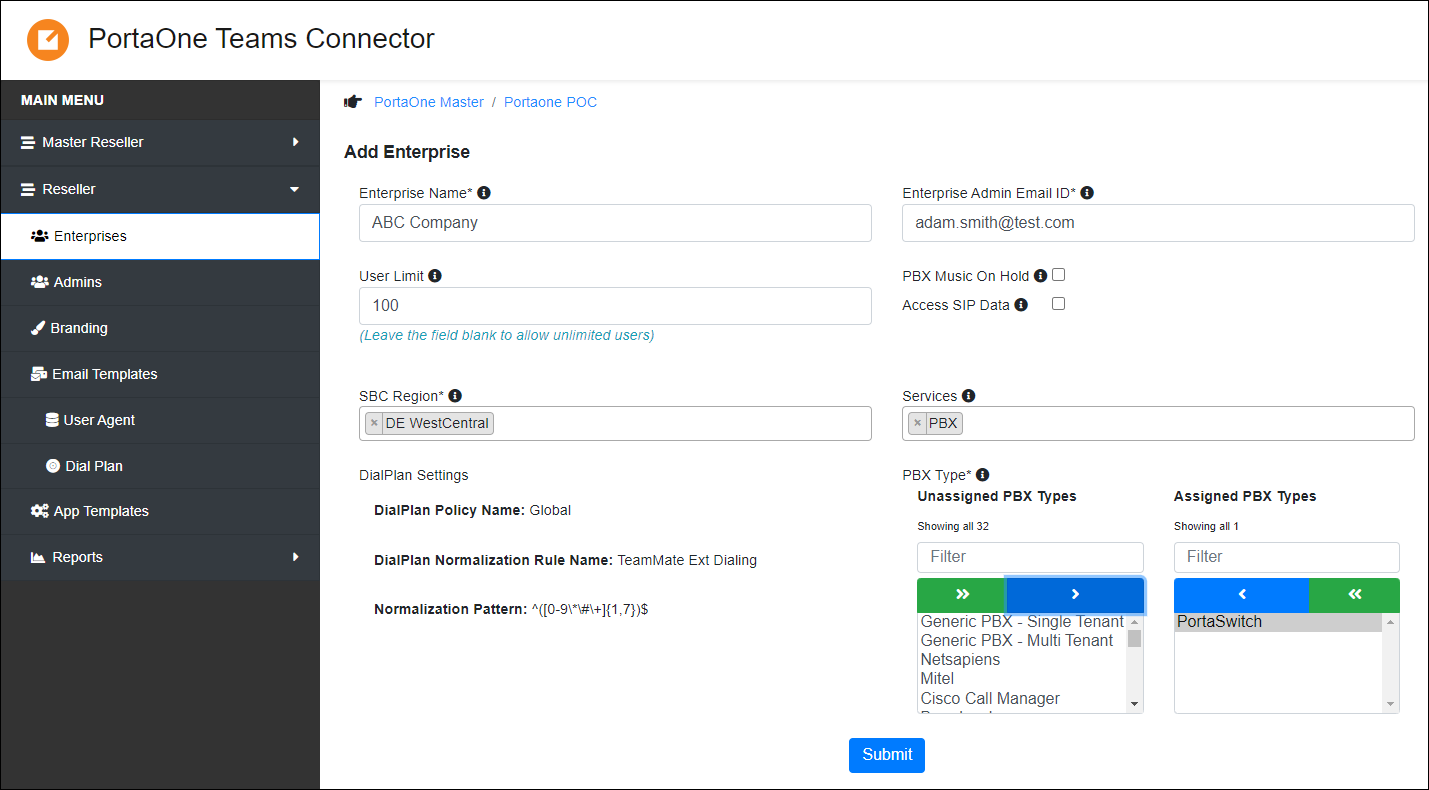
You will need to create a new Enterprise for each new customer. For this, perform the following steps:
4.1 Log in with your Reseller credentials to the Reseller portal.
4.2 Go to Enterprises >> click Add Enterprise.

4.3 Fill in the details:
- Enterprise name – specify your customer’s name (it will also be displayed for your customer on the Enterprise portal).
- Enterprise admin email – specify the email address of the customer’s Microsoft Global Administrator.
- User limit – specify the number of Teams users (extensions) the customer can add. This limit can be edited in the future.
- PBX Music On Hold – select the checkbox if you want to override the Teams music on hold (MOH) with the MOH configured for your customer in PortaSwitch.
- Access to SIP data – if your customer has SIP experience and you wish to allow them access to the call monitoring tool for troubleshooting, select the checkbox.
- SBC Region – this is the location of the session border controller (SBC) for establishing the direct routing between the SBCs of PortaSwitch and Teams. It’s recommended to choose the region that is physically closest to the customer’s physical location, e.g., if the customer is operating in Europe, choose “DE WestCentral” or “UK South.”
- Services – select PBX service.
- PBX Type – in the Unassigned PBX Types dropdown list, select the integration with “PortaSwitch”, and click Move selected
 to move this value to the Assigned PBX Types list.

4.4 Click Submit.


