On the Customer Management screen, you can view a list of all registered customers.
Advanced search
In advanced search mode, you can specify an unlimited number of search conditions. Every condition applies to a particular field (e.g., customer’s ZIP code). Click on ![]() Add a new search condition to add another condition.
Add a new search condition to add another condition.
|
Operation |
Description |
|---|---|
|
Is |
The value of the field in the customer information must match the search criteria exactly. |
|
Begins with |
The value of the field in the customer information must start with the specified value (e.g., if you enter the filter value “John”, customers with the names “John” and “Johnny” will be selected). |
|
Contains |
The value of the field in the customer information must contain the specified value somewhere (e.g., if you enter the filter value “Eric”, customers with the names “Eric”, “Erica”, “Maverick” and “American” will be selected). |
|
Ends with |
The value of this customer information field must end with the specified value (e.g., if you enter the filter value “smith”, customers with the last names “Smith” and “Hammersmith” will be selected). |
|
Is empty |
The corresponding field in the customer information must be empty. |
All search operations are case-insensitive, so you can enter “Eric” as a search criterion and, even if the customer’s name was originally entered as “eric” or “ERIC”, you will still see him in the list.
All conditions work in conjunction, so in the case of multiple search criteria, the customer’s record must satisfy all of them in order to appear in the result list.
 During a search operation using auxiliary fields (e.g., fax) or the “contains” comparison, the database cannot use indexes. This will
result in a full table scan, meaning an increased load on the server and a longer time to produce the final result. Please avoid using such search operations if not necessary.
Edit Customer
This page allows you to change details for a particular customer.
|
Field |
Description |
|---|---|
|
Customer ID |
Defines the customer name as it will appear in the PortaBilling system. This is distinct from the Company Name field in the Address Info tab. |
|
Customer Class |
The Customer Class assigned to this customer. In order to change any parameters of the particular Customer Class, click on the link “Customer Class”. When editing the Customer, the field Customer Class will only contain classes with the same currency, or classes with no defined currency. |
|
Balance Control |
The customer category: either prepaid (a customer who pays for services in advance) or postpaid. |
|
Available Funds (only for prepaid customers) |
The balance for prepaid customers. While consuming the service, the amount of available funds decreases. When it reaches zero value, no more services can be used. |
|
Balance (only for postpaid customers) |
The customer’s current balance |
|
Current Credit Limit (only for postpaid customers) |
The credit limit value defined for a customer during creation. |
Address info
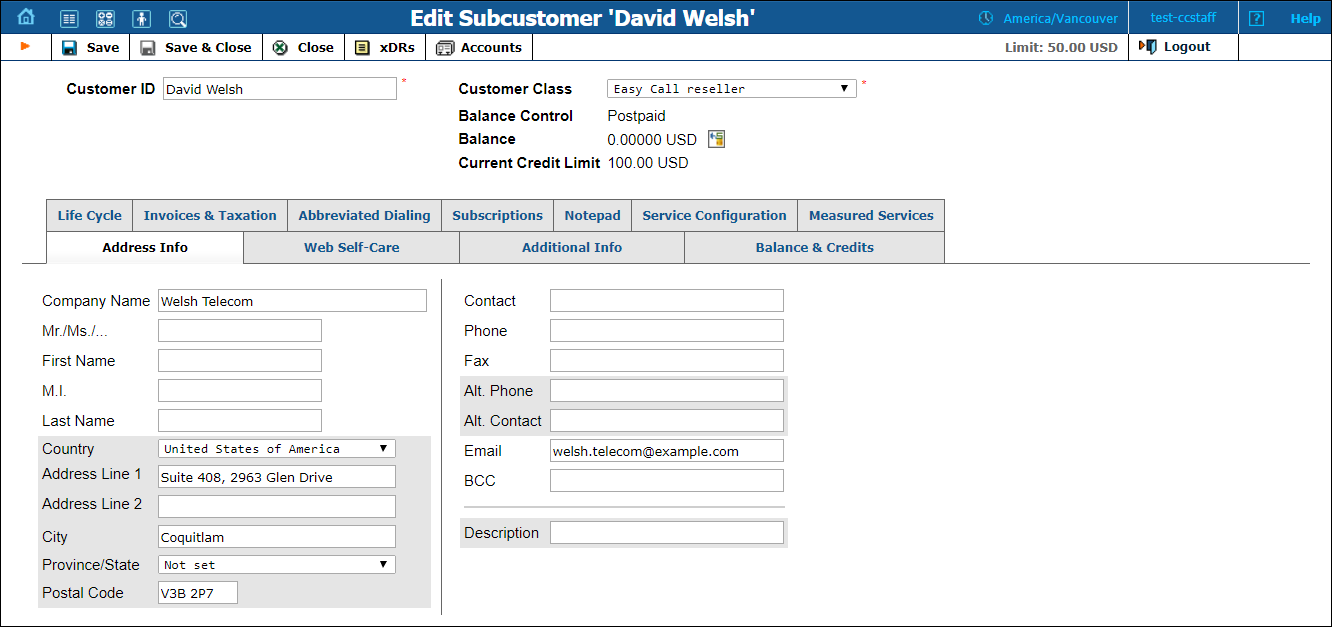
The Address Info tab provides most of the commonly required contact information. Also, note that you may enable your account manager to receive a copy of every email sent to the customer by entering his email address in the BCC field.
Balance adjustments
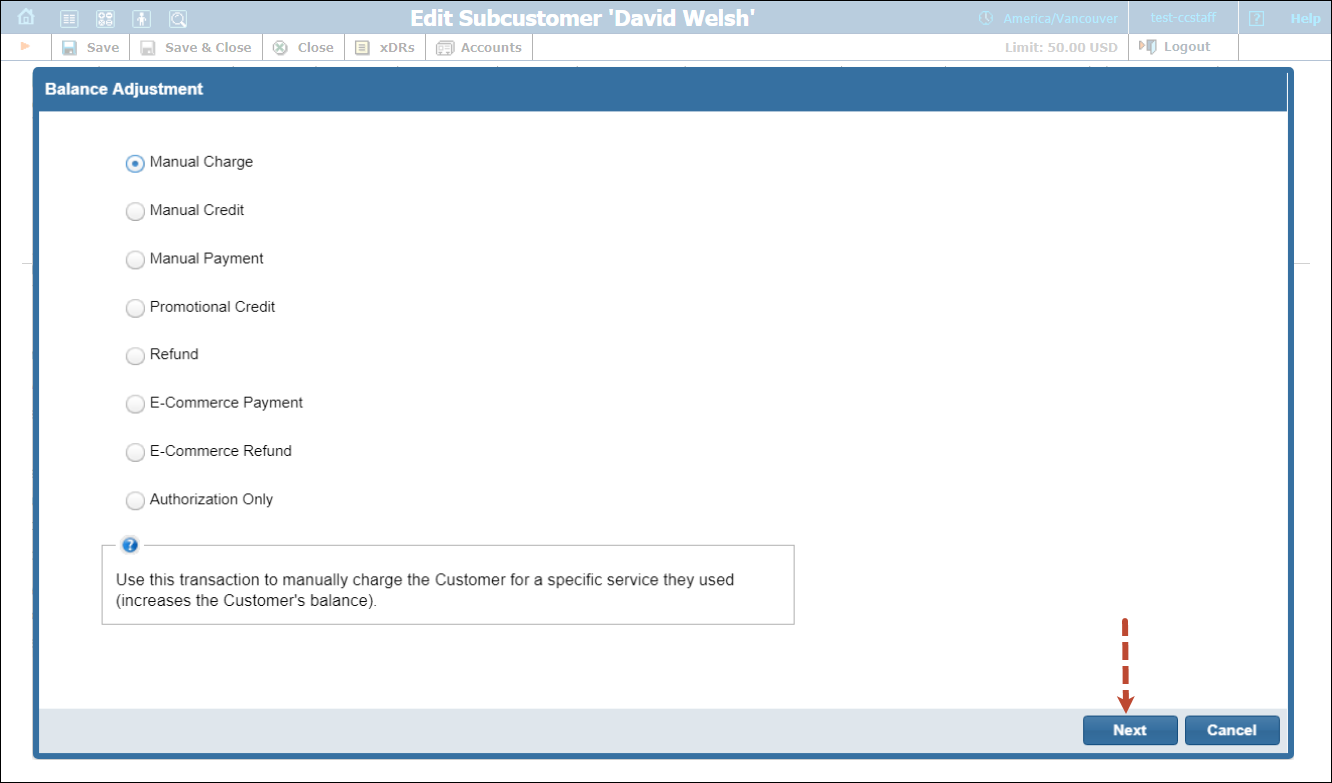
The Balance Adjustments wizard allows you to correct a customer’s balance:
|
Field |
Description |
|---|---|
|
Action |
Manual Charge: Use this transaction to manually charge a customer for a specific service they used; for instance, if you are selling SIP phones to a customer. This means the balance will be changed so that the customer is able to make fewer calls. Manual Credit: Use this transaction to manually give compensation related to a specific service; for instance, if the customer files a complaint and you agree to give him credit toward future service use. This means the balance will be changed so that the customer is able to make more calls. Manual Payment: Use this transaction when you receive a payment (e.g., cash or check) directly from the customer. This means the balance will be changed so that the customer is able to make more calls. Promotional Credit: Use this transaction to give the customer credit, for example, as a sales promotion. The difference between this and the “Manual Credit” transaction is that this transaction applies to a special “Credits/Promotions” service, and not to any actual service. Basically, it provides some “virtual” funds to the customer for future use. Refund: Use this transaction to refund an earlier payment received from the customer (e.g., a check returned by the bank). This means the balance will be changed so that the customer is able to make fewer calls. E-Commerce Payment: Use this transaction to charge the customer’s credit card and apply the amount to the customer’s balance as payment. E-Commerce Refund: Use this transaction to reverse a previous E-commerce payment. It withdraws funds from your company’s merchant account and applies them as a credit to the user’s credit card. The amount is added to the user’s account balance. Authorization Only: Verifies that the customer’s credit card is valid and reserves a given amount. Returns a transaction ID to be used in a Capture Payment transaction. This does not affect the user’s account balance in PortaBilling or his credit card balance. Note: the transaction ID will be written to the customer’s Notepad entry. Capture Payment: Charges the customer’s credit card and applies the amount to his balance as a payment (decreases the customer’s balance). Requires a transaction ID from the Authorization Only transaction. The amount must be less than or equal to the amount of the corresponding Authorization Only transaction. |
|
Amount |
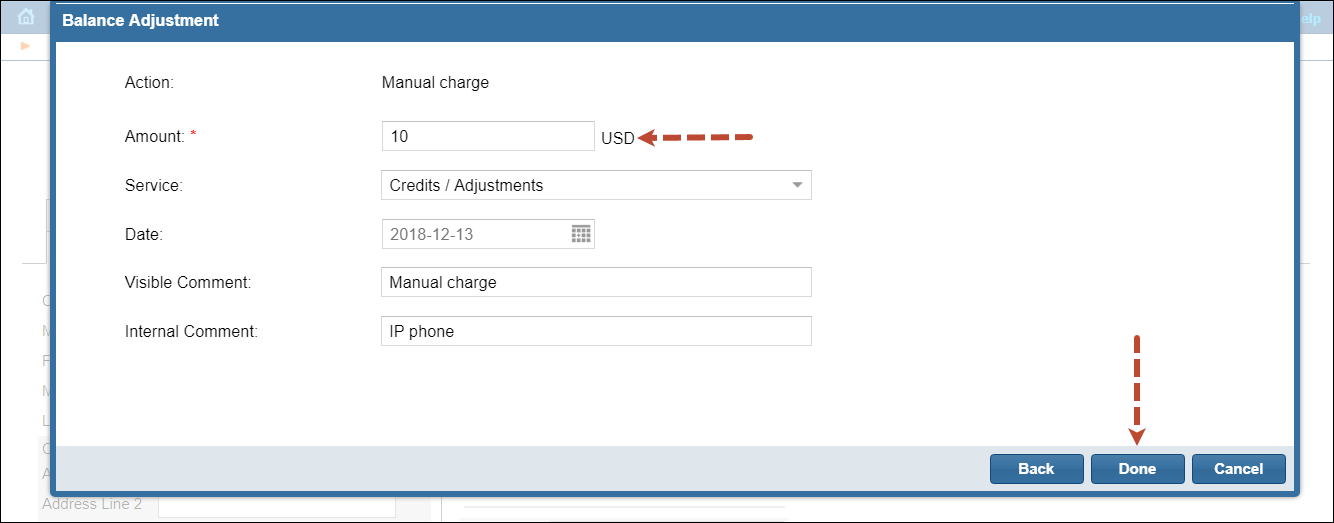
Amount to charge/refund. |
|
Service (only for Manual charge and Manual credit) |
A service for which the manual charge/credit is made. The charged/credited amount will be included in the selected service section on the next invoice. |
|
Tax Transaction Code (only for Manual charge and Manual credit) |
An internal code by which taxes are calculated for this transaction. This code is mapped to the taxation codes of EZTax, Avalara, GST, or SureTax taxation plug-ins as defined in PortaBilling. The Tax Transaction Code field is only available for Manual charge and Manual credit transactions. |
|
Date (only for Manual charge and Manual credit) |
A date associated with the manual charge/credit. For example, you can specify a date for manual credit action for when an item is credited. Note that if the selected date falls within a previous (closed) billing period the transaction will be included in the next invoice. |
|
Include into Out-Of-Turn Invoice (only for Manual charge and Manual credit transactions) |
This allows you to include transactions on an out-of-turn invoice to be issued on demand. You should then generate the invoice with the requisite transactions on the Out-Of-Turn Invoice page. For example, if the end user visits your office to buy a new IP phone, your clerk will locate the account, issue an invoice covering the cost of the phone, take the money for the phone and give the phone and the invoice to the end user. Transactions included in an out-of-turn invoice that was generated on the Out-Of-Turn Invoice page won’t be reflected on the regular invoice issued at the end of the billing period. |
|
Transaction ID (only for E Commerce Refund and Capture Payment) |
The transaction ID was obtained via the Authorization Only transaction. This is required to use the reserved earlier amount for a current transaction. |
|
Visible Comment |
A comment on this transaction visible to the administrator as well as the customer, in the xDR browser or on the invoice. |
|
Internal Comment |
An internal comment on this transaction; not visible in the xDR browser, and accessible only from the database directly. |
Additional info
|
Field |
Description |
|---|---|
|
Alias authentication /registration defaults |
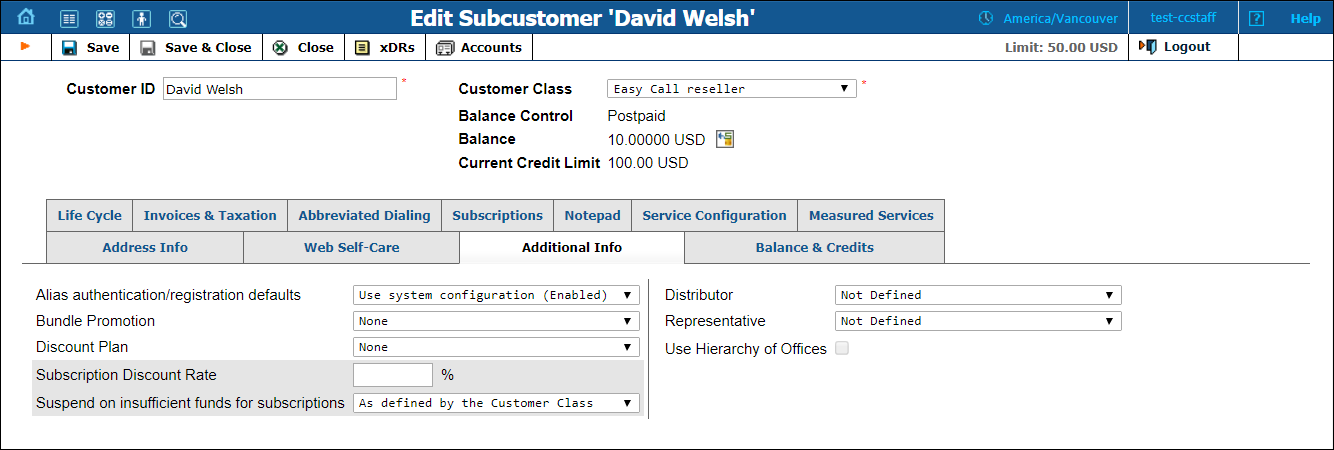
This defines whether an alias can be used independently for making and receiving calls.
|
|
Bundle Promotion |
Bundle promotion to be applied to this customer. |
|
Discount Plan |
Volume discount plan to be applied to this customer. |
|
Subscription Discount Rate |
Amount of discount applied by default to all subscriptions of this customer (assigned either directly to a customer or to one of his accounts). |
|
Suspend on insufficient funds for subscriptions |
This option allows you to suspend a customer when their balance or available funds are insufficient to cover subscription charges of subscriptions assigned to them directly.
|
|
Distributor |
Assigns a distributor to this customer if any. |
|
Representative |
Assigns a representative to this customer if any. |
|
Use Hierarchy of Offices |
This defines two types of customers:
Main Office (HQ) and Branch Office (site) customers are linked together into a group. |
Balance & credits
|
Field |
Description |
|---|---|
|
Permanent Credit Limit |
The credit limit value defined for a customer during creation. |
|
Temporary Credit Limit Increase (only for postpaid customers) |
Here you can temporarily increase a customer’s credit limit (the value should be defined either as an amount or as a percentage of a positive Permanent Credit Limit value). This shows a temporary increase of the customer’s credit limit. |
|
Valid Until (only for postpaid customers) |
Specify the date and time for when an increased credit limit value will automatically be reverted to a permanent state. The values for the Temporary Credit Limit and Valid Until cannot be higher than the values provided in the Maximum possible increase prompt.
|
|
Low Funds/ Credit Limit Warning Threshold(s) |
If a warning threshold is defined for a customer balance and the customer balance reaches this value, a notification is sent to the customer. Depending on the customer balance model, warning thresholds are known as:
For postpaid customers the balance warning threshold is defined either as an amount or a percentage of a positive Permanent Credit Limit value. For prepaid customers, balance warning thresholds are defined only as an amount of an Available Funds value. To send customers multiple notifications, define several balance warning thresholds as comma-separated values. |
|
Unallocated Payments |
Unallocated payments show that the customer “overpaid” you sometime in the past, and are used to correct the paid/unpaid status of future invoices. Unallocated payments do not represent a “cash reserve.” When a payment is made, the amount is immediately applied to the customer’s balance.
|
|
Credit Limit History |
This shows changes made to the customer’s credit limit (e.g., increases, decreases, temporary increases, etc.). Available only for postpaid customers. |
|
Subscriber-to-Subscriber transfers allowed |
This allows end users to transfer funds among accounts (only debit accounts can transfer and receive funds).
|
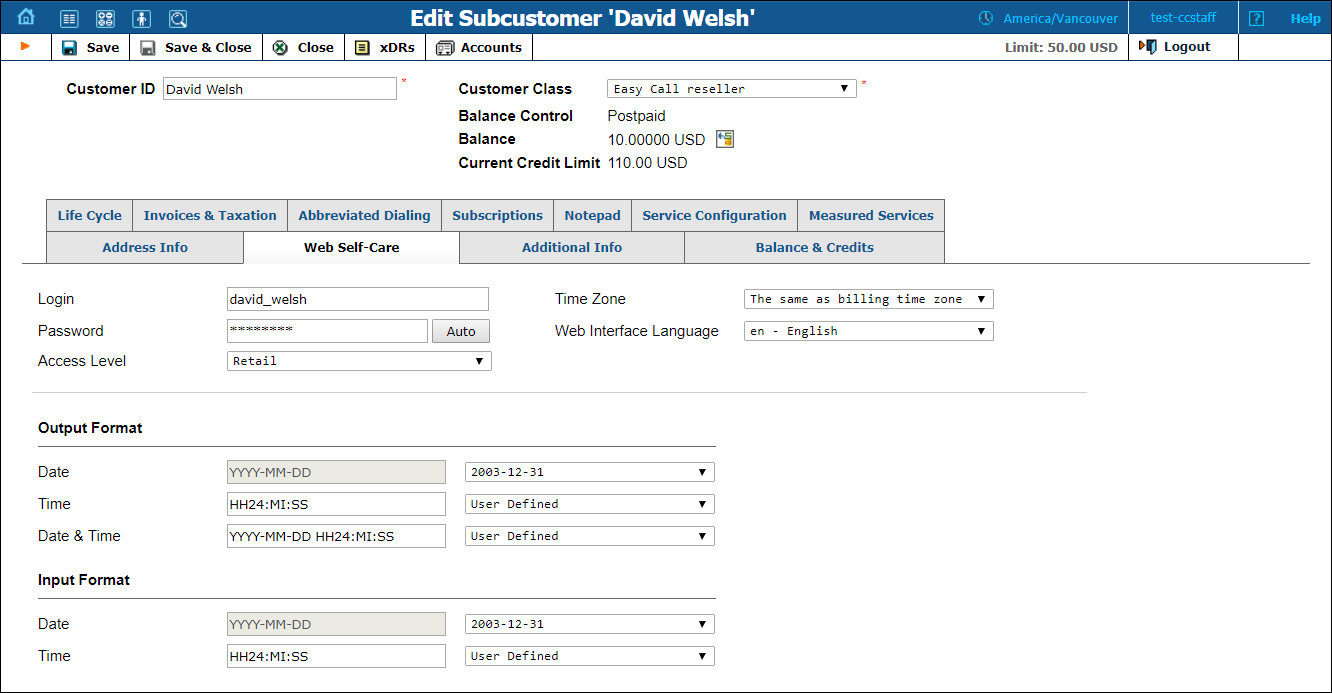
Web self-care
|
Field |
Description |
|---|---|
|
Login |
Customer login for his web Self-care interface. |
|
Password |
Web Self-care interface password for the customer. An easy-to-remember yet secure password may be generated automatically by clicking the Auto button. |
|
Access Level |
Access level assigned to the customer. |
|
Time Zone |
Time zone for the customer web Self-care interface. |
|
Web Interface Language |
Displays the customer Self-care interface in a particular language. |
Date & Time Format
PortaBilling allows defining both input and output date and time formats for each customer registered in the system.
By making changes to the date and/or time format on this page, customers will be able to enter dates and times in the desired format throughout the entire customer self-care interface, on invoices, and so on (see the screenshot below).
See the Date & Time format section for examples of date and time format usage.
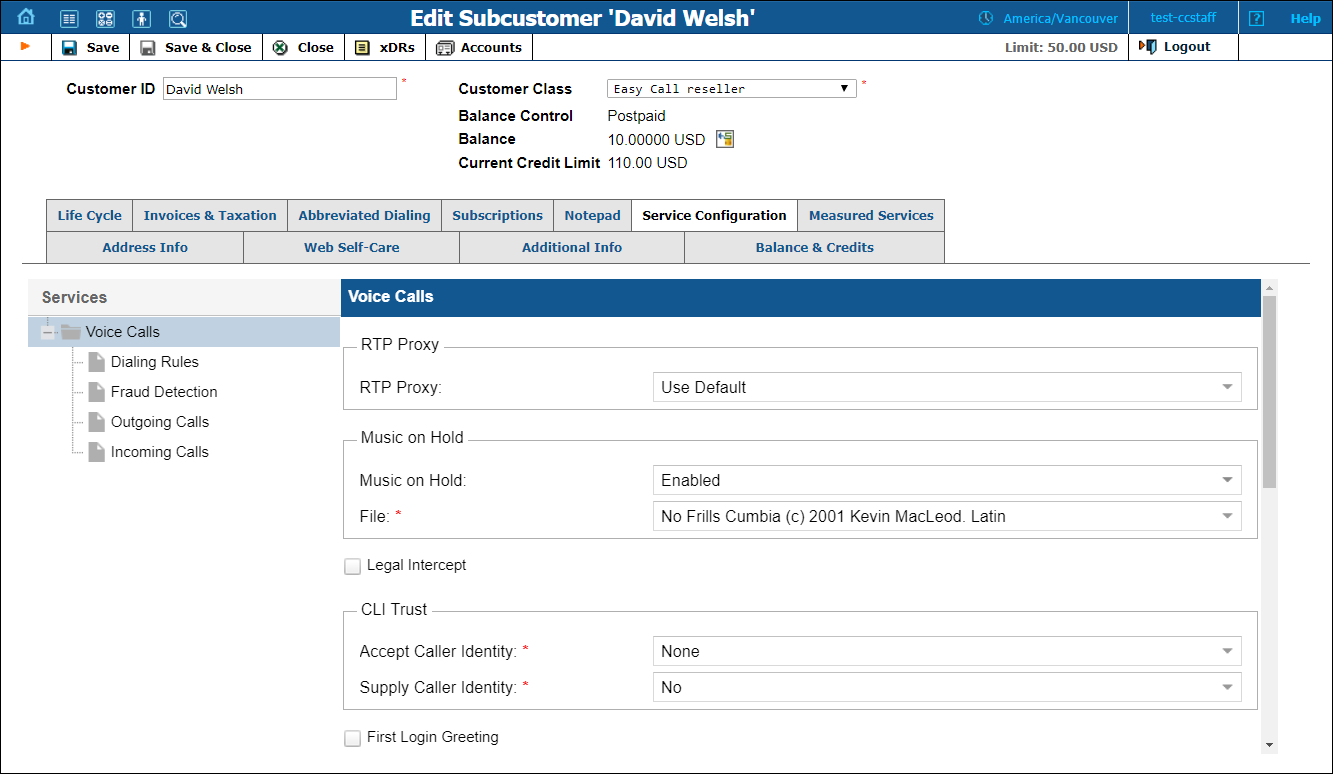
Service configuration
Using this tab, you can activate/deactivate various features of the services provided. Note that features are defined per service type (the physical service provided to the user) rather than per service (the name used in the billing configuration and “visible” to the end user). Thus, if you decide tomorrow to bundle your VoIP services under a different name, and create a new service called “Internet Telephony” rather than the old name, “Voice Call”, you do not actually have to change the configuration settings for any of your customers.
The Services links on the left allow you to specify for which service type you would like to define parameters.
Parameters for the Voice Calls service type
|
Field |
Description |
|---|---|
|
The Voice Calls service type |
|
|
Legal Intercept |
Intercepts all incoming and outgoing calls of this customer for law enforcement purposes. |
|
First Login Greeting |
When a new account (phone number) in this cloud PBX environment is provisioned and registers for the first time, call this phone back and play a pre-recorded voice message confirming service activation, giving information about various available options, and so on. |
|
Music On Hold |
Defines the music on hold to be used with the cloud PBX environment. Choose None to disable this feature, or select the default setting for the customer. To upload your own music, select a file on your local file system using the Browse button. To rename the music, enter the desired name in the Music Name field; otherwise, the local file name will be used. The uploaded music will replace the previous entry in the list, and is usually enabled within 10 minutes. |
|
Call Parking |
Enables call parking for this customer’s cloud PBX.
These access codes are available only if call parking is enabled for the customer. |
|
RTP Proxy |
This specifies the RTP proxy policy for this customer.
|
| CLI Trust |
|
|
Accept Caller Identity |
|
|
Supply Caller Identity |
|
| Limit simultaneous calls |
|
|
Limit Simultaneous Calls |
Engage real-time checks of the number of concurrent calls made by this customer’s accounts. When the specified number of concurrent calls has already been established (calls are in a “connected” state) and the account tries to place another call, that call will be rejected. To enable the Limit Simultaneous Calls feature, activate the send_start_acct option for the corresponding PortaSIP instances on the Configuration Server. To increase the features accuracy, activate the
allow_reauth option too. Note that these features may slightly increase the load on the billing engine.
|
|
Count |
|
|
Codec connectivity profile |
Select a suitable codec connectivity profile that will be used for bandwidth allocation calculation. Every new call’s allocated bandwidth is calculated by considering a negotiated codec and its parameters to enable full use of the available bandwidth and block new calls if no more bandwidth is available. |
|
Max bandwidth |
This allows you to configure the bandwidth utilization limitation to ensure that only an acceptable number of calls are allowed, in order to avoid severe degradation of the sound quality on calls in progress. The system plays a ‘limit reached’ warning when allocated bandwidth is used up. Playing warning prompts requires an additional 8 Kbps of bandwidth. Therefore, set aside a certain amount of bandwidth (about 8 Kbps) when you define the bandwidth limit.
Note that only external calls are scrutinized during bandwidth consumption calculation.
|
|
The Dialing Rules section |
|
|
Dialing Rules |
This permits you to enable/disable the dialing rules. |
|
Dialing Format |
|
|
Translate CLI on outgoing calls |
This permits you to translate the CLI number in outgoing calls based on the selected dialing format. |
|
Translate CLI on incoming calls |
This permits you to translate the CLI number in incoming calls based on the selected dialing format. |
|
The Fraud Detection section |
|
|
Location Information |
In this section, you can set the country that the end user is currently in or usually resides in (and thus this country will be treated as ‘safe’ when the system checks for fraudulent activity) and whether the end user is allowed to make calls from abroad.
|
|
Allowed Mobility |
This option is available only when Location Information is set to Enabled. Specify whether the end user is permitted to make calls from abroad.
In this case, the call will be screened if it does not meet one of the following conditions:
|
|
Current Location |
This option is available only when Location Information is set to Enabled. Select the country from the list. |
|
The Outgoing Calls section |
|
|
Override Identity |
Here you can set options that an end user may use for an identity. If an end user applies an identity that does not belong among the options permitted, it will be replaced with an identity provided by an administrator. PortaBilling provides several options for overriding identity information:
|
|
Batch |
This allows you to specify the batch (this field is only available when If Different From All Accounts In The Specified Batch has been selected). |
|
Huntgroup |
This allows you to specify a huntgroup (this field is only available when If Different From All Accounts In The Specified Huntgroup is selected). |
|
Site |
This allows you to specify a site (this field is only available when If Different From All Accounts In The Specified Site is selected). |
|
Identity |
Here you can specify a default value that will replace the account identity (or display number) when the identity used for the call in the RPID/PAI headers (or From header) is invalid. If not specified, the account ID will be used instead. |
|
Override Display Number |
This allows you to control the “Caller number” value that will be placed in the From: header and typically displayed on the called party’s phone display. The possible values are:
|
|
Override Display Name |
This allows you to override the caller name used by the calling account. The possible values are:
|
| Paging/Intercom |
|
|
Paging/Intercom |
This allows you to enable the intercom feature for accounts under this customer. An end user can dial a special service code before a phone number to establish an intercom connection (two-way communication using phone’s loudspeakers) with a colleague (within the same cloud PBX). |
|
The Incoming Calls section |
|
|
Endpoint Redirection |
This allows the end user to configure call redirection on their SIP phones (if this feature is supported by the SIP phone). |
|
Ext-to-Ext Call Distinctive Ring |
For incoming calls from phones within the cloud PBX environment, use a ring pattern different from the default one. |
| Sip Contact |
|
|
Sip Contact |
Enable this feature to define the way a SIP device will perform SIP registration to PortaSwitch. |
|
Deliver Incoming Calls To |
Define whether the IP PBX address for delivering incoming calls is taken from the IP PBX registration account or specified directly in the Static Address field. |
|
Account |
This shows the customer’s IP PBX registration account. This option is usually selected if a customer’s IP PBX is located at a dynamic IP address and can register only the main phone line (provisioned as the registration account in PortaBilling) on the PortaSIP server. |
|
Static Address |
Enable this feature if the customer’s IP PBX can’t perform SIP registration to PortaSwitch.
|
|
Transport |
Select the transport protocol (either TCP or UDP) that is used to deliver incoming calls. |
| User-managed SIP addresses |
|
|
User-managed SIP addresses |
Define to which external SIP proxies the customer can forward calls using the SIP URI forward feature. Addresses – type IP addresses or hostnames of external SIP proxies here. Use one of the following formats:
A user-managed SIP address must be unique. Its value length should not be greater than the allowed maximum (255). |
| Group Pickup |
|
|
Group Pickup |
The Group Pickup feature enables members of the same huntgroup to answer each other’s calls by dialing a Group Pickup Prefix. To fine-tune a group pickup functionality, a customer can organize cloud PBX extensions into pickup groups. Pickup groups are based on huntgroups, i.e., huntgroup A with number 2000 can serve as primary pickup group for its extensions 123 and 456. At the same time extension 123 can also belong to huntgroup B with number 9999. In this example, extension 123 has the following pickup options:
Note that group pickup must be enabled for the particular huntgroup as well. In case no primary pickup groups are defined within the cloud PBX (e.g., a small company with only several staff members) any extension can pick up incoming calls of others by dialing only the pickup prefix. |
Abbreviated dialing
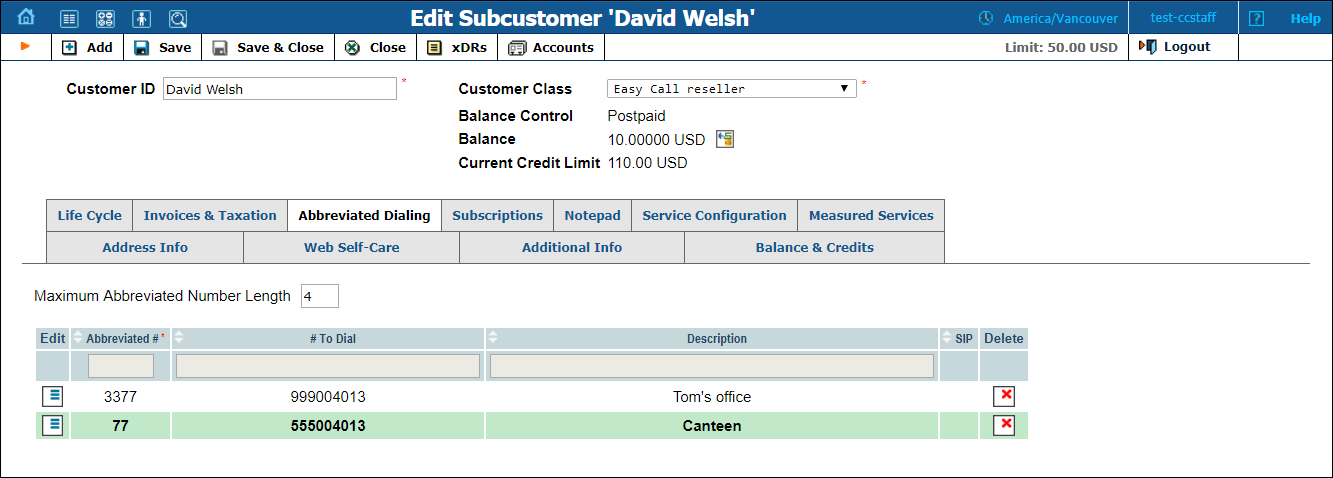
Here you can define a list of phone extensions for customers’ cloud PBX environment, plus create abbreviated dialing for external phone numbers. The Abbreviated Dialing feature works with both SIP and H.323, with adequate support from either PortaSIP or Cisco TCL IVR.
A PortaBilling customer can set up dialing rules as an international prefix, outside prefix, direct number (e.g., 911), or abbreviated dialing for his accounts.
To add a new abbreviated dialing number, click the ![]() Add button and enter the following information:
Add button and enter the following information:
Subscriptions
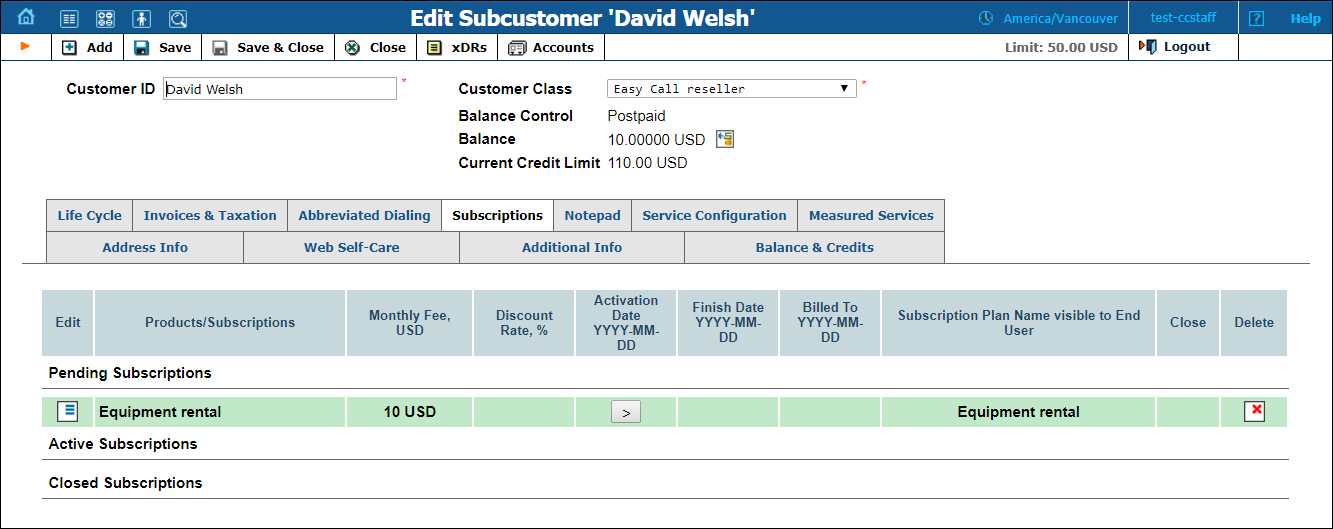
This tab displays the subscription plans currently applied to this customer.
Subscriptions are divided into three groups:
- Pending Subscriptions displays subscriptions that are not active yet (i.e., they will be activated sometime in the future). While a subscription is in pending status, it can be deleted.
- Active Subscriptions displays currently activated (and billed) subscription plans.
- Closed Subscriptions displays subscriptions that have already been closed.
|
Field |
Description |
|---|---|
|
Product/Subscriptions |
The subscription plan name. Click this link to open the corresponding subscription plan. |
|
Monthly Fee (for subscriptions charged progressively) |
|
|
Discount Rate, % |
Enter a discount rate for this subscription. If you leave this field empty, it means that the discount rate defined in the customer information should be applied. If you enter any value, it will override the customer discount rate. 0 means no discount (e.g., the rate defined in the subscription plan is applied) |
|
Start Date |
Enter the desired subscription activation date: immediately, or sometime in the future. |
|
Activation Date |
(Read-only) Displays the date when the subscription was activated. |
|
Finish Date |
Enter the date when this subscription should be automatically canceled. |
|
Billed To |
(Read-only) The date to which subscription charges have already been applied. |
|
Subscription Plan Name Visible to End User |
The subscription plan name as the end user will see it on the invoice. |
|
Close |
Allows you to close one of the optional subscriptions. |
Life cycle
|
Field |
Description |
|---|---|
|
Current Billing Time Zone |
Time zone in which customer’s billing period will be closed and invoices will be generated. |
|
Current Billing Period |
Defines the frequency of invoicing for this customer. |
|
Next Billing Date |
Read-only field; displays the date when the customer’s current billing will be closed (and invoice and statistics generated). |
|
Status History |
Read-only field; allows you to track important events in a customer’s lifecycle, such as when the customer was created, blocked/unblocked or provisionally terminated/opened. |
Invoices & taxation
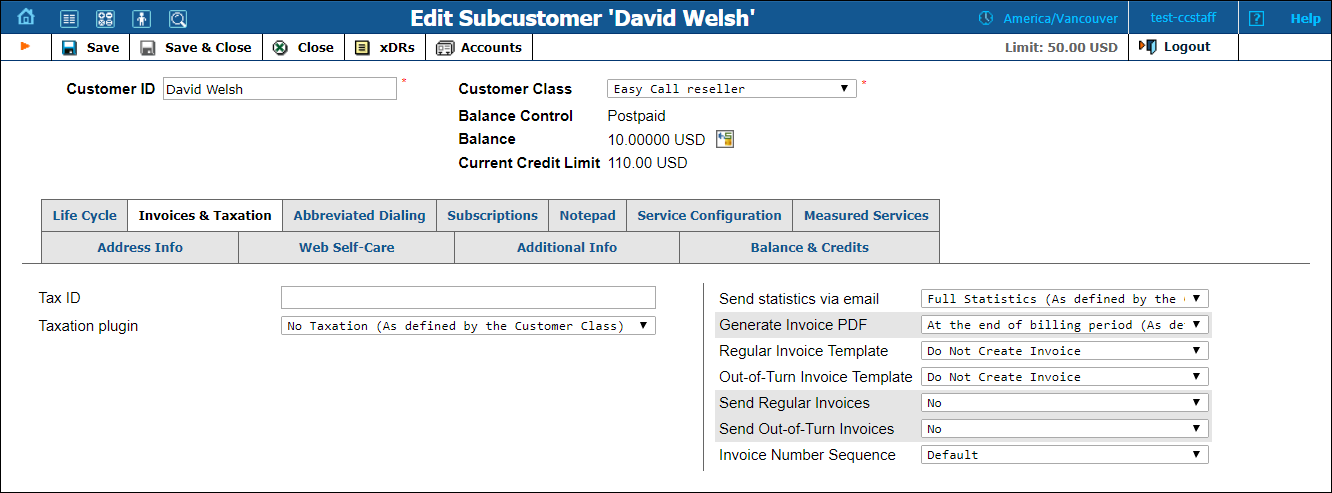
On this tab you can define the following:
- How to tax the customer for provided services.
- Whether to send statistics and invoices by email.
- What invoice template to use and how to enumerate the invoices.
|
Field |
Description |
|---|---|
|
Tax ID |
Customer’s tax ID. |
|
Taxation Plugin |
|
|
Send Statistics via email |
Defines what kind of xDR statistics should be delivered to the customer by email after the billing period is closed:
Note that these options only affect the delivery of xDR files by email. The actual statistics files will always be generated and accessible for download from the administrator interface or customer self-care interface. |
|
Generate Invoice PDF |
|
|
Regular Invoice Template |
Defines the regular invoice template for this customer.
Choose the required invoice template from the list. |
|
Out-of-Turn Invoice Template |
Defines the out-of-turn invoice template for this customer.
Select the required invoice template from the list. |
|
Send Regular Invoices |
Defines whether new regular invoices should be delivered to the customer by email.
|
|
Send Out-of-Turn Invoices |
Defines whether out-of-turn invoices should be delivered to the customer by email.
|
|
Invoice Number Sequence |
Select an invoice number sequence that will be used for this customer:
|
Since taxation parameters depend on the specific taxation module and your local tax laws, please consult your tax attorney for details regarding their use.
Measured services
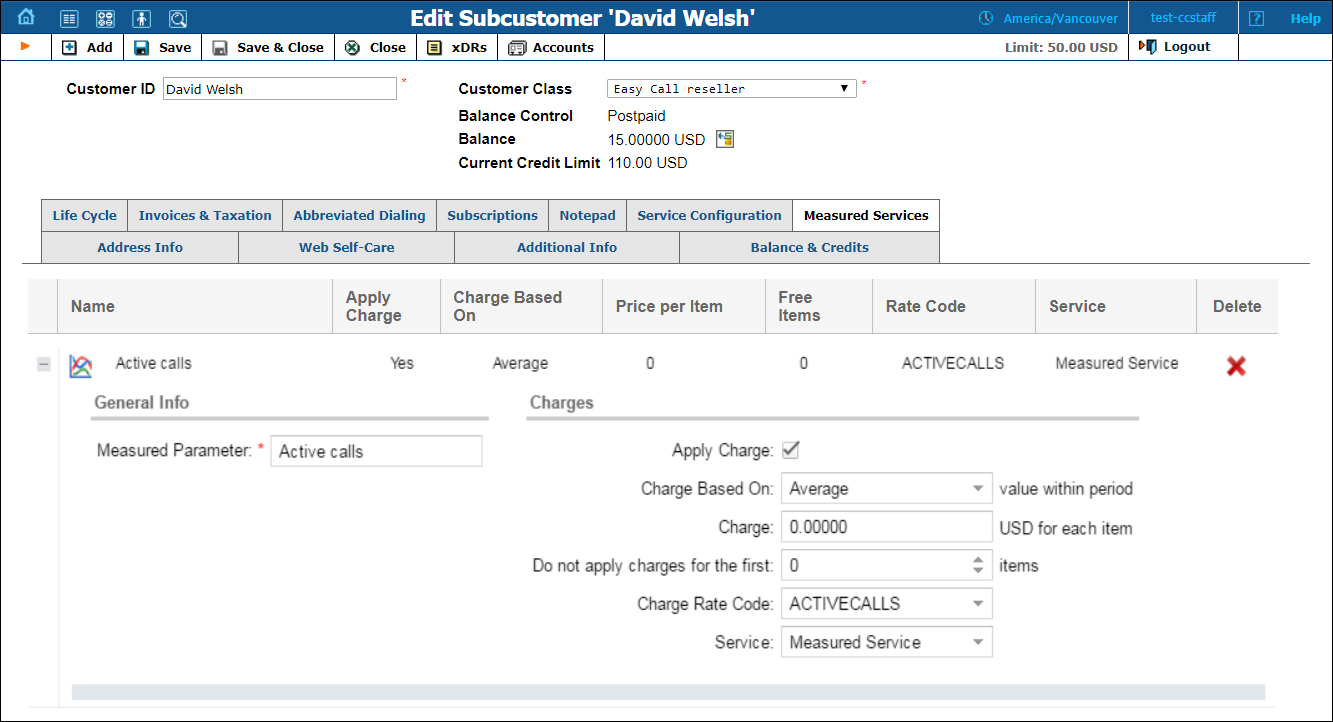
On this tab, you can configure which allocated resources will be measured and what charges will be applied for their consumption. All resources consumed have their own metrics.
|
Field |
Description |
|---|---|
|
Measured Parameter |
Specify which consumed resource will be measured and aggregated. The available options are:
|
|
Apply Charge |
Select this check box to apply charges to customers for consumed resources. If left clear, measured resources data will be used for statistical purposes only. |
|
Charge Based On Value Within Period |
Select which criteria will form the basis for charges to be calculated and applied to customers. The available options are:
|
|
Charge for Each Item |
Specify the price for each consumed unit of resources. |
|
Do Not Apply Charges for the First Items |
Specify the amount of consumed resources that the customer will not be charged for (as a rule this is included in the customer’s service bundle). |
|
Charge Rate Code |
Select which rate code is to be used to calculate charges for resources consumed. This rate code is shown in the customer’s xDRs and invoices. |
|
Service |
The service type used to calculate charges for resources consumed. This service type is shown in the customer’s xDRs and invoices. |
To browse resource usage statistics, click the ![]() Click here to view graphs icon next to the necessary resource metric.
Click here to view graphs icon next to the necessary resource metric.
The statistics window consists of two graphs. The bottom graph displays resource usage data for the last three months; the upper graph displays a detailed view of the resource usage for a particular time interval selected from the three-month period below.
To select a time period, click on the start date in the bottom graph and drag the mouse cursor to the finish date.
The topmost part of the window provides additional information about the selected metric. The following options are available:
|
Field |
Description |
|---|---|
|
Charges for the period |
This represents the customer’s billing period. You can select any of this customer’s billing periods within the xDR storage time and see their charges. |
|
Value |
This is the measured resource value defined for the selected metric for the current billing period. It can be minimum, maximum or average. |
|
Amount |
If any resource consumption charges have been applied to the customer, they are displayed for the selected billing period. Charges for the current billing period will not be displayed since it is not yet closed. If no charges were applied to the customer, a zero amount is displayed. |
|
Remained Free Items |
The number of available allocated resources that are included in the service bundle for the current billing period. |


