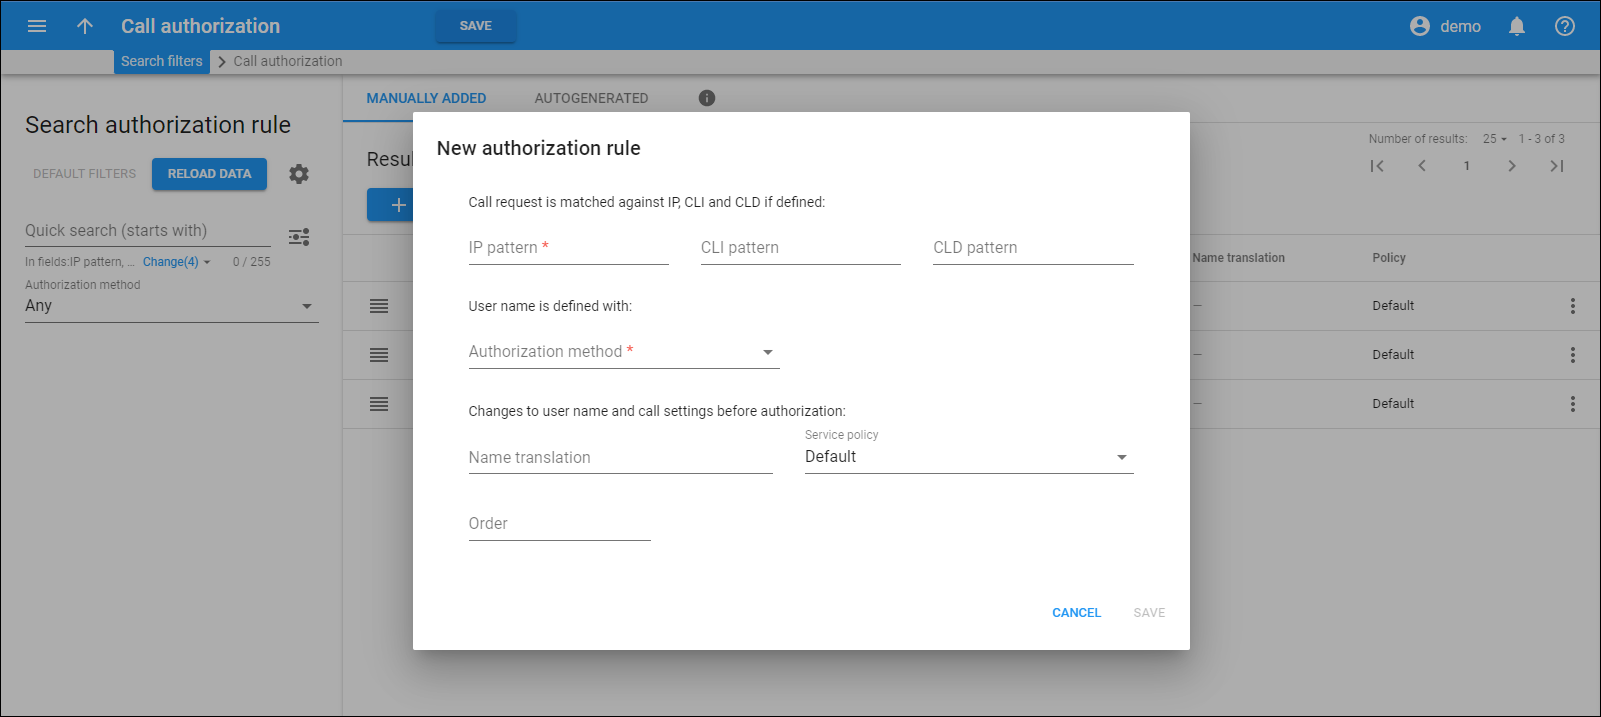
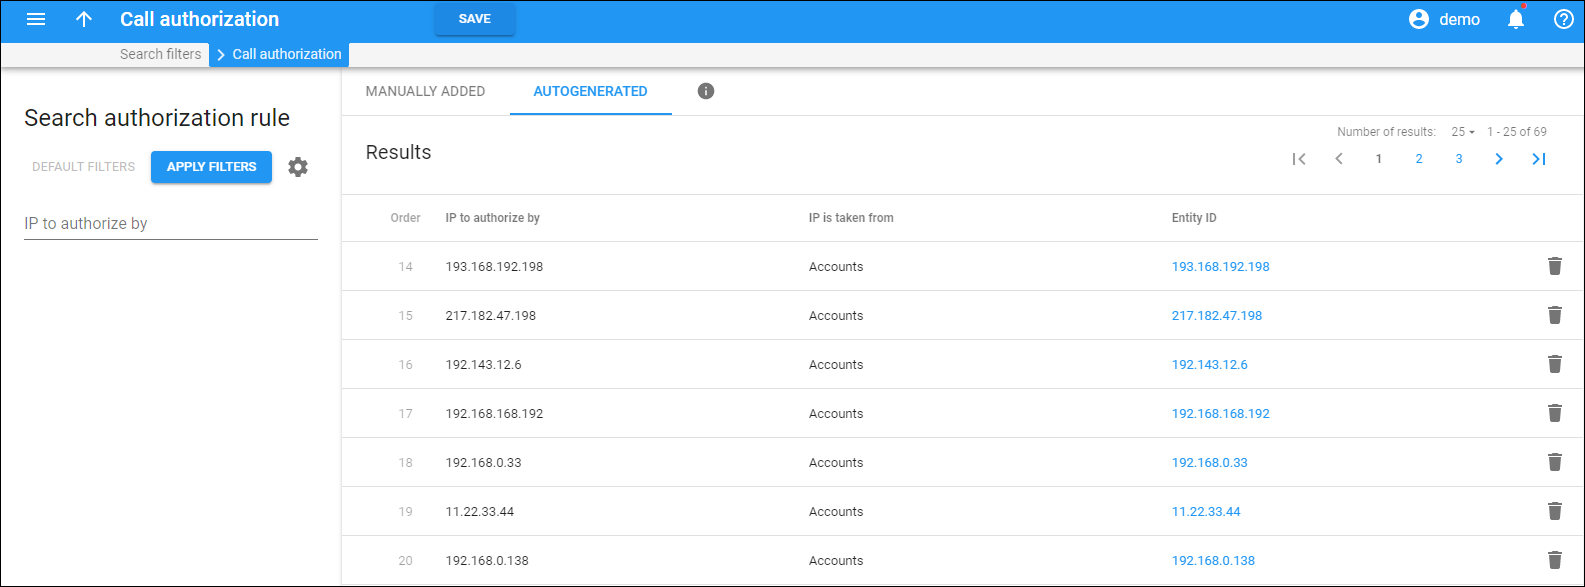
On this panel, you can view two tabs with the call authorization rules: Manually added and Autogenerated.
The order of rules match checking:
- Manually added
- Autogenerated for accounts
- Autogenerated for connections
- Autogenerated for nodes
- Digest authorization
Note that manually added rules always take precedence over autogenerated rules if the IP field for these rules is the same.
Manually added
On this tab, you can add new authorization rules for call processing. This is useful when calls arrive from gateways that don't support digest authentication.
If you set multiple conditions, this rule applies only if the call request meets all of them. For example, you set two conditions: "1.2.3.4" for the remote IP and "5789#" for the CLD. The rule applies only if both conditions are met: the call comes from IP address 1.2.3.4 and the destination phone number starts with 5789#.
If no rule works for a given call request, then digest authentication is used.
Manually added rules take precedence over autogenerated rules.
To edit an authorization rule, click More![]() and Edit
and Edit .
To delete an authorization rule, click More![]() and Delete
and Delete ![]() .
.
Each entry in the authorization rule list consists of:
Order
The order of rules is important. The topmost rule has the highest priority. Since the "first match" principle works here, arrange the more specific rules before the less specific ones.
For example, move the "call comes from IP 5.6.7.8 and CLI starts with 44" rule to the top of the list and more generic ones such as "call comes from IP 5.6.7.8" to the bottom.
To re-sort the rules, drag a rule using Reorder to place it in the order you want. Make sure the full list of rules is shown (there is no input on the Search authorization rule panel).
IP pattern
The IP address of the remote party.
CLI pattern
The phone number of the calling party.
CLD pattern
The phone number of the called party.
Authorization method
The authorization method that is used for this authorization rule. See the full list of authorization methods in the Search authorization rule section.
Name translation
This is the Python regular expression that adjusts the user name that is indicated in a call request to match the account ID in PortaBilling.
Policy
This is a service policy that is used with this authorization rule. Click on the specific service policy name to see the policy details. To create a service policy, go to Service catalog > Service policies.
When no service policy is assigned, Default is displayed. To change the service policy, click More ![]() , and Edit
, and Edit . Select the service policy from the dropdown in the Service policy field.
How to add new authorization rule
Click New rule to add a new rule. Fill in the fields in the New authorization rule dialog and click Save.
- IP pattern – type the IP address of the remote party. This can be an IP address or an IPv4 network prefix in CIDR notation (e.g., 192.168.99.0/24). Note that the "signaling" address is used, e.g., the IP address from which PortaSIP receives the INVITE, not the information in the INVITE request itself, such as "Contact" or "From" headers.
- CLI pattern – specify the phone number of the calling party. The field can contain:
- Digits;
- The "*" and "#" symbols;
- "%" – this wildcard is for any number of symbols;
- "_" or "x" – these are equivalent wildcards for one symbol. For example, if you specify "1334#," the rule is applied only if the calling phone number starts with 1334#. Note that the phone number in the "From" header of the INVITE request is used.
- CLD pattern – specify the phone number of the called party. The field can contain:
- Digits;
- The "*" and "#" symbols;
- "%" – this wildcard is for any number of symbols;
- "_" or "x" – these are equivalent wildcards for one symbol. For example, if you specify "1234#," the rule is applied if the destination phone number starts with 1234# only. Note that the phone number in the Request-URI is used, not the number in the "To" header of the INVITE request.
- Authorization method – select the authorization method from the dropdown list that will be used for this authorization rule.
- CLD – the User-Name attribute is the phone number, called CLD. The CLD is part of the Request-URI placed before @. Also, it is usually reflected in the "To" header field. Note that the CLD parameter for the User-Name attribute is always taken from the Request-URI.
- CLD Tech-Prefix – the User-Name attribute consists of the first part of the CLD parameter ending with # (including # itself). For example, a call with the To header (CLD) equal to 77788#12125551234 is authorized as 77788#.
- CLD Tech-Prefix and IP – the User-Name attribute consists of the first part of the CLD parameter ending with # (including # itself) and the IP address prefixed with @. For example, a call from IP address 122.255.109.2 with the To header (CLD) equal to 080099#12125551234 is authorized as 080099#@122.255.109.2.
- CLI – the User-Name attribute is the phone number of the party calling.
- CLI (PAI if no CLI) – the User-Name attribute is the phone number of the party calling. If the CLI is not specified, the User-Name attribute contains the value from the PAI (P-Asserted-Identity) header.
- CLI (RPID if no CLI) – the User-Name attribute is the phone number of the party calling. If the CLI is not specified, the User-Name attribute is taken from the RPID (Remote-Party-ID) header.
- CLI Tech-Prefix – the User-Name attribute consists of the first part of the CLI parameter ending with # (including # itself). For example, a call with the From header (CLI) equal to 977#16045551234 is authorized as 977#.
- CLI Tech-Prefix and IP – the User-Name attribute consists of the first part of the CLI parameter ending with # (including # itself) and the IP address prefixed with @. For example, a call from IP address 122.255.109.2 with the From header (CLI) equal to 977#16045551234 is authorized as 977#@122.255.109.2.
- Digest – digest authentication is applied to obtain the User-Name attribute.
- IP – the User-Name attribute is the IP address from which PortaSIP receives the INVITE.
- PAI – the User-Name attribute contains the value from the PAI header.
- PAI and IP – the User-Name attribute consists of the value from the PAI header and the IP address from which PortaSIP receives the INVITE prefixed with @. For example, a call from IP address 122.255.109.2 with the PAI header 12349874567 is authorized as 12349874567@122.255.109.2.
- PCI (P-Charge-Info) – the User-Name attribute consists of a number from the P-Charge-Info header and the IP address prefixed with @. For example, a call from IP address 122.255.109.2 with the P-Charge-Info header sip:+12349874567@example.com is authorized as +12349874567@122.255.109.2.
- PSU (P-Served-User) – the User-Name attribute contains the value from the PSU header.
- Remote IP – the identity for authentication is an IP address taken from a custom Remoteip SIP header. Note that this IP address is used "as is," without validation.
- RPID – the User-Name attribute contains the value from the RPID header.
- Trunk Group ID (TGRP) – the User-Name attribute contains the value from the "tgrp" part of the "Contact" header. If you want to use any of these authorizations: PAI, RPID, PCI (P-Charge-Info), CLI (PAI if no CLI), or CLI (RPID if no CLI), make sure the privacy_incoming option is enabled on the Configuration server. Otherwise, B2BUA ignores SIP privacy headers such as "p-asserted-identity" (PAI), "remote-party-id" (RPID) and "p-charge-info." To discuss creating other possible authorization methods, contact support@portaone.com.
- Name translation – specify the Python regular expression that adjusts the user name that arrives in a call request to match the account ID in PortaBilling. The header from which PortaSIP retrieves the identity for translation is defined by the type of call authorization scenario. For example, for authentication by CLI, the number is taken from the From header.
- Policy – select a service policy from the dropdown list that will be used with this authorization rule. To assign no service policy to the rule, select the Default option. You can change it later while editing an authorization rule.
- Order – define the order of the rule. The rule with the highest priority will be used first.
Autogenerated
On this tab, you can view the call authorization rules that are automatically generated when you create:
- Accounts with an ID containing IP.
- Connections with the VoIP from Vendor type containing remote IP. Note that if vendor authorization is defined for the connection, a rule won't be generated.
- Nodes. By default, IP authentication is applied to all nodes in the given environment. To override an autogenerated rule, create your own one on the Manually added panel if, for example, you need to do authorization based on CLI/CLD for calls coming from your PSTN gateway.
When a new record is created, a new rule automatically appears at the top of the list.
Order
This shows the order of an autogenerated rule. The order is set automatically when the rule is generated.
IP to authorize by
This is the IP address that is used for authorization.
IP is taken from
This shows whether the IP is taken from an account, connection or node.
Entity ID
This is the entity ID, which is also a link that redirects you to the specific account, connection, or node page.


