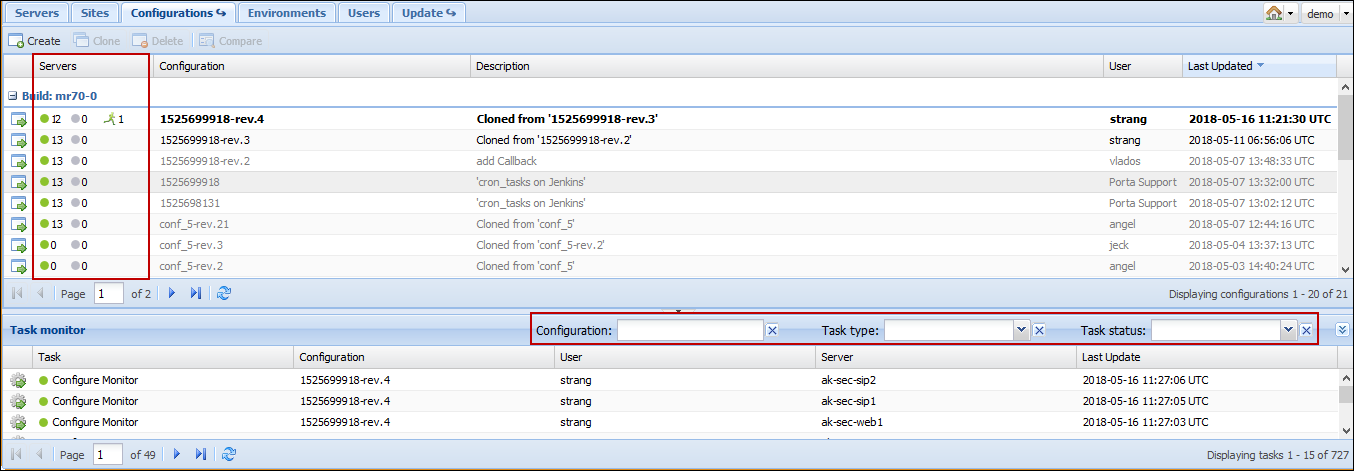
This tab allows you to manage the configurations used in your PortaSwitch system (each row represents a configuration tree).
The existing configurations are marked as follows:
- "active" (i.e. current) is bold black.
- "backup" (i.e. previous) is black.
- "inactive" (i.e. old/new) is grey.
|
Field |
Description |
|---|---|
|
The configuration information. Click the icon to open the configuration information page. |
|
|
Servers |
Contains clickable indicators that show the state of applying the configuration:
When you click the succeeded or failed indicator those tasks are automatically displayed in the Task monitor window. |
|
Configuration |
The name of the configuration. |
|
Description |
A short description of the configuration. This field is not mandatory. |
|
User |
The user who performed the configuration. |
|
Last Updated |
The time when the configuration was last edited. |
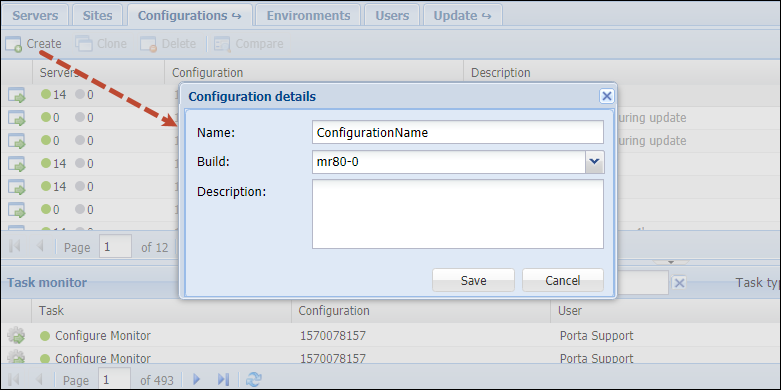
You can create a new configuration by clicking the Create button, typing in its name and description, and choosing which software version it applies to.
If the configuration already exists, you can edit its description by double-clicking on it.
You can clone the configuration by clicking the Clone button (to clone a configuration means to copy it), or delete it using the Delete button.
You cannot change or delete the active (currently applied) or the backup (previously used) configurations. This is to ensure that there is always a "stable" configuration you can use for rollback. You can open such a configuration for review
using the ![]() Configuration Details button, or you can create a new configuration as its exact copy (and then edit this new configuration) by using
the Clone button.
Configuration Details button, or you can create a new configuration as its exact copy (and then edit this new configuration) by using
the Clone button.
You can easily compare two configurations and see the differences between them. Choose two configurations by holding down the Ctrl button on your keyboard, and then click the Compare button which will become highlighted above.
Click the ![]() Configuration Details button for the required option of the corresponding configuration to open it in the configuration editing mode. Bear
in mind that you cannot change or delete the options of an active or backup configuration.
Configuration Details button for the required option of the corresponding configuration to open it in the configuration editing mode. Bear
in mind that you cannot change or delete the options of an active or backup configuration.
Configuration information
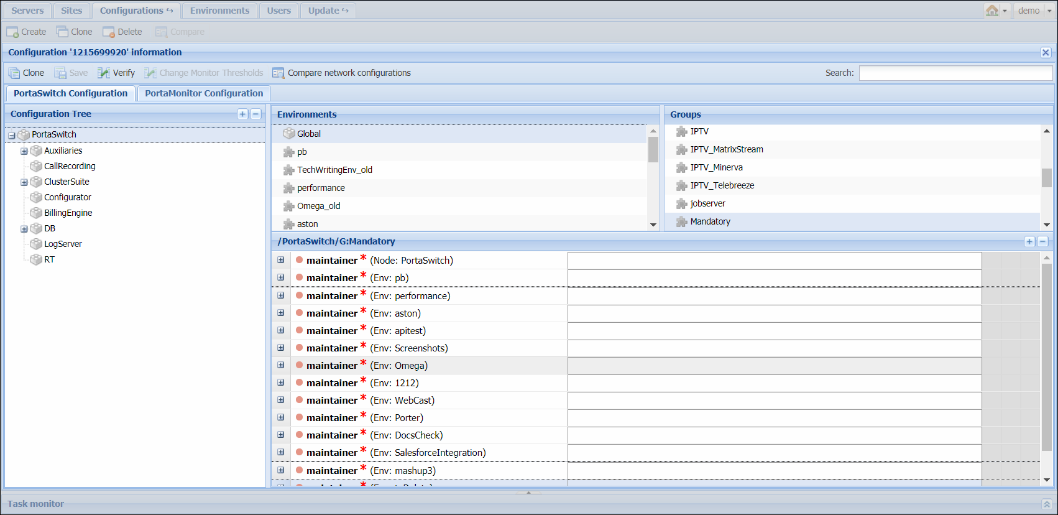
On this page, you can see the Configuration Tree, Environments, Groups panels, and the panel where all the configuration options for a given service are shown.
Some options can be specified at the level of the particular instance and at the level of the configuration tree node that holds this instance.
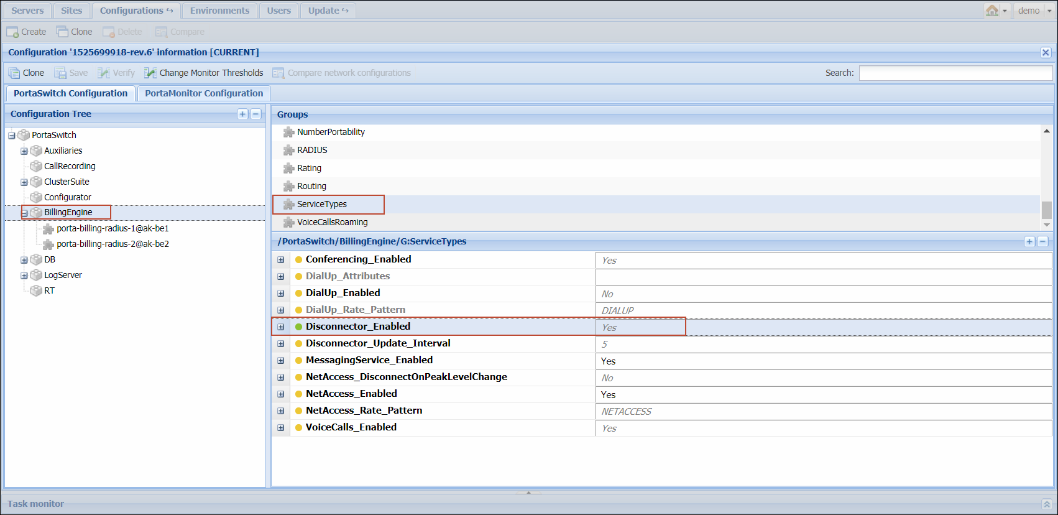
For example, in the Configuration Tree panel, you can choose PortaSwitch > BillingEngine > porta-billing-radius-1@akbilling and set the Disconnector_Enabled option for this instance. (You can find this option in the ServiceTypes group.)
But you can also specify the same option at the level of the configuration tree node (PortaSwitch > BillingEngine > …).
If you specify the option value at the level of the configuration tree node, it becomes a default value for all the instances under this configuration tree node. The Configuration server will choose which value to use according to the following rule:
- If you specify the option value at the level of a particular instance, the Configuration server will use this value and ignore the data specified at the level of the configuration tree node;
- If you leave the option value at the level of a particular instance blank, the Configuration server will use the default value – that is, specified at the level of the configuration tree node.
The same rule applies when you specify options for environments.
You can set up configuration options for each billing environment separately or you can do this globally for all billing environments by specifying a default value.
Note that it is not always correct to specify default (global) values for the options since such settings are applied to all instances, some of which may be located on different physical servers. For example, if you set private LADDR (Layered-Architecture Device Driver) for PortaSIP on the global level, the configuration will be correct as long as all virtual PortaSIP instances are located on the same physical server. However, if PortaSIP cluster is deployed within PortaSwitch installation, there are two or more PortaSIP servers. In such cases, setting a default value for the private IP address (LADDR) may not be correct since some PortaSIP instances that are located on other physical servers, may adopt the specified IP address (that doesn’t belong to their server).
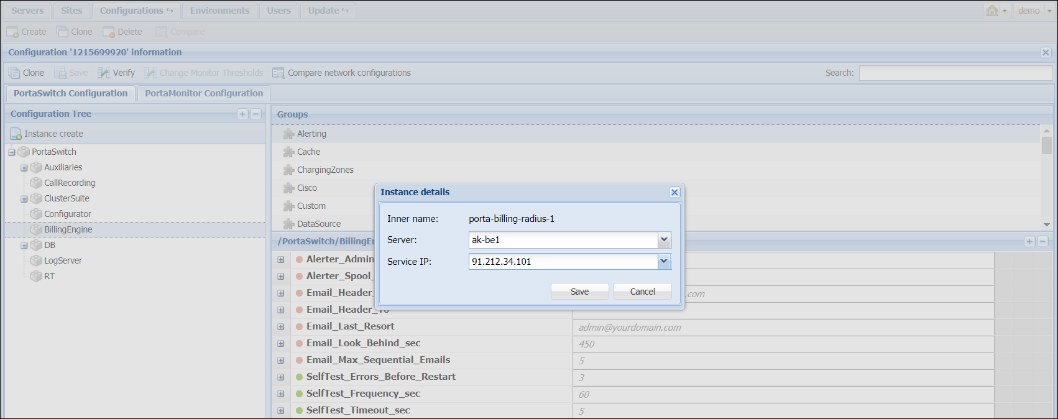
A service that runs on your server (e.g., "web interface" or "SIP server") is called an instance. Each service requires its own IP address so that it can be accessed by your customers. To add a new instance, press the ![]() Instance create button. In the pop-up window, choose the server which this instance will run on, its service IP, and a billing environment where this instance
will run, and then press Save.
Instance create button. In the pop-up window, choose the server which this instance will run on, its service IP, and a billing environment where this instance
will run, and then press Save.
To change these settings later on select the instance from the configuration tree and double-click on it.
In the configuration options window, you can see instance options with either default values (shown in grey) or explicitly defined values (shown in black). To edit a specific option, double-click on it. You can also add one more value by using the ![]() Add Value button.
Add Value button.
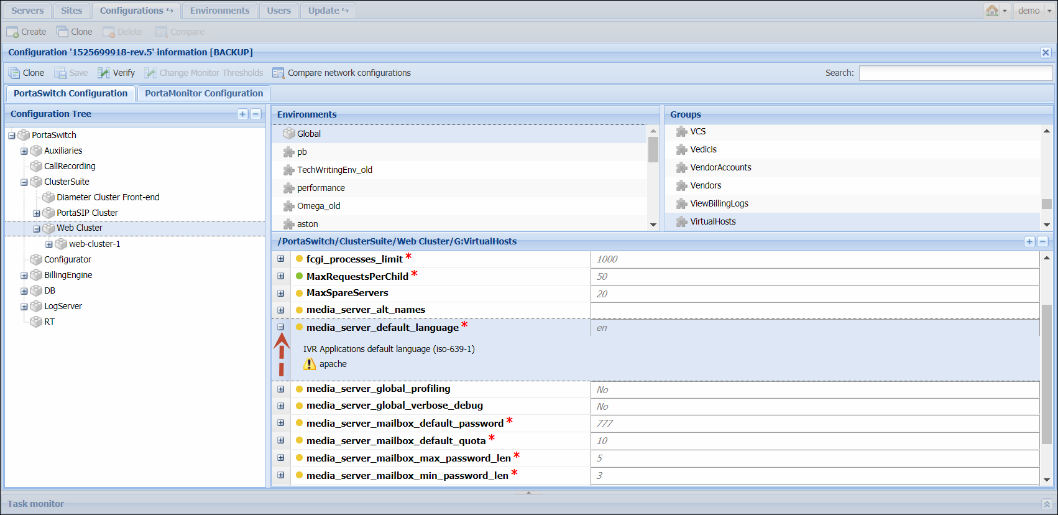
To find additional information about the required option, click the plus sign on the left. Once you open the required option, you will see its description and an alert about possible action in case you change the option value:
If you want to create one more instance with the same options as in the existing one, use the ![]() Instance clone button.
Instance clone button.
After all the values have been set, click the ![]() Verify button to see the differences between the current configuration and the intended one. Then,
click
Verify button to see the differences between the current configuration and the intended one. Then,
click ![]() Check/Apply button to verify if the configuration is valid (e.g., all the required options have values assigned to them); then on the pop-up
window with the status information you can choose whether to perform a complete check or apply the configuration right away.
Check/Apply button to verify if the configuration is valid (e.g., all the required options have values assigned to them); then on the pop-up
window with the status information you can choose whether to perform a complete check or apply the configuration right away.
If you want to check whether any services will be restarted when a new configuration is applied (e.g., for more suitable scheduling) press the Complete Check button. The system will simulate the whole procedure and provide a detailed log of actions that will be executed when the configuration is applied.
If you are satisfied with the results of the preliminary check, press the Apply button. As soon as the configuration has been applied, you will see this action displayed on the Task page.
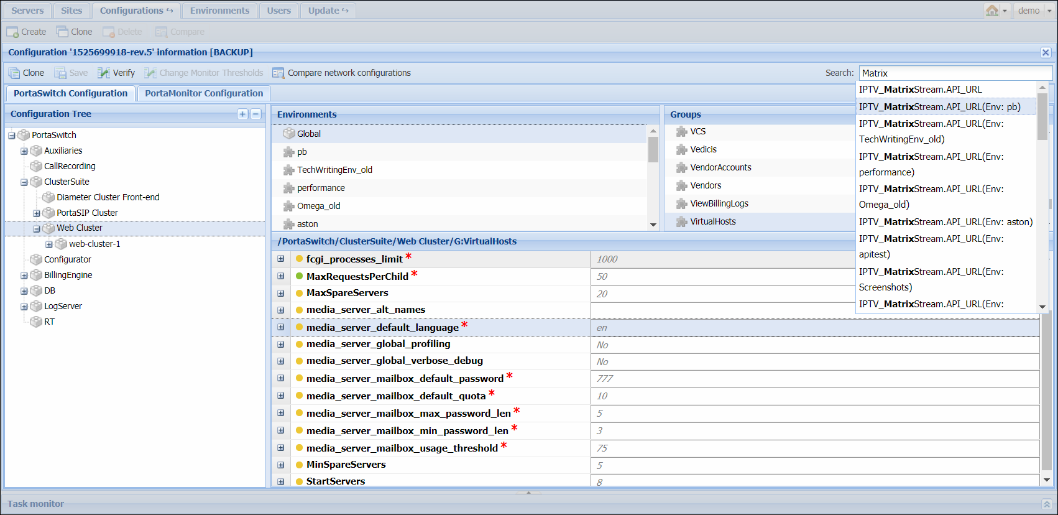
There is also extended Search functionality inside each configuration tree that allows you to make a search by the option’s name or value, or the name of the instance. Start by simply entering the target value to see all the possible variants.
PortaMonitor configuration
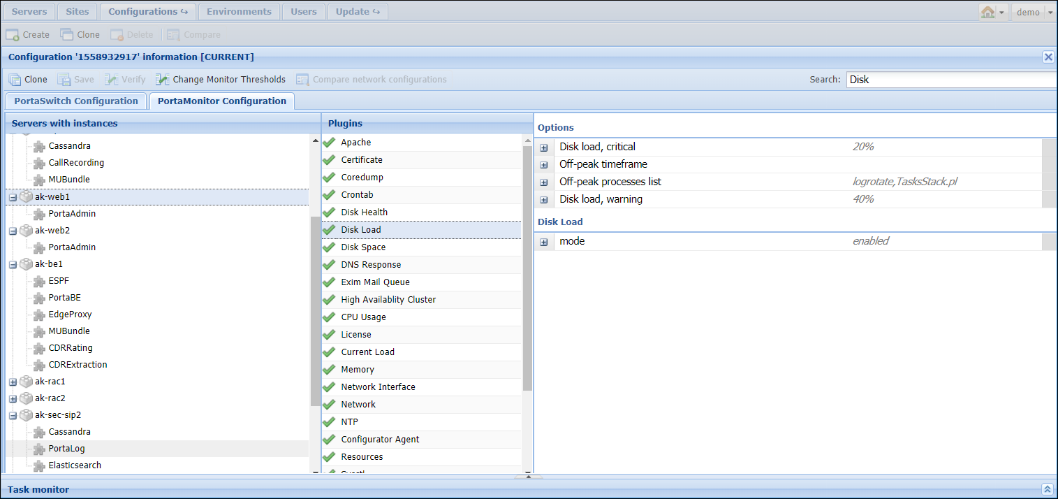
On the PortaMonitor Configuration tab, you can see the list of monitoring plugins enabled in your installation. A monitoring plugin is a script in Perl, Python, Shell, or a binary executor, that checks a particular parameter of a server (e.g., Disk health, CPU usage, etc.) or service (e.g., RADIUS cluster, number of MySQL connections, etc.), matches it with the threshold and reports the parameter status to the PortaOne monitoring system. Every minute each parameter is checked.
The monitoring plugins are grouped per server and per instance. To simplify navigation and operation on the PortaMonitor Configuration tab, it is divided into three sections:
The Servers with instances section lists all your installation’s servers and all the instances running on those servers.
The Plugins section lists all monitoring plugins available either on a given server or for a particular instance. The ![]() status icon shows a plugin is enabled;
the
status icon shows a plugin is enabled;
the ![]() icon marks a plugin as disabled and this particular parameter is therefore not monitored. Click the server’s name to display its monitoring plugins. Select an
instance to view the list of plugins available for it.
icon marks a plugin as disabled and this particular parameter is therefore not monitored. Click the server’s name to display its monitoring plugins. Select an
instance to view the list of plugins available for it.
Select a plugin and view its configuration thresholds in the Options section. Here you can enable or disable the plugin and change its thresholds. Before you make any modifications to the monitoring plugins, we strongly recommend that you discuss them with PortaOne support.
After you have made the changes, click the ![]() Change Monitor Thresholds button to apply them. To ensure that monitoring thresholds apply to the active
server and/or instance, the
Change Monitor Thresholds button to apply them. To ensure that monitoring thresholds apply to the active
server and/or instance, the ![]() Change Monitor Thresholds button is only active for the currently active configuration.
Change Monitor Thresholds button is only active for the currently active configuration.
Internal modules of the billing engine
Below you will find the descriptions of some modules that allow you to enable or disable certain PortaSwitch features. We suggest that you enable additional modules (that have been disabled by default) only if you understand how they work and plan to use the functionality they provide.
NumberPortability
This feature is enabled on the Configuration server by default.
See the Local Number Portability section in the PortaBilling Administrator Guide for more information about this feature.
CallParking
This is a convenient PBX feature that allows users to put a conversation on hold, move to a different location, and then resume the conversation from a different IP phone by dialing a pickup code. Enable Call Parking when you want to use this feature.
GroupPickup_Enabled
By dialing a Group Pickup Prefix on the phones, this feature permits those phones within the same PBX environment (all accounts under the same customer) to answer each other’s calls. This feature is enabled by default.
FavoriteNumbers_Enabled
The Favorite numbers feature permits the application of a special promotional rating for a group of numbers that are individually defined for each subscriber. After this feature is enabled in the billing engine, the "Favorite numbers" feature is enabled for individual accounts on the Account info page in the Service Features tab of the web interface.
Callback
Enabling this module permits the use of the special authorization and rating models for callback service.
DialPlan_Enabled
This module is used to produce a "routing prognosis" (a list of routes to be used when a specific phone number is called) when requested from the "Test dialplan" portion of the PortaBilling web interface. It should be enabled in order for the web dial plan component to operate correctly.
CLDlookupInDIDinventory (DID Inventory Module)
If you purchase bulk numbers from a telco operator and upload them to PortaSwitch, but some of them are not yet provisioned to PortaSwitch accounts, these numbers may cause routing loops. Someone calls a number; the call is delivered to your network; but since the destination number does not belong to any local account, PortaSwitch considers it to be an outside number and routes it to an external carrier, which then delivers it to your network again, and the action repeats continually, again and again.
In order to prevent this from happening, numbers that do not belong to any local accounts (while currently available in the database) can be "registered" in the DID inventory. When a call is made to one of these numbers, PortaSwitch considers these numbers "not yet provisioned" and therefore, the call fails and shows the following disconnection code: CLD_UNASSIGNED. Therefore, enable this module to prevent routing loops for calls to unassigned DID numbers.
UnifiedMessaging_Enabled
When this module is enabled it takes control of the handling and routing for the PortaSwitch Media server voice applications. Do not forget to activate the UM feature for products that are required to provide UM service:
- On the PortaBilling Main Menu page, in the Rating section, choose Products.
- On the Product Management page, click on the name of the corresponding product.
- Click on the Service Configuration tab.
- In the Services column, under Voice Calls, select Incoming Calls.
- From the UM Enabled list, select Enabled to activate UM services for this product.
IvrUtilities_Enabled
This module implements various actions, requested by IVR applications (e.g., performing a customer sign-up by creating a new account). This module is enabled on the Configuration server by default.
Paging_Enabled
PortaSwitch supports the Paging/Intercom Calls feature, which enables users from the same group to use two phones like an on-door speakerphone. This module is enabled on the Configuration server by default.
See the Paging/Intercom Calls section in the PortaSIP Administrator Guide for more information.
FixUpBrokenAccessNodeRatingPatterns
Enable this module if you need a workaround for improperly configured third-party nodes, i.e. when one node sends a call to another one in a non-E.164 format and the BE authorization is inconsistent with access code accounting.


