The external invoice template is a HTML + CSS file. This file consists of ordinary HTML/CSS code and special placeholders (variables) that define which relevant invoice data should be shown in your invoice (i.e. company name, invoice number or invoice due date). When a template file is parsed for output, the variables are replaced with their actual values by a template processing engine (also known as a template processor). The CSS part of the code defines how your invoice will look and may include special style sheets for proper PDF styling which will be used by PrinceXML to convert HTML documents into PDF files.
Add variables to your invoice template
Your invoice template includes changeable and unchangeable content. The unchangeable (boilerplate) part of the template is defined by plain HTML code with style classes, while the changeable part is defined by means of variables – variable values that show up in your invoice. Variables are included in special tags to clearly indicate where in the document they must be placed and they are then auto-replaced with the actual values by a template processing engine. PortaBilling uses the Template Toolkit to process external invoice templates (the manual can be found at https://metacpan.org/pod/Template::Manual ). By default, the [% … %] tags are used to indicate variables in the Template Toolkit.
The following code demonstrates how to include the variables invoice.issue_date (indicates the date when the invoice was created) and invoice.invoice_number (indicates the invoice’s order number) in an invoice template:
<table class="abs date-num">
<tr>
<td>Date</td>
<td>Invoice #</td>
</tr>
<tr>
<td>[% invoice.issue_date | html %]</td>
<td>[% invoice.invoice_number | html %]</td>
</tr>
</table>
Variables with personal data
When you create a custom invoice template, the variables with personal data, e.g., account ID, are enclosed in special tags by default such as
<class="hidden_personal_data">
These tags allow you to protect personal data and comply with GDPR (this means that the administrators with restricted access to personal data will see the anonymized invoice version).
How it works
Say you enable the Mask personal information in data accessed by this user option for an administrator. Your custom template can include variables that contain personal data such as account_id and look like this
<span class="hidden_personal_data">[% account_id %]</span>
While processing the invoice template, the variable is substituted with the real value, 11234. Then two versions of the invoice are generated – one with the full personal data and the second one with the anonymized personal data, e.g. 11234 is replaced with “⋅⋅⋅”.
As a result, the administrator sees “⋅⋅⋅” instead of the actual account ID. Meanwhile, the customer will receive a standard invoice, where all the data is shown.
Note that the variables with personal data should be used in the custom invoice templates in the following way:
- Use only the standard filters supported by Template Toolkit. Refer to Template::Manual::Filters for a complete list of available filters, their descriptions, and examples of use.
- Apply regular expressions to variables such as
row.xdr_cld.match("VALUE")instead of direct variable comparison with a string/number such as row.xdr_cld == “VALUE”
To find a list of variables (and their descriptions) that can be used to show different information in the invoice, refer to the Variables that can be used in an external invoice template section.
Template toolkit directives
Besides the use of variables, the Template Toolkit provides a set of directives that allows more complex processing operations to be performed. These include accessing and updating template variables, processing templates files and blocks (for example, including another template onto the current one), and ways of selecting and grouping the data based on a particular condition, etc.
The Template::Manual::Directives page lists all the Template Toolkit directives, complete with examples of their use.
PDF specific CSS
PrinceXML – the PDF conversion tool used in PortaBilling – converts HTML documents into PDF files by applying Cascading Style Sheets (CSS). In order to adjust generated PDF files to your own look and feel, customize the style sheets written in CSS according to PrinceXML’s guidelines for CSS customization (available on their web site: http://www.princexml.com/doc/8.1/ ).
For example, the following CSS code sets the page size and borders for your PDF files:
@page {
size: A4 portrait;
margin-left:   0.25in;
margin-right:  0.25in;
margin-top:    0.25in;
margin-bottom: 0.25in;
}
The following CSS code can be used to add a custom footer to the bottom of every PDF page in your invoice:
@page {
@bottom-left {
content: "2000-2015 PortaOne, Ink. Thank you for choosing our company!";
font-family: serif;
font-size: 10pt;
}
}
Advanced template customization
This section provides some code examples to help in designing a unique template that best meets your needs.
Add voice calls details
Code to add a separate invoice page with details about voice calls made during a billing period:
<!-- xdrs -->
<!-- only voice calls -->
[% SET iter = services.3 -%]
[% SET row = iter.next_row -%]
[% IF row -%]
<table class="xdrs">
<thead>
<tr>
<td style="table-column-span: 7;"><b>Voice Calls</b></td>
</tr>
</thead>
<tbody>
[% SET total_amount = 0 -%]
[% SET total_time = 0 -%]
[% SET prev_row = undef -%]
[% WHILE row -%]
<tr>
<td>[% row.xdr_cli | html %]</td>
<td>[% row.xdr_cld | html %]</td>
<td>[% row.country_name | html -%]</td>
<td>[% row.destination_description | html %]</td>
<td>[% row.xdr_connect_time | html %]</td>
<td>[% row.xdr_charged_quantity %]</td>
<td>[% money(row.xdr_charged_amount) %] [% customer.iso_4217 | html %]</td>
</tr>
[% SET total_amount = total_amount + money(row.xdr_charged_amount) -%]
[% SET total_time = total_time + row.xdr_charged_quantity -%]
[% SET prev_row = row -%]
[% SET row = iter.next_row -%]
[% END -%]
[% IF prev_row -%]
<tr>
<td style="table-column-span: 5;"><b>Total:</b></td>
<td>[% total_time %]</td>
<td>[% total_amount %] [% customer.iso_4217 %]</td>
</tr>
[% END -%]
</tbody>
</table>
[% END -%]
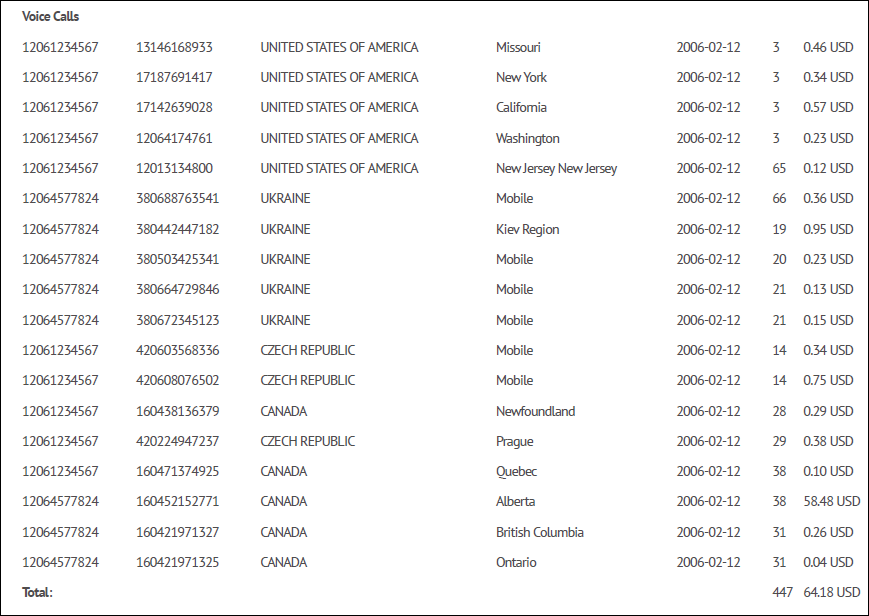
The resulting invoice page with details on voice calls will look like this:
Group voice calls by country
Code to group voice calls made during a billing period by country name:
<!-- xdrs -->
<!-- only voice calls -->
[% SET iter = services.3 -%]
<!-- group resulted CDRs by country name -->
[% SET row = iter.next_row('country_name') -%]
[% IF row -%]
<table class="xdrs">
<thead>
<tr>
<td style="table-column-span: 7;"><b>Voice Calls</b></td>
</tr>
</thead>
<tbody>
[% SET total_amount = 0 -%]
[% SET total_time = 0 -%]
[% SET prev_row = undef -%]

[% WHILE row -%]
[% IF prev_row AND prev_row.country_name != row.country_name -%]
<tr>
<td style="table-column-span: 5;"><b>Total by [% prev_row.country_name | html -%]</b></td>
<td>[% total_time %]</td>
<td>[% total_amount %] [% customer.iso_4217 %]</td>
</tr>
<tr>
<td style="table-column-span: 7;">[% row.country_name | html -%]</td>
</tr>
[% SET total_amount = 0 -%]
[% SET total_time = 0 -%]
[% ELSIF NOT prev_row %]
<tr>
<td style="table-column-span: 7;">[% row.country_name | html -%]</td>
</tr>
[% END %]
<tr>
<td>[% row.xdr_cli | html %]</td>
<td>[% row.xdr_cld | html %]</td>
<td>[% row.country_name | html -%]</td>
<td>[% row.destination_description | html %]</td>
<td>[% row.xdr_connect_time | html %]</td>
<td>[% row.xdr_charged_quantity %]</td>
<td>[% money(row.xdr_charged_amount) %] [% customer.iso_4217 | html %]</td>
</tr>
[% SET total_amount = total_amount + money(row.xdr_charged_amount) -%]
[% SET total_time = total_time + row.xdr_charged_quantity -%]
[% SET prev_row = row -%]
[% SET row = iter.next_row -%]
[% END -%]
[% IF prev_row -%]
<tr>
<td style="table-column-span: 5;"><b>Total by [% prev_row.country_name | html -%]</b></td>
<td>[% total_time %]</td>
<td>[% total_amount %] [% customer.iso_4217 %]</td>
</tr>
[% END -%]
</tbody>
</table>
[% END -%]
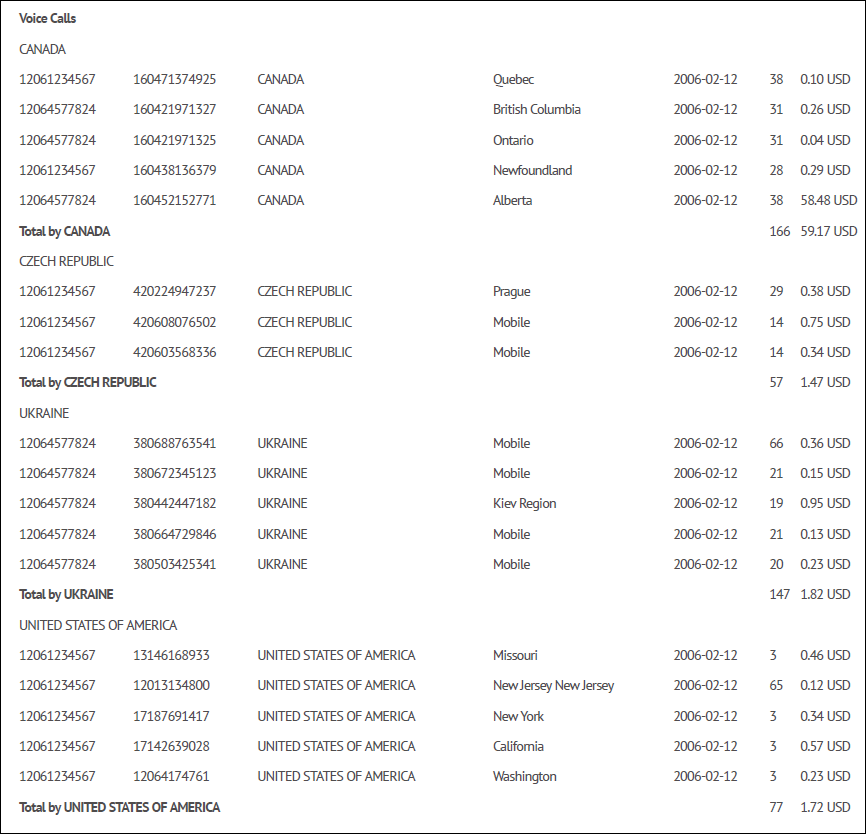
The resulting invoice page summarizing voice calls grouped by country name will look as follows:
Design reseller invoices to show charges for customer subscriptions sold via a reseller
Code for the reseller’s invoice template to show recurring charges for customer subscriptions sold via a reseller. Note that it’s possible to group subscription charges only by reseller’s direct customers, not by sub-resellers.
[% SET customer_name_map = {} %]
[% SET acc_customer_map = {} %]
[% SET customer_cld_totals_map = {} %]
[% SET i_service = 4 %]
[% SET srv = services.${i_service} %]
[% SET row = srv.next_row %]

[% WHILE row %]
[% IF row.xdr_i_sub_account %]
[% IF !acc_customer_map.${row.xdr_i_sub_account} %]
[% SET subcustomer_info = get_customer_info( { i_sub_account => row.xdr_i_sub_account } ) %]
[% IF !subcustomer_info %]
[% row = srv.next_row %]
[% NEXT %]
[% END %]
[% SET acc_customer_map.${row.xdr_i_sub_account} = subcustomer_info.i_customer %]
[% SET customer_name_map.${subcustomer_info.i_customer} = subcustomer_info.name %]
[% END %]
[% SET i_sub_customer = acc_customer_map.${row.xdr_i_sub_account} %]
[% SET customer_name = customer_name_map.${i_sub_customer} %]
[% IF !customer_cld_totals_map.${customer_name}.${row.xdr_cld} %]
[% SET customer_cld_totals_map.${customer_name}.${row.xdr_cld} = { fee => 0, count => 0 } %]
[% END %]
[% SET totals_info = customer_cld_totals_map.${customer_name}.${row.xdr_cld} %]
[% SET totals_info.fee = totals_info.fee + row.xdr_charged_amount %]
[% SET totals_info.count = totals_info.count + 1 %]
[% END %]
[% row = srv.next_row %]
[% END %]

<body>
[% FOREACH customer_name IN customer_cld_totals_map.keys.sort %]
<br/>
<table style="width: 100%; border-collapse: collapse; height: 108px;" border="1">
<tbody>
<tr style="">
<td style="width: 100%;" colspan="3"><b>[% customer_name | html %]</b></td>
</tr>
<tr style="">
<td style="width: 85%;"><b>Subscriptions</b></td>
<td style="width: 5%;"><b>Qty</b></td>
<td style="width: 15%;"><b>Total fee</b></td>
</tr>
[% SET cld_totals_map = customer_cld_totals_map.${customer_name} %]
[% FOREACH xdr_cld IN cld_totals_map.keys.sort %]
[% SET totals_info = cld_totals_map.${xdr_cld} %]
<tr style="">
<td style="width: 85%; "><b>[% xdr_cld | html %]</b></td>
<td style="width: 5%; ">[% totals_info.count | html %]</td>
<td style="width: 15%; ">[% totals_info.fee | html %]</td>
</tr>
[% END %]
</tbody>
</table>
[% END %]
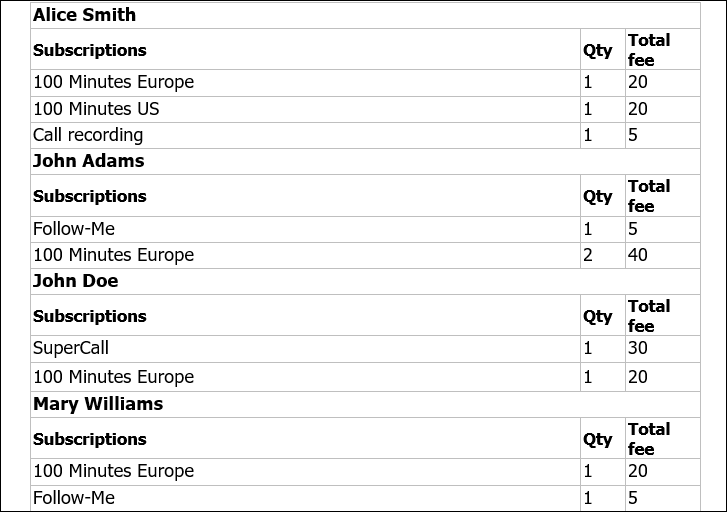
The resulting invoice page will look as follows:
Here you can find other examples of advanced template customizations, e.g., to display the invoice data in the same way as on “legacy” invoices.
General recommendations
Below are a few general points to remember when creating your own invoice template:
- If you are planning to develop a multiple page template (for example, with summary information on the first page and detailed information on the second page), we recommend that you write the code for each page individually and then combine it later on. If the code is contained in one single file, pages may overlap when viewed in a web browser.
- If the Template Toolkit construction is included in a custom invoice template, some template blocks might be displayed incorrectly in a web browser until the final HTML output is produced. This is normal and is corrected when the template passes through the template processor.
- It is a good idea to work out the overall design of your invoice template first, and then proceed with adding the Template Toolkit constructions.
- You may link the template HTML file to an external CSS file as PrinceXML does not apply any restrictions on this.


