To ensure secure communications between sites within your installation and their proper management by the Configuration server, the servers of these sites must be organized into a single virtual private network. PortaSwitch provides a built-in VPN solution to do just that.
A site-to-site VPN uses tunnels to create data packets from ordinary IP packets and then to forward them to the remote server over a public network. Encryption is used to ensure their security.
To build a VPN tunnel between the sites means to configure a VPN endpoint on every site and enable connectivity between them.
The sections below describe how to configure VPN endpoints for sites deployed on the premises and hidden behind NAT.
General requirements
- VPN endpoints must be reachable over a public network. Thus, they must have a public IP address assigned to them.
- If sites are hidden behind NAT, a VPN endpoint can be configured on private IP addresses, since it is NAT that serves as the communication point.
- The internal IP address of a VPN endpoint must belong to the same subnet as the internal IP addresses of the servers of the same site.
- VPN endpoints must freely exchange UDP traffic on ports 500 (ISAKMP) and 4500 (NAT traversal). Configure your network routers to forward incoming requests to VPN endpoints.
- To avoid IP address conflicts and routing issues between VPN endpoints the internal network addresses of your sites must not cross.
VPN endpoint configuration for sites deployed on the premises
To configure a VPN endpoint for a site deployed on the premises you must obtain the following information about local (where you configure the endpoint) and remote sites:
- The VPN endpoint’s public IP address.
- The VPN endpoint’s private IP address.
- The site’s internal network address.
- The pre-shared key used for authentication. You can generate a pre-shared key with openssl, pwgen or any other tool that can generate random string.
Complete the following steps:
- Clone the existing configuration.
- From the Configuration tree, select Auxiliaries > VPN
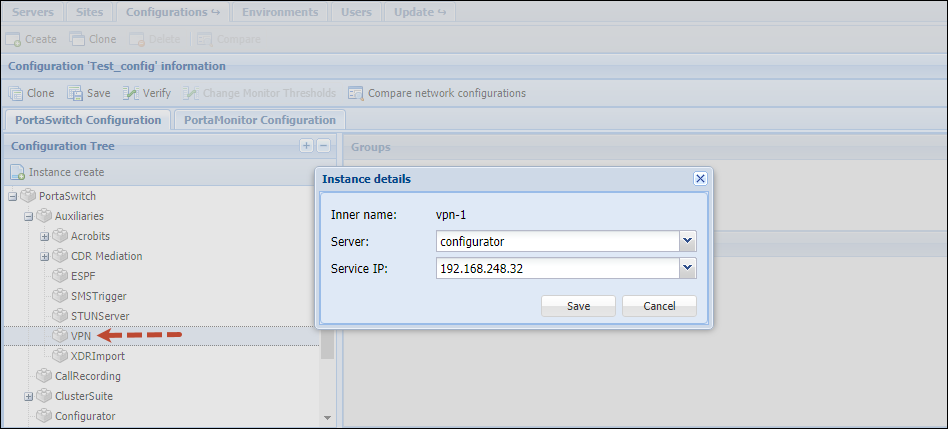
- Press the Instance create button.
- Fill in the Instance create form:
- Server – select the server where the VPN instance will reside.
- Service IP – select the public IP address for the VPN instance.
- Click Save.

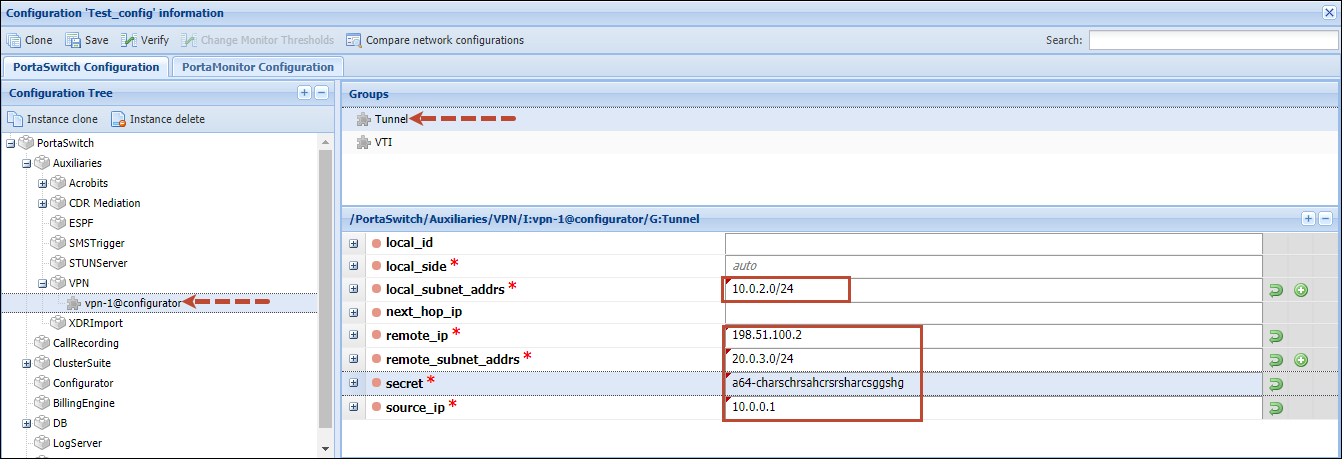
- Select the Tunnel group and fill in the following details:
- source_ip – specify the private IP address of the server with the VPN instance (e.g., 10.0.2.10).
- local_subnet_addrs – specify the internal network address of the local site (e.g., 10.0.2.0/24). Click the
 icon to add more subnets.
 - remote_ip – specify the public IP address of the remote VPN endpoint (e.g., 198.51.100.2).
- remote_subnet_addrs – specify the internal network address of the remote site (e.g., 20.0.3.0/24). Click the
 icon to add more subnets;
 - local_side – this is used to determine the VPN tunnel sides – left and right. Leave the default auto option for the system to automatically set the sides.
- secret – specify the pre-shared key used for authentication.
- Click Verify to verify the configuration.
- Click Check/Apply to apply the configuration.
Repeat these steps to configure the VPN endpoint on the remote site.
VPN endpoint configuration for sites hidden behind NAT
In this deployment, VPN endpoints can be allocated private IP addresses. However, NAT routers must be configured to forward incoming UDP requests to the VPN endpoint on ports 500 (ISAKMP) and 4500 (NAT traversal).
To configure a VPN endpoint for a site deployed on the premises you must obtain the following information about local (where you configure the endpoint) and remote sites:
- The VPN endpoint public IP address;
- The VPN endpoint’s private IP address;
- The NAT server’s public IP address;
- The NAT server’s private IP address
- The site’s internal network address;
- The pre-shared key used for authentication. You can generate a pre-shared key with openssl, pwgen or any other tool that can generate a random string.
To configure a VPN endpoint, complete the following steps:
- Clone the existing configuration.
- From the Configuration tree, select Auxiliaries > VPN
- Click the Instance create button.
- Fill in the Instance create form:
- Server – select the server where the VPN instance will reside.
- Service IP – select the private IP address for the VPN instance.
- Click Save.
- Select the Tunnel group and fill in the following details:
- local_id – specify the public IP address of the local NATserver here (e.g., 198.51.100.1).
- source_ip – specify the private IP address of the server with the VPN instance (e.g., 10.0.2.15).
- local_subnet_addrs – specify the internal network address of the local site (e.g., 10.0.2.0/24). Click the
 icon to add more subnets.
 - next_hop_ip – specify the internal IP address of the local NAT server (e.g., 192.168.0.1).
- remote_ip – specify the public IP address of the remote NAT server (e.g., 198.163.100.2).
- remote_subnet_addrs – specify the internal network address of the remote site (e.g., 20.0.3.0/24). Click the
 icon to add more subnets.
 - local_side – this is used to determine the VPN tunnel sides – left and right. Leave the default auto option here.
- secret – specify the pre-shared key used for authentication.
- Click Verify to verify the configuration.
- Click Check/Apply to apply the configuration.
Repeat these steps to configure a VPN endpoint on the remote site.
VPN endpoint configuration for sites deployed in a cloud
To set up a VPN endpoint for a site deployed in a cloud, the following information about your on-premises site is required:
- the public IP address for a remote VPN endpoint located on the premises;
- the IP address for the private on-premises network that will be added to the VPN.
The VPN endpoint configuration is handled by PortaOne Support. Once a VPN endpoint is configured in a PortaSwitch Cloud network, you will be provided with its public IPv4 address, a pre-shared key and a private cloud network address.
To configure the VPN endpoint for your on-premises site:
- Create and configure the VPN instance as described in the VPN endpoint configuration for sites deployed on the premises section.
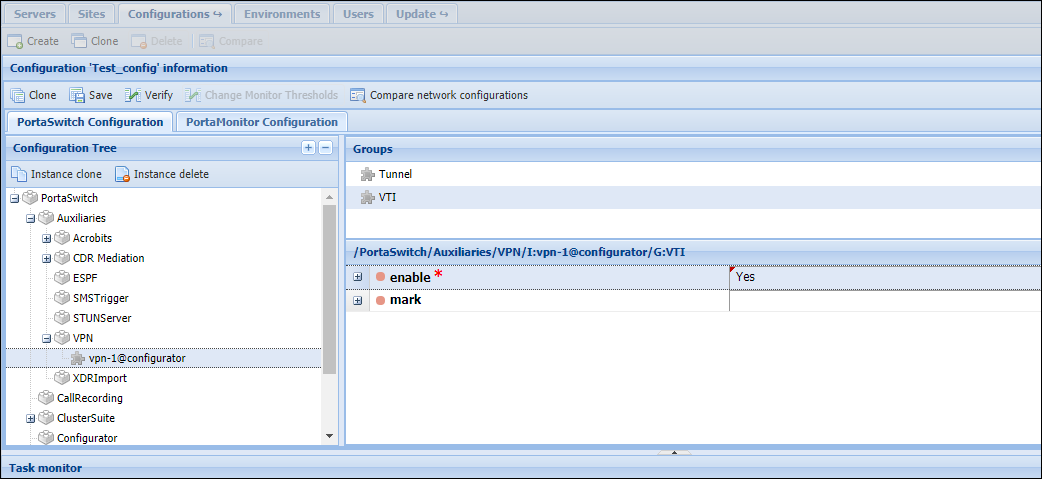
- Enable the VTI mode for the endpoint:
- Select the VTI group for the VPN instance;
- Set Yes in the enable option.
- Click Verify to verify the configuration.
- Click Check/Apply to apply the configuration.
When applying the configuration, the system automatically establishes the VPN tunnel and routing between the cloud-based site and the on-premises site.
Configure a backup VPN tunnel for PortaSwitch
We recommend that you configure a backup tunnel when one of your sites is deployed in the cloud and the other site is on the premises. This meets the Oracle Cloud Infrastructure recommendations. When the main tunnel is offline for maintenance, the other tunnel is used to send traffic between the sites.
This ensures fault tolerance and improves the reliability of PortaSwitch. End users do not even notice that maintenance is being performed since services continue to be available without interruption.
To enable redundant tunnels between sites, you must set up the following:
- The VPN instance for the cloud-based site.
After configuration you receive:
- A public IPv4 address (unique for each VPN instance);
- A pre-shared key (unique for each VPN instance);
- Two subnetwork addresses (common for all VPN instances).
- The VPN instances for an on-premises site.
On the Configuration server:
- Configure the VPN instances (main and backup) on the same server, e.g., Configurator. See the VPN endpoint configuration for sites deployed on the premises section.
- Open each VPN instance and select Tunnel group > specify two subnetwork addresses in the remote_subnet_addrs option (e.g., 192.168.5.0/24, 192.199.9.0/24).
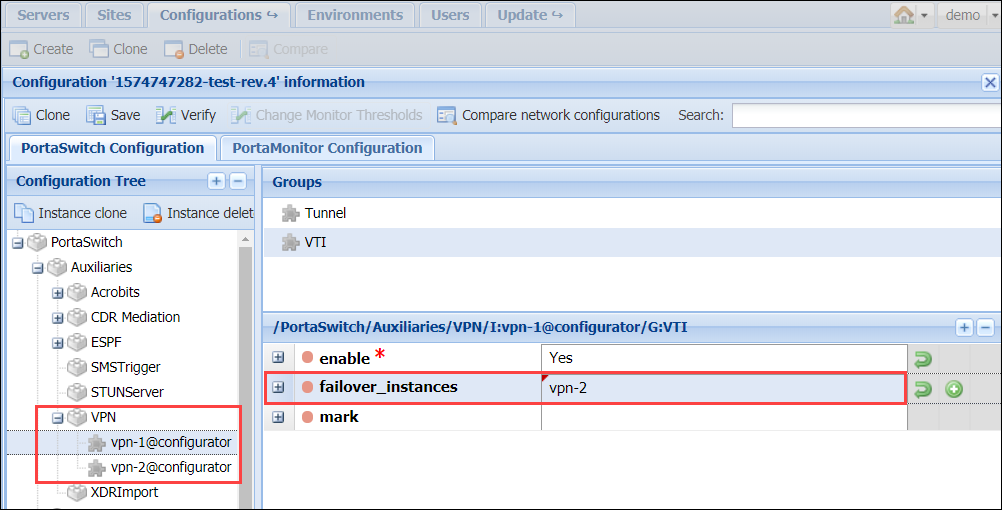
- Open each VPN instance and select VTI group > enable the VTI mode for each instance.
- Open the "main" VPN instance and select VTI group.
- In the failover_instances option, select the other VPN instance from the list.
- Click Verify to verify the configuration.
- Click Check/Apply to apply the configuration.
Once the configuration is applied, the system automatically uses the other VPN instance as a backup.
You can configure the redundant VPN tunnels for:
- The sites deployed on the premises and in the cloud.
- The sites deployed on the premises in separate datacenters.
- Dual Version PortaSwitch: for source and target systems.
We recommend that you configure a separate Internet connection for each VPN tunnel for every on-premise installation.
This ensures the stability of PortaSwitch by using redundant VPN tunnels.


