The brandpane feature is only available on the old web interface.
Using the brandpane feature you can customize your system on a per-environment basis to display your company name and logo on every web page.
Every realm within the environment (e.g., admin, customer, vendor, cc_staff) can be modified by using a separate template. Brandpane templates are stored in the database and are periodically cached to ~porta-admin//brandpane.
To use the brandpane feature you will need to create an appropriate template file hierarchy. Do NOT use ~porta-admin/apache/brandpane for that as it is periodically updated by the caching procedure. Instead, use any temporary directory (e.g., /home/demoroot/tmp/bp).
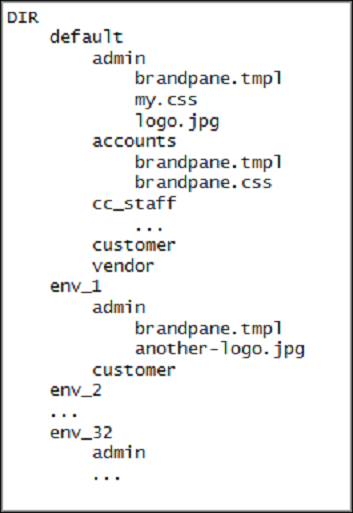
Brandpane file hierarchy
- First-level sub-directories represent environments. The name of a sub-directory must be ‘default’ (for an unspecified environment) or ‘env_#’ (where # is i_env number). Sub-directory ‘default’ is required.
- Second-level sub-directories represent realms, named as in configuration (admin, accounts, cc_staff, customer, vendor, representative, etc.). Sub-directory ‘admin’ is required.
- Every sub-directory must contain at least one file named ‘brandpane.tmpl,’ which is an ordinary HTML file. Additional files (images and CSS) are allowed.
Brandpane template selection order
Brandpane is searched and applied in the following order:
- env_$I_ENV/$REALM
- default/$REALM
- env_$I_ENV/admin
- default/admin
$I_ENV and $REALM are the current environment number and name of the realm. Steps 3 and 4 are not executed if the current realm is ‘admin.’
Create new brandpane templates
Follow the steps below to create a new brandpane template:
- The template’s file hierarchy should be created in a temporary directory (e.g., in /home/demoroot/tmp/bp). Log in to the server with the admin instance assigned to it and type:
cd /home/demoroot/tmp/

mkdir bp
- Create a proper brandpane file hierarchy and HTML components according to your requirements. Edit files brandpane.tmpl (a sample file is shown below).
<table width=100% border="0" align="left" cellpadding="0" cellspacing="0" bgcolor="white">

<tr>

<td width="100%">

<img src="/brandpane/default/admin/mylogo.gif">

</td>

</tr>

</table>
Note that images must include a full path, relative to the Document Root (e.g., “/brandpane/default/admin/my-logo.jpg”).
- Import the brandpane into the database:
impexp_templates.pl -i -brandpane -- path=/home/demoroot/tmp/bp
- Activate the brandpane feature on the Configuration server web interface (the BrandPane_Enabled option).
Modify brandpane templates
To change a brandpane template, export it from the database to a temporary directory, make your desired modifications and then import it back to the database:
- Export brandpane templates into temporary directory:impexp_templates.pl -e -brandpane –path=/home/demoroot/tmp/bp
- Edit files, add / remove images, styles, etc.:nano /home/demoroot/tmp/bp/default/admin/brandpane.tmpl
- Import brandpane templates back into the database:impexp_templates.pl -i -brandpane –path=/home/demoroot/tmp/bp
- Wait until Apache updates the cached brandpane templates.
- Clear the temporary directory:rm -rf /home/demoroot/tmp/bp
Remove brandpane templates
To remove brandpane templates, find the appropriate template in the database and remove it:
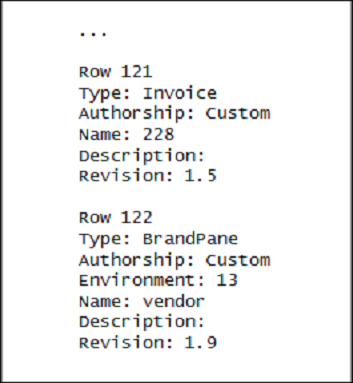
- Find the brandpane template number in the database:impexp_templates.pl -l -dbA command output example is shown below. Note that the template’s name is also its realm.

- Remove the template with the appropriate number:sudo -u -www impexp_templates.pl -d -t=122
- Remove the template from the file system on every admin instance of the web cluster:rm -r /home/porta-admin/apache/brandpane/$I_ENV/$REALM
$I_ENV and $REALM are the current environment number and name of the realm.
Brandpane for self-care interfaces
The brandpane functionality for self-care interfaces works similarly to other realms. It is configurable and can be turned on/off on the Configuration server via the ShowBrandPane option. The only difference between them is that the brandpane template file for self-care interfaces must be in the HTML format. An example of the brandpane.html file is shown below:
<!DOCTYPE HTML PUBLIC "-//W3C//DTD HTML 4.01 Transitional//EN"**

"http://www.w3.org/TR/html4/loose.dtd">

 <html>

 <head>

<meta http-equiv="Content-Type" content="text/html; charset=utf-8">**

<meta http-equiv="X-UA-Compatible" content="IE=8">**

 <title>Account Self-Care</title>

 </head>

 <body style="background-color:Tomato">

<img alt="text" src="/brandpane/env_3/customer/logo.png">

 </body>

 </html>
The look and feel of the self-care interfaces’ brandpane can be adjusted by modifying the CSS entries in the brandpane.css file (which should be linked to the brandpane.html file). For example, the following code changes the default brand pane height:
.brandPane{

height: 200px;

}
If you need to customize the self-care interfaces’ brandpane in different ways for different customers or accounts, you can do this via the following variables: i_customer and i_account. An example below shows how this can be done:
<!DOCTYPE HTML PUBLIC "-//W3C//DTD HTML 4.01 Transitional//EN" "http://www.w3.org/TR/html4/loose.dtd">

<html>

<head>

<meta http-equiv="Content-Type" content="text/html; charset=utf-8">

<meta http-equiv="X-UA-Compatible" content="IE=8">

<title>Account Self-Care</title>

</head>

<body style="background-color:Tomato">

<table>

<tr>

<td>

<h1> Hello customer # <%$i_customer%> </h1>

</td>

<td>

% my $result = $i_customer % ( int(rand(9)) + 1);

<% $result %>

% if ( $result % 2 == 0 ) {

<img alt="" src="/brandpane/env_3/customer/logo.png"

% } else {

<img alt="" src="/brandpane/env_3/customer/logo1.png"

% }

</td>

</tr>

</table>

</body>

</html>

<%args>

$i_customer => undef

$i_account => undef

</%args>
Thus, different logos will be displayed, depending on which customer has logged in to their self-care interface.
Adding a reseller’s logo to the reseller’s customers’ self-care interfaces
- Activate the brandpane feature as described in the topic above.
- Configure an additional virtual web server which will run on the reseller’s domain name (e.g., www.supercall.com).
- Include conditional statements in the brandpane component. These will analyze the domain name the customer is trying to access, and will then produce the company name and logo for your domain (www.sipcall.com), while for the reseller’s (www.supercall.com) the reseller’s name and logo will be produced. See the following example:
% if ($ENV{HTTP_HOST} =~ m/supercall.com/) {

<img src="/supercall.gif">

% } else { # our default domain

<img src="/sipcall.gif">

% }


