



Once your free trial/paid subscription is activated, you can deploy your branded IoT and M2M portal:
Preparation steps
Before proceeding with the module configuration and deployment, perform the following steps:
- Configure domains
- Obtain SSL certificates for these domains
- Add the portal domain to the list of trusted domains
- Make sure the configuration on the PortaBilling web interface is complete
- Prepare a logo and a favicon
Step 1: Configure domains
Configure the portal domain (e.g., sim.company.com) – this will be used in the portal URL that customers open in their browsers.
Optionally, configure the middleware domain (e.g., middleware.company.com) – this will be used internally as a proxy for all API requests between the portal and PortaSwitch and is not visible to customers. The proxy helps protect PortaSwitch from overload caused by many concurrent API requests, e.g., during malicious activity on the portal.
- Your PortaSwitch location is Europe, North America, South Africa, or Australia. In other locations, API requests may be processed with a delay.
- Your PortaSwitch uses a unified API endpoint, where both the admin and customer self-care APIs run under the same hostname.
When configuring DNS for these domains, specify the IP address depending on the location (cluster) where you deploy the portal. Find the IP addresses here.
Step 2: Obtain SSL certificates
Choose one of the following ways to obtain SSL certificates for the domains configured at step 1:
Generate automatically (recommended)
SSL certificates can be generated automatically. Configure the domains as described in step 1, and PortaOne will request certificates from the Let’s Encrypt certification authority (CA).
If you choose automatic generation, you can skip step 3.
If you configured a Certification Authority Authorization (CAA) DNS record for your main domain to allow issuing certificates only via a specific CA and plan to use subdomains, you must also allow Let’s Encrypt for these subdomains.
Add the following CAA records to the DNS configuration of the portal and middleware subdomains:
- sim.company.com IN CAA 0 issue “letsencrypt.org”
- middleware.company.com IN CAA 0 issue “letsencrypt.org”
Order SSL certificates from a trusted CA
Optionally, you can order SSL certificates for your domains (configured in step 1) from your trusted certification authority (CA), such as Verisign.
After you receive the SSL certificates and private RSA key files from the CA, upload them in the IoT and M2M portal Configuration UI.
For subdomains, you can use:
- A wildcard certificate for the main domain, valid for its subdomains. For example, if the main domain is company.com, the wildcard certificate covers *.company.com such as sim.company.com and middleware.company.com.
A wildcard certificate covers only first-level subdomains like *.company.com. It is not suitable for nested subdomains, for example, sim.packages.company.com.
- A certificate issued explicitly for both subdomains configured in step 1 (e.g., sim.company.com and middleware.company.com).
Step 3: Add the portal domain to the list of trusted domains
Cross-Origin Resource Sharing (CORS) is a set of rules that web browsers use to control access between websites on different domains. By default, CORS blocks all requests from another origin as potentially malicious. For example, a web page on evilhacker.com cannot send requests to an API on myphone.com.
To allow cross-origin API requests from your portal to PortaSwitch, add the portal domain to the list of domains trusted by the PortaSwitch API. This lets the portal access the API.
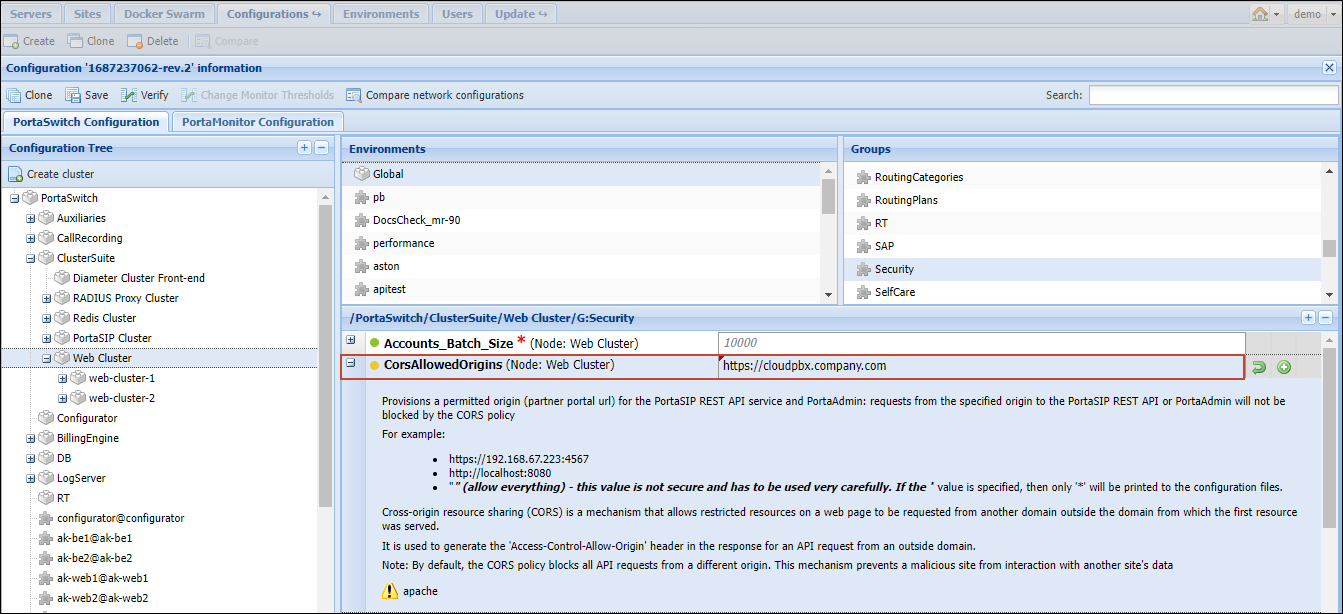
If your system version is MR97 or later
Go to the Configuration server web interface and set the portal URL (e.g., sim.company.com) in the CorsAllowedOrigins option.
If your system version is MR95-96
Go to the Configuration server web interface and set the portal URL (e.g., sim.company.com) in both options:
- CorsAllowedOrigins
- Media_server_cors_allowed_origins
If your system version is MR94
Contact the PortaOne support team for assistance.
Step 4: Make sure the configuration on the PortaBilling web interface is complete
If you have not yet configured the service plans that will be assigned to SIM cards, follow the steps in the handbook.
For the remainder of this guide, we assume you have already configured products, product groups (to organize products in groups), SIM inventory, customers (you can create test customers to test access to the portal), and these customers’ agreements.
Step 5: Prepare a logo and a favicon
For your branded portal, prepare a logo (standard and small versions) and a favicon in the format specified below.
Logo
The format of the standard logo:
- .png
- width up to 770 pixels
The format of the small logo:
- .png
- width up to 220 pixels
It is crucial that the logo has a transparent background.

Favicon
The format of the favicon:
- square .ico image
- 32×32 pixels
Step 6 (Optional): Obtain access to the Boomi platform
This step is required only when the IoT and M2M portal integrates with a mobile core or an IoT platform, such as Cisco Jasper IoT Control Center.
A Boomi subscription is required. Contact PortaOne Sales for assistance.
Module configuration and deployment
Once the module is activated and the preparation steps are performed, you can customize and deploy your branded IoT and M2M portal.
On the My modules page, click Configure for IoT and M2M portal module.

On the IoT and M2M portal Configuration UI page that opens, fill in the configuration details and click Save & deploy (or Save for later to deploy it later).
The form on the Configuration UI consists of the following blocks:
- General settings
- Your portal branding
- Choose a domain configuration
- PortaSwitch connection configuration
- Specific for IoT and M2M Portal
- BOOMI integration settings (optional)
General settings
Before proceeding with the module configuration, select the location that is closest to your PortaSwitch and the suitable portal version:
- Instance location – select the cloud datacenter closest to your PortaSwitch for portal deployment (to minimise the latency). If none of the locations are close enough, please contact PortaOne Sales. Additional data centers in other locations can be activated upon request.
- IoT and M2M Portal version – by default, the latest available IoTand M2M Portal version is set. You can also select another version from the list.

Your portal branding
The portal lets you customize branding elements such as the company logo and favicon. You can upload standard and small logo versions and use them per portal instance.
- Company logo – upload your logo that will be shown on the full-size sidebar of the portal web interface.

- Company logo small size – upload a smaller version of your logo that will be shown on the collapsed sidebar of the portal web interface.
- Favicon – click to upload an .ico image that will be used as a favicon for the portal web page.

Choose domain configuration
Specify the domains configured at preparation step 1 and upload SSL certificates for these domains (or choose to generate the certificates automatically).
- Portal domain – specify the domain name for the portal’s web page, e.g., sim.company.com.
- Choose whether middleware should be deployed – select the checkbox to deploy the portal middleware.
Choose whether you want PortaOne to generate certificates for you or if you want to upload your custom certificates. If you choose the custom certificates option, upload your SSL certificate for your domain and the private RSA key.

PortaSwitch connection configuration
Fill in the parameters that are needed to connect the portal to PortaSwitch.
- Customer API URL – specify the URL of the PortaSwitch customer self-care interface: https://[domain name]:/rest. By default, the customer realm port is 8444 (you can check the actual port on the Configuration server web interface in the VirtualHostsCustomer.server_port option). For example, the URL can be https://telecom.com:8444/rest.

Specific for IoT and M2M Portal
Fill in the parameters that define key settings for the IoT and M2M portal:
- Default product ID for new SIM card – identifier of the main product for new SIM cards. When a customer adds a new SIM card to their fleet, the portal creates an account, assigns the SIM card to it, and applies this product.
- List of customer class IDs to detect if customer is a postpaid (comma separated) – identifier(s) of postpaid customer classes, separated by commas. Customers in these classes are not required to prepay for plan activation. When a customer activates a new SIM card, the portal checks whether the customer belongs to any of these classes. If yes, no payment is required. If not, the portal sends a request to charge the customer’s card.
- List of operators in format ‘code1,operator_name1,list_of_product_groups1;code2,operator_name2,list_of_product_groups2’ – defines SIM card parameters per mobile operator and product group:
- Code – 6-digit prefix of the SIM card ICCID. When a customer adds a new SIM card and selects a mobile operator, the portal adds this prefix (e.g., 896111 for Telstra, 896222 for Optus) to the entered ICCID.
- Operator name – defines the operator name shown to the customer when they activate a new SIM card with the corresponding ICCID. For example, if the customer activates an Optus SIM card, they will see Optus as the operator name.
- Product groups – identifier(s) of the product group for a mobile operator. Product groups are pre-configured per mobile operator. For example, when a customer adds a SIM card with ICCID 8962220000000000001 (Optus mobile operator), they can assign only products from the Optus product group (Optus 1MB, Optus 3MB, Optus 5MB add-on products), and products without a product group (Hardware rental).
For example, the value in this field may look like [{“code”:”896111″,”name”:”TELSTRA”,”productgroups”:[53]},{“code”:”896222″,”name”:”OPTUS”,”productgroups”:[52]}]
- External URL for adding new SIM card – the URL of an external portal where the customer can order a new SIM card (opens in a new tab), e.g., https://web-site.myshop.com.
- Disclaimer URL – the URL of a page with a statement describing the warranty and how services are provided (opens in a new tab), e.g., terms_of_usage.com.

Boomi integration settings (optional)
Fill in the parameters when the IoT and M2M portal integrates with a mobile core or IoT platforms, such as Cisco Jasper IoT Control Center.
- Boomi platform URL host in format https://boomi-domain-name.com – the URL of your Boomi environment, e.g., https://boomi.company.com.
- Boomi platform URL path – API endpoint on the Boomi side that the portal calls. It is added to the host to form the full URL, e.g., https://boomi.company.com/ws/rest/Account-12345/SimProvisioning.
- Login for Boomi platform – the username used by the portal to authenticate with Boomi.
- Password for Boomi platform – the password or token paired with the login for authentication.

Test the portal
Once the IoT and M2M portal is successfully deployed, open the link to the portal web page and test the basic functionality.


