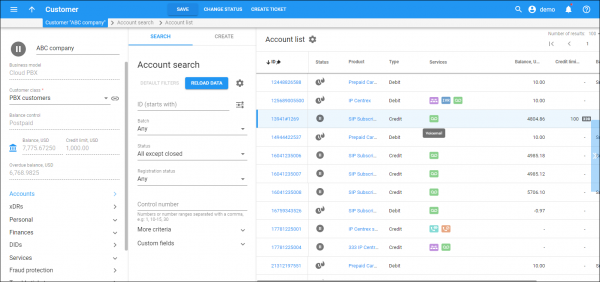
The Account list page displays a list of accounts that matches your search query.
Each entry in the result list consists of:
-
ID – the account ID, which is also a link that redirects you to the edit account page.
-
Status – a status icon shows the account’s status. No icon means the account is active and all services are available.
-
Product – the account’s main product.
-
Type – the account type: either debit (the account can consume services when money is deposited in it) or credit (the account can consume services and pay for them later).
-
Services – services available for the account:
-
Balance – the account’s opening balance (only for debit accounts).
-
Credit limit – the credit limit set for the account (only for credit accounts with an individual credit limit). When the account’s balance reaches that credit limit, this account becomes unusable.
-
Batch – the batch that the account belongs to.
-
Idle, days – the number of days the account has not been in use.
-
Registration – the SIP status of the account: either online (accounts with an active SIP registration) or offline (accounts whose SIP registration has expired).
-
xDRs – the xDRs are data records that include billing information related to services provided to this customer. Click xDRs
next to the account to open its xDR history.
To edit an account, click the account ID in the list.
Customize the panel
Change table settings – click Settings in the title bar to customize columns and change row style.
Re-order the columns – drag-and-drop the column headers right or left to place the columns in the order you want.
Re-order the rows – click Arrow (or
) next to the column header to re-sort the rows. For example, the Accounts list panel displays accounts in descending order. You can re-sort them in the reverse order.
Change the default number of results globally – use the Number of results drop-down list in the upper right corner to adjust the maximum number of rows that appear on the panel. By default, the panel displays 25 rows. Once the number is changed, it’s automatically saved, so the same number of rows is shown for PortaBilling entities, e.g., customer, account, reseller, etc.


