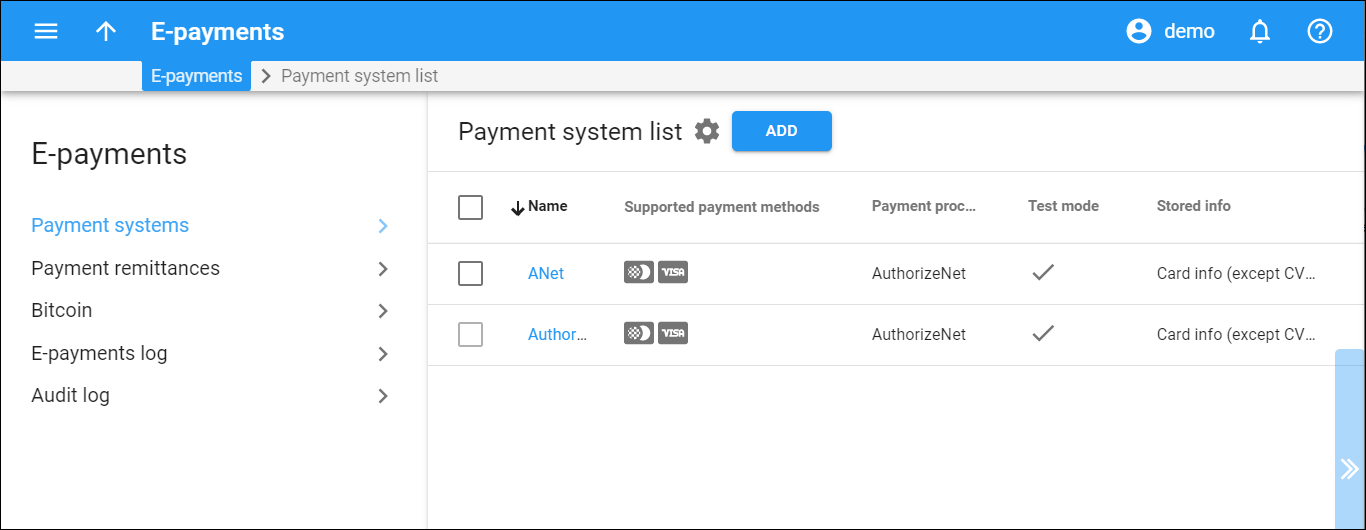
This panel displays the list of payment systems. Here you can add/remove a payment system.
Each entry in the payment system list consists of:
- Name – the name of the payment system. Click the name to open payment system details.
- Supported payment methods – one or several payment methods that can be used to make a payment.
- Payment processor – the payment processor used for the payment system.
- Test mode – Check mark
indicates that the payment system is in test mode. The test mode is used when you configure a new payment system and want to test it without processing the real card data.
- Stored info – this shows the data stored for this payment system. The possible options are Card info (except the CVV) or Token only.
Add a new payment system
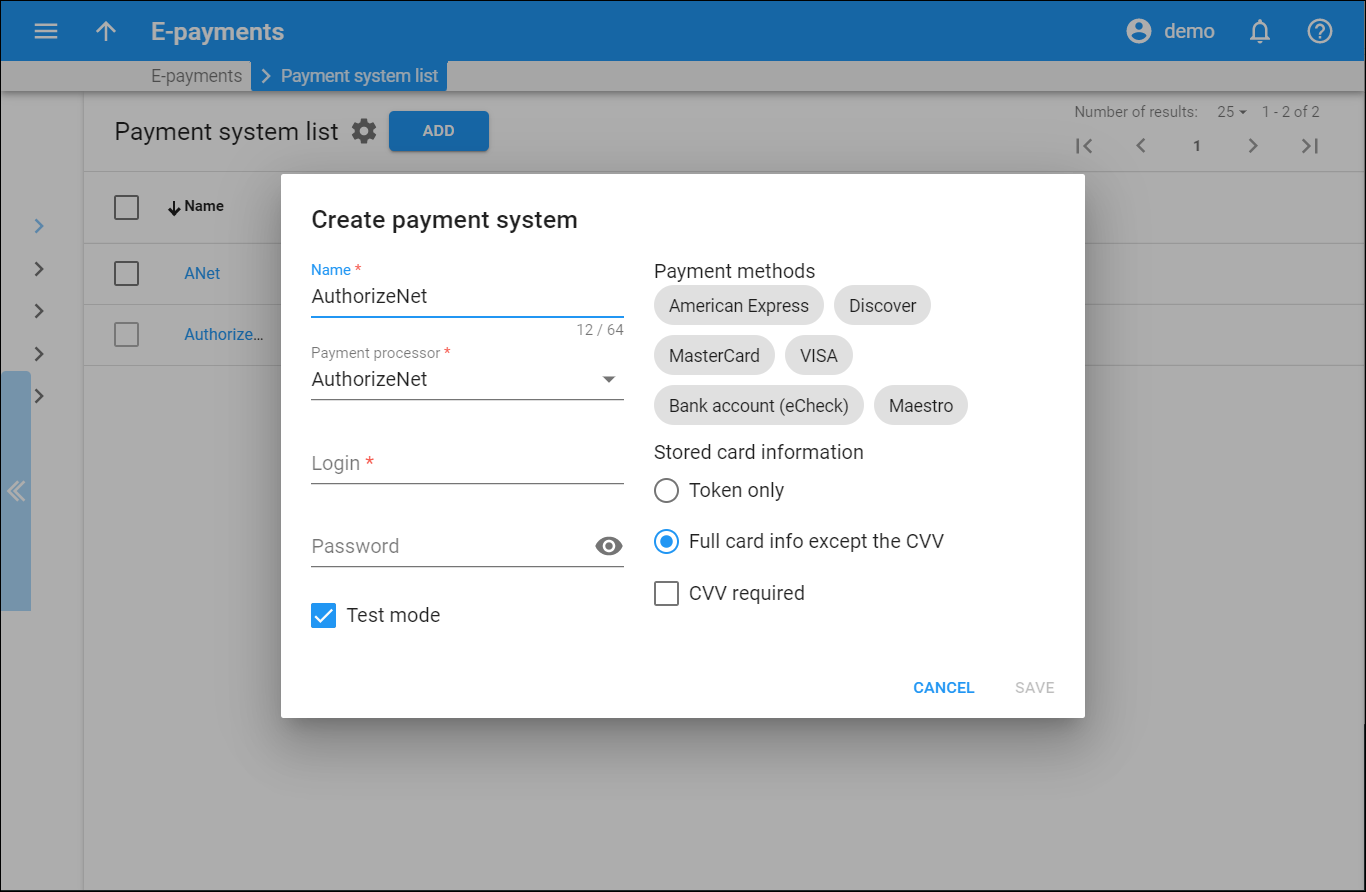
To create a payment system, click Add. Fill in the details in the dialog window that opens and click Save.
Note that you can’t assign payment systems with the same payment methods to the same currency. For example, you can’t have two systems with VISA payment methods assigned to the USD currency.
Name
Type in the unique payment system’s name.
Payment processor
Select a payment processor from the list.
A payment processor is a real-time transaction processing system that functions as a payment service using a secure transaction server on the Internet.
Login
Type in login to the payment processor account.
Password
Insert a password for the payment processor account.
Test mode
Use the Test mode to test the payment processor settings without using the real card data. Test mode is useful when you configure a new payment system or change the settings of an already configured one.
URL suffix
This field appears for the PayPal payment processor only. You can generate the URL suffix in your PayPal account. It helps to distinguish requests from PayPal and pass them to a correct billing environment.
Payment methods
Here you can select one or multiple payment methods from the list of payment methods available for the chosen Payment processor. To select a payment method, click on it.
Stored card information
Choose how the card information will be stored for the payment system you create:
- Token only – PortaBilling stores only the token received from the payment processor. The processor generates the token when a user performs a transaction with a card for the first time. The user enters all the card information, including the CVV code, only once. Any further transactions don’t need additional CVV verifications.
- Full card info except the CVV – this is the default option. PortaBilling stores all card information except for the card security code, which can’t be saved for security reasons.
CVV required
When you create a merchant account connected with a payment processor, you can set it to check the card security code. If you did it there, you should also enable it in PortaBilling.
Turn on the CVV required toggle switch if a card security code is required for payments via this processor.
Delete a payment system
To delete a payment system, select the corresponding checkbox and click DELETE. You can’t delete payment systems that are assigned to customers, accounts, etc.
What is an online payment processor
You can use one or more payment systems for online payments. To make use of these services, you must first create a payment processor account.
A payment processor is a system that functions as a payment service using a secure transaction server on the Internet. Users that have a payment processor account can use this system to submit, authorize, capture, and settle credit card or eCheck transactions with no separate transaction terminal.
A payment system performs credit card transactions. By default, your credit card already uses some payment system. Besides that, you can add another payment processor system by buying it from your credit card vendor.
Once your payment system is set up and “live” on the credit card system, you can begin accepting online payments.
Supported online payment processors
“Supported” means that these payment processors have a corresponding Business: OnlinePayment plug-in module available at www.cpan.org. This does not guarantee that the module will support all the features you require. Some extra work may be required to integrate it into the solution and perform testing.
Refer to the Supported online payment processors chapter to see the list of supported online payment processors.
Customize the panel
Change table settings – click Settings in the title bar to customize columns and change row style.
Re-order the columns – drag-and-drop the column headers right or left to place the columns in the order you want.
Re-order the rows – click Arrow (or
) next to the column header to re-sort the rows. For example, the Payment system list panel displays payment systems in alphabetical order. You can re-sort them in the reverse order.
Change the default number of results globally – use the Number of results drop-down list in the upper right corner to adjust the maximum number of rows that appear on the panel. By default, the panel displays 25 rows. Once the number is changed, it’s automatically saved, so the same number of rows is shown for PortaBilling entities, e.g., customer, account, reseller, etc.


